Upload data automatically to Amazon S3 from Outlook
On this post I will explain how to solve the problem that a lot of companies are facing at the moment of syncronizing and uploading automatically data from Microsoft Office tools like Outlook or Sharepoint to AWS.
The different secctions on this article:
- Create a new Amazon S3 Bucket
- Create a new IAM Role and Policy for accessing the S3 bucket
- Creae a new SFTP server using AWS Transfer for SFTP
- Add user on the SFTP server
- Test the connection to SFTP using WinSCP
- Create a Power Automate Flow and connect it to Amazon S3 via SFTP
The first we will need to do is to create an Amazon S3 Bucket and configure SFTP using AWS Transfer for SFTP.
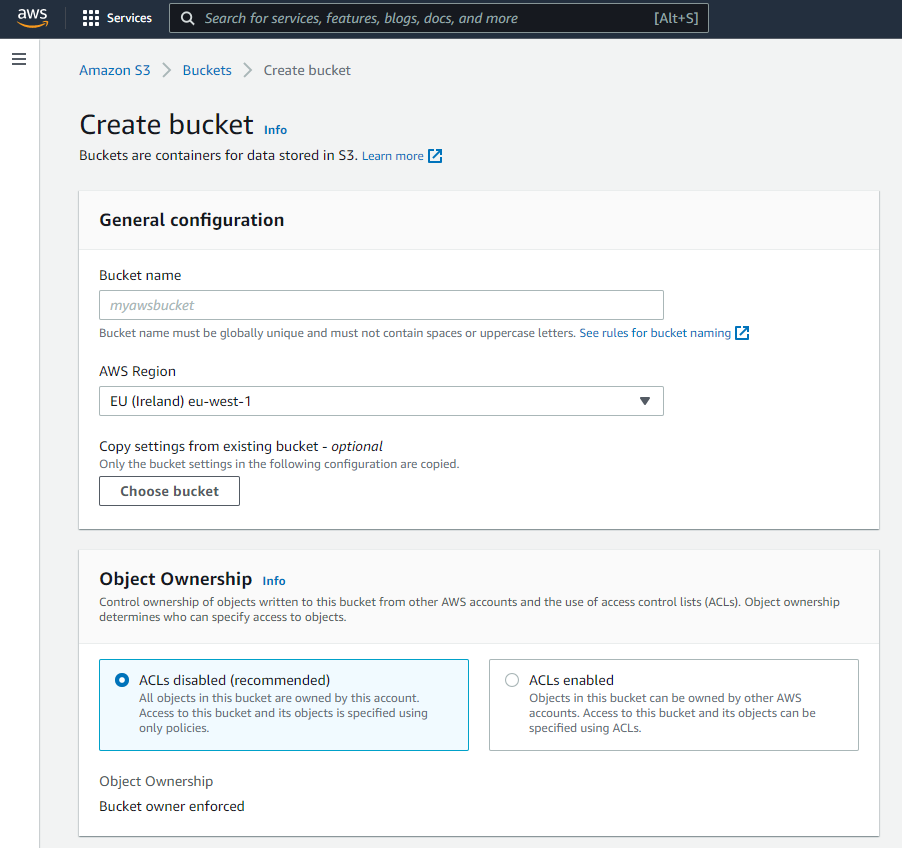
1. Create a new Amazon S3 Bucket
- Sign in to the AWS Management Console and open the Amazon S3 console at https://console.aws.amazon.com/s3/.
- Choose Create bucket. The Create bucket wizard opens.
- In Bucket name, enter a DNS-compliant name for your bucket.The bucket name must:
- Be unique across all of Amazon S3.
- Be between 3 and 63 characters long.
- Not contain uppercase characters.
- Start with a lowercase letter or number.
- In Region, choose the AWS Region where you want the bucket to reside.
- Under Object Ownership disable ACLs
- In Bucket settings for Block Public Access, choose the Block Public Access settings that you want to apply to the bucket.
- You can have some extra optional configuration such as Default encryption or Tags but for the purpose of this blog post this are not needed.
- Finally click Create bucket
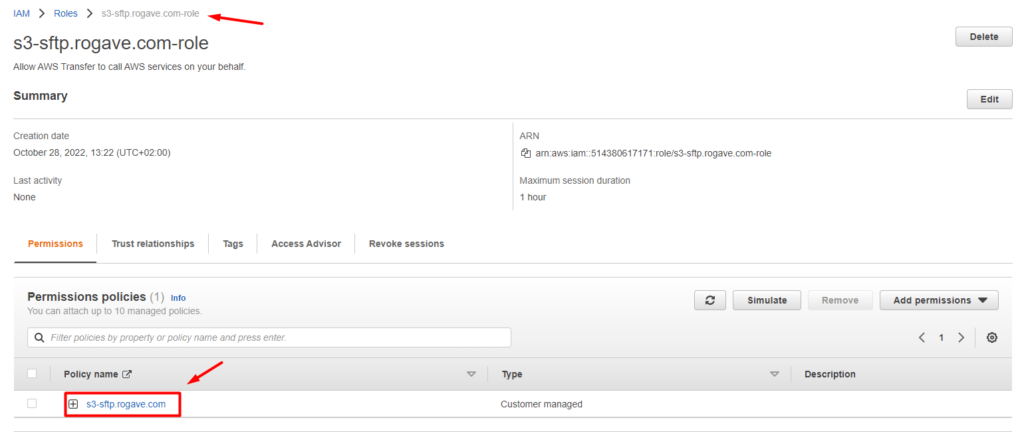
2. Create a new IAM Role and Policy for accessing the S3 bucket
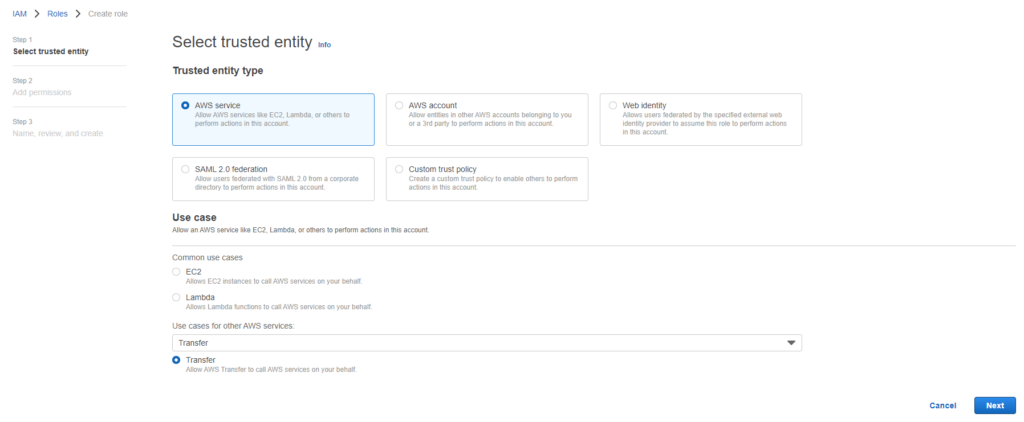
- Sign in to the AWS Management Console and open the IAM Management Console.
- Click on Create role
- Select AWS Service
- On Use case select Transfer and click on the bullet point in Transfer below.
5. Click on Next (on the bottom-right)
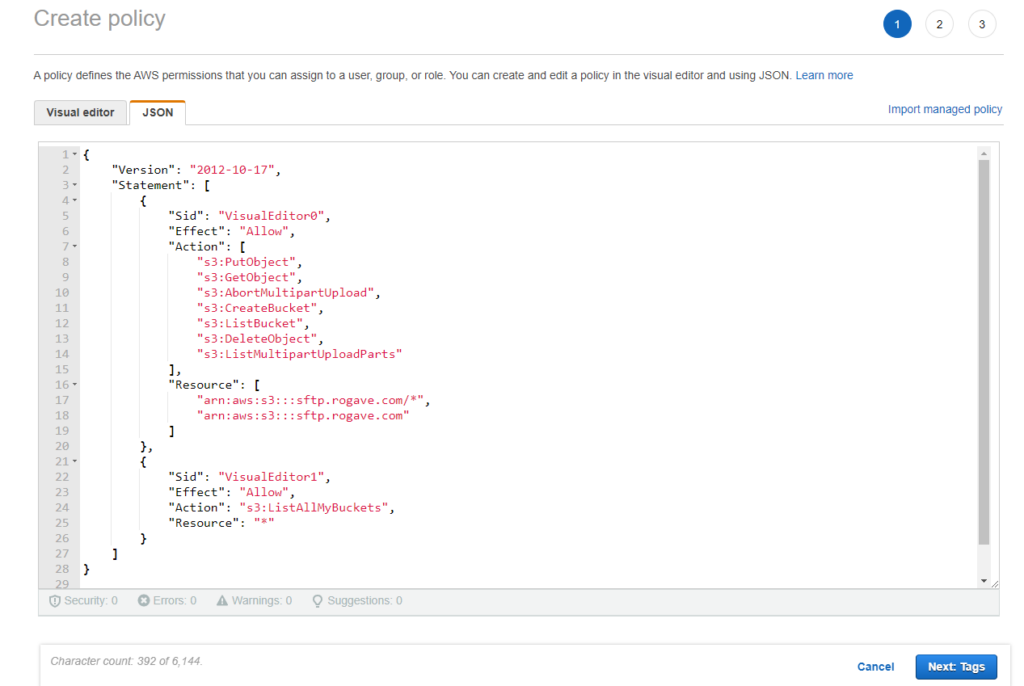
6. On this page we need to select the permissions policies. You can just go wild and select AmazonS3FullAccess and then the role will have full access to all the buckets and will be able to do everything. That’s not recommended, actually, in cloud we apply The Principal of Least Privileges therefore in this case we will create a custom policy with limited access. For that we need to click on Create policy (on the top-right).
Once the new tab we click on the JSON tab and we paste the following code:
{
    "Version": "2012-10-17",
    "Statement": [
        {
            "Sid": "VisualEditor0",
            "Effect": "Allow",
            "Action": [
                "s3:PutObject",
                "s3:GetObject",
                "s3:AbortMultipartUpload",
                "s3:CreateBucket",
                "s3:ListBucket",
                "s3:DeleteObject",
                "s3:ListMultipartUploadParts"
            ],
            "Resource": [
                "arn:aws:s3:::[s3-bucket-name]/*",
                "arn:aws:s3:::[s3-bucket-name]"
            ]
        },
        {
            "Sid": "VisualEditor1",
            "Effect": "Allow",
            "Action": "s3:ListAllMyBuckets",
            "Resource": "*"
        }
    ]
}
Please, note you need to replace [s3-bucket-name] with the name of the bucket you created previously. With this JSON script what we are doing is creating a policy that will provide FULL access to ONLY the bucket created before but not the rest of buckets we have. The only thing the policy is able to do on other buckets is to list all the bucket names we have but only that.
In my case it looks like this:
7. Then we click on Next:Tags and then Next:Review.
8. Finally we have to set the policy name and click on Create policy. For the policy names it’s recommended to use a naming convention so it’s easier to maintain them.
9. Once we have create the policy we have to go back on the page Create role, click on the Refresh button next to the Create policy button and then select the policy we just created and then click Next.
10. Finally we have to put a name to the role and click Create role.
Once the role has been created, we can click on it and see details like the permissions policies attached to it:
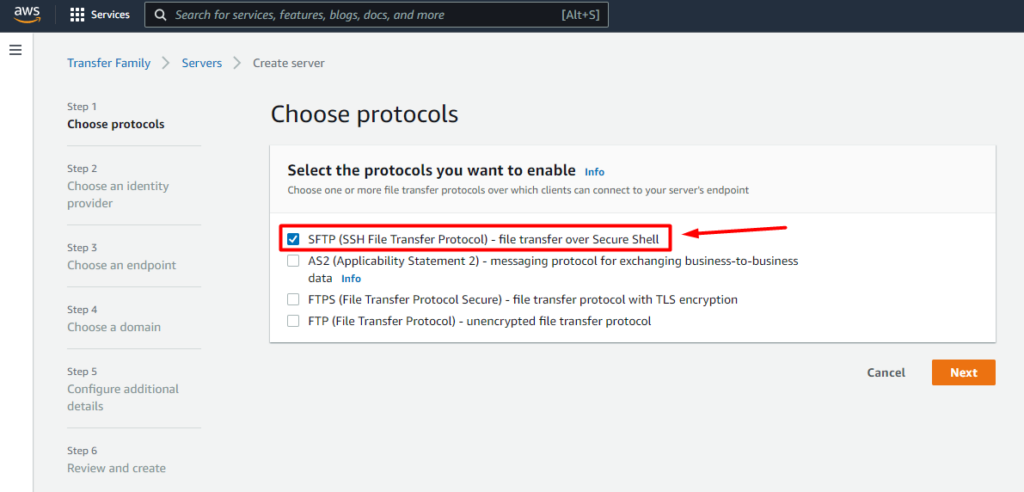
3. Creae a new SFTP server using AWS Transfer for SFTP
- Sign in to the AWS Management Console and open the AWS Transfer for SFTP console at https://aws.amazon.com/sftp/.
- Click on Create server.
- Next we need to select the Identity provider. In this case we have 2 options but for this blog we will use Service managed because it’s much easier to configure and doesn’t require any exisiting LDAP or Active Directory.
- On the next step we will set as Publicly accessible endpoint type
- You can add a DNS configuration using Amazon Route 53 but in this case we don’t need it. That would be nice if you want to use a DNS name at the moment of connecting instead of an IPv4 (e.g: sftp.mysite.com)
- Then we have to choose the domain, in this case we will use Amazon S3
- Last step on the configuration is to provide a role for logging into CloudWatch. Here you can just click Create a new role or select an exisiting role if you already have one.
- Finally we click on Create server
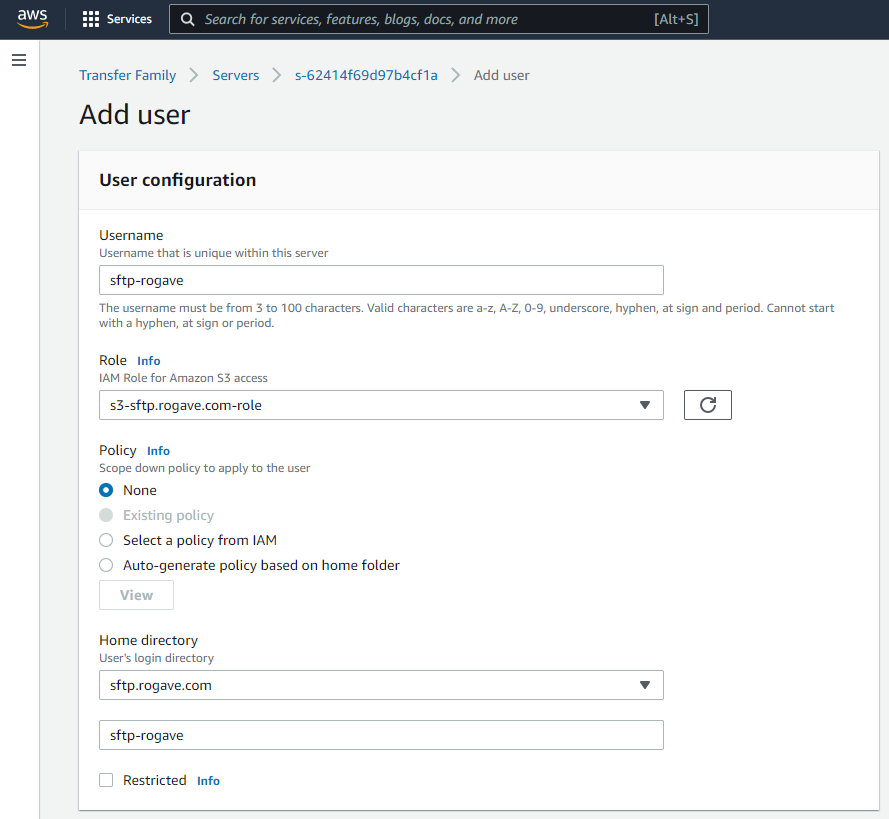
4. Add user on the SFTP server
Now we can add a new user! For that we need to select the server we just created and then Add user.

Then we just need to fill all the data on the form:
- Username
- Select the Role that can access the S3 bucket we just created before.
- Select the S3 Bucket created on the first step on Home directory.
After filling all this information you will have something similar to this:
Then we have to add an SSH public key, this key will be used as a method of authentication. Basically, when we connect to the SFTP server we will use the Username and the Key we will generate.
For generating a key there are multiple way to do it and you can check them here: https://docs.aws.amazon.com/transfer/latest/userguide/key-management.html#sshkeygen
For this tutorial I will use a tool called PuTTY Key Generator. You can download this from: https://www.puttygen.com/
Once it’s installed you open and click on Generate. Then you have to move the mouse to generate entropy so it can createa “real” random numbers to generate the key.
Once it’s created you will see something like this:
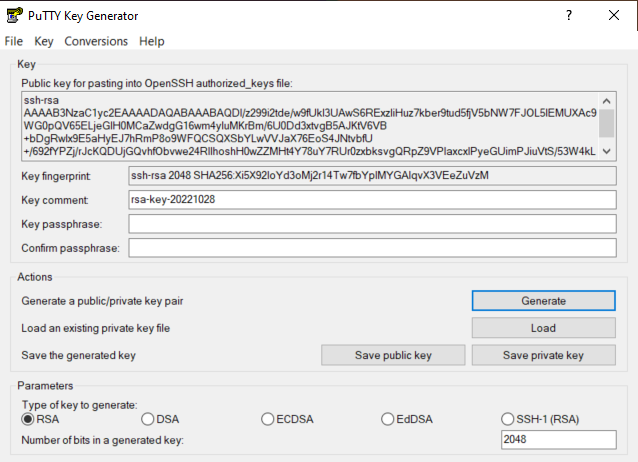
Then you have to export the key and make sure to save the public and private keys in a safe place, specially the private key is really important to keep secret and safe (like if it was a password).
Then we have to copy the public key and paste it on the Public key textfield.
Finally, we can just click Add at the bottom and our user will be created!
5. Test the connection to SFTP using WinSCP
Before we continue to the next steps, I just want to make sure the connection works and we can upload and download file from it.
For testing this we can use any SFTP client, in my case I am going to use WinSCP.
If you also want to use this client you can download it from the official websie: https://winscp.net/eng/download.php
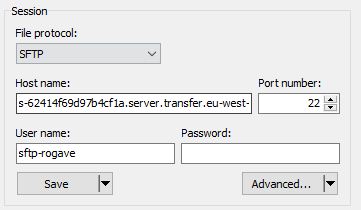
Once the program is open we have to click on New Session. Then a new form will open, we then click on New Site.
- Select File protocol the type SFTP
- On Host name you can use your own Custom hostname in case you configured one using Amazon Route 53 or your own. If not, you can just use the Endpoint that is created automatically.
The endpoint format is: [server-id].server.transfer.[region-id].amazonaws.com - The Port number put 22
- On User name you have to put the username we just created before
At this point you should have something similar to this (with your own data):
Then we have to click on Advanced… and go to SSH -> Authentication. Here we need to select the Private key file that we generated and saved before, this file extension is PPK.
If all goes well, you should get an alert message to Trust the key, we have to accept it and then we will be able to access the S3 Bucket from our computer using the SFTP Transfer service.
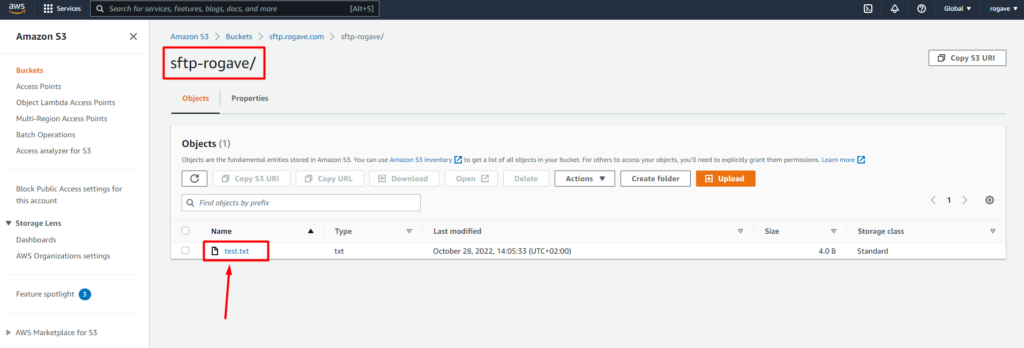
Now you can just play with some files and try to upload, remove and download them.
Here you can see how I uploaded a test.txt file on the folder sftp-rogave on the bucket called sftp.rogave.com. If you want to place the files on the root folder, you have to delete the Home directory folder on the User in the Server page in the AWS Transfer Family page.
At this point we have created:
- S3 Bucket
- IAM Role
- IAM Policy
- AWS SFTP Transfer Server
- User in the AWS SFTP Transfer Server
- RSA Key (Public and Private Key)
6. Create a Power Automate Flow and connect it to Amazon S3 via SFTP
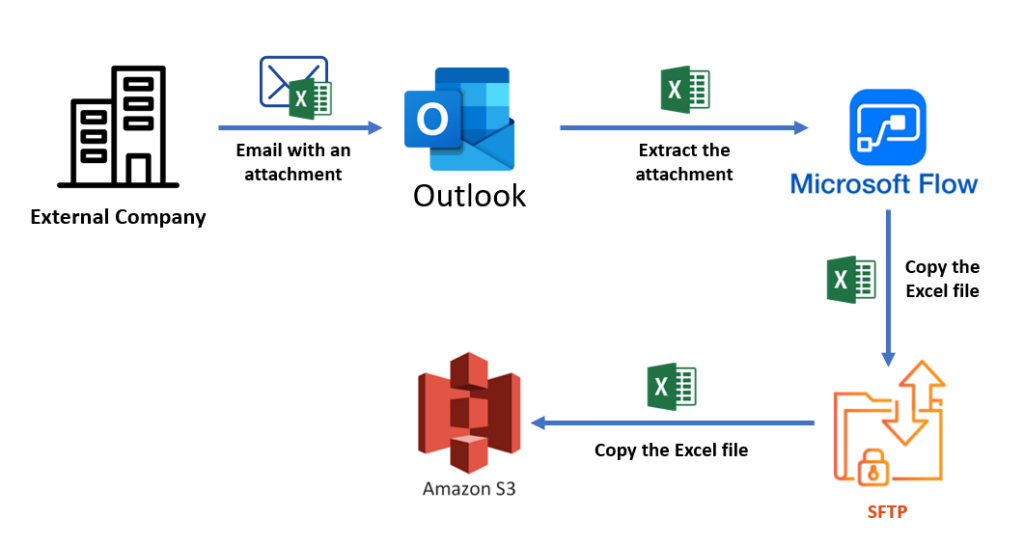
Now we are ready to connect to the Amazon S3 bucket from any SFTP client, as we could see using WinSCP. The idea of this blog is to explain how we can automate the extraction of attachments on emails and send them automatically to Amazon S3 so we can process them using other services.
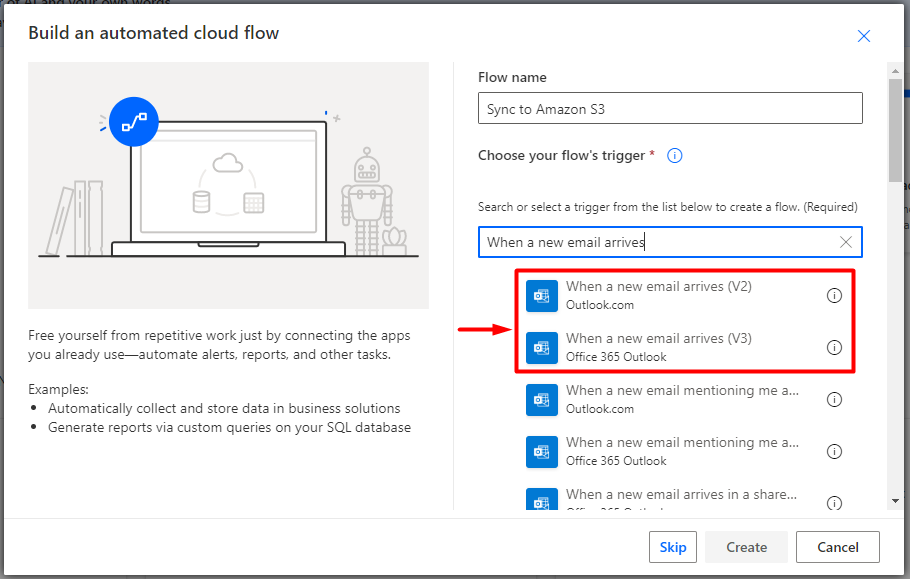
The last step is to create a Power Automate Flow that will get trigger everytime a new email with attachments arrives in Outlook. The flow will extract the attachment and copy it into our S3 Bucket automatically.
Microsoft Power Automate, formerly known as Microsoft Flow until November 2019, is an iPaaS platform by Microsoft for automation of recurring tasks. It is part of the Microsoft Power Platform line of products together with products such as Power Apps and Power BI.
Now a days, a lot of companies and users are using Microsoft products, specially with Outlook and SharePoint, and the integration of this products with Power Automate is really easy!
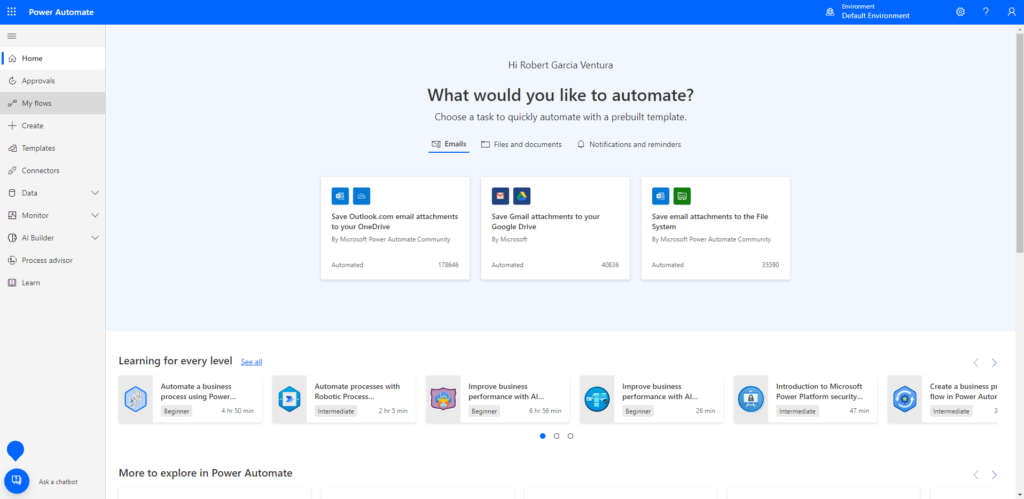
If you open for the first time Power Automate you will see different pre-builds flows as a template.
To create the flow we need to click into + Create menu in the left and then select Automated cloud flow and then we set a Flow name and choose the flow trigger to be “When a new email arrives (V2)” or “When a new email arrives (V3)”.
Once we have created the flow we see already the first step on it, also called the Trigger.
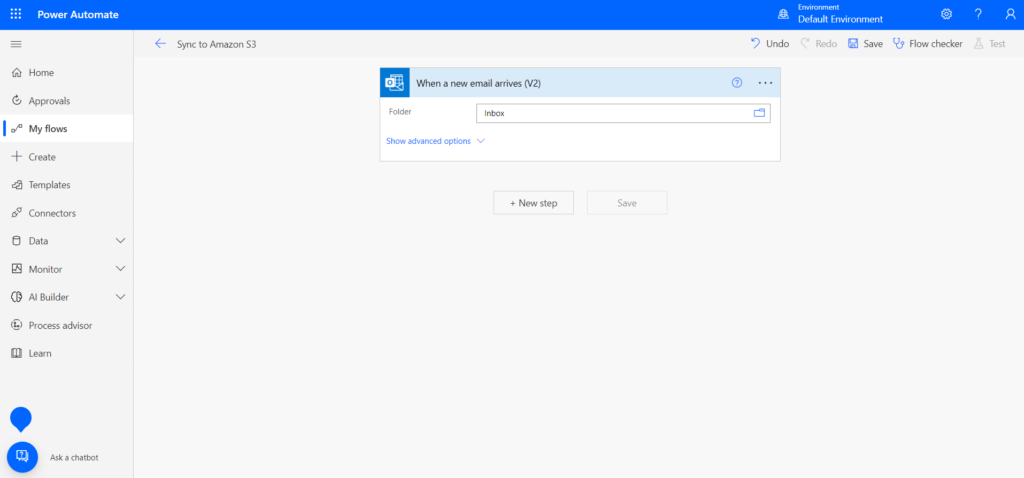
Here we can select the folder from where we want to get the emails with attachments. In my case I will use the main inbound called Inbox. An interesting thing you could do here is if you want to only process the files comming from the Company X you can create an Outloook rule and automatically move the emails comming from x@companyx.com into the folder CompanyX in your email account. Then you can just select this folder on the Trigger.
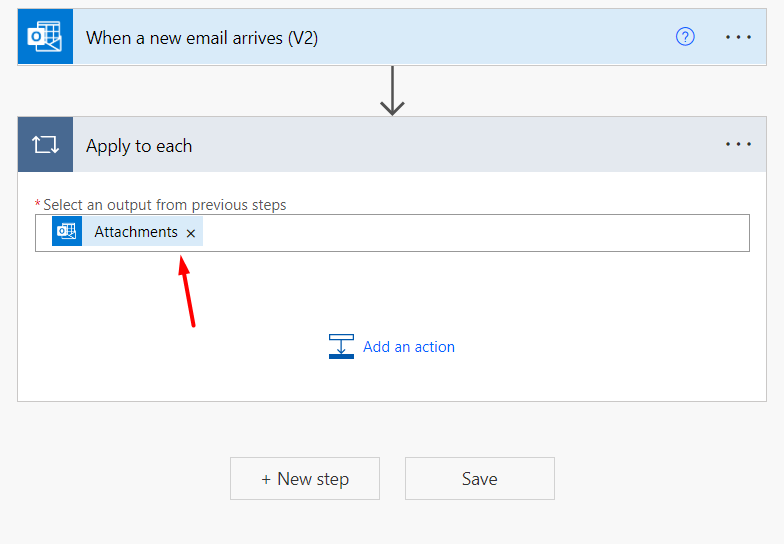
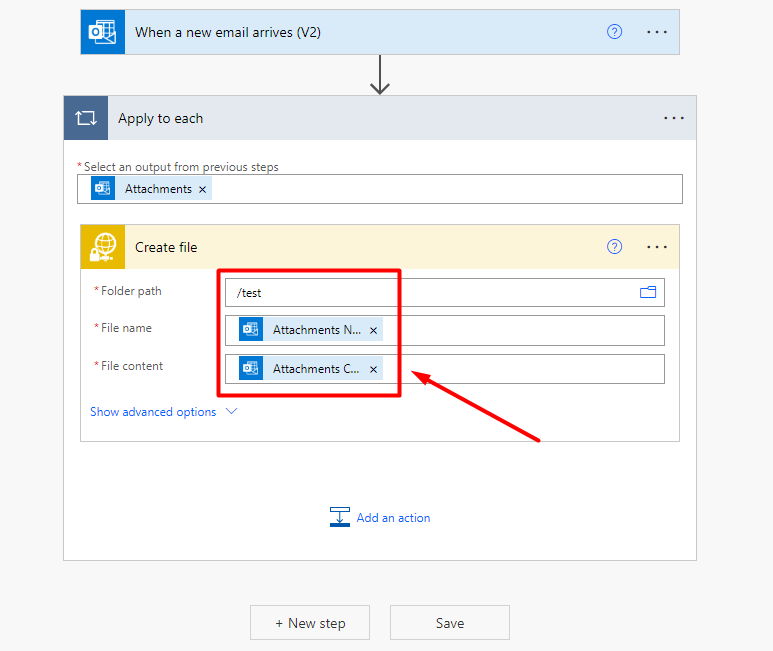
Then we press on + New step and we search for the option Apply to each and then we select Attachments as an output from the previous steps:
Now we click on Add an action inside the Apply to each step, and we search for Create file (SFTP – SSH).
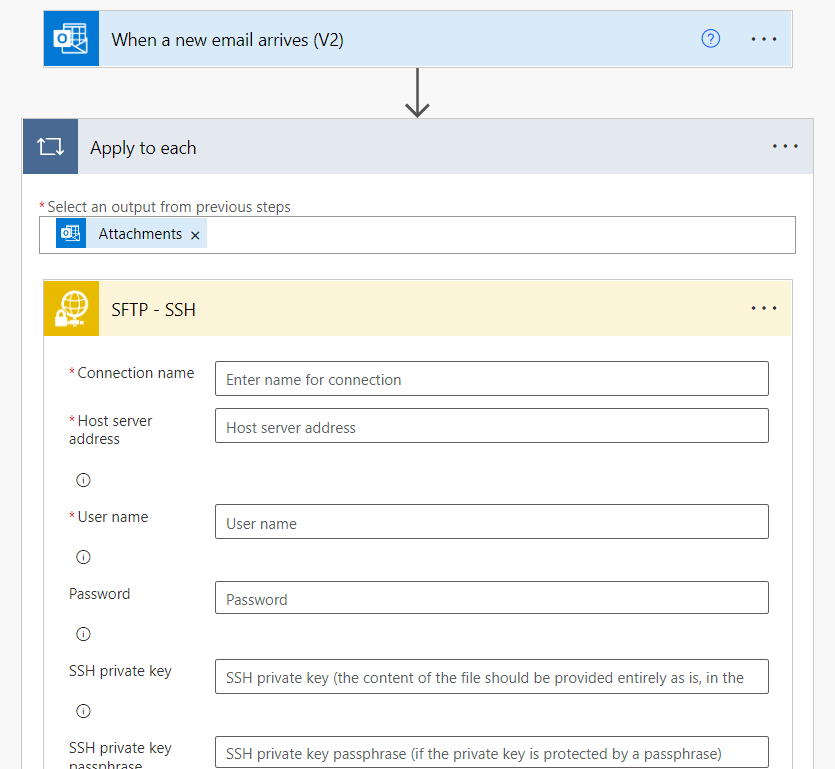
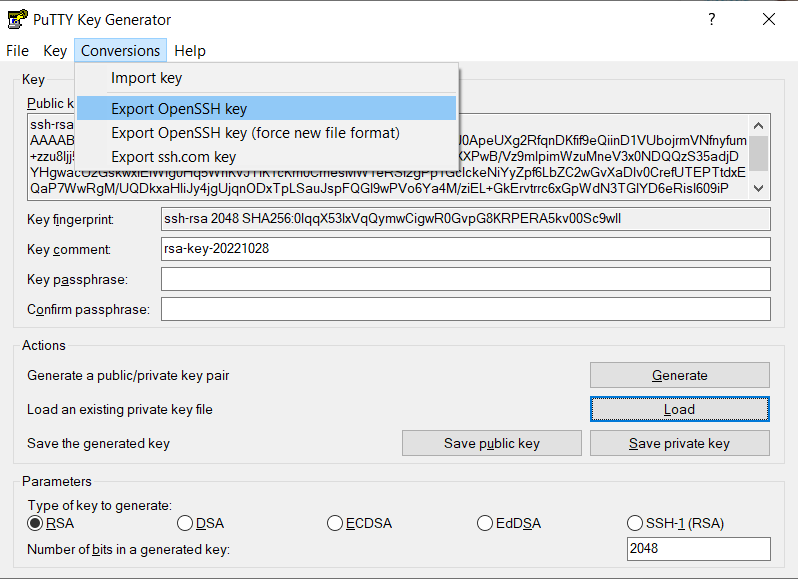
Now we have to fill all the fields with the same data we used at the moment of connecting to the SFTP server using WinSCP. But in this case there is a change on the SSH private key format. We need to transform the SSH private key into OpenSSH Key format. To do that we will use again PuTTY Key Generator.
We first need to load the PPK file by clicking on File -> Load private key. Then we go to Conversions -> Export OpenSSH key and we save file.
Once we have transformed the key, we open it with a Text Editor and we copy all the content into the SSH private key field.
The private key format should be:
-----BEGIN RSA PRIVATE KEY-----
<private-key>
-----END RSA PRIVATE KEY-----
Make sure to copy ALL text of the file, including the begin and end line. Also, you need to check Disable SSH host key validation.
If you followed all the steps you should have something like this:
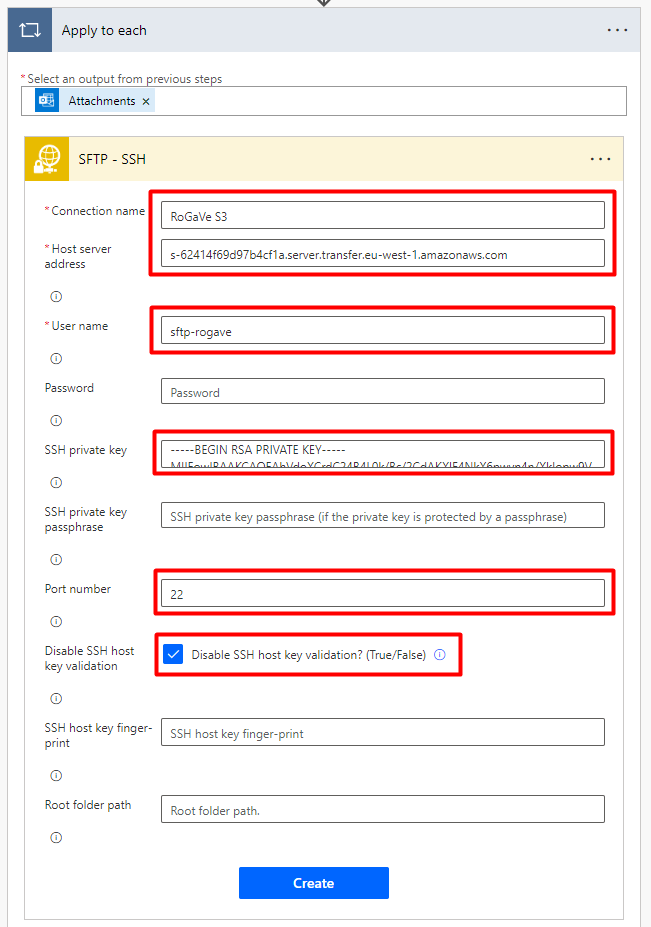
Finally, click on Create!
Once we have configured to connection, we have to set the Folder path, File name and File content.
The Folder path can be any folder in specific in where you want to store the files, for example /test. On File name you have to select Attachments Name and on File content you have to select Attachment Content.
Now we have to test if it really works, for that we can click the option in the top-right called Test.
Now send and email with an attachment to the folder you have configured.
Congratualtions if the flow worked! In case something doesn’t work, please check the previous steps to make sure you didn’t missed something.
Here is another example of flow that could be done using SharePoint instead of Outlook.
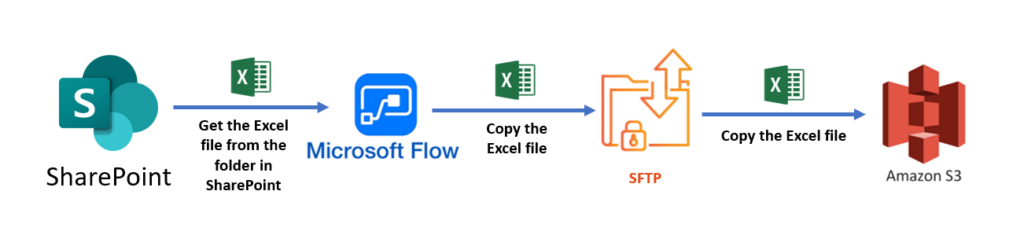
In this case, the Trigger of the flow is When a file is created or modified on SharePoint.
Hope you liked this post! 🙂
For any feedback please feel free to contact me, I will greatly appreciate any feedback!
В данной статье рассматриваются проблемы общественного здоровья и социальные факторы, влияющие на него. Мы акцентируем внимание на значении профилактики и осведомленности в защите здоровья на уровне общества. Читатели смогут узнать о новых инициативах и программах, направленных на улучшение здоровья населения.
Разобраться лучше – вывод из запоя в стационаре
В этой статье собраны факты, которые освещают целый ряд важных вопросов. Мы стремимся предложить читателям четкую, достоверную информацию, которая поможет сформировать собственное мнение и лучше понять сложные аспекты рассматриваемой темы.
ТОП-5 причин узнать больше – нарколог домой
Если у пациента наблюдаются эти симптомы, важно своевременно обратиться к специалисту для назначения вывода из запоя на дому, что поможет предотвратить более серьезные осложнения и ускорить процесс восстановления, при этом можно заранее заказать помощь с учетом возраста пациента (в том числе после 40–50 лет), данных больного и особенностей его состояния.
Получить больше информации – анонимный вывод из запоя на дому в екатеринбурге
Публикация приглашает вас исследовать неизведанное — от древних тайн до современных достижений науки. Вы узнаете, как случайные находки превращались в революции, а смелые мысли — в новые эры человеческого прогресса.
Более подробно об этом – вызвать нарколога на дом
Вывод из запоя в стационаре в Санкт-Петербурге: профессиональное лечение, капельницы и контроль состояния пациента в наркологической клинике «Элегия Мед».
Получить больше информации – вывод из запоя в стационаре клиника в санкт-петербурге
Мы собрали для вас самые захватывающие факты из мира науки и истории. От малознакомых деталей до грандиозных событий — эта статья расширит ваш кругозор и подарит новое понимание того, как устроен наш мир.
Как это работает — подробно – нарколог на дом
Нарколог на дом в Москве — это формат помощи, который рассматривают в тех случаях, когда после употребления алкоголя больному требуется врачебный осмотр без поездки в клинику. Чаще всего обращение связано с запоем, выраженным похмельным синдромом, нарушением сна, слабостью, тремором, тревогой, обезвоживанием, сердцебиением, скачками давления и общим ухудшением самочувствия. Дальнейшая тактика зависит от состояния больного на момент осмотра, длительности употребления алкоголя, возраста и сопутствующих заболеваний.
Разобраться лучше – нарколог на дом вывод в москве
В этом обзорном материале представлены увлекательные детали, которые находят отражение в различных аспектах жизни. Мы исследуем непонятные и интересные моменты, позволяя читателю увидеть картину целиком. Погрузитесь в мир знаний и удивительных открытий!
Обратиться к источнику – вывод из запоя недорого
Эта статья для ознакомления предлагает читателям общее представление об актуальной теме. Мы стремимся представить ключевые факты и идеи, которые помогут читателям получить представление о предмете и решить, стоит ли углубляться в изучение.
Получить полную информацию – наркологическая помощь на дому
Эта познавательная публикация погружает вас в море интересного контента, который быстро захватит ваше внимание. Мы рассмотрим важные аспекты темы и предоставим вам уникальные Insights и полезные сведения для дальнейшего изучения.
Тыкай сюда — узнаешь много интересного – вывод из запоя на дому телефоны
Комплексный подход, включающий эти методы, значительно повышает шансы на успешное и долговременное восстановление. Современные реабилитационные центры в Москве предлагают целый ряд программ, которые способствуют полному возвращению пациента к здоровой и активной жизни.
Разобраться лучше – reabilitacziya-alkogolikov-moskva-3.ru/
Этот обзор предлагает структурированное изложение информации по актуальным вопросам. Материал подан так, чтобы даже новичок мог быстро освоиться в теме и начать использовать полученные знания в практике.
Прочесть заключение эксперта – вывод из запоя клиника
Этот текст призван помочь читателю расширить кругозор и получить практические знания. Мы используем простой язык, наглядные примеры и структурированное изложение, чтобы сделать обучение максимально эффективным и увлекательным.
Более подробно об этом – вывести из запоя
Отдельно стоит выделить ситуации, когда семья сталкивается не только с алкоголем, но и с употреблением наркотиков. В таких случаях врачебная консультация особенно важна, поскольку последствия интоксикации могут отличаться, а признаки наркомании и алкоголизма иногда накладываются друг на друга. Если речь идет о смешанном употреблении, подход к помощи на дому требует особой осторожности.
Получить дополнительную информацию – нарколог на дом вывод
Реабилитация алкоголиков невозможна без участия высококвалифицированных специалистов. Это врачи-наркологи, психологи, психотерапевты и социальные работники, каждый из которых вносит свой вклад в восстановление пациента. Психологическая поддержка особенно важна на всех этапах лечения, поскольку помогает пациенту осознать проблему, справиться с внутренними конфликтами и выработать стратегии для предотвращения рецидивов. В некоторых случаях, например, при длительном запое или наркомании, может быть рекомендован выезд на дом для предоставления первой медицинской помощи и дальнейшей реабилитации.
Узнать больше – центр реабилитации алкоголиков
В этой статье представлен занимательный и актуальный контент, который заставит вас задуматься. Мы обсуждаем насущные вопросы и проблемы, а также освещаем истории, которые вдохновляют на действия и изменения. Узнайте, что стоит за событиями нашего времени!
Переходите по ссылке ниже – вывести из запоя воронеж
В этой статье собраны факты, которые освещают целый ряд важных вопросов. Мы стремимся предложить читателям четкую, достоверную информацию, которая поможет сформировать собственное мнение и лучше понять сложные аспекты рассматриваемой темы.
Получить дополнительные сведения – вызвать нарколога на дом срочно
Наиболее частыми причинами обращения становятся запой, выраженная слабость, тремор, нарушение сна, тревога, учащенный пульс, нестабильное давление, тошнота и ощущение физического истощения. Эти проявления могут сочетаться между собой и усиливаться после прекращения употребления алкоголя, особенно если эпизод длился несколько дней.
Выяснить больше – вызов нарколога на дом в москве
Помощь на дому рассматривают при состояниях, связанных с острым ухудшением самочувствия после алкоголя. Чаще всего это несколько дней запоя, тяжелое похмелье, бессонница, тревога, дрожь в руках, слабость, отсутствие аппетита, тошнота, сухость во рту и ощущение истощения. В подобных случаях врачебный осмотр нужен для оценки общего состояния и выбора безопасной тактики.
Получить больше информации – нарколог на дом вывод в екатеринбурге
Эта статья погружает вас в увлекательный мир знаний, где каждый факт становится открытием. Мы расскажем о ключевых исторических поворотных моментах и научных прорывах, которые изменили ход цивилизации. Поймите, как прошлое формирует настоящее и как его уроки могут помочь нам строить будущее.
Не упусти шанс – прокапывание от алкоголя на дому
Вывод из запоя на дому в Екатеринбурге: эффективное лечение, детоксикация и восстановление организма в наркологической клинике «Детокс»
Изучить вопрос глубже – анонимный вывод из запоя на дому
Реабилитация алкоголиков в Москве: восстановление после зависимости и поддержка специалистов в наркологической клинике «Похмельная служба»
Ознакомиться с деталями – центр реабилитации алкоголиков
Этот информативный текст отличается привлекательным содержанием и актуальными данными. Мы предлагаем читателям взглянуть на привычные вещи под новым углом, предоставляя интересный и доступный материал. Получите удовольствие от чтения и расширьте кругозор!
Полная информация здесь – вывод из запоя на дому спб цены
Вывод из запоя на дому в Екатеринбурге с выездом врача — это специализированная медицинская услуга, которая помогает человеку безопасно и эффективно выйти из запойного состояния без необходимости госпитализации. Запой является состоянием, при котором человек не может контролировать потребление алкоголя, и последствия могут быть крайне серьезными, как для физического, так и для психоэмоционального здоровья. В таких случаях помощь врача на дому становится важным и необходимым шагом для восстановления здоровья пациента и предотвращения осложнений.
Детальнее – анонимный вывод из запоя на дому в екатеринбурге
Домашний формат помощи рассматривают тогда, когда человеку тяжело добраться до медицинского учреждения, состояние ухудшается после нескольких дней употребления спиртного или родственникам требуется очная оценка без промедления. После осмотра становится ясно, допустима ли помощь на дому, требуется ли капельница, можно ли ограничиться наблюдением в домашних условиях или нужен другой маршрут помощи. Вопрос о том, как вызвать специалиста, нередко возникает в ситуациях, когда состояние нарастает быстро и требуется решение без откладывания. Если подобные эпизоды повторяются, дальнейшее обсуждение может касаться не только текущего состояния, но и лечения алкоголизма, работы с зависимостью и более длительной программы восстановления.
Исследовать вопрос подробнее – вызов нарколога на дом
В этой статье представлен занимательный и актуальный контент, который заставит вас задуматься. Мы обсуждаем насущные вопросы и проблемы, а также освещаем истории, которые вдохновляют на действия и изменения. Узнайте, что стоит за событиями нашего времени!
Интересует подробная информация – вывод из запоя цены воронеж
Откройте для себя скрытые страницы истории и малоизвестные научные открытия, которые оказали колоссальное влияние на развитие человечества. Статья предлагает свежий взгляд на события, которые заслуживают большего внимания.
Интересует подробная информация – сколько стоит поставить капельницу дома
Этот информативный текст отличается привлекательным содержанием и актуальными данными. Мы предлагаем читателям взглянуть на привычные вещи под новым углом, предоставляя интересный и доступный материал. Получите удовольствие от чтения и расширьте кругозор!
Получить дополнительную информацию – наркологическая помощь на дому
Помощь на дому рассматривают при состояниях, которые возникают после длительного употребления алкоголя или тяжелого алкогольного эпизода. Чаще всего это запой, выраженная интоксикация, бессонница, тревога, слабость, тремор, тошнота, сухость во рту, отсутствие аппетита, нестабильное давление и сердцебиение. Врачебный осмотр требуется в тех случаях, когда больному трудно восстановиться самостоятельно, а самочувствие продолжает ухудшаться.
Детальнее – нарколог на дом вывод
Нарколог на дом в Екатеринбурге: выезд врача на дом, лечение запоя и консультации в наркологической клинике «НЕО+».
Получить больше информации – нарколог на дом анонимно
Этот обзор предлагает структурированное изложение информации по актуальным вопросам. Материал подан так, чтобы даже новичок мог быстро освоиться в теме и начать использовать полученные знания в практике.
Связаться за уточнением – вывод из запоя на дому в воронеже
Эта познавательная публикация погружает вас в море интересного контента, который быстро захватит ваше внимание. Мы рассмотрим важные аспекты темы и предоставим вам уникальные Insights и полезные сведения для дальнейшего изучения.
Не упусти шанс – выведение из запоя на дому воронеж
Нарколог на дом в Москве: срочный выезд врача, капельницы и помощь при запое в наркологической клинике «Клиника доктора Калюжной».
Получить дополнительные сведения – https://narkolog-na-dom-moskva-17.ru
Необходимость обращения за наркологической помощью определяется по совокупности симптомов и их выраженности. При ухудшении состояния важно ориентироваться на объективные признаки, а не ждать самостоятельного улучшения.
Ознакомиться с деталями – http://narkologicheskaya-pomoshh-nizhnij-novgorod-8.ru/
Когда зависимости становятся хроническими и угрожают жизни пациента, комплексная реабилитация при наркомании в специализированных клиниках Москвы, включая вывод из состояния в стационаре и последующий анализ данных о состоянии пациента, может стать единственным возможным решением. Процесс восстановления включает в себя работу не только с зависимостью, но и с психоэмоциональным состоянием, что делает лечение более эффективным и долговечным.
Подробнее можно узнать тут – https://reabilitacziya-alkogolikov-moskva-2.ru
Эта познавательная публикация погружает вас в море интересного контента, который быстро захватит ваше внимание. Мы рассмотрим важные аспекты темы и предоставим вам уникальные Insights и полезные сведения для дальнейшего изучения.
Слушай внимательно — тут важно – нарколог на дому капельница цена
Этот текст призван помочь читателю расширить кругозор и получить практические знания. Мы используем простой язык, наглядные примеры и структурированное изложение, чтобы сделать обучение максимально эффективным и увлекательным.
Не упусти шанс – нарколог прокапать
Каждый из этапов важен для успешного лечения наркомании и требует квалифицированной наркологической медицинской помощи. Реабилитационные программы, предлагаемые в Москве, часто включают в себя все эти компоненты, при этом в ряде случаев консультации могут предоставляться бесплатно, что способствует комплексному подходу к решению проблемы зависимости.
Получить дополнительную информацию – https://reabilitacziya-alkogolikov-moskva-3.ru/
Реабилитация алкоголиков — это важный этап на пути к избавлению от зависимости. В Москве существует множество центров, предлагающих реабилитацию с индивидуальной программой, что помогает обеспечить более персонализированный и эффективный подход к каждому пациенту. Индивидуальная программа учитывает физическое и психологическое состояние человека, а также его социальное окружение и личные особенности. Это позволяет добиться лучших результатов в лечении и восстановлении.
Ознакомиться с деталями – https://reabilitacziya-alkogolikov-moskva.ru/
Вывод из запоя на дому в Екатеринбурге — это услуга, которая позволяет пациентам пройти лечение в удобных для них условиях, без необходимости посещать стационар. Процедура включает несколько этапов, каждый из которых направлен на снижение уровня алкогольной интоксикации и стабилизацию состояния пациента. Главным преимуществом вывода из запоя на дому является то, что это не только удобно, но и позволяет избежать лишнего стресса, который может быть вызван госпитализацией.
Подробнее – вывод из запоя на дому круглосуточно екатеринбург
Реабилитация алкоголиков проходит через несколько обязательных этапов. Каждый этап фокусируется на определенных аспектах восстановления и помогает человеку не только избавиться от физической зависимости, но и научиться жить без алкоголя в долгосрочной перспективе, включая кодирование, особенно после длительных лет запоя, а также восстановление в условиях специализированного дома. Этапное восстановление помогает избежать перегрузки пациента, обеспечивая плавный переход от одной стадии лечения к другой.
Углубиться в тему – клиника реабилитации алкоголиков
Помощь на дому рассматривают при состояниях, которые сопровождаются заметным ухудшением самочувствия после алкоголя. Обычно это запой на протяжении нескольких дней, тяжелое похмелье, выраженная слабость, бессонница, тревога, дрожь в руках, сухость во рту, отсутствие аппетита, тошнота, раздражительность и ощущение истощения. В подобных случаях врачебный осмотр нужен для того, чтобы оценить тяжесть состояния и определить, безопасен ли домашний формат в конкретной ситуации.
Ознакомиться с деталями – запой нарколог на дом в москве
Комплексный подход, включающий эти методы, значительно повышает шансы на успешное и долговременное восстановление. Современные реабилитационные центры в Москве предлагают целый ряд программ, которые способствуют полному возвращению пациента к здоровой и активной жизни.
Получить больше информации – http://reabilitacziya-alkogolikov-moskva-3.ru/
Решение о помещении пациента в стационар принимается на основе объективных медицинских критериев, а не только по желанию родственников. К показаниям относятся: запой длительностью более 72 часов, выраженная абстиненция с тахикардией, артериальной гипертензией, профузным потоотделением, наличие в анамнезе алкогольных делириев или судорожных эпизодов, сопутствующие хронические заболевания печени, сердца, поджелудочной железы. При отравление продуктами распада этанола, когда интоксикация затрагивает несколько систем одновременно, резкое прекращение употребления без медицинской поддержки может спровоцировать отек мозга, острую сердечную недостаточность или желудочно-кишечное кровотечение. При сочетанных расстройствах, когда в анамнезе присутствует наркомании, протоколы адаптируются под специфику психоактивных соединений и включают усиленный нейрологический контроль. Стационар позволяет провести полноценную диагностику, включая ЭКГ, экспресс-анализы крови и мониторинг сатурации, что формирует точную картину состояния и исключает шаблонные назначения.
Подробнее – быстрый вывод из запоя в стационаре в санкт-петербурге
Вывод из запоя на дому в Екатеринбурге – это услуга, которая становится необходимой, когда состояние пациента ухудшается после длительного употребления алкоголя, и медицинская помощь требуется немедленно. На дому пациенту предоставляется квалифицированная помощь, направленная на быстрое снятие интоксикации, восстановление водно-солевого баланса и стабилизацию общего состояния.
Получить дополнительные сведения – https://vyvod-iz-zapoya-na-domu-ekaterinburg-17.ru
Осмотр на дому особенно важен в тех случаях, когда больному трудно вставать, пить воду, принимать пищу, спокойно лежать или ориентироваться в собственном состоянии. В такой ситуации очная оценка помогает понять, допустим ли домашний формат и достаточно ли его на текущем этапе. При выраженном ухудшении состояния, признаках перегрузки организма или риске осложнений может потребоваться срочный пересмотр тактики.
Выяснить больше – нарколог на дом анонимно
Вывод из запоя на дому в Екатеринбурге с выездом врача — это специализированная медицинская услуга, которая помогает человеку безопасно и эффективно выйти из запойного состояния без необходимости госпитализации. Запой является состоянием, при котором человек не может контролировать потребление алкоголя, и последствия могут быть крайне серьезными, как для физического, так и для психоэмоционального здоровья. В таких случаях помощь врача на дому становится важным и необходимым шагом для восстановления здоровья пациента и предотвращения осложнений.
Углубиться в тему – http://www.domen.ru
Терапевтический процесс в стационаре строится по принципу последовательного выполнения клинических задач: диагностика, стабилизация, медикаментозная поддержка и подготовка к амбулаторному этапу. При поступлении врач проводит детальный осмотр, собирает анамнез, оценивает неврологический статус и при необходимости назначает лабораторные исследования. На основе полученных данных формируется индивидуальный протокол, учитывающий возраст, длительность интоксикации, наличие сопутствующих патологий и переносимость лекарственных компонентов. Мы применяем только сертифицированные препараты, зарегистрированные в РФ, и строго соблюдаем клинические рекомендации Минздрава, исключая псевдонаучные методики.
Исследовать вопрос подробнее – https://vyvod-iz-zapoya-v-staczionare-sankt-peterburg-20.ru/
Вывод из запоя на дому в Екатеринбурге: эффективное лечение, детоксикация и восстановление организма в наркологической клинике «Детокс»
Изучить вопрос глубже – вывод из запоя на дому анонимно
Осмотр особенно важен при нескольких днях употребления алкоголя подряд, выраженной слабости, дрожи в руках, нарушении сна, учащенном пульсе, нестабильном давлении, тошноте и признаках обезвоживания. Эти симптомы часто сочетаются и могут усиливаться в течение ближайших часов после прекращения употребления.
Получить дополнительную информацию – https://narkolog-na-dom-moskva-21.ru
По теме “Современные тренды и идеи для уютного жилища”, нашел много полезного.
Ссылка ниже:
https://journal-flat.ru
Нарколог на дом в Москве — это формат помощи, который рассматривают в тех случаях, когда после употребления алкоголя больному требуется врачебный осмотр без поездки в клинику. Чаще всего обращение связано с запоем, выраженным похмельным синдромом, нарушением сна, слабостью, тремором, тревогой, обезвоживанием, сердцебиением, скачками давления и общим ухудшением самочувствия. Дальнейшая тактика зависит от состояния больного на момент осмотра, длительности употребления алкоголя, возраста и сопутствующих заболеваний.
Подробнее можно узнать тут – нарколог на дом
Нарколог на дом в Екатеринбурге: срочная медицинская помощь, капельницы и восстановление состояния в наркологической клинике «НЕО+».
Получить дополнительную информацию – нарколог на дом вывод в екатеринбурге
Помощь на дому рассматривают при состояниях, связанных с острым ухудшением самочувствия после алкоголя. Чаще всего это несколько дней запоя, тяжелое похмелье, бессонница, тревога, дрожь в руках, слабость, отсутствие аппетита, тошнота, сухость во рту и ощущение истощения. В подобных случаях врачебный осмотр нужен для оценки общего состояния и выбора безопасной тактики.
Выяснить больше – запой нарколог на дом в екатеринбурге
Каждый из этапов важен для успешного лечения наркомании и требует квалифицированной наркологической медицинской помощи. Реабилитационные программы, предлагаемые в Москве, часто включают в себя все эти компоненты, при этом в ряде случаев консультации могут предоставляться бесплатно, что способствует комплексному подходу к решению проблемы зависимости.
Подробнее тут – reabilitacziya-alkogolikov-moskva-3.ru/
Процесс реабилитации алкоголиков включает в себя несколько методов, направленных на восстановление как физического, так и психоэмоционального состояния пациента. В Москве доступны различные программы, от традиционной детоксикации до современных подходов, при этом в отдельных случаях предусматривается вывод данных о состоянии пациента и динамике лечения при алкогольной зависимости, включая когнитивно-поведенческую терапию и арт-терапию.
Углубиться в тему – центр реабилитации алкоголиков в москве
Нарколог на дом в Москве — это формат медицинской помощи, который рассматривают при состояниях после употребления алкоголя, когда больному требуется осмотр врача без поездки в клинику. Чаще всего обращение связано с запоем, выраженным похмельным синдромом, нарушением сна, тревогой, слабостью, тремором, обезвоживанием, скачками давления, сердцебиением и общим ухудшением самочувствия. Дальнейшая тактика зависит от состояния больного на момент осмотра, продолжительности употребления алкоголя, возраста и сопутствующих заболеваний.
Получить больше информации – врач нарколог на дом
Вывод из запоя на дому требуется в тех случаях, когда человек сталкивается с длительным непрерывным употреблением алкоголя, которое приводит к тяжелым последствиям для организма. Это состояние опасно не только для здоровья, но и для жизни, поэтому быстрое вмешательство специалистов необходимо, при этом можно заказать наркологическая помощь. Врач на дому помогает пациенту выйти из запоя безопасно, минимизируя риски для его здоровья, что является особенно важно для больного, включая случаи наркомании, а также с учетом его данных, возраста (в том числе после 40–50 лет) и актуальной цена лечения для тех, кто не хочет или не может пройти лечение в стационаре.
Узнать больше – вывод из запоя на дому цена
Запой – это состояние, при котором человек продолжает употреблять алкоголь в течение длительного времени, не в состоянии прекратить употребление самостоятельно, что является проявлением алкоголизма. Это может привести к серьезным проблемам со здоровьем, и в таком случае необходим вывод из запоя с помощью наркологической помощи, при этом в дальнейшем может рассматриваться кодирование.
Получить больше информации – нарколог на дом вывод из запоя
Вывод из запоя на дому с медицинским контролем — это услуга, которая позволяет пациентам избавиться от алкогольной зависимости в комфортных условиях своего дома. В Екатеринбурге эта услуга становится все более востребованной, поскольку она предоставляет безопасный и эффективный способ вывода человека из запоя, при этом не требуя госпитализации. Процедура сопровождается контролем квалифицированных специалистов, что минимизирует риски и ускоряет процесс восстановления.
Разобраться лучше – вывод из запоя на дому анонимно в екатеринбурге
Домашний формат выбирают в тех случаях, когда человеку тяжело добраться до медицинского учреждения, он ослаблен после нескольких дней употребления спиртного или родственникам важно быстрее получить врачебную оценку состояния. После осмотра определяют, допустима ли помощь на дому, требуется ли капельница, возможен ли вывод из запоя в домашних условиях или нужен другой объем наблюдения. Если эпизоды повторяются, обсуждение обычно выходит за рамки снятия острых симптомов и затрагивает дальнейшую помощь при алкоголизме. Уже на этапе первого обращения часто уточняют, можно ли вызвать врача срочно, доступна ли круглосуточная помощь и в каких случаях состояние требует наблюдения в стационаре.
Подробнее тут – http://narkolog-na-dom-moskva-19.ru
Отдельно оценивают ситуации, когда подобные эпизоды повторяются. Если человек уже не впервые переносит запой, тяжелый выход из него или выраженное ухудшение самочувствия после алкоголя, вопрос обычно выходит за рамки разовой помощи. Тогда уже при первичном обращении рассматривают не только текущую стабилизацию состояния, но и дальнейшие шаги. При затяжном течении проблемы могут обсуждаться лечение зависимости, программа восстановления и условия, при которых потребуется наблюдение в стационаре.
Подробнее можно узнать тут – вызвать нарколога на дом в москве
Дополнительным поводом для обращения становится состояние, при котором больному тяжело вставать, пить воду, есть, спокойно лежать или переносить обычную бытовую нагрузку. В таких ситуациях домашний осмотр помогает быстрее определить, какого объема помощи достаточно на текущем этапе. Если обращение связано не только с алкоголем, но и с подозрением на употребление наркотиков, оценка проводится особенно осторожно, поскольку при наркомании клиническая картина может быть иной.
Разобраться лучше – вызвать нарколога на дом москва
Вывод из запоя на дому требуется в тех случаях, когда человек сталкивается с длительным непрерывным употреблением алкоголя, которое приводит к тяжелым последствиям для организма. Это состояние опасно не только для здоровья, но и для жизни, поэтому быстрое вмешательство специалистов необходимо, при этом можно заказать наркологическая помощь. Врач на дому помогает пациенту выйти из запоя безопасно, минимизируя риски для его здоровья, что является особенно важно для больного, включая случаи наркомании, а также с учетом его данных, возраста (в том числе после 40–50 лет) и актуальной цена лечения для тех, кто не хочет или не может пройти лечение в стационаре.
Ознакомиться с деталями – http://vyvod-iz-zapoya-na-domu-ekaterinburg-16.ru/
Чаще всего нарколога на дом вызывают при повторяющемся или длительном запое, тяжелом похмелье, бессоннице после алкоголя, треморе, выраженной слабости и ухудшении общего самочувствия. Поводом для обращения также становятся тревога, раздражительность, скачки артериального давления, учащенный пульс, обезвоживание и необходимость поставить капельницу дома под наблюдением специалиста. Во многих случаях звонок в наркологический центр поступает тогда, когда родственники понимают, что состояние больного уже не позволяет ждать следующего дня.
Подробнее – запой нарколог на дом
Вывод из запоя на дому в Екатеринбурге: эффективное лечение, детоксикация и восстановление организма в наркологической клинике «Детокс»
Получить дополнительные сведения – вывод из запоя на дому анонимно в екатеринбурге
Отдельно выделяют ситуации, когда родственники вызывают врача не только из-за текущего состояния, но и потому, что подобные эпизоды повторяются. Если накапливаются последствия алкоголизма, нарушается сон, меняется поведение, появляются устойчивые проблемы дома и в повседневной жизни, разовая помощь обычно рассматривается как первый этап последующей тактики. При тяжелом состоянии, признаках отравлении алкоголем или сочетании нескольких рисков сразу может понадобиться более интенсивное наблюдение в стационаре.
Углубиться в тему – нарколог на дом
Нарколог на дом в Екатеринбурге: выезд врача на дом, лечение запоя и консультации в наркологической клинике «НЕО+».
Получить дополнительные сведения – запой нарколог на дом екатеринбург
Домашний формат помощи рассматривают тогда, когда человеку тяжело добраться до медицинского учреждения, состояние ухудшается после нескольких дней употребления спиртного или родственникам требуется очная оценка без промедления. После осмотра становится ясно, допустима ли помощь на дому, требуется ли капельница, можно ли ограничиться наблюдением в домашних условиях или нужен другой маршрут помощи. Вопрос о том, как вызвать специалиста, нередко возникает в ситуациях, когда состояние нарастает быстро и требуется решение без откладывания. Если подобные эпизоды повторяются, дальнейшее обсуждение может касаться не только текущего состояния, но и лечения алкоголизма, работы с зависимостью и более длительной программы восстановления.
Получить больше информации – нарколог на дом в москве
Когда зависимости становятся хроническими и угрожают жизни пациента, комплексная реабилитация при наркомании в специализированных клиниках Москвы, включая вывод из состояния в стационаре и последующий анализ данных о состоянии пациента, может стать единственным возможным решением. Процесс восстановления включает в себя работу не только с зависимостью, но и с психоэмоциональным состоянием, что делает лечение более эффективным и долговечным.
Выяснить больше – реабилитация алкоголиков в москве
Выбор между домашней помощью и стационарным лечением определяется не удобством, а медицинской целесообразностью. В условиях клиники исключаются внешние триггеры, обеспечивается изоляция от источников алкоголя и создается контролируемая среда, где терапевтические решения принимаются на основе объективных показателей. Такой подход критически важен для предотвращения осложнений, минимизации дискомфорта абстиненции и формирования устойчивой базы для дальнейшей противорецидивной работы.
Углубиться в тему – быстрый вывод из запоя в стационаре
Реабилитация алкоголиков в Москве с поддержкой специалистов направлена не только на избавление от зависимости, но и на восстановление полноценной жизни пациента. В процессе реабилитации особое внимание уделяется не только медицинским методам, но и психологической поддержке, что помогает пациенту разобраться в причинах своей зависимости, научиться справляться с трудными ситуациями и адаптироваться к социальной жизни без алкоголя.
Изучить вопрос глубже – reabilitacziya-alkogolikov-moskva-1.ru/
Отдельного внимания требуют случаи, когда больной почти не ест, плохо пьет воду, не может спокойно лежать, жалуется на сильное сердцебиение, нехватку сна или выраженное внутреннее напряжение. В такой ситуации осмотр помогает определить, безопасно ли оставаться дома и какого объема помощи достаточно на текущем этапе. Если речь идет о выраженных проявлениях абстинентного синдрома, затягивать с обращением нецелесообразно.
Изучить вопрос глубже – https://narkolog-na-dom-ekaterinburg-3.ru/
Наиболее частыми причинами обращения становятся выраженная слабость, тремор, нарушение сна, тревога, учащенный пульс, скачки артериального давления, тошнота и признаки обезвоживания. Эти симптомы могут сочетаться между собой и усиливаться после прекращения употребления алкоголя, особенно после нескольких дней запоя.
Исследовать вопрос подробнее – https://narkolog-na-dom-ekaterinburg.ru
Помощь на дому рассматривают при состояниях, которые сопровождаются выраженным ухудшением самочувствия после алкоголя. Обычно речь идет о нескольких днях запоя, тяжелом похмелье, бессоннице, тревоге, дрожи в руках, слабости, тошноте, сухости во рту, отсутствии аппетита и признаках обезвоживания. В таких случаях врачебный осмотр нужен для оценки тяжести состояния и выбора безопасной тактики.
Детальнее – нарколог на дом анонимно москва
Нарколог на дом в Москве: срочный выезд врача, капельницы и помощь при запое в наркологической клинике «Клиника доктора Калюжной».
Разобраться лучше – нарколог на дом цена в москве
После нескольких дней употребления алкоголя организм работает с перегрузкой. Усиливается обезвоживание, ухудшается сон, появляется дрожь, растет тревожность, нарушается аппетит, могут беспокоить скачки давления, сердцебиение, слабость и тошнота. В такой ситуации состояние нередко требует осмотра врача, особенно если самочувствие продолжает ухудшаться или уже были неудачные попытки справиться своими силами. Подобные состояния встречаются не только при последствиях алкоголизма, но и у людей, которые впервые столкнулись с тяжелой интоксикацией после приема спиртного.
Исследовать вопрос подробнее – нарколог на дом вывод екатеринбург
2ttns7
Нарколог на дом в Москве: срочный выезд врача, капельницы и помощь при запое в наркологической клинике «Клиника доктора Калюжной».
Ознакомиться с деталями – нарколог на дом цена москва
Bu arada, eger tere hangi ayda ekilir konusuyla ilgileniyorsan?z, suraya bir goz at?n. Link burada: https://hobiyapma.com/articles/tere-ekimi-nasil-yapilir/
Не каждый человек с зависимостью от алкоголя готов признать свою проблему и обратиться за помощью. Однако, когда зависимость достигает тяжелых форм, требуется профессиональное вмешательство, и комплексная реабилитация в наркологическом доме становится важнейшим этапом восстановления, при этом в некоторых случаях помощь может предоставляться бесплатно, а сама программа рассчитана на длительный срок — до нескольких лет. Признаки того, что нужна реабилитация, могут включать невозможность прекратить пить даже при наличии серьезных последствий для здоровья, социальной жизни и межличностных отношений.
Разобраться лучше – реабилитация алкоголиков стоимость москва
Реабилитация алкоголиков с поддержкой специалистов — это системный подход к лечению алкогольной зависимости, который включает в себя различные медицинские, психологические и социальные методы. В Москве существует множество наркологических центров, предлагающих такие программы, где пациентам предоставляется комплексное лечение под наблюдением квалифицированных специалистов. Процесс реабилитации направлен не только на избавление от алкогольной зависимости, но и на восстановление социальной адаптации пациента, улучшение его психоэмоционального состояния и предотвращение рецидивов. В клиниках также могут предложить кодирование от алкоголизма, что помогает значительно снизить риск возвращения к прежним привычкам и обеспечить долгосрочную трезвость пациента.
Подробнее можно узнать тут – центр реабилитации алкоголиков город
Процесс вывода из запоя на дому с выездом врача в Екатеринбурге включает несколько этапов, начиная с первичного осмотра пациента и заканчивая корректировкой лечения в зависимости от его состояния. Врач-нарколог проводит полный осмотр, анализирует симптомы и составляет план лечения, который включает детоксикацию организма, поддерживающую терапию и медикаментозное лечение для снятия симптомов абстиненции.
Получить больше информации – анонимный вывод из запоя на дому в екатеринбурге
Откройте для себя скрытые страницы истории и малоизвестные научные открытия, которые оказали колоссальное влияние на развитие человечества. Статья предлагает свежий взгляд на события, которые заслуживают большего внимания.
Ознакомиться с теоретической базой – https://thenews21.com/understanding-us-inheritance-law-sam-pitrodas-comment-triggers-political-controversy-in-india
Домашний формат выбирают в тех случаях, когда человеку тяжело добраться до медицинского учреждения, он ослаблен после нескольких дней употребления спиртного или родственникам важно быстрее получить врачебную оценку состояния. После осмотра определяют, допустима ли помощь на дому, требуется ли капельница, возможен ли вывод из запоя в домашних условиях или нужен другой объем наблюдения. Если эпизоды повторяются, обсуждение обычно выходит за рамки снятия острых симптомов и затрагивает дальнейшую помощь при алкоголизме. Уже на этапе первого обращения часто уточняют, можно ли вызвать врача срочно, доступна ли круглосуточная помощь и в каких случаях состояние требует наблюдения в стационаре.
Получить больше информации – нарколог на дом цена в москве
Когда зависимости становятся хроническими и угрожают жизни пациента, комплексная реабилитация при наркомании в специализированных клиниках Москвы, включая вывод из состояния в стационаре и последующий анализ данных о состоянии пациента, может стать единственным возможным решением. Процесс восстановления включает в себя работу не только с зависимостью, но и с психоэмоциональным состоянием, что делает лечение более эффективным и долговечным.
Исследовать вопрос подробнее – клиника реабилитации алкоголиков город
Процесс вывода из запоя на дому с выездом врача в Екатеринбурге включает несколько этапов, начиная с первичного осмотра пациента и заканчивая корректировкой лечения в зависимости от его состояния. Врач-нарколог проводит полный осмотр, анализирует симптомы и составляет план лечения, который включает детоксикацию организма, поддерживающую терапию и медикаментозное лечение для снятия симптомов абстиненции.
Углубиться в тему – вывод из запоя на дому в екатеринбурге
Вывод из запоя на дому с медицинским контролем — это процесс, при котором нарколог или медсестра приезжает к пациенту на дом для проведения необходимых процедур. Основной задачей является снятие абстинентного синдрома, восстановление водно-электролитного баланса и нормализация общего состояния пациента, при этом оказывается наркологическая помощь. Этот процесс проходит под наблюдением квалифицированных специалистов, что помогает избежать осложнений, часто возникающих при самостоятельном выходе из запоя, а в дальнейшем может потребоваться кодирование и реабилитация.
Подробнее можно узнать тут – вывод из запоя на дому анонимно
Отдельного внимания требуют случаи, когда больной почти не ест, плохо пьет воду, не может спокойно лежать, жалуется на сильное сердцебиение, нехватку сна или выраженное внутреннее напряжение. В такой ситуации осмотр помогает определить, безопасно ли оставаться дома и какого объема помощи достаточно на текущем этапе. Если речь идет о выраженных проявлениях абстинентного синдрома, затягивать с обращением нецелесообразно.
Подробнее – врач нарколог на дом екатеринбург
Вывод из запоя на дому с быстрым облегчением в Екатеринбурге является эффективным методом для тех, кто хочет быстро избавиться от неприятных симптомов абстиненции, не выходя из дома. Основное преимущество этого метода — это быстрый результат, минимальные риски для здоровья и отсутствие необходимости в стационарном лечении. Процедура, проводимая опытным медицинским специалистом, помогает не только устранить симптомы похмелья, но и восстановить нормальное состояние организма без стресса и неудобств для пациента.
Получить дополнительные сведения – http://www.domen.ru
Наркологическая клиника в Ростове-на-Дону рассматривается как специализированная медицинская структура, обеспечивающая лечение и помощь 24/7 при состояниях, связанных с зависимостями. В клинике «Вектор Трезвости» работа выстроена по принципу непрерывности, что позволяет оказывать медицинское вмешательство независимо от времени суток и стадии обращения. Такой формат особенно важен при острых интоксикациях, выраженной абстиненции и резких соматических нарушениях, когда своевременность помощи напрямую влияет на прогноз. Наркологическая клиника в Ростове-на-Дону функционирует в условиях постоянной готовности медицинского персонала и строгого соблюдения клинических регламентов.
Детальнее – вывод наркологическая клиника
Вывод из запоя на дому в Санкт-Петербурге с выездом нарколога, детоксикацией и восстановлением состояния в наркологической клинике «Частный медик 24»
Изучить вопрос глубже – https://vyvod-iz-zapoya-na-domu-sankt-peterburg-8.ru/
Капельница от похмелья — это медицинская процедура, направленная на быстрое устранение симптомов интоксикации и восстановление работы организма после употребления алкоголя. В отличие от самостоятельных попыток справиться с состоянием, инфузионная терапия позволяет воздействовать на причину недомогания, а не только на его проявления. В наркологической клинике «Похмельная служба» помощь организуется с учётом состояния пациента и проводится под контролем врача.
Углубиться в тему – капельница от похмелья в воронеже
Продолжительный запой истощает организм, провоцируя нарушения работы сердца, печени и нервной системы. Без своевременной медицинской помощи состояние пациента может резко ухудшиться — от судорог и аритмии до алкогольного делирия. Врачи наркологической клиники «ДонМед Экстренная Наркология» проводят срочную детоксикацию и вывод из запоя в Ростове-на-Дону, обеспечивая круглосуточное наблюдение и контроль осложнений. Каждое вмешательство подбирается индивидуально, а лечение направлено не только на снятие интоксикации, но и на стабилизацию психоэмоционального состояния пациента.
Детальнее – вывод из запоя вызов на дом
Good afternoon!
Our boosters are trained to follow best practices for account security and discretion always.
From Normal to Mythic we have teams ready to tackle any boss mechanic effectively and safely.
The most complete information on the website – https://www.wow-power-leveling.org/WowArmory/wow-armory-character-lookup
wow instant boost, buy wow gold cheap, trusted power leveling
wow heroic raid boost, wow character boost, wow carry service
Good luck and good gameplay!
Наиболее частыми поводами для вызова становятся несколько дней употребления алкоголя подряд, выраженная слабость, дрожь в руках, тревога, тошнота, нарушение сна, скачки давления, учащенный пульс и признаки обезвоживания. Эти симптомы могут сочетаться между собой и усиливаться по мере продолжения запоя или после резкого прекращения употребления.
Получить дополнительную информацию – нарколог на дом вывод екатеринбург
В этом обзорном материале представлены увлекательные детали, которые находят отражение в различных аспектах жизни. Мы исследуем непонятные и интересные моменты, позволяя читателю увидеть картину целиком. Погрузитесь в мир знаний и удивительных открытий!
Узнать больше – вызвать нарколога на дом
Реабилитация алкоголиков с поддержкой специалистов в Москве представляет собой важный и сложный процесс, в котором ключевую роль играет профессиональное вмешательство. Программы реабилитации включают в себя не только медицинскую помощь, но и психологическую, социальную и эмоциональную поддержку, что способствует успешному и долгосрочному восстановлению пациента. Такая комплексная помощь является основой эффективного лечения и предотвращения рецидивов.
Подробнее можно узнать тут – центр реабилитации алкоголиков город
Эта публикация содержит ценные советы и рекомендации по избавлению от зависимости. Мы обсуждаем различные стратегии, которые могут помочь в процессе выздоровления и важность обращения за помощью. Читатели смогут использовать полученные знания для улучшения своего состояния.
Узнать напрямую – помощь нарколога на дому в москве
Нарколог на дом в Москве: срочная медицинская помощь, капельницы и восстановление состояния в наркологической клинике «Клиника доктора Калюжной».
Разобраться лучше – http://www.domen.ru
Помощь на дому рассматривают при состояниях, которые сопровождаются заметным ухудшением самочувствия после алкоголя. Это может быть запой на протяжении нескольких дней, тяжелое похмелье, дрожь в руках, нарушение сна, выраженная слабость, тревога, тошнота, сухость во рту, снижение аппетита и признаки обезвоживания. В таких случаях осмотр врача нужен для того, чтобы оценить тяжесть состояния и понять, безопасно ли оставаться дома.
Изучить вопрос глубже – нарколог на дом в москве
Наиболее частыми причинами обращения становятся запой, выраженная слабость, тремор, тревога, бессонница, тошнота, нестабильное давление, учащенный пульс и ощущение физического истощения. Эти проявления могут сочетаться между собой и усиливаться после прекращения употребления алкоголя, особенно если эпизод длился несколько дней подряд.
Подробнее – https://narkolog-na-dom-moskva-20.ru
Особое внимание мы уделяем психологической составляющей. Нарколог на дом в Екатеринбурге в «НЕО+» — это не только физическое очищение, но и работа с мотивацией, разрушение психологических триггеров зависимости. Зависимость разрушает жизнь, поэтому мы предлагаем психотерапевтическое сопровождение. Родственники получают отдельную поддержку: консультации психолога помогают правильно выстроить общение с зависимым человеком и мотивировать его на дальнейшее лечение. Реабилитация может проходить амбулаторно или в стационаре партнёрских центров с комфортабельными условиями, где пациенты находятся под круглосуточным наблюдением.
Углубиться в тему – нарколог на дом цена
Откройте для себя скрытые страницы истории и малоизвестные научные открытия, которые оказали колоссальное влияние на развитие человечества. Статья предлагает свежий взгляд на события, которые заслуживают большего внимания.
Узнать из первых рук – вывод из запоя дешево
Эта разъяснительная статья содержит простые и доступные разъяснения по актуальным вопросам. Мы стремимся сделать информацию понятной для широкой аудитории, чтобы каждый мог разобраться в предмете и извлечь из него максимум пользы.
Прочесть заключение эксперта – поставить капельницу на дому цена нижний новгород
В данной статье рассматриваются проблемы общественного здоровья и социальные факторы, влияющие на него. Мы акцентируем внимание на значении профилактики и осведомленности в защите здоровья на уровне общества. Читатели смогут узнать о новых инициативах и программах, направленных на улучшение здоровья населения.
Давай разберёмся досконально – вызов нарколога на дом цена
Помощь на дому рассматривают при состояниях, которые сопровождаются заметным ухудшением самочувствия после алкоголя. Это может быть запой на протяжении нескольких дней, тяжелое похмелье, дрожь в руках, нарушение сна, выраженная слабость, тревога, тошнота, сухость во рту, снижение аппетита и признаки обезвоживания. В таких случаях осмотр врача нужен для того, чтобы оценить тяжесть состояния и понять, безопасно ли оставаться дома.
Получить больше информации – https://narkolog-na-dom-moskva-17.ru/
Реабилитация алкоголиков в Москве: лечение зависимости, восстановление и поддержка под контролем специалистов в наркологической клинике «Похмельная служба»
Выяснить больше – клиника реабилитации алкоголиков
Good morning!
Transparency builds trust and we are proud of our open approach to business operations.
Transparency is key to our operation and we provide regular updates on your order status.
The most complete information on the website – https://www.wow-power-leveling.org/WorldOfWarcraftRaces/best-wow-tank-class
wow leveling guide, dragonflight leveling boost, wow profession boost
fast wow boost, wow character boost, wow gold buy
Good luck and good gameplay!
Когда человек или его родственники понимают, что нужен нарколог на дом в Екатеринбурге, время становится решающим фактором. Запой, ломка, тяжёлая интоксикация — в таких ситуациях промедление может привести к необратимым последствиям для здоровья и жизни. Наша клиника создана именно для того, чтобы оказывать эффективную круглосуточную помощь в самых сложных случаях. Мы не заставляем ждать в очередях государственных учреждений, не ставим на учёт и не разглашаем информацию. Всё происходит анонимно, в домашних условиях или в комфортных условиях нашей партнёрской клиники. Пациенты из Екатеринбурга, Свердловской области, а также соседних регионов уже более 12 лет выбирают «НЕО+» благодаря сочетанию скорости, профессионализма, полной анонимности и доказанной результативности. Алкогольной зависимости и проблем с наркотиками подвержены как алкоголиков, так и наркозависимых, и мы помогаем всем.
Получить дополнительную информацию – нарколог на дом анонимно
Помощь на дому рассматривают при состояниях, связанных с острым ухудшением самочувствия после алкоголя. Чаще всего это несколько дней запоя, тяжелое похмелье, бессонница, тревога, дрожь в руках, слабость, отсутствие аппетита, тошнота, сухость во рту и ощущение истощения. В подобных случаях врачебный осмотр нужен для оценки общего состояния и выбора безопасной тактики.
Получить дополнительную информацию – вызов нарколога на дом екатеринбург
Нарколог на дом в Москве — это формат помощи, который рассматривают в тех случаях, когда после употребления алкоголя больному требуется врачебный осмотр без поездки в клинику. Чаще всего обращение связано с запоем, выраженным похмельным синдромом, нарушением сна, слабостью, тремором, тревогой, обезвоживанием, сердцебиением, скачками давления и общим ухудшением самочувствия. Дальнейшая тактика зависит от состояния больного на момент осмотра, длительности употребления алкоголя, возраста и сопутствующих заболеваний.
Подробнее можно узнать тут – http://narkolog-na-dom-moskva-20.ru
В этом обзорном материале представлены увлекательные детали, которые находят отражение в различных аспектах жизни. Мы исследуем непонятные и интересные моменты, позволяя читателю увидеть картину целиком. Погрузитесь в мир знаний и удивительных открытий!
Как достичь результата? – капельница после запоя цена
Дальше задача — восстановить управляемость состояния. Это включает снижение интоксикации, коррекцию обезвоживания, выравнивание показателей, уменьшение тревоги и нормализацию сна. Но чтобы результат закрепился, необходим второй слой: работа с триггерами (стресс, конфликт, усталость, одиночество), профилактика «вечернего отката», поддержка режима и понимание, какие симптомы допустимы, а какие требуют повторной оценки. Именно это отличает лечение зависимости от разовой попытки «стало легче — дальше как-нибудь».
Углубиться в тему – https://narkologicheskaya-klinika-sergiev-posad12.ru/chastnaya-narkologicheskaya-klinika-v-sergievom-posade
Мы собрали для вас самые захватывающие факты из мира науки и истории. От малознакомых деталей до грандиозных событий — эта статья расширит ваш кругозор и подарит новое понимание того, как устроен наш мир.
Подробнее – капельница от запоя
Отдельно оценивают ситуации, когда эпизоды повторяются и становятся частью более устойчивой проблемы. Если после алкоголя регулярно развивается тяжелое состояние, нарушается привычный режим жизни, усиливаются последствия алкоголизма и возникают сложности с контролем употребления, домашний выезд может быть только первым этапом более длинного маршрута помощи. При этом наркологическая помощь может включать не только снятие острых проявлений, но и дальнейшую программу лечения зависимости, если речь идет о длительном течении заболевания.
Получить дополнительные сведения – нарколог на дом вывод москва
Поводом для обращения обычно становятся слабость, тремор, тревога, бессонница, учащенный пульс, нестабильное давление, тошнота и ощущение физического истощения. Эти проявления часто усиливаются после прекращения употребления алкоголя или на фоне затянувшегося запоя.
Получить больше информации – https://narkolog-na-dom-moskva-17.ru/
Вывод из запоя на дому в Санкт-Петербурге с выездом специалиста, стабилизацией состояния и медицинской поддержкой в наркологической клинике «Частный медик 24»
Узнать больше – вывод из запоя на дому круглосуточно в санкт-петербурге
Откройте для себя скрытые страницы истории и малоизвестные научные открытия, которые оказали колоссальное влияние на развитие человечества. Статья предлагает свежий взгляд на события, которые заслуживают большего внимания.
А есть ли продолжение? – вывести из запоя на дому
Качественная наркологическая помощь строится от безопасности к устойчивости. Сначала врач оценивает состояние: длительность употребления, выраженность интоксикации и отмены, давление и пульс, признаки обезвоживания, характер сна, уровень тревоги, наличие хронических заболеваний и препаратов, которые уже принимались дома. Затем выбирается формат лечения — стационарный, амбулаторный или выездной — исходя из рисков, а не из удобства. Это принципиально: при нестабильных показателях и высокой вероятности осложнений требуется более высокий уровень контроля.
Получить больше информации – запой наркологическая клиника
Этот информационный обзор станет отличным путеводителем по актуальным темам, объединяющим важные факты и мнения экспертов. Мы исследуем ключевые идеи и представляем их в доступной форме для более глубокого понимания. Читайте, чтобы оставаться в курсе событий!
Посмотреть всё – вывод из запоя на дому недорого
Запой — это не «просто много выпил», а состояние, при котором организм уже не справляется с нагрузкой от алкоголя и продуктов его распада. Человек может обещать себе остановиться «с утра», но утром становится хуже: дрожь, потливость, тошнота, сердцебиение, скачки давления, сильная тревога, бессонница. В таких условиях алкоголь начинает восприниматься как единственный быстрый способ облегчить симптомы, и запой продолжается. Опасность в том, что с каждым днём растут риски осложнений — со стороны сердца, сосудов, нервной системы, печени, поджелудочной железы, а также повышается вероятность травм и непредсказуемых поступков на фоне интоксикации.
Подробнее тут – http://vyvod-iz-zapoya-klin12.ru
Реализация данных задач позволяет наркологу на дом в Ростове-на-Дону оказывать помощь в контролируемом и безопасном формате.
Подробнее можно узнать тут – нарколог капельница на дом ростов-на-дону
Этот информационный обзор станет отличным путеводителем по актуальным темам, объединяющим важные факты и мнения экспертов. Мы исследуем ключевые идеи и представляем их в доступной форме для более глубокого понимания. Читайте, чтобы оставаться в курсе событий!
Прочитать подробнее – выведение из запоя на дому
В клинике «ЮгМед Наркологический Центр» лечение зависимостей включает сразу несколько направлений, каждое из которых играет важную роль в процессе восстановления. Медицинская команда подбирает сочетание методов, позволяющее безопасно вывести человека из состояния зависимости и вернуть его к нормальной жизни. В таблице ниже представлены основные терапевтические блоки и их задачи.
Подробнее – наркологические клиники алкоголизм в ростове-на-дону
Эта статья освещает различные аспекты освобождения от зависимости и пути к выздоровлению. Мы обсуждаем важность осознания своей проблемы и обращения за помощью. Читатели получат практические советы о том, как преодолевать трудности и строить новую жизнь без зависимости.
Не упусти шанс – наркологическая помощь стационар
Этот информативный текст сочетает в себе темы здоровья и зависимости. Мы обсудим, как хронические заболевания могут усугубить зависимости и наоборот, как зависимость может влиять на общее состояние здоровья. Читатели получат представление о комплексном подходе к лечению как физического, так и психического состояния.
Хочешь знать всё? – нарколог стационар спб
Публикация знакомит читателей с различными подходами к реабилитации. От традиционных методов до современных программ — вы узнаете, как выбрать оптимальный путь к выздоровлению и преодолеть препятствия на этом пути.
Ознакомьтесь с аналитикой – лечение в наркологическом стационаре
Вывод из запоя на дому в Санкт-Петербурге с анонимным выездом врача, снятием интоксикации и поддержкой в наркологической клинике «Частный медик 24»
Разобраться лучше – http://vyvod-iz-zapoya-na-domu-sankt-peterburg-12.ru/
Каждый курс лечения включает несколько этапов, направленных на постепенное улучшение состояния. Система выстроена так, чтобы обеспечить плавное восстановление функций организма без стресса. Ниже приведена таблица, показывающая основные этапы лечения и применяемые процедуры.
Подробнее – наркология вывод из запоя
Hello!
Enjoy instant delivery and secure transactions even with our lowest priced gold packages.
Compare our prices with competitors and see why we offer the best value consistently.
More detailed information on the website – https://www.wow-power-leveling.org/Gameplay/wow-list-of-flying-mounts
wow leveling boost 2026, safe wow boost, wow character boost
safe wow boost, wow progression boost, wow boosting service review
Good luck and good gameplay!
В Нижнем Новгороде стационарный формат лечения применяется при наличии факторов, повышающих риск осложнений или снижающих эффективность домашней терапии. Врач принимает решение на основании осмотра, консультации и анализа данных, оценивая текущее состояние пациента и его реакцию на предыдущие попытки лечения. При необходимости можно заранее обратиться в центр лечения алкоголизма и наркомании или заказать услугу по телефону.
Получить дополнительную информацию – вывод из запоя капельница в нижнем новгороде
Эта обзорная заметка содержит ключевые моменты и факты по актуальным вопросам. Она поможет читателям быстро ориентироваться в теме и узнать о самых важных аспектах сегодня. Получите краткий курс по современной информации и оставайтесь в курсе событий!
Не упусти шанс – нарколога на дом
Алкогольная зависимость часто держится на страхе отмены. Человек заранее боится вечера: что не уснёт, начнётся паника, поднимется давление, появится дрожь и ощущение «внутреннего разгона». Из-за этого запой поддерживается не удовольствием, а попыткой избежать ухудшения. В клинике лечение начинается с оценки риска осложнений и тяжести отмены. Это позволяет определить, нужен ли стационар, или можно начинать лечение без госпитализации с медицинским контролем и ясным планом на ночь.
Разобраться лучше – anonimnaya-narkologicheskaya-klinika
Медицинская команда контролирует каждый этап лечения, отслеживая динамику и корректируя терапию при необходимости. Благодаря такому подходу удаётся добиться не временного улучшения, а устойчивого восстановления.
Углубиться в тему – http://narcologicheskaya-klinika-v-rostove19.ru
После алкоголя в организме накапливаются токсичные продукты распада, нарушается водно-солевой баланс и страдает нервная система, что особенно выражено после запоя или при алкоголизме. Это проявляется головной болью, слабостью, тошнотой и нарушением сна. Капельница помогает ускорить процессы очищения и восстановить внутренние системы, обеспечивая более быстрое облегчение состояния и помогая человеку выйти из состояния запоев.
Подробнее тут – капельница от похмелья на дому воронеж
Выезд врача на дом рассматривают в ситуациях, когда человеку тяжело добраться до медицинского учреждения, он ослаблен после нескольких дней употребления спиртного или родственникам важно быстро получить очную оценку состояния. После осмотра определяют, допустим ли домашний формат, нужна ли капельница, достаточно ли наблюдения на дому или следует сразу рассматривать другой объем помощи. Если подобные эпизоды повторяются, дальнейшее обсуждение может касаться не только текущего состояния, но и лечения алкоголизма, кодирования, участия психолога, психиатра и реабилитации. В таких случаях наркологическая помощь рассматривается шире, чем разовый вызов на дом.
Получить дополнительную информацию – http://narkolog-na-dom-moskva-20.ru
В Воронеже круглосуточная помощь при похмелье востребована в ситуациях, когда симптомы появляются внезапно или усиливаются в ночное время, особенно в запое или после запоя. Врач проводит консультацию, оценивает состояние пациента и принимает решение о проведении инфузионной терапии. Такой подход позволяет своевременно устранить симптомы и предотвратить их дальнейшее развитие. При необходимости можно оставить заявку, уточнить цены или получить помощь бесплатно на первичном этапе.
Разобраться лучше – капельница от похмелья на дом
В этом обзорном материале представлены увлекательные детали, которые находят отражение в различных аспектах жизни. Мы исследуем непонятные и интересные моменты, позволяя читателю увидеть картину целиком. Погрузитесь в мир знаний и удивительных открытий!
Информация доступна здесь – наркологическая помощь на дом
Реабилитация алкоголиков в Москве: лечение зависимости, восстановление и поддержка под контролем специалистов в наркологической клинике «Похмельная служба»
Подробнее – центр реабилитации алкоголиков
Алкоголизм редко начинается как «большая проблема». Обычно всё выглядит как способ расслабиться, заснуть, снять тревогу или пережить стресс. Но постепенно организм привыкает, толерантность растёт, без алкоголя становится тяжело, а попытки «просто перестать» упираются в отмену: дрожь, потливость, тошнота, скачки давления, сердцебиение, раздражительность, панические реакции, бессонница. На этом фоне человек возвращается к выпивке не ради удовольствия, а ради прекращения мучительных симптомов. Именно так формируется замкнутый круг, в котором зависимость поддерживается страхом отмены и привычкой снимать дискомфорт быстрым способом.
Получить дополнительные сведения – sergiev-posad-lechenie-alkogolizma
В практической работе выделяются последовательные этапы, обеспечивающие медицинскую целостность:
Подробнее можно узнать тут – наркологические клиники алкоголизм ростов-на-дону
Предлагаем вашему вниманию интересную справочную статью, в которой собраны ключевые моменты и нюансы по актуальным вопросам. Эта информация будет полезна как для профессионалов, так и для тех, кто только начинает изучать тему. Узнайте ответы на важные вопросы и расширьте свои знания!
Прочесть заключение эксперта – прокапаться на дому нижний новгород
Эта статья погружает вас в увлекательный мир знаний, где каждый факт становится открытием. Мы расскажем о ключевых исторических поворотных моментах и научных прорывах, которые изменили ход цивилизации. Поймите, как прошлое формирует настоящее и как его уроки могут помочь нам строить будущее.
См. подробности – выведение из запоя на дому нижний новгород
Реабилитация включает несколько ключевых этапов, каждый из которых направлен на решение определённых проблем пациента. Важно, чтобы все этапы были комплексными и последовательными, чтобы достичь наиболее эффективного результата.
Изучить вопрос глубже – http://reabilitacziya-alkogolikov-moskva-1.ru/
В этом информативном обзоре собраны самые интересные статистические данные и факты, которые помогут лучше понять текущие тренды. Мы представим вам цифры и графики, которые иллюстрируют, как развиваются различные сферы жизни. Эта информация станет отличной основой для глубокого анализа и принятия обоснованных решений.
Перейти к статье – вывести из запоя цена
Состав инфузии — это не «универсальный коктейль». Мы балансируем гидратацию, электролиты и поддерживающие компоненты в зависимости от симптомов и соматической картины. Ниже — примеры логики подбора. Это не руководство к самолечению: решение принимает врач на месте.
Получить дополнительную информацию – помощь вывод из запоя в петрозаводске
Выбор между домашней помощью и стационарным лечением определяется не удобством, а медицинской целесообразностью. В условиях клиники исключаются внешние триггеры, обеспечивается изоляция от источников алкоголя и создается контролируемая среда, где терапевтические решения принимаются на основе объективных показателей, а не субъективных ощущений пациента. Такой подход критически важен для предотвращения осложнений, минимизации дискомфорта абстиненции и формирования устойчивой базы для дальнейшей противорецидивной работы.
Подробнее – наркология вывод из запоя в стационаре санкт-петербург
Нарколог на дом в Москве: срочный выезд врача, капельницы и помощь при запое в наркологической клинике «Клиника доктора Калюжной».
Изучить вопрос глубже – нарколог на дом в москве
Если к «окну оценки» прогресс ниже ожидаемого, команда меняет один параметр — дозировку, временное окно приёма, приоритет модуля — и назначает новую дату сверки. Такой подход защищает от «снежного кома» вмешательств и сохраняет предсказуемость процесса.
Ознакомиться с деталями – наркологическая клиника лечение алкоголизма
Эта информационная статья охватывает широкий спектр актуальных тем и вопросов. Мы стремимся осветить ключевые факты и события с ясностью и простотой, чтобы каждый читатель мог извлечь из нее полезные знания и полезные инсайты.
Получить дополнительную информацию – вывод из запоя в стационаре в санкт-петербурге
Вывод из запоя на дому в Екатеринбурге: срочная помощь, детоксикация и восстановление под контролем специалистов в наркологической клинике «Детокс»
Выяснить больше – http://vyvod-iz-zapoya-na-domu-ekaterinburg-16.ru
В обзорной статье вы найдете собрание важных фактов и аналитики по самым разнообразным темам. Мы рассматриваем как современные исследования, так и исторические контексты, чтобы вы могли получить полное представление о предмете. Погрузитесь в мир знаний и сделайте шаг к пониманию!
Углубить понимание вопроса – как вызвать нарколога на дом
Лечение в наркологической клинике в Твери проходит поэтапно. Такая структура позволяет пациенту адаптироваться к изменениям и закреплять результат.
Подробнее можно узнать тут – http://narcologicheskaya-klinika-tver0.ru
Для жителей Нижнего Тагила у нас организованы три параллельных канала помощи: очные визиты в клинику, «тихий» выезд на дом и защищённые телемедицинские консультации. Координатор уже при первом звонке уточняет ключевые риски (аллергии, хронические заболевания, эпизоды судорог/психозов, приём постоянных препаратов), бытовые условия (возможность обеспечить тишину на 2–3 часа, доступ к воде, особенности подъезда), а также предпочтения по конфиденциальности. Это позволяет врачу подготовить персональный стартовый протокол заранее и сократить время между осмотром и первой процедурой.
Детальнее – наркологическая клиника наркологический центр в нижнем тагиле
Нарколог на дом в Москве: срочный выезд врача, капельницы и помощь при запое в наркологической клинике «Клиника доктора Калюжной».
Ознакомиться с деталями – нарколог на дом вывод в москве
Эта разъяснительная статья содержит простые и доступные разъяснения по актуальным вопросам. Мы стремимся сделать информацию понятной для широкой аудитории, чтобы каждый мог разобраться в предмете и извлечь из него максимум пользы.
Узнайте всю правду – нарколог на дом
Этот текст посвящён сложным аспектам зависимости и её влиянию на жизнь человека. Мы обсудим психологические, физические и социальные последствия зависимого поведения, а также важность своевременного обращения за помощью.
Исследовать вопрос подробнее – наркологические стационары
В этой статье мы обсудим процесс восстановления после зависимостей, акцентируя внимание на различных методах и подходах к реабилитации. Читатели узнают, как создать план выздоровления и использовать полезные ресурсы для достижения устойчивых изменений.
А что дальше? – нарколог стационар спб
Домашний формат выбирают в тех случаях, когда человеку тяжело добраться до медицинского учреждения, он ослаблен после нескольких дней употребления спиртного или родственникам важно быстрее получить врачебную оценку состояния. После осмотра определяют, допустима ли помощь на дому, требуется ли капельница, возможен ли вывод из запоя в домашних условиях или нужен другой объем наблюдения. Если эпизоды повторяются, обсуждение обычно выходит за рамки снятия острых симптомов и затрагивает дальнейшую помощь при алкоголизме. Уже на этапе первого обращения часто уточняют, можно ли вызвать врача срочно, доступна ли круглосуточная помощь и в каких случаях состояние требует наблюдения в стационаре.
Подробнее тут – вызов нарколога на дом москва
Реабилитация алкоголиков в Москве с поддержкой специалистов направлена не только на избавление от зависимости, но и на восстановление полноценной жизни пациента. В процессе реабилитации особое внимание уделяется не только медицинским методам, но и психологической поддержке, что помогает пациенту разобраться в причинах своей зависимости, научиться справляться с трудными ситуациями и адаптироваться к социальной жизни без алкоголя.
Получить больше информации – реабилитация алкоголиков стоимость
Стационарное наблюдение также целесообразно тогда, когда больному трудно соблюдать рекомендации дома, состояние быстро меняется или родственники не могут обеспечить полноценный контроль. В таких условиях медицинское сопровождение позволяет своевременно оценивать динамику и корректировать лечение. При выраженных психических нарушениях, тревожно-депрессивных проявлениях или изменении поведения к оценке состояния может подключаться психиатр, поскольку у части больных запой сопровождается не только соматическими, но и психическими осложнениями алкогольной зависимости.
Подробнее тут – вывод из запоя в стационаре клиника санкт-петербург
Решение о помещении пациента в стационар принимается на основе объективных медицинских критериев, а не только по желанию родственников. К показаниям относятся: запой длительностью более 72 часов, выраженная абстиненция с тахикардией, артериальной гипертензией, профузным потоотделением, наличие в анамнезе алкогольных делириев или судорожных эпизодов, сопутствующие хронические заболевания печени, сердца, поджелудочной железы. При отравление продуктами распада этанола, когда интоксикация затрагивает несколько систем одновременно, резкое прекращение употребления без медицинской поддержки может спровоцировать отек мозга, острую сердечную недостаточность или желудочно-кишечное кровотечение. При сочетанных расстройствах, когда в анамнезе присутствует наркомании, протоколы адаптируются под специфику психоактивных соединений и включают усиленный нейрологический контроль. Стационар позволяет провести полноценную диагностику, включая ЭКГ, экспресс-анализы крови и мониторинг сатурации, что формирует точную картину состояния и исключает шаблонные назначения.
Изучить вопрос глубже – быстрый вывод из запоя в стационаре в санкт-петербурге
Особенно понравился раздел про Актуальные события и проблемы Сахалина: новости, жильё, образование.
Вот, делюсь ссылкой:
https://media65.ru
Мы предлагаем вам окунуться в океан любопытных фактов и вдохновляющих историй. Эта публикация поможет расширить горизонты, разбудить интерес к науке и истории и увидеть мир с новой стороны.
Читать далее > – сколько стоит капельница от запоя
Вывод из запоя на дому в Екатеринбурге: помощь при запое, снятие интоксикации и медицинская поддержка в наркологической клинике «Детокс»
Подробнее – нарколог на дом вывод из запоя
Вывод из запоя на дому с медицинским контролем — это процесс, при котором нарколог или медсестра приезжает к пациенту на дом для проведения необходимых процедур. Основной задачей является снятие абстинентного синдрома, восстановление водно-электролитного баланса и нормализация общего состояния пациента, при этом оказывается наркологическая помощь. Этот процесс проходит под наблюдением квалифицированных специалистов, что помогает избежать осложнений, часто возникающих при самостоятельном выходе из запоя, а в дальнейшем может потребоваться кодирование и реабилитация.
Получить больше информации – вывод из запоя на дому анонимно екатеринбург
В этом обзорном материале представлены увлекательные детали, которые находят отражение в различных аспектах жизни. Мы исследуем непонятные и интересные моменты, позволяя читателю увидеть картину целиком. Погрузитесь в мир знаний и удивительных открытий!
Более того — здесь – вывод из запоя цены нижний новгород
Каждый этап имеет важное значение и обеспечивает долгосрочный эффект от терапии.
Ознакомиться с деталями – лечение женского алкоголизма в твери
Дальше задача — восстановить управляемость состояния. Это включает снижение интоксикации, коррекцию обезвоживания, выравнивание показателей, уменьшение тревоги и нормализацию сна. Но чтобы результат закрепился, необходим второй слой: работа с триггерами (стресс, конфликт, усталость, одиночество), профилактика «вечернего отката», поддержка режима и понимание, какие симптомы допустимы, а какие требуют повторной оценки. Именно это отличает лечение зависимости от разовой попытки «стало легче — дальше как-нибудь».
Подробнее – narkologicheskaya-klinika
Каждое направление вносит свой вклад в общий результат и делает процесс лечения более надежным и комплексным.
Подробнее тут – наркологическая клиника тверь
Помощь на дому рассматривают при состояниях, которые сопровождаются заметным ухудшением самочувствия после алкоголя. Обычно это несколько дней запоя, тяжелое похмелье, дрожь в руках, бессонница, выраженная слабость, раздражительность, тревога, тошнота, сухость во рту, отсутствие аппетита и признаки обезвоживания. В таких случаях осмотр врача нужен для оценки тяжести состояния и определения безопасной тактики.
Получить дополнительную информацию – запой нарколог на дом в москве
Вывод из запоя на дому с детоксикацией необходим в тех случаях, когда человек страдает от длительного употребления алкоголя, и его состояние требует профессионального вмешательства, включая случаи наркомании. Такое состояние, как правило, сопровождается выраженными симптомами абстиненции, такими как головная боль, тошнота, рвота, тремор, а также психоэмоциональными расстройствами — тревожностью, депрессией или галлюцинациями. В этих случаях вывод из запоя на дому с детоксикацией становится оптимальным решением, позволяющим быстро снять симптомы и вернуть пациента к нормальной жизни, при этом учитываются данные больного и актуальная цена лечения.
Подробнее – vyvod-iz-zapoya-na-domu-ekaterinburg-20.ru/
Отдельно оценивают ситуации, когда эпизоды повторяются и становятся частью более устойчивой проблемы. Если после алкоголя регулярно развивается тяжелое состояние, нарушается привычный режим жизни, усиливаются последствия алкоголизма и возникают сложности с контролем употребления, домашний выезд может быть только первым этапом более длинного маршрута помощи. При этом наркологическая помощь может включать не только снятие острых проявлений, но и дальнейшую программу лечения зависимости, если речь идет о длительном течении заболевания.
Исследовать вопрос подробнее – https://narkolog-na-dom-moskva-19.ru
В этом обзорном материале представлены увлекательные детали, которые находят отражение в различных аспектах жизни. Мы исследуем непонятные и интересные моменты, позволяя читателю увидеть картину целиком. Погрузитесь в мир знаний и удивительных открытий!
А есть ли продолжение? – вызвать врача нарколога на дом срочно
В практике круглосуточного лечения применяются следующие этапы:
Подробнее тут – https://narkologicheskaya-klinika-v-rostove19.ru/chastnaya-narkologicheskaya-klinika-rostov-na-donu/
Детоксикация при запое — это не «универсальная капельница», а медицинская стабилизация по состоянию. Сначала оцениваются риски: давление, пульс, дыхание, признаки обезвоживания, выраженность интоксикации и отмены, наличие хронических заболеваний, препараты, которые человек уже принимал. Затем подбирается поддержка, направленная на снижение интоксикации и восстановление функций организма.
Подробнее можно узнать тут – вывод из запоя капельница
Комплексное использование этих методов позволяет не только устранить физические проявления запоя, но и подготовить пациента к дальнейшему лечению зависимости.
Получить дополнительные сведения – http://vyvod-iz-zapoya-tver0.ru
Лечение в режиме круглосуточного наблюдения выстраивается как непрерывный медицинский процесс. Даже при экстренном обращении терапия рассматривается как последовательность взаимосвязанных мероприятий с обязательным врачебным контролем.
Узнать больше – наркологическая клиника наркологический центр в краснодаре
Мы собрали для вас самые захватывающие факты из мира науки и истории. От малознакомых деталей до грандиозных событий — эта статья расширит ваш кругозор и подарит новое понимание того, как устроен наш мир.
Изучить материалы по теме – стационар вывод из запоя
Ключевая задача первичного этапа — безопасно купировать абстинентный синдром и обеспечить постепенный метаболический «выход» без резких колебаний давления и частоты сердечных сокращений. Дополнительно оцениваются когнитивные и аффективные проявления, нарушения сна, уровень тревоги и наличие сопутствующих воспалительных процессов. По результатам обследования формируется индивидуальный план лечения с учетом предшествующего анамнеза, толерантности к препаратам и возможной полипрагмазии.
Разобраться лучше – вывод из запоя на дому круглосуточно в переулок панфилова, 36
В практике круглосуточного лечения применяются следующие этапы:
Исследовать вопрос подробнее – вывод наркологическая клиника в ростове-на-дону
Мы работаем по модели «72 часа + 2 недели»: первые трое суток посвящены стабилизации витальных показателей, коррекции сна и сокращению «тяговых» откликов, следующие 14 дней — консолидации результата и запуску психотерапевтического блока. Маркеры прописываются заранее, поэтому и пациент, и семья понимают, когда и что мы будем оценивать, как корректируем план, если динамика ниже ожидаемой.
Ознакомиться с деталями – http://www.domen.ru
Наиболее частыми причинами обращения становятся запой, выраженная слабость, тремор, нарушение сна, тревога, учащенный пульс, нестабильное давление, тошнота и ощущение физического истощения. Эти проявления могут сочетаться между собой и усиливаться после прекращения употребления алкоголя, особенно если эпизод длился несколько дней.
Углубиться в тему – вызов нарколога на дом
Специалисты, выезжающие на дом, оснащены всем необходимым для оказания полноценной помощи. Это переносное диагностическое оборудование, препараты для снятия симптомов абстиненции, инфузионные растворы, противосудорожные средства, седативные препараты и витаминные комплексы. Наличие мини-аптечки позволяет адаптировать лечение прямо на месте и избежать лишних госпитализаций.
Узнать больше – анонимная наркологическая помощь в владимире
Режим работы 24/7 в клинике «Формула Трезвости» обусловлен клинической спецификой зависимостей, для которых характерны внезапные ухудшения состояния. Наркологическая клиника в Краснодаре обеспечивает постоянную готовность медицинского персонала к приёму пациентов и началу терапии без временных ограничений. Это позволяет существенно сократить интервал между появлением симптомов и медицинским вмешательством, снижая риск осложнений.
Разобраться лучше – частная наркологическая клиника в краснодаре
Уже при первичном звонке мы собираем ключевую информацию: длительность употребления, типы веществ, сопутствующие заболевания, прошлые реакции на лекарства, эпизоды судорог и психозов, недавние значения АД/ЧСС. Это позволяет подготовить персональный стартовый протокол ещё до визита: поставить цель на первые 72 часа, определить метрики (сон, «тяга», дневная энергия), запланировать вечерний ритуал и расписать дистанционные чек-ины. Прозрачность шагов снижает тревогу у пациента и семьи и повышает соблюдаемость — фундамент устойчивого результата.
Подробнее тут – наркологическая клиника лечение алкоголизма
Зависимость редко начинается «резко» и очевидно. Чаще всё выглядит как способ справляться с усталостью, тревогой или бессонницей: выпить, чтобы расслабиться; принять вещество, чтобы «собраться» или наоборот «выключиться». Со временем организм перестраивается, толерантность растёт, а трезвость начинает сопровождаться неприятными симптомами — раздражительностью, дрожью, потливостью, тошнотой, скачками давления, паническими реакциями, нарушением сна. В такой точке человеку обычно нужен не совет «возьми себя в руки», а медицински выстроенный маршрут: оценка состояния, безопасная стабилизация и лечение, которое снижает риск повторения.
Подробнее – наркологическая клиника цены адреса
Такая последовательность шагов позволяет врачу действовать точно и эффективно. Благодаря комплексному подходу пациент чувствует облегчение уже через 1–2 часа после начала терапии, а полное восстановление наступает в течение суток.
Подробнее – вывод из запоя на дому круглосуточно в ставрополе
Детоксикация при запое — это не «универсальная капельница», а медицинская стабилизация по состоянию. Сначала оцениваются риски: давление, пульс, дыхание, признаки обезвоживания, выраженность интоксикации и отмены, наличие хронических заболеваний, препараты, которые человек уже принимал. Затем подбирается поддержка, направленная на снижение интоксикации и восстановление функций организма.
Подробнее можно узнать тут – https://vyvod-iz-zapoya-klin12.ru/vyvod-iz-zapoya-kapelnica-v-klinu
Главные задачи детоксикации при запое — безопасно снизить концентрацию токсичных метаболитов, восстановить водно-электролитный баланс, уменьшить перегрузку сердечно-сосудистой системы и вернуть физиологию сна. Мы начинаем с медленного стартового объёма инфузии, чтобы оценить переносимость, затем переходим к основной фазе и при необходимости к постинфузионной поддержке. Во время сеанса контролируются витальные показатели, динамика симптомов (тремор, тошнота, головная боль, фотофобия, тревога), а также «поведенческие» маркеры — способность расслабиться, усидеть спокойно, засыпать без «рывков».
Изучить вопрос глубже – врач вывод из запоя в каменске-уральске
Наркологическая помощь сегодня — это не просто экстренное вмешательство, но и полноценная система поддержки, охватывающая острые, хронические и пограничные состояния, вызванные употреблением алкоголя или наркотиков. В клинике «ВладЗдоровье» во Владимире специалисты обеспечивают высокопрофессиональную помощь в домашних условиях или в стационаре, с учётом потребностей конкретного пациента. Скорость реагирования, анонимность и современные терапевтические протоколы делают услугу максимально доступной и эффективной для жителей города и области.
Углубиться в тему – платная наркологическая помощь
Запой — это не «просто много выпил», а состояние, при котором организм уже не справляется с нагрузкой от алкоголя и продуктов его распада. Человек может обещать себе остановиться «с утра», но утром становится хуже: дрожь, потливость, тошнота, сердцебиение, скачки давления, сильная тревога, бессонница. В таких условиях алкоголь начинает восприниматься как единственный быстрый способ облегчить симптомы, и запой продолжается. Опасность в том, что с каждым днём растут риски осложнений — со стороны сердца, сосудов, нервной системы, печени, поджелудочной железы, а также повышается вероятность травм и непредсказуемых поступков на фоне интоксикации.
Подробнее – вывод из запоя на дому
Круглосуточный режим работы в клинике «Северный Вектор» обусловлен спецификой течения зависимостей, при которых ухудшение состояния может происходить внезапно. Наркологическая клиника в Ростове-на-Дону обеспечивает постоянную готовность медицинского персонала к приёму пациентов, что позволяет сократить время между возникновением симптомов и началом лечения. Такой подход снижает риск осложнений и повышает клиническую безопасность.
Детальнее – наркологическая клиника цены ростов-на-дону
Соблюдение конфиденциальности в клинике «Формула Трезвости» рассматривается как значимый клинический фактор. Наркологическая клиника в Краснодаре выстраивает лечебный процесс без избыточных формальностей, что снижает уровень тревожности и повышает готовность пациента к сотрудничеству с врачом. Практика показывает, что анонимный формат способствует более точному сбору анамнеза и повышает управляемость лечебного процесса.
Узнать больше – https://narkologicheskaya-clinica-v-krd19.ru/narkologa-na-dom-krasnodar/
С первого контакта координатор уточняет: длительность запоя, виды алкоголя, аллергии, список текущих лекарств, эпизоды судорог или психозов в анамнезе, сердечно-сосудистые жалобы. На основании ответов команда подбирает безопасную схему старта и резервный план на случай усиления симптомов. Врач привозит портативный монитор для контроля АД/ЧСС/SpO2, глюкометр, набор инфузионных линий и расходников, а также средства для экспресс-коррекции тревоги по показаниям.
Углубиться в тему – http://vyvod-iz-zapoya-pervouralsk0.ru
Good morning!
Enhance your gameplay with our comprehensive wow carry service for all types of content.
We actively engage with our community to improve our services based on user feedback.
The most complete information on the website – https://www.wow-power-leveling.org/Gameplay/wow-list-of-flying-mounts
gladiator boost wow, wow boost cheap, best boosting service wow
wow raid boost, cheap wow power leveling, wow gold price
Good luck and good gameplay!
Эта публикация завернет вас в вихрь увлекательного контента, сбрасывая стереотипы и открывая двери к новым идеям. Каждый абзац станет для вас открытием, полным ярких примеров и впечатляющих достижений. Подготовьтесь быть вовлеченными и удивленными каждый раз, когда продолжите читать.
Лучшее решение — прямо здесь – помощь нарколога на дому в москве
Предлагаем вашему вниманию интересную справочную статью, в которой собраны ключевые моменты и нюансы по актуальным вопросам. Эта информация будет полезна как для профессионалов, так и для тех, кто только начинает изучать тему. Узнайте ответы на важные вопросы и расширьте свои знания!
Погрузиться в научную дискуссию – вывод из запоя в клинике в санкт петербурге
Alright, It explained things better than most sites I’ve seen, and it actually felt useful. I’ll look into this again.
not gonna lie, this filled in some gaps for me. i’ll look into this again.
This is actually interesting, This appeared while I was scrolling through results, and I actually stayed longer than I thought I would. this solved something I was stuck on and it didn’t feel forced or overdone. I didn’t expect to stay this long.
Well, It connected a few things I didn’t fully understand before, which I really appreciate. I’ll keep this in mind.
Помощь на дому рассматривают при состояниях, которые сопровождаются выраженным ухудшением самочувствия после алкоголя. Обычно речь идет о нескольких днях запоя, тяжелом похмелье, бессоннице, тревоге, дрожи в руках, слабости, тошноте, сухости во рту, отсутствии аппетита и признаках обезвоживания. В таких случаях врачебный осмотр нужен для оценки тяжести состояния и выбора безопасной тактики.
Получить больше информации – нарколог на дом москва
This site was… how do I say it? relevant, It actually answered something I was confused about. this is worth saving.
Эта информационная заметка предлагает лаконичное и четкое освещение актуальных вопросов. Здесь вы найдете ключевые факты и основную информацию по теме, которые помогут вам сформировать собственное мнение и повысить уровень осведомленности.
Где можно узнать подробнее? – прокапаться на дому
Этот увлекательный информационный материал подарит вам массу новых знаний и ярких эмоций. Мы собрали для вас интересные факты и сведения, которые обогатят ваш опыт. Откройте для себя увлекательный мир информации и насладитесь процессом изучения!
Прочитать подробнее – нарколог на дом стоимость
В этом информативном обзоре собраны самые интересные статистические данные и факты, которые помогут лучше понять текущие тренды. Мы представим вам цифры и графики, которые иллюстрируют, как развиваются различные сферы жизни. Эта информация станет отличной основой для глубокого анализа и принятия обоснованных решений.
Перейти к статье – вызов нарколога на дом
Эта информационная статья охватывает широкий спектр актуальных тем и вопросов. Мы стремимся осветить ключевые факты и события с ясностью и простотой, чтобы каждый читатель мог извлечь из нее полезные знания и полезные инсайты.
Что скрывают от вас? – вывод из запоя спб стационар
Алкоголизм редко начинается как «большая проблема». Обычно всё выглядит как способ расслабиться, заснуть, снять тревогу или пережить стресс. Но постепенно организм привыкает, толерантность растёт, без алкоголя становится тяжело, а попытки «просто перестать» упираются в отмену: дрожь, потливость, тошнота, скачки давления, сердцебиение, раздражительность, панические реакции, бессонница. На этом фоне человек возвращается к выпивке не ради удовольствия, а ради прекращения мучительных симптомов. Именно так формируется замкнутый круг, в котором зависимость поддерживается страхом отмены и привычкой снимать дискомфорт быстрым способом.
Ознакомиться с деталями – http://lechenie-alkogolizma-sergiev-posad12.ru
References:
Roulette online
References:
mauicountyvirtualjobfair.com
Эта познавательная публикация погружает вас в море интересного контента, который быстро захватит ваше внимание. Мы рассмотрим важные аспекты темы и предоставим вам уникальные Insights и полезные сведения для дальнейшего изучения.
Ознакомиться с деталями – выезд нарколога круглосуточно
Лечение алкоголизма в Сергиевом Посаде важно рассматривать не как разовую «чистку» или временный перерыв, а как последовательный маршрут. Самый уязвимый период — первые 24–72 часа после прекращения употребления: днём может стать легче, но к вечеру и ночью волной возвращаются тревога и бессонница, усиливается внутреннее напряжение, появляются телесные симптомы. В этот момент человек чаще всего срывается, потому что ему кажется, что «иначе не выдержу». Поэтому качественная помощь строится так, чтобы пациент прошёл вечер и ночь безопасно, с понятными ориентирами и медицинской поддержкой, а затем перешёл к восстановлению и профилактике рецидива.
Детальнее – https://lechenie-alkogolizma-sergiev-posad12.ru/
References:
Hardrock casino hollywood fl
References:
https://www.tokai-job.com
References:
Wildwood casino
References:
https://git.lucas-michel.fr/
Лечение алкоголизма в Сергиевом Посаде важно рассматривать не как разовую «чистку» или временный перерыв, а как последовательный маршрут. Самый уязвимый период — первые 24–72 часа после прекращения употребления: днём может стать легче, но к вечеру и ночью волной возвращаются тревога и бессонница, усиливается внутреннее напряжение, появляются телесные симптомы. В этот момент человек чаще всего срывается, потому что ему кажется, что «иначе не выдержу». Поэтому качественная помощь строится так, чтобы пациент прошёл вечер и ночь безопасно, с понятными ориентирами и медицинской поддержкой, а затем перешёл к восстановлению и профилактике рецидива.
Ознакомиться с деталями – лечение алкоголизма
Публикация посвящена жизненным историям людей, успешно справившихся с зависимостью. Мы покажем, что выход есть, и он начинается с первого шага — принятия проблемы и желания измениться.
Что ещё нужно знать? – вывод из запоя частный врач
References:
Mill bay casino
References:
http://www.abgodnessmoto.co.uk
В этой статье мы подробно рассматриваем проверенные методы борьбы с зависимостями, включая психотерапию, медикаментозное лечение и поддержку со стороны общества. Мы акцентируем внимание на важности комплексного подхода и возможности успешного восстановления для людей, столкнувшихся с этой проблемой.
Детали по клику – вывести из запоя недорого на дому
Эта публикация раскрывает психологические механизмы зависимости и их роль в развитии расстройств. Читатель узнает о том, как психология влияет на формирование зависимостей и как профессиональная помощь может изменить ситуацию.
Подробнее можно узнать тут – вывод из запоя самара недорого
В этой статье собраны факты, которые освещают целый ряд важных вопросов. Мы стремимся предложить читателям четкую, достоверную информацию, которая поможет сформировать собственное мнение и лучше понять сложные аспекты рассматриваемой темы.
Изучите внимательнее – служба вывода из запоя
Ayr?ca, eger kilo kayb? neden olur konusuyla ilgileniyorsan?z, suraya bak?n. Iste link: https://atletikgiyim.com/articles/ani-kilo-kaybi-nedenleri-ve-yonetimi/
Этот текст призван помочь читателю расширить кругозор и получить практические знания. Мы используем простой язык, наглядные примеры и структурированное изложение, чтобы сделать обучение максимально эффективным и увлекательным.
Детальнее – капельница от алкоголя цена самара
В клинике «Вектор Восстановления» логика маршрута строится по этапам. Первый этап — оценка состояния и рисков: длительность употребления, тяжесть отмены, давление, пульс, обезвоживание, хронические заболевания, прошлые осложнения, препараты, которые пациент уже принимал дома. Второй этап — стабилизация: снижение интоксикации, коррекция состояния, восстановление сна, уменьшение тревоги. Третий этап — сопровождение первых суток и переход к восстановлению: план на 24–72 часа, контроль динамики и профилактика «вечернего отката». Четвёртый этап — работа с зависимостью как с привычкой и системой поведения: триггеры, стресс, режим, поддержка семьи, навыки отказа, профилактика рецидива.
Выяснить больше – https://lechenie-alkogolizma-sergiev-posad12.ru/lechenie-alkogolizma-platno-v-sergievom-posade
В клинике «Вектор Восстановления» логика маршрута строится по этапам. Первый этап — оценка состояния и рисков: длительность употребления, тяжесть отмены, давление, пульс, обезвоживание, хронические заболевания, прошлые осложнения, препараты, которые пациент уже принимал дома. Второй этап — стабилизация: снижение интоксикации, коррекция состояния, восстановление сна, уменьшение тревоги. Третий этап — сопровождение первых суток и переход к восстановлению: план на 24–72 часа, контроль динамики и профилактика «вечернего отката». Четвёртый этап — работа с зависимостью как с привычкой и системой поведения: триггеры, стресс, режим, поддержка семьи, навыки отказа, профилактика рецидива.
Получить дополнительные сведения – bolezn-alkogolizm-lechenie
В клинике «Вектор Восстановления» логика маршрута строится по этапам. Первый этап — оценка состояния и рисков: длительность употребления, тяжесть отмены, давление, пульс, обезвоживание, хронические заболевания, прошлые осложнения, препараты, которые пациент уже принимал дома. Второй этап — стабилизация: снижение интоксикации, коррекция состояния, восстановление сна, уменьшение тревоги. Третий этап — сопровождение первых суток и переход к восстановлению: план на 24–72 часа, контроль динамики и профилактика «вечернего отката». Четвёртый этап — работа с зависимостью как с привычкой и системой поведения: триггеры, стресс, режим, поддержка семьи, навыки отказа, профилактика рецидива.
Ознакомиться с деталями – http://lechenie-alkogolizma-sergiev-posad12.ru
Этот медицинский обзор сосредоточен на последних достижениях, которые оказывают влияние на пациентов и медицинскую практику. Мы разбираем инновационные методы лечения и исследований, акцентируя внимание на их значимости для общественного здоровья. Читатели узнают о свежих данных и их возможном применении.
Подробнее – круглосуточный вывод из запоя
References:
Fairmont charlevoix
References:
55x.top
В клинике «Вектор Восстановления» логика маршрута строится по этапам. Первый этап — оценка состояния и рисков: длительность употребления, тяжесть отмены, давление, пульс, обезвоживание, хронические заболевания, прошлые осложнения, препараты, которые пациент уже принимал дома. Второй этап — стабилизация: снижение интоксикации, коррекция состояния, восстановление сна, уменьшение тревоги. Третий этап — сопровождение первых суток и переход к восстановлению: план на 24–72 часа, контроль динамики и профилактика «вечернего отката». Четвёртый этап — работа с зависимостью как с привычкой и системой поведения: триггеры, стресс, режим, поддержка семьи, навыки отказа, профилактика рецидива.
Выяснить больше – https://lechenie-alkogolizma-sergiev-posad12.ru/centr-lecheniya-alkogolizma-v-sergievom-posade
Стационар выбирают, когда нужно наблюдать состояние круглосуточно или есть вероятность резкого ухудшения. Это может быть длительный запой, выраженная абстиненция, нестабильное давление, подозрение на осложнения со стороны сердца и сосудов, история судорог, спутанность сознания, психотические симптомы. Преимущество стационара — контроль динамики и возможность быстро менять терапию, если план «не заходит». Кроме того, в стационаре проще выстроить полноценный переход к лечению зависимости: не просто снять острые проявления, а сразу подключить психологическое сопровождение и подготовить пациента к следующему этапу.
Получить дополнительную информацию – chastnaya-narkologicheskaya-klinika-moskva
Этот увлекательный информационный материал подарит вам массу новых знаний и ярких эмоций. Мы собрали для вас интересные факты и сведения, которые обогатят ваш опыт. Откройте для себя увлекательный мир информации и насладитесь процессом изучения!
Прочесть заключение эксперта – капельница от запоя стоимость
Этот информативный текст отличается привлекательным содержанием и актуальными данными. Мы предлагаем читателям взглянуть на привычные вещи под новым углом, предоставляя интересный и доступный материал. Получите удовольствие от чтения и расширьте кругозор!
Узнать больше – выведение из запоя цена
В этом информативном обзоре собраны самые интересные статистические данные и факты, которые помогут лучше понять текущие тренды. Мы представим вам цифры и графики, которые иллюстрируют, как развиваются различные сферы жизни. Эта информация станет отличной основой для глубокого анализа и принятия обоснованных решений.
Кликни и узнай всё! – выезд нарколога круглосуточно
Лечение алкоголизма в Сергиевом Посаде важно рассматривать не как разовую «чистку» или временный перерыв, а как последовательный маршрут. Самый уязвимый период — первые 24–72 часа после прекращения употребления: днём может стать легче, но к вечеру и ночью волной возвращаются тревога и бессонница, усиливается внутреннее напряжение, появляются телесные симптомы. В этот момент человек чаще всего срывается, потому что ему кажется, что «иначе не выдержу». Поэтому качественная помощь строится так, чтобы пациент прошёл вечер и ночь безопасно, с понятными ориентирами и медицинской поддержкой, а затем перешёл к восстановлению и профилактике рецидива.
Подробнее можно узнать тут – http://lechenie-alkogolizma-sergiev-posad12.ru/
Читатели получат представление о том, как современные технологии влияют на развитие медицины. Обсуждаются новые методы лечения, персонализированный подход и роль цифровых решений в повышении качества медицинских услуг.
Где почитать поподробнее? – прокапаться от алкоголя на дому самара
Далее выполняется медицинская детоксикация: корректируется водно-электролитный баланс, снимается интоксикация, поддерживается работа сердечно-сосудистой системы, снижается тремор, стабилизируется сон и тревожность. Важно, что схема подбирается индивидуально: при разных рисках объём поддержки будет различаться. В ряде случаев достаточно амбулаторного наблюдения и рекомендаций, в других — нужен стационар, чтобы контролировать динамику и вовремя корректировать терапию.
Подробнее – http://vyvod-iz-zapoya-moskva1-12.ru/vyvod-iz-zapoya-v-moskve-na-domu/
В этой статье представлен занимательный и актуальный контент, который заставит вас задуматься. Мы обсуждаем насущные вопросы и проблемы, а также освещаем истории, которые вдохновляют на действия и изменения. Узнайте, что стоит за событиями нашего времени!
Где можно узнать подробнее? – выведение +из запоя +в стационаре
В данной статье мы поговорим о будущем медицины, акцентируя внимание на прорывных разработках и их потенциале. Читатель узнает о новых подходах к лечению, роли искусственного интеллекта и возможностях персонализированной медицины.
Расширить кругозор по теме – капельница от запоя недорого
Наша клиника предлагает полный цикл услуг — от экстренного вызова нарколога до долгосрочной реабилитации. Каждый этап разрабатывается индивидуально с учётом возраста, стажа зависимости и сопутствующих заболеваний. Современные протоколы 2026 года позволяют проводить лечение максимально комфортно и эффективно, минимизируя болезненные симптомы и снижая риск срывов. В этом виде деятельности мы используем только проверенные методы медицины.
Изучить вопрос глубже – нарколог на дом вывод в екатеринбурге
Брали металлочерепицу для коттеджа. Менеджер помог подобрать синий RAL 5005 — смотрится оригинально. Монтажники работали аккуратно, мусор убрали за собой. Прошла зима — никаких нареканий. металлочерепица 0.5 мм Красноярск
Если у человека повторяются срывы, ухудшается сон, появляется потребность выпить перед важными делами или чтобы просто «почувствовать себя нормально», это уже не вопрос силы воли. Это сигнал, что нервная система и организм перестроились под алкоголь, и нужен медицинский подход: оценка рисков, безопасная стабилизация и программа восстановления.
Подробнее тут – https://lechenie-alkogolizma-sergiev-posad12.ru/lechenie-alkogolizma-stacionar-v-sergievom-posade/
В этом обзорном материале представлены увлекательные детали, которые находят отражение в различных аспектах жизни. Мы исследуем непонятные и интересные моменты, позволяя читателю увидеть картину целиком. Погрузитесь в мир знаний и удивительных открытий!
Выяснить больше – вызов нарколога на дом в москве
Эта статья сочетает познавательный и занимательный контент, что делает ее идеальной для любителей глубоких исследований. Мы рассмотрим увлекательные аспекты различных тем и предоставим вам новые знания, которые могут оказаться полезными в будущем.
Смотрите также – вызвать врача нарколога на дом москва недорого
Публикация знакомит читателей с различными подходами к реабилитации. От традиционных методов до современных программ — вы узнаете, как выбрать оптимальный путь к выздоровлению и преодолеть препятствия на этом пути.
Смотрите также… – капельница от запоя на дому круглосуточно
В Санкт-Петербурге вывод из запоя на дому рассматривается, когда состояние пациента позволяет проводить лечение вне стационара, но требует контроля специалиста. Врач оценивает общее состояние, длительность запоя и выраженность симптомов, после чего принимает решение о формате помощи при алкоголизме. Важно, что лечение начинается сразу после осмотра, без необходимости ожидания госпитализации. При необходимости можно заказать услуги на сайте клиники или получить консультацию специалистов.
Узнать больше – вывод из запоя на дому круглосуточно
Мы собрали для вас самые захватывающие факты из мира науки и истории. От малознакомых деталей до грандиозных событий — эта статья расширит ваш кругозор и подарит новое понимание того, как устроен наш мир.
Узнать напрямую – нарколог на дом вывод из запоя на дому
Маркировка товаров в 1С — настроили работу с Честным знаком. Сканируем коды, они привязываются к позициям. На проверках никаких вопросов от надзорных органов не возникало. автоматизация учёта предприятий Белгород
Чаще всего нарколога на дом вызывают при повторяющемся или длительном запое, тяжелом похмелье, бессоннице после алкоголя, треморе, выраженной слабости и ухудшении общего самочувствия. Поводом для обращения также становятся тревога, раздражительность, скачки артериального давления, учащенный пульс, обезвоживание и необходимость поставить капельницу дома под наблюдением специалиста. Во многих случаях звонок в наркологический центр поступает тогда, когда родственники понимают, что состояние больного уже не позволяет ждать следующего дня.
Подробнее тут – нарколог на дом в екатеринбурге
Эта статья погружает вас в увлекательный мир знаний, где каждый факт становится открытием. Мы расскажем о ключевых исторических поворотных моментах и научных прорывах, которые изменили ход цивилизации. Поймите, как прошлое формирует настоящее и как его уроки могут помочь нам строить будущее.
Получить дополнительную информацию – вывод из запоя на дому цена
Затяжной запой перестает быть бытовой проблемой в тот момент, когда организм теряет способность самостоятельно восстанавливаться после интоксикации. Накопление ацетальдегида, нарушение водно-электролитного баланса, истощение запасов витаминов и перегрузка сердечно-сосудистой системы создают состояние, при котором домашние методы перестают быть безопасными. Срочно стабилизировать самочувствие и быстро купировать абстинентный синдром позволяет только контролируемая медицинская среда. Вывод из запоя в стационаре в Нижнем Новгороде становится клинически обоснованным решением, когда требуется не просто снятие симптомов, а комплексная детоксикация под круглосуточным наблюдением врачей. Наркологическая клиника «Стармед» организует процесс лечения в соответствии с актуальными стандартами доказательной медицины, обеспечивая безопасность пациента, прозрачность процедур и плавный переход к противорецидивной терапии. Мы понимаем, что решение о госпитализации часто принимается в состоянии стресса, поэтому наша работа начинается с четкой диагностики, честного объяснения плана лечения и соблюдения строгих протоколов конфиденциальности. Опытные специалисты клиники помогут вызвать доверие к процессу восстановления уже на этапе первого контакта.
Получить дополнительные сведения – вывод из запоя в стационаре
За выездом врача обращаются в тех случаях, когда человеку тяжело добраться до клиники, он ослаблен после нескольких дней употребления спиртного или родственникам важно быстрее получить медицинскую консультацию на месте. После осмотра определяют, допустим ли домашний формат, требуется ли капельница, достаточно ли наблюдения на дому или нужен другой объем помощи. Если эпизоды повторяются, в дальнейшем могут обсуждаться лечение алкоголизма, кодирование, участие психолога, реабилитация и более широкая программа помощи при зависимости. Уже на этапе первичного обращения нередко уточняют, как вызвать специалиста, какие услуги доступны на дому и в каких случаях вывод из запоя рассматривают не дома, а в стационаре.
Ознакомиться с деталями – вызов нарколога на дом
Наиболее частыми причинами обращения становятся запой, тяжелый похмельный синдром, тремор, выраженная слабость, тревога, бессонница, нестабильное давление, учащенный пульс, тошнота и признаки обезвоживания. Эти проявления могут сочетаться между собой и усиливаться после прекращения употребления алкоголя, особенно если эпизод длился несколько дней.
Изучить вопрос глубже – врач нарколог на дом
Публикация охватывает основные направления развития современной медицины. Мы обсудим значимость научных исследований, инноваций в лечении и роли общественного участия в формировании системы здравоохранения.
Подробная информация доступна по запросу – прокапаться от алкоголя цены
Нарколог на дом в Москве — это формат медицинской помощи, который рассматривают при состояниях после употребления алкоголя, когда больному требуется осмотр врача без поездки в клинику. Чаще всего обращение связано с запоем, выраженным похмельным синдромом, бессонницей, тревогой, слабостью, тремором, обезвоживанием, скачками давления, сердцебиением и общим ухудшением самочувствия. Дальнейшая тактика зависит от состояния больного на момент осмотра, продолжительности употребления алкоголя и сопутствующих заболеваний.
Выяснить больше – вызов нарколога на дом
Обзор посвящён процессу восстановления после зависимостей. Мы расскажем о различных этапах реабилитации, поддерживающих ресурсах и важности мотивации в достижении устойчивого выздоровления.
Только для своих – капельница на дому цена
Осмотр на дому особенно важен в тех случаях, когда больному трудно вставать, пить воду, принимать пищу, спокойно лежать или ориентироваться в собственном состоянии. Чем тяжелее переносится выход из употребления, тем выше значение очной оценки, потому что по телефону невозможно полноценно определить границы безопасной помощи. При выраженных симптомах может потребоваться срочный выезд, чтобы вовремя оценить риски и определить, допустим ли вывод из запоя дома или необходимо наблюдение в стационаре.
Изучить вопрос глубже – запой нарколог на дом в москве
Такие состояния требуют профессионального вмешательства, так как без лечения могут усиливаться и приводить к ухудшению самочувствия. При этом помощь может предоставляться анонимно, в соответствии с политикой конфиденциальности данных пациента.
Разобраться лучше – vyvod-iz-zapoya-na-domu-sankt-peterburg-12.ru/
В данной статье мы акцентируем внимание на важности поддержки в процессе выздоровления. Мы обсудим, как друзья, семья и профессионалы могут помочь тем, кто сталкивается с зависимостями. Читатели получат практические советы, как поддерживать близких на пути к новой жизни.
Получить профессиональную консультацию – анонимный вызов врача нарколога на дом
Этот текст посвящён сложным аспектам зависимости и её влиянию на жизнь человека. Мы обсудим психологические, физические и социальные последствия зависимого поведения, а также важность своевременного обращения за помощью.
Доступ к полной версии – нарколог на дом круглосуточно екатеринбург
Вывод из запоя на дому с медицинским контролем — это процесс, при котором нарколог или медсестра приезжает к пациенту на дом для проведения необходимых процедур. Основной задачей является снятие абстинентного синдрома, восстановление водно-электролитного баланса и нормализация общего состояния пациента, при этом оказывается наркологическая помощь. Этот процесс проходит под наблюдением квалифицированных специалистов, что помогает избежать осложнений, часто возникающих при самостоятельном выходе из запоя, а в дальнейшем может потребоваться кодирование и реабилитация.
Подробнее – вывод из запоя на дому круглосуточно
В Воронеже медицинская помощь при похмелье необходима, когда симптомы выражены и не проходят самостоятельно, особенно после запоя или в запое. Врач проводит консультацию, оценивает общее состояние пациента и принимает решение о проведении инфузионной терапии. Такой подход позволяет избежать осложнений и ускорить восстановление при алкоголизме и других формах зависимости. При необходимости можно оставить заявку, уточнить цены или получить помощь бесплатно на первичном этапе.
Изучить вопрос глубже – капельница от похмелья вызов на дом в воронеже
Процедура вывода из запоя на дому включает несколько этапов, каждый из которых имеет важное значение для общего улучшения состояния пациента. Главная цель — это не только устранение симптомов абстиненции, но и восстановление нормальной работы органов и систем организма. Врач, который проводит процедуру, использует медикаментозные средства для восстановления водно-солевого баланса, нормализации работы печени, почек и других органов, пострадавших от алкоголя. Также в процесс включаются препараты, которые способствуют снятию нервного напряжения и психоэмоционального стресса.
Получить дополнительные сведения – нарколог на дом вывод из запоя в екатеринбурге
Похмельный синдром сопровождается головной болью, слабостью, нарушением сна, сухостью во рту и нестабильностью давления, что часто наблюдается после запоя или при алкоголизме. Эти симптомы связаны с накоплением токсинов и нарушением водно-солевого баланса. Капельница позволяет ускорить выведение вредных веществ и восстановить нормальное функционирование организма, помогая человеку быстрее выйти из состояния запоев.
Выяснить больше – капельница от похмелья на дом
Чаще всего домашний формат применяется при следующих состояниях:
Углубиться в тему – вывод из запоя на дому цена санкт-петербург
“dogalgazl? evde rutubet neden olur” konusu icin mukemmel bir kaynak var. Suradan okuyabilirsiniz: https://yapevleri.com/articles/evdeki-rutubet-nedenleri-cozumleri/
Помощь на дому рассматривают при состояниях, которые сопровождаются заметным ухудшением самочувствия после алкоголя. Это может быть запой на протяжении нескольких дней, тяжелое похмелье, дрожь в руках, нарушение сна, выраженная слабость, тревога, тошнота, сухость во рту, снижение аппетита и признаки обезвоживания. В таких случаях осмотр врача нужен для того, чтобы оценить тяжесть состояния и понять, безопасно ли оставаться дома.
Узнать больше – нарколог на дом в москве
В этом информативном обзоре собраны самые интересные статистические данные и факты, которые помогут лучше понять текущие тренды. Мы представим вам цифры и графики, которые иллюстрируют, как развиваются различные сферы жизни. Эта информация станет отличной основой для глубокого анализа и принятия обоснованных решений.
Получить дополнительные сведения – капельница от алкоголя цена
Выбор между домашней помощью и стационарным лечением определяется не удобством, а медицинской целесообразностью. В условиях клиники исключаются внешние триггеры, обеспечивается изоляция от источников алкоголя и создается контролируемая среда, где терапевтические решения принимаются на основе объективных показателей. Такой подход критически важен для предотвращения осложнений, минимизации дискомфорта абстиненции и формирования устойчивой базы для дальнейшей противорецидивной работы.
Исследовать вопрос подробнее – вывод из запоя в стационаре анонимно в санкт-петербурге
Процедура начинается с осмотра пациента. Врач оценивает основные показатели, включая давление и пульс, а также выраженность симптомов. После этого формируется состав капельницы и определяется тактика лечения, что позволяет эффективно провести вывод из запоя.
Получить дополнительные сведения – капельница от похмелья цена
Стационар выбирают, когда нужно наблюдать состояние круглосуточно или есть вероятность резкого ухудшения. Это может быть длительный запой, выраженная абстиненция, нестабильное давление, подозрение на осложнения со стороны сердца и сосудов, история судорог, спутанность сознания, психотические симптомы. Преимущество стационара — контроль динамики и возможность быстро менять терапию, если план «не заходит». Кроме того, в стационаре проще выстроить полноценный переход к лечению зависимости: не просто снять острые проявления, а сразу подключить психологическое сопровождение и подготовить пациента к следующему этапу.
Ознакомиться с деталями – лучшая наркологическая клиника в москве отзывы
Осмотр на дому особенно важен в тех случаях, когда больному трудно вставать, пить воду, принимать пищу, спокойно лежать или ориентироваться в собственном состоянии. Чем тяжелее переносится выход из употребления, тем выше значение очной оценки, потому что по телефону невозможно полноценно определить границы безопасной помощи. При выраженных симптомах может потребоваться срочный выезд, чтобы вовремя оценить риски и определить, допустим ли вывод из запоя дома или необходимо наблюдение в стационаре.
Углубиться в тему – нарколог на дом москва
Непрерывный мониторинг витальных показателей позволяет фиксировать малейшие изменения в состоянии пациента и своевременно вносить коррективы в терапевтический план. В палатах клиники «Элегия Мед» установлены системы отслеживания частоты пульса, сатурации, температуры и артериального давления, данные с которых автоматически передаются в медицинскую карту. Медсестры и дежурные врачи проверяют состояние пациента по графику, проводят симптоматическую терапию, контролируют прием препаратов и обеспечивают комфортные условия для восстановления. Такая организация процесса исключает хаотичное назначение средств, предотвращает полипрагмазию и гарантирует, что каждый этап детоксикации проходит под строгим клиническим контролем. При необходимости применяются дополнительные методы очищения крови, включая плазмаферез, который эффективно помогает вывести стойкие токсины и метаболиты, не удаляемые стандартной инфузионной терапией.
Получить дополнительные сведения – вывод из запоя в стационаре клиника
За выездом врача чаще обращаются тогда, когда человеку тяжело добраться до клиники, он ослаблен после нескольких дней употребления алкоголя или родственникам важно быстрее понять, какая тактика будет безопасной. После осмотра можно определить, нужна ли капельница, достаточно ли детоксикации на дому, требуется ли повторное наблюдение, а в дальнейшем — консультация по лечению алкоголизма, кодирование или реабилитация. В части случаев уже первый звонок позволяет понять, идет ли речь только о временном ухудшении самочувствия или о состоянии, при котором может потребоваться вывод из запоя в стационаре.
Ознакомиться с деталями – http://www.domen.ru
Вывод из запоя на дому в Екатеринбурге: срочное восстановление, детоксикация и медицинская помощь в наркологической клинике «Детокс»
Углубиться в тему – нарколог на дом вывод из запоя екатеринбург
Эта статья сочетает познавательный и занимательный контент, что делает ее идеальной для любителей глубоких исследований. Мы рассмотрим увлекательные аспекты различных тем и предоставим вам новые знания, которые могут оказаться полезными в будущем.
Желаете узнать подробности? – капельница от алкоголя на дому цена
Помощь на дому рассматривают при состояниях, которые сопровождаются заметным ухудшением самочувствия после алкоголя. Это может быть запой на протяжении нескольких дней, тяжелое похмелье, дрожь в руках, нарушение сна, выраженная слабость, тревога, тошнота, сухость во рту, снижение аппетита и признаки обезвоживания. В таких случаях осмотр врача нужен для того, чтобы оценить тяжесть состояния и понять, безопасно ли оставаться дома.
Ознакомиться с деталями – нарколог на дом москва
Если дома действительно шумно (ремонт, маленькие дети, вечерние гости) или состояние нестабильно, предложим короткое наблюдение в клинике: отдельный вход, «тихий коридор», камерные посты, затем — возвращение домой и продолжение амбулаторного маршрута. Важен не формат, а предсказуемый результат: степень облегчения должна соответствовать целям этапа, а не множеству случайных факторов среды.
Изучить вопрос глубже – вывод из запоя в нижнем тагиле
Продолжительное употребление алкоголя неизбежно переводит организм в состояние хронической интоксикации, при котором собственные компенсаторные механизмы перестают справиться с нарастающей токсической нагрузкой. Накапливающиеся продукты метаболизма этанола, дефицит электролитов, нарушение работы ферментных систем и дисфункция центральной нервной системы формируют клиническую картину, требующую не симптоматического облегчения, а комплексного медицинского вмешательства. Вывод из запоя в стационаре в Нижнем Новгороде в наркологической клинике «Стармед» организован с соблюдением современных протоколов доказательной медицины, где безопасность пациента, непрерывный мониторинг и персонализированный подбор терапии являются абсолютным приоритетом. Мы понимаем, что кризисные состояния не терпят отлагательств, поэтому наши квалифицированные специалисты готовы быстро оценить клиническую ситуацию, организовать безопасную транспортировку и запустить детоксикационный протокол без задержек. Все манипуляции проводятся в лицензированных условиях, с непрерывным отслеживанием витальных показателей и строгим соблюдением врачебной этики. Первичная оценка состояния начинается с дистанционной консультации, что позволяет врачам заранее подготовить необходимое оборудование, скорректировать план госпитализации и минимизировать время между обращением и началом терапии. Такой подход исключает хаотичные решения и фокусирует внимание на реальных медицинских проблемах, требующих системного решения.
Детальнее – стационар вывод из запоя нижний новгород
So, I came here from another page and stayed, even though I almost skipped it. it helped me see things differently and it wasn’t overwhelming.
Honestly, It made things less confusing. I’ll probably return here.
Выбор формата — ключевой момент. Нельзя ориентироваться только на удобство, потому что в ряде случаев «домашний» вариант создаёт иллюзию безопасности, когда на самом деле нужен контроль. В клинике «Свет Баланса» формат подбирается по состоянию: оценивают симптомы, риски осложнений, способность пациента соблюдать назначения и необходимость наблюдения.
Подробнее можно узнать тут – лучшая наркологическая клиника москва
В этой статье мы обсудим процесс восстановления после зависимостей, акцентируя внимание на различных методах и подходах к реабилитации. Читатели узнают, как создать план выздоровления и использовать полезные ресурсы для достижения устойчивых изменений.
Ознакомиться с полной информацией – врача капельницу от запоя
Выезд врача — это не «процедура без вопросов», а клиническое решение. На месте оценивают давление, пульс, дыхание, степень обезвоживания, уровень сознания, выраженность тревоги, наличие боли, судорожных проявлений, неврологические симптомы. После этого подбирают схему поддержки, объясняют ограничения и ожидаемую динамику: что должно улучшаться в первые часы, какие симптомы допустимы, а какие требуют немедленного обращения. Важная часть — рекомендации на ближайшие сутки: режим питья и питания, сон, контроль давления, что категорически нельзя смешивать и почему. Такой подход снижает риск осложнений и помогает не «сорваться» в самостоятельные эксперименты.
Узнать больше – https://narkologicheskaya-klinika-moskva12.ru/chastnaya-narkologicheskaya-klinika-v-moskve
После первичного улучшения работа не заканчивается. Врач формирует план восстановления: режим воды и питания, ориентиры по самочувствию, критерии «нормальной» динамики, признаки, при которых нужно повторно оценить состояние, и шаги по профилактике рецидива. Такой подход снижает вероятность повторного витка: человек понимает, что слабость и эмоциональная нестабильность в первые дни возможны, не пугается «волны» вечером и не пытается гасить её алкоголем.
Получить больше информации – http://narkologicheskaya-klinika-sergiev-posad12.ru
Вывод из запоя в стационаре в Санкт-Петербурге: круглосуточная помощь, лечение запоя и восстановление организма в наркологической клинике «Элегия Мед».
Узнать больше – вывод из запоя в стационаре в санкт-петербурге
Эта статья освещает различные аспекты освобождения от зависимости и пути к выздоровлению. Мы обсуждаем важность осознания своей проблемы и обращения за помощью. Читатели получат практические советы о том, как преодолевать трудности и строить новую жизнь без зависимости.
Дополнительно читайте здесь – капельница против похмелья
Главная проблема запоя не только в самом алкоголе, но и в последствиях для организма. За несколько дней нарушается водно-электролитный баланс, страдают сердце и сосуды, печень работает с перегрузкой, нервная система становится сверхчувствительной. На этом фоне резкая отмена алкоголя может привести к ухудшению: усиление тремора, скачки давления, выраженная тревога, бессонница, галлюцинации, судорожные реакции. Поэтому медицинский вывод из запоя — это не «разовая капельница», а комплексная стабилизация с учётом рисков. Врач оценивает состояние, собирает информацию о длительности употребления, сопутствующих заболеваниях и лекарствах, которые пациент уже принимал, и только потом выбирает тактику.
Подробнее тут – vyvod-iz-zapoya-moskovskij-rajon
Разовая стабилизация снимает страдание, но не убирает причину употребления. Частая ошибка — воспринимать детокс как «финал». На практике зависимость поддерживается привычными сценариями: стресс, бессонница, конфликт, усталость, «пустота» после отмены, тяга как способ быстро переключить эмоции. Поэтому после острого этапа важно перейти к диагностике зависимости, работе с триггерами и профилактике рецидивов. Это особенно актуально для тех, у кого уже были срывы после коротких периодов трезвости или кто видит повторяющийся цикл: напряжение — употребление — ухудшение — временная ремиссия — повтор.
Ознакомиться с деталями – http://narkologicheskaya-klinika-moskva12.ru
В статье по вопросам здоровья мы рассматриваем актуальные проблемы, с которыми сталкивается общество. Обсуждаются заболевания, факторы риска и важные аспекты профилактики. Читатели получат полезные советы о том, как сохранить здоровье и улучшить качество жизни.
Тыкай сюда — узнаешь много интересного – нарколог круглосуточно
Между прочим, если вас интересует Футбольные гимны и фанатская культура на стадионах, загляните сюда.
Вот, делюсь ссылкой:
https://fan-liverpool.ru
В статье представлены ключевые моменты по актуальной теме, дополненные советами экспертов и ссылками на дополнительные ресурсы. Цель материала — дать читателю инструменты для самостоятельного развития и принятия осознанных решений.
Что скрывают от вас? – вызов на дом капельницы от запоя
Публикация знакомит читателей с различными подходами к реабилитации. От традиционных методов до современных программ — вы узнаете, как выбрать оптимальный путь к выздоровлению и преодолеть препятствия на этом пути.
Слушай внимательно — тут важно – нарколог на дом в екатеринбурге
Качественная наркологическая помощь строится от безопасности к устойчивости. Сначала врач оценивает состояние: длительность употребления, выраженность интоксикации и отмены, давление и пульс, признаки обезвоживания, характер сна, уровень тревоги, наличие хронических заболеваний и препаратов, которые уже принимались дома. Затем выбирается формат лечения — стационарный, амбулаторный или выездной — исходя из рисков, а не из удобства. Это принципиально: при нестабильных показателях и высокой вероятности осложнений требуется более высокий уровень контроля.
Узнать больше – вывод наркологическая клиника
В статье представлены ключевые моменты по актуальной теме, дополненные советами экспертов и ссылками на дополнительные ресурсы. Цель материала — дать читателю инструменты для самостоятельного развития и принятия осознанных решений.
Лови подробности – вызов на дом капельницы от запоя
Нарколог на дом в Москве: круглосуточный выезд, детоксикация и лечение зависимостей в наркологической клинике «Клиника доктора Калюжной».
Исследовать вопрос подробнее – нарколог на дом в москве
Зависимость редко начинается как «сразу серьёзная проблема». Сначала алкоголь или вещества используются как способ снять напряжение, заглушить тревогу или уснуть. Потом это постепенно превращается в устойчивый механизм: трезвость даётся тяжело, сон ломается, появляется внутренняя дрожь, раздражительность, скачки давления, тревога, а утро всё чаще начинается с мысли «нужно поправиться, иначе не выдержу». В Орехово-Зуево многие долго надеются справиться самостоятельно, потому что стыдно, нет времени или кажется, что «в этот раз точно получится». Но зависимость устроена так, что без грамотной помощи чаще всего возвращает человека в один и тот же круг: попытка прекратить — тяжёлая отмена — снова употребление — ухудшение здоровья и отношений.
Углубиться в тему – https://narkologicheskaya-klinika-orekhovo-zuevo2-12.ru/narkologicheskaya-klinika-sajt-v-orekhovo-zuevo/
Ребята, статья для тех, кто хочет не просто «выжить», а закрепиться на рынке. Автор объясняет, почему в условиях жёсткой конкуренции SEO становится не опцией, а необходимостью. Особенно ценно, что есть раздел про интеграцию SEO с другими каналами: контент-маркетинг, SMM, продажи. Комплексный подход — единственный путь к устойчивому успеху. Почитайте: https://olivadance.ru/2026/05/seo-kak-fundament-biznesa-pochemu-igra-v-dolguju-edinstvennaja-strategija-dlja-vyzhivanija/
Важно и то, что симптомы могут быть волнообразными. Сегодня стало легче — через несколько часов снова накрывает тревогой, потливостью, тахикардией или паникой. Медицинский подход учитывает эту динамику: назначается поддержка, формируется план контроля и объясняются признаки, при которых нужно срочно усиливать наблюдение. Это снижает вероятность осложнений и помогает избежать типичного сценария, когда человек, испугавшись ухудшения ночью, снова начинает пить «чтобы отпустило».
Подробнее можно узнать тут – moskva-vyvod-iz-zapoya-na-domu
Предлагаем вашему вниманию интересную справочную статью, в которой собраны ключевые моменты и нюансы по актуальным вопросам. Эта информация будет полезна как для профессионалов, так и для тех, кто только начинает изучать тему. Узнайте ответы на важные вопросы и расширьте свои знания!
Читать полностью – нарколог на дом екатеринбург
Домашний формат выбирают тогда, когда человеку тяжело добраться до медицинского учреждения, он ослаблен после нескольких дней употребления алкоголя или родственникам важно быстро получить врачебную оценку состояния. После осмотра определяют, допустима ли помощь на дому, требуется ли детоксикация, нужна ли капельница, достаточно ли домашнего наблюдения или следует сразу рассматривать другой объем помощи. Если эпизоды повторяются, обсуждение может выходить за рамки одного выезда и включать лечение алкоголизма, помощь при зависимости, кодирование, участие психолога и реабилитацию. Уже на этапе первичного обращения нередко уточняют, как вызвать врача, какие услуги доступны на дому и в каких условиях домашний формат остается безопасным.
Получить дополнительную информацию – нарколог на дом анонимно в москве
References:
Tuscany suites and casino
References:
giaovienvietnam.vn
References:
Blackjack for dummies
References:
unitedpool.org
Далее выполняется медицинская детоксикация: корректируется водно-электролитный баланс, снимается интоксикация, поддерживается работа сердечно-сосудистой системы, снижается тремор, стабилизируется сон и тревожность. Важно, что схема подбирается индивидуально: при разных рисках объём поддержки будет различаться. В ряде случаев достаточно амбулаторного наблюдения и рекомендаций, в других — нужен стационар, чтобы контролировать динамику и вовремя корректировать терапию.
Выяснить больше – http://vyvod-iz-zapoya-moskva1-12.ru/vyvod-iz-zapoya-v-moskve-na-domu/
Поводом для обращения обычно становятся слабость, тремор, тревога, бессонница, учащенный пульс, нестабильное давление, тошнота и ощущение физического истощения. Эти проявления часто усиливаются после прекращения употребления алкоголя или на фоне затянувшегося запоя.
Выяснить больше – http://narkolog-na-dom-moskva-17.ru/
В этой статье собраны факты, которые освещают целый ряд важных вопросов. Мы стремимся предложить читателям четкую, достоверную информацию, которая поможет сформировать собственное мнение и лучше понять сложные аспекты рассматриваемой темы.
Заходи — там интересно – найти нарколога на дом
Мы рассмотрим современные вызовы здравоохранения и пути их решения с помощью технологий и научных исследований. В статье собраны данные о новых лекарствах, методах диагностики и системном подходе к улучшению здоровья населения.
Получить больше информации – капельница на дому от запоя
В этой публикации мы исследуем ключевые аспекты здоровья, включая влияние образа жизни на благополучие. Читатели узнают о важности правильного питания, физической активности и психического здоровья. Мы предоставим практические советы и рекомендации для поддержания здоровья и развития профилактических подходов.
Уникальные данные только сегодня – нарколог на дом
В попытке «пережить» запой или отмену многие принимают снотворные или седативные средства, иногда на фоне алкоголя. Это меняет риски и может быть опасно для дыхания и сердечного ритма. Поэтому врачу важно знать, что уже было принято: тактика лечения и наблюдения зависит от деталей. Чем точнее исходная информация, тем безопаснее стабилизация и тем предсказуемее результат в первые часы и ночью.
Углубиться в тему – anonimnaya-narkologicheskaya-klinika
References:
Casino el camino
References:
http://www.advertiseajob.co.uk
References:
Sun cruz casino
References:
gratisafhalen.be
Этот обзор сосредоточен на различных подходах к избавлению от зависимости. Мы изучим традиционные и альтернативные методы, а также их сочетание для достижения максимальной эффективности. Читатели смогут открыть для себя новые стратегии и подходы, которые помогут в их борьбе с зависимостями.
Обратитесь за информацией – прокапаться от похмелья
Домашний выезд обычно выбирают тогда, когда человеку трудно добраться до медицинского учреждения, он ослаблен после нескольких дней употребления спиртного или родственникам важно быстро получить врачебную оценку состояния. После осмотра определяют, допустим ли домашний формат, нужна ли капельница, достаточно ли наблюдения на дому или следует рассматривать другой объем помощи. Уже на этапе первичного обращения нередко уточняют, как вызвать врача, какие наркологическая услуги доступны на дому, возможен ли срочный выезд круглосуточно и в каких случаях вывод из запоя безопаснее проводить не дома, а в стационаре.
Подробнее можно узнать тут – вызвать нарколога на дом москва
Самостоятельный выход часто строится на ошибочных решениях: «уменьшать дозу», смешивать алкоголь со снотворными, принимать седативные без понимания влияния на дыхание и сердце, использовать сомнительные «похмельные» наборы. Такие действия могут временно приглушить симптомы, но повышают риск ухудшения и делают состояние непредсказуемым. Ещё одна проблема — отсутствие контроля: человек не замечает, как давление уходит в опасные цифры, как развивается обезвоживание или как усиливаются неврологические симптомы. В клинике же у врача есть задача не просто «снять неприятное», а стабилизировать организм, защитить сердце и сосуды, восстановить сон и снизить тревогу так, чтобы дальнейшее восстановление стало реальным.
Подробнее – https://vyvod-iz-zapoya-moskva1-12.ru/srochnyj-vyvod-iz-zapoya-v-moskve
В этой информационной статье вы найдете интересное содержание, которое поможет вам расширить свои знания. Мы предлагаем увлекательный подход и уникальные взгляды на обсуждаемые темы, побуждая пользователей к активному мышлению и критическому анализу.
См. подробности – выезд нарколога на дом круглосуточно
Эта статья освещает различные аспекты освобождения от зависимости и пути к выздоровлению. Мы обсуждаем важность осознания своей проблемы и обращения за помощью. Читатели получат практические советы о том, как преодолевать трудности и строить новую жизнь без зависимости.
Прочесть заключение эксперта – капельница на дому екатеринбург
Нарколог на дом в Москве: выезд врача на дом, лечение запоя и консультации в наркологической клинике «Клиника доктора Калюжной».
Выяснить больше – врач нарколог на дом
References:
List of las vegas casinos
References:
https://10xhire.io
References:
Casino enghien
References:
behired.eu
Вывод из запоя на дому в Санкт-Петербурге с выездом нарколога, детоксикацией и восстановлением состояния в наркологической клинике «Частный медик 24»
Подробнее тут – вывод из запоя на дому цена в санкт-петербурге
Нарколог на дом в Екатеринбурге: выезд врача на дом, лечение запоя и консультации в наркологической клинике «НЕО+».
Изучить вопрос глубже – нарколог на дом екатеринбург
Решение о помещении пациента в стационар принимается на основе объективных медицинских критериев, а не только по желанию родственников. К показаниям относятся: запой длительностью более трех суток, выраженные симптомы абстиненции, наличие в анамнезе алкогольных делириев или судорожных эпизодов, сопутствующие хронические заболевания печени, поджелудочной железы, сердца или нервной системы. Отдельным фактором выступает полинаркомания или сочетание алкогольной зависимости с приемом психофармакологических препаратов без назначения врача. В таких ситуациях риск развития тяжелых осложнений возрастает многократно, и амбулаторный формат не обеспечивает необходимого уровня контроля. Госпитализация позволяет провести полноценную диагностику, включая ЭКГ, экспресс-анализы крови, оценку неврологического статуса и мониторинг сатурации, что формирует точную картину состояния и исключает назначение шаблонных схем.
Подробнее – стационар вывод из запоя
В этой статье представлен занимательный и актуальный контент, который заставит вас задуматься. Мы обсуждаем насущные вопросы и проблемы, а также освещаем истории, которые вдохновляют на действия и изменения. Узнайте, что стоит за событиями нашего времени!
Желаете узнать подробности? – вызов врача нарколога на дом
В этой статье мы рассматриваем разрушительное влияние зависимости на жизнь человека. Обсуждаются аспекты, такие как здоровье, отношения и профессиональные достижения. Читатели узнают о необходимости обращения за помощью и о путях к восстановлению.
Полезно знать – вызвать капельницу от запоя на дому
Эти преимущества делают вывод из запоя на дому с медицинским контролем оптимальным решением для тех, кто хочет быстро и безопасно вернуться к нормальной жизни без необходимости посещать клинику.
Углубиться в тему – вывод из запоя на дому круглосуточно в екатеринбурге
Отдельного внимания требуют случаи, когда больной почти не ест, плохо пьет воду, не может спокойно лежать, жалуется на сильное сердцебиение, нехватку сна или выраженное внутреннее напряжение. В такой ситуации осмотр помогает определить, безопасно ли оставаться дома и какого объема помощи достаточно на текущем этапе. Если речь идет о выраженных проявлениях абстинентного синдрома, затягивать с обращением нецелесообразно.
Подробнее тут – http://www.domen.ru
Алкогольная интоксикация сопровождается накоплением токсинов, нарушением водно-солевого баланса и изменениями в работе нервной системы, что характерно для алкоголизма и состояний после запоя. Это проявляется головной болью, слабостью, тошнотой, сухостью во рту и нарушением сна. Капельница позволяет ускорить процессы очищения организма и стабилизировать состояние пациента под контролем врача, помогая человеку быстрее выйти из состояния запоев.
Разобраться лучше – капельница от похмелья цена в воронеже
В этой статье представлен занимательный и актуальный контент, который заставит вас задуматься. Мы обсуждаем насущные вопросы и проблемы, а также освещаем истории, которые вдохновляют на действия и изменения. Узнайте, что стоит за событиями нашего времени!
Где можно узнать подробнее? – капельница от запоя на дому
Наркологическая клиника — это пространство профессиональной помощи, где пациент получает комплексное лечение зависимости, медицинский контроль и психологическую поддержку. В клинике «ВолгаМед Баланс» в Тольятти лечение основано на принципах доказательной медицины и конфиденциальности. Каждая терапевтическая программа выстраивается индивидуально, с учётом физического состояния пациента, стадии заболевания и его мотивации к выздоровлению. Врачи клиники обеспечивают непрерывный контроль за состоянием, применяя современные методы дезинтоксикации, психотерапии и медикаментозной стабилизации.
Получить больше информации – https://narkologicheskaya-klinika-tolyatti0.ru/tolyatti-narkologicheskij-dispanser/
Врачи клиники используют щадящие методики и современные инфузионные составы, которые не перегружают организм и позволяют безопасно восстановить жизненные функции. Контроль проводится на всех этапах: от диагностики до постлечебного наблюдения.
Получить больше информации – вывод из запоя капельница на дому тольятти
Такие условия позволяют начать лечение без задержек и обеспечить более мягкое восстановление. При этом помощь может предоставляться анонимно.
Исследовать вопрос подробнее – вывод из запоя на дому анонимно
Этот информационный материал подробно освещает проблему наркозависимости, ее причины и последствия. Мы предлагаем информацию о методах лечения, профилактики и поддерживающих программах. Цель статьи — повысить осведомленность и продвигать идеи о необходимости борьбы с зависимостями.
Проследить причинно-следственные связи – прокапаться от похмелья
Нарколог на дом — это услуга, позволяющая получить квалифицированную медицинскую помощь в привычной обстановке без необходимости посещения клиники. В «ЛадаМед Выезд» в Тольятти круглосуточно дежурят врачи-наркологи, готовые оперативно выехать по адресу и провести детоксикацию, стабилизацию состояния и консультацию по дальнейшему лечению. Такой формат особенно востребован при запое, абстинентном синдроме, интоксикации или необходимости срочной поддержки без госпитализации. Все процедуры проводятся анонимно, безопасно и под контролем специалиста.
Получить дополнительную информацию – нарколог на дом вывод тольятти
Этот процесс не занимает много времени — обычно процедура длится от 30 до 60 минут. Важно, что врач контролирует все этапы, обеспечивая безопасность пациента и корректируя терапию по мере необходимости. Такой подход позволяет быстро и эффективно облегчить симптомы похмелья и вернуться к нормальной жизнедеятельности.
Получить дополнительные сведения – капельница от похмелья анонимно
Домашний вызов нарколога удобен в случаях, когда человеку тяжело ехать в клинику, он отказывается от поездки или родственники хотят как можно быстрее заказать медицинскую помощь на месте. Формат выезда позволяет врачу оценить самочувствие, определить тяжесть состояния и подобрать дальнейшую тактику. Если ситуация требует расширенного подхода, может обсуждаться последующая консультация в центре, лечение алкоголизма, кодирование, а в более сложных случаях — длительная реабилитация.
Разобраться лучше – нарколог на дом цена екатеринбург
sar?msak kavanozda nas?l saklan?r hakk?ndaki makaleyi cok sevdim. Link burada: https://kendifikirler.com/articles/sarmak-kavanozda-nasil-saklanir/
Алкогольная зависимость часто держится на страхе отмены. Человек заранее боится вечера: что не уснёт, начнётся паника, поднимется давление, появится дрожь и ощущение «внутреннего разгона». Из-за этого запой поддерживается не удовольствием, а попыткой избежать ухудшения. В клинике лечение начинается с оценки риска осложнений и тяжести отмены. Это позволяет определить, нужен ли стационар, или можно начинать лечение без госпитализации с медицинским контролем и ясным планом на ночь.
Выяснить больше – http://narkologicheskaya-klinika-sergiev-posad12.ru/chastnaya-narkologicheskaya-klinika-v-sergievom-posade/
Помощь на дому рассматривают при состояниях, которые сопровождаются заметным ухудшением самочувствия после алкоголя. Обычно это запой на протяжении нескольких дней, тяжелое похмелье, выраженная слабость, бессонница, тревога, дрожь в руках, сухость во рту, отсутствие аппетита, тошнота, раздражительность и ощущение истощения. В подобных случаях врачебный осмотр нужен для того, чтобы оценить тяжесть состояния и определить, безопасен ли домашний формат в конкретной ситуации.
Углубиться в тему – нарколог на дом вывод в москве
Исследования показывают, что такой подход существенно повышает шанс на долгосрочное выздоровление и уменьшает вероятность рецидивов. Это связано с тем, что пациент чувствует внимание и заботу, а также получает помощь в преодолении своих личных психологических барьеров.
Подробнее можно узнать тут – центр реабилитации алкоголиков в москве
zi6syv
Несмотря на выездной формат, лечение выстраивается поэтапно и соответствует медицинским стандартам. Это обеспечивает управляемость процесса и безопасность пациента.
Подробнее можно узнать тут – https://narkolog-na-dom-v-rnd19.ru/narkolog-rostov-baumana/
Вывод из запоя на дому с быстрым облегчением в Екатеринбурге является эффективным методом для тех, кто хочет быстро избавиться от неприятных симптомов абстиненции, не выходя из дома. Основное преимущество этого метода — это быстрый результат, минимальные риски для здоровья и отсутствие необходимости в стационарном лечении. Процедура, проводимая опытным медицинским специалистом, помогает не только устранить симптомы похмелья, но и восстановить нормальное состояние организма без стресса и неудобств для пациента.
Детальнее – вывод из запоя на дому анонимно в екатеринбурге
Главная цель — не просто снять симптомы абстиненции, а безопасно восстановить работу организма. Для этого применяются современные препараты и сбалансированные растворы, которые выводят токсины, поддерживают функции печени и нормализуют обмен веществ. Дополнительно пациент получает витаминотерапию и легкую психокоррекционную поддержку.
Детальнее – вывод из запоя вызов город
Основные показания для проведения процедуры:
Узнать больше – капельница от похмелья вызов на дом в воронеже
В Нижнем Новгороде выезд нарколога на дом используется при состояниях, требующих оперативной медицинской оценки и начала терапии. Врач приезжает с необходимыми препаратами, проводит осмотр и формирует план лечения на месте. Такой формат позволяет сократить время до начала помощи и снизить нагрузку на пациента.
Выяснить больше – вызов наркологической помощи нижний новгород
Этот документ охватывает важные аспекты медицинской науки, сосредотачиваясь на ключевых вопросах, касающихся здоровья населения. Мы рассматриваем свежие исследования, клинические рекомендации и лучшие практики, которые помогут улучшить качество лечения и профилактики заболеваний. Читатели получат возможность углубиться в различные медицинские дисциплины.
Получить профессиональную консультацию – частная наркологическая клиника нижний новгород
Такие состояния требуют профессионального вмешательства, так как без лечения могут усиливаться и приводить к ухудшению самочувствия. При этом помощь может предоставляться анонимно, в соответствии с политикой конфиденциальности данных пациента.
Подробнее можно узнать тут – нарколог на дом вывод из запоя в санкт-петербурге
Помощь на дому рассматривают при состояниях, которые сопровождаются заметным ухудшением самочувствия после алкоголя. Обычно это запой на протяжении нескольких дней, тяжелое похмелье, выраженная слабость, бессонница, тревога, дрожь в руках, сухость во рту, отсутствие аппетита, тошнота, раздражительность и ощущение истощения. В подобных случаях врачебный осмотр нужен для того, чтобы оценить тяжесть состояния и определить, безопасен ли домашний формат в конкретной ситуации.
Исследовать вопрос подробнее – нарколог на дом вывод в москве
Этот информативный текст сочетает в себе темы здоровья и зависимости. Мы обсудим, как хронические заболевания могут усугубить зависимости и наоборот, как зависимость может влиять на общее состояние здоровья. Читатели получат представление о комплексном подходе к лечению как физического, так и психического состояния.
Читать далее > – лечение наркомании нижний новгород
Выбор центра для реабилитации алкоголиков с индивидуальной программой в Москве — это ключевой момент в процессе восстановления. Успех лечения во многом зависит от квалификации специалистов, качества программ и уровня условий, которые предоставляются пациенту. Важно, чтобы клиника предложила не только медицинскую помощь, но и психологическую поддержку, которая является основой для успешной реабилитации. Также стоит учитывать, что в некоторых случаях вывод из запоя или лечение может быть проведено анонимно, а стационарное лечение на летний период может стать удобным решением для более продолжительного и комфортного восстановления пациента.
Получить больше информации – https://reabilitacziya-alkogolikov-moskva.ru/
Результаты первичной оценки формируют основу для выбора лечебной тактики и объёма медицинского вмешательства.
Получить больше информации – наркология вывод из запоя
Решение о помещении пациента в стационар принимается на основе объективных медицинских критериев, а не только по желанию родственников. К показаниям относятся: запой длительностью более 72 часов, выраженная абстиненция с тахикардией, артериальной гипертензией, профузным потоотделением, наличие в анамнезе алкогольных делириев или судорожных эпизодов, сопутствующие хронические заболевания печени, сердца, поджелудочной железы. В сложные ситуации, когда интоксикация затрагивает несколько систем одновременно, резкое прекращение употребления без медицинской поддержки может спровоцировать отек мозга, острую сердечную недостаточность или желудочно-кишечное кровотечение. При сочетанных расстройствах, когда в анамнезе присутствует наркомании, протоколы адаптируются под специфику психоактивных соединений и включают усиленный нейрологический контроль. Стационар позволяет провести полноценную диагностику, включая ЭКГ, экспресс-анализы крови, УЗИ внутренних органов и мониторинг сатурации, что формирует точную картину состояния и исключает шаблонные назначения.
Узнать больше – быстрый вывод из запоя в стационаре
Помощь на дому рассматривают при состояниях, которые сопровождаются заметным ухудшением самочувствия после алкоголя. Обычно это запой на протяжении нескольких дней, тяжелое похмелье, выраженная слабость, бессонница, тревога, дрожь в руках, сухость во рту, отсутствие аппетита, тошнота, раздражительность и ощущение истощения. В подобных случаях врачебный осмотр нужен для того, чтобы оценить тяжесть состояния и определить, безопасен ли домашний формат в конкретной ситуации.
Изучить вопрос глубже – врач нарколог на дом в москве
Наркологическая клиника в Тольятти рассматривается как профильное медицинское звено, ориентированное на лечение алкогольной и наркотической зависимости с учётом клинических особенностей пациента. В клинике «Гармония Волги» медицинская помощь выстраивается на основе диагностики, поэтапной терапии и врачебного наблюдения, что позволяет контролировать состояние пациента на всех этапах лечения.
Исследовать вопрос подробнее – https://narkologicheskaya-klinika-v-tolyatti0.ru/narkologicheskaya-bolnicza-tolyatti
Запой – это состояние, при котором человек продолжает употреблять алкоголь в течение длительного времени, не в состоянии прекратить употребление самостоятельно, что является проявлением алкоголизма. Это может привести к серьезным проблемам со здоровьем, и в таком случае необходим вывод из запоя с помощью наркологической помощи, при этом в дальнейшем может рассматриваться кодирование.
Углубиться в тему – вывод из запоя на дому цена
Наркологическая клиника в Сергиевом Посаде — это помощь, которая начинается с понимания рисков. Важны не красивые обещания «за один час», а прогнозируемая динамика в первые сутки и понятный план на 24–72 часа. Именно в это время чаще всего происходит повторное ухудшение: днём может стать легче, но к вечеру и ночью волной возвращаются тревога и бессонница, появляются телесные симптомы отмены, и человек снова тянется к алкоголю или веществам «чтобы отпустило». Если заранее не подготовить этот период и не объяснить, как действовать, даже удачная первичная стабилизация может закончиться срывом.
Детальнее – https://narkologicheskaya-klinika-sergiev-posad12.ru/platnaya-narkologicheskaya-klinika-v-sergievom-posade/
Реабилитация алкоголиков — это важный этап на пути к избавлению от зависимости. В Москве существует множество центров, предлагающих реабилитацию с индивидуальной программой, что помогает обеспечить более персонализированный и эффективный подход к каждому пациенту. Индивидуальная программа учитывает физическое и психологическое состояние человека, а также его социальное окружение и личные особенности. Это позволяет добиться лучших результатов в лечении и восстановлении.
Изучить вопрос глубже – реабилитация алкоголиков
Процедура вывода из запоя на дому включает несколько ключевых этапов, которые обеспечивают максимально быстрое и безопасное восстановление пациента. Эти этапы тщательно контролируются врачом, что минимизирует риски и помогает достичь наилучших результатов.
Выяснить больше – вывод из запоя на дому анонимно екатеринбург
Отдельно оценивают ситуации, когда подобные эпизоды повторяются. Если человек уже не впервые переносит запой, тяжелый выход из него или выраженное ухудшение самочувствия после алкоголя, вопрос обычно выходит за рамки разовой помощи. Тогда уже при первичном обращении рассматривают не только текущую стабилизацию состояния, но и дальнейшие шаги. При затяжном течении проблемы могут обсуждаться лечение зависимости, программа восстановления и условия, при которых потребуется наблюдение в стационаре.
Ознакомиться с деталями – нарколог на дом анонимно
Помощь 24/7 означает, что нарколог на дом в Хабаровске может быть направлен в любое время суток, включая ночные часы и выходные дни. В клинике «Ясный Вектор» выездная служба функционирует с учётом логистики города, что позволяет минимизировать время ожидания врача.
Подробнее – нарколог на дом в хабаровске
Главный принцип работы наркологической клиники — это последовательность, безопасность и уважение к каждому пациенту. Независимо от степени зависимости, лечение строится на тщательной диагностике, определении индивидуальных особенностей и поэтапном подходе. Медицинская помощь оказывается как в условиях стационара, так и на дому, где врачи могут провести детоксикацию, стабилизировать состояние и составить дальнейший план терапии.
Ознакомиться с деталями – частная наркологическая клиника в ростове-на-дону
Медицинская помощь начинается с детального осмотра и сбора анамнестических данных. Врач оценивает длительность запоя, объем употребляемого алкоголя, наличие хронических заболеваний и ранее перенесенных осложнений. Эти сведения необходимы для выбора корректной тактики лечения и исключения потенциальных рисков.
Узнать больше – https://vyvod-iz-zapoya-khabarovsk0.ru/vyvod-iz-zapoya-kruglosutochno-khabarovsk
Нарколог на дом — это услуга, позволяющая получить квалифицированную медицинскую помощь в привычной обстановке без необходимости посещения клиники. В «ЛадаМед Выезд» в Тольятти круглосуточно дежурят врачи-наркологи, готовые оперативно выехать по адресу и провести детоксикацию, стабилизацию состояния и консультацию по дальнейшему лечению. Такой формат особенно востребован при запое, абстинентном синдроме, интоксикации или необходимости срочной поддержки без госпитализации. Все процедуры проводятся анонимно, безопасно и под контролем специалиста.
Узнать больше – нарколог на дом круглосуточно
urb4yp
Для жителей Екатеринбурга наркологическая клиника «Частный медик 24» предлагает услуги выезда нарколога на дом для проведения капельницы от похмелья. Это удобный и эффективный способ лечения, особенно если пациент испытывает тяжёлые симптомы похмелья и не может поехать в клинику. Выезд нарколога на дом позволяет начать лечение сразу, не тратя время на поездку и ожидания в клинике. Врач приезжает с необходимыми препаратами и оборудованием, проводит осмотр и назначает необходимую терапию.
Ознакомиться с деталями – http://www.domen.ru
Вывод из запоя на дому в Санкт-Петербурге с выездом нарколога, детоксикацией и восстановлением состояния в наркологической клинике «Частный медик 24»
Углубиться в тему – нарколог на дом вывод из запоя
Нарколог на дом — это формат медицинской помощи, при котором пациент получает лечение без посещения стационара. В наркологической клинике «Частный медик 24» в Нижнем Новгороде такая услуга используется при острых состояниях: запой, выраженная алкогольная интоксикация, абстинентный синдром, а также при необходимости срочного вмешательства без транспортировки больного. Выезд врача позволяет начать терапию в первые часы ухудшения состояния, что снижает риск осложнений и облегчает переносимость лечения.
Подробнее – вызов нарколога на дом в нижнем новгороде
Наиболее частыми причинами обращения становятся выраженная слабость, тремор, нарушение сна, тревога, учащенный пульс, скачки артериального давления, тошнота и признаки обезвоживания. Эти симптомы могут сочетаться между собой и усиливаться после прекращения употребления алкоголя, особенно после нескольких дней запоя.
Получить дополнительную информацию – вызвать нарколога на дом в екатеринбурге
Снятие симптомов даёт человеку окно трезвости, но не устраняет причины повторения. Если после стабилизации пациент возвращается в прежний режим — недосып, перегруз, конфликтность, прежнее окружение — вероятность рецидива остаётся высокой. Поэтому в клинике важно работать с тягой и триггерами, восстанавливать сон и эмоциональную устойчивость, формировать понятный план действий на уязвимые часы и дни. Чем конкретнее этот план, тем меньше вероятность импульсивного решения «выпить/употребить для облегчения».
Подробнее тут – http://narkologicheskaya-klinika-orekhovo-zuevo12.ru
Фармакологическая поддержка в стационаре направлена на решение конкретных клинических задач: восполнение дефицита жидкости и электролитов, защиту гепатоцитов, нормализацию сна, снижение тревожности и купирование болевого синдрома. Стандартная капельница для вывода из запоя включает кристаллоиды для восстановления объема циркулирующей крови, витамины группы B и C для поддержки метаболизма, гепатопротекторы для снижения токсической нагрузки, седативные и противорвотные препараты для стабилизации нервной системы. При выраженном похмелья или тяжелой абстиненции могут назначаться препараты для коррекции нейромедиаторного обмена, однако их применение строго дозируется и контролируется. Дозировки корректируются ежедневно на основе динамики показателей, что обеспечивает безопасность и эффективность терапии без перегрузки организма. Стандарты качества в клинике «Стармед» исключают «универсальные» схемы и требуют строгого врачебного контроля на каждом этапе инфузии.
Подробнее тут – вывод из запоя в стационаре нижний новгород
В этой статье мы рассматриваем разрушительное влияние зависимости на жизнь человека. Обсуждаются аспекты, такие как здоровье, отношения и профессиональные достижения. Читатели узнают о необходимости обращения за помощью и о путях к восстановлению.
Личный опыт — читайте сами – наркологический центр в нижнем новгороде
5bar47
Осмотр на дому особенно важен в тех случаях, когда больному трудно вставать, пить воду, принимать пищу, спокойно лежать или ориентироваться в собственном состоянии. Чем тяжелее переносится выход из употребления, тем выше значение очной оценки, потому что по телефону невозможно полноценно определить границы безопасной помощи. При выраженных симптомах может потребоваться срочный выезд, чтобы вовремя оценить риски и определить, допустим ли вывод из запоя дома или необходимо наблюдение в стационаре.
Подробнее – врач нарколог на дом москва
Такой алгоритм помогает врачу быстро устранить симптомы и восстановить пациента без стресса. Процедура занимает от 40 до 90 минут, в зависимости от состояния и применяемых препаратов.
Детальнее – нарколог на дом вывод из запоя в тольятти
Эта услуга позволяет людям, которые не могут или не хотят покидать свой дом, получить профессиональную помощь и избавиться от зависимости без госпитализации. К тому же, вывод из запоя на дому позволяет избежать стресса, связанного с нахождением в медицинских учреждениях, при этом можно заказать вызов специалистов с учетом их опыта и лет работы, а также данных больного.
Разобраться лучше – http://vyvod-iz-zapoya-na-domu-ekaterinburg-18.ru/
Процесс выезда врача организован последовательно и включает несколько этапов, направленных на быстрое восстановление пациента. Ниже представлена таблица с основными шагами процедуры.
Получить дополнительную информацию – нарколог на дом круглосуточно
В Санкт-Петербурге вывод из запоя на дому рассматривается, когда состояние пациента позволяет проводить лечение вне стационара, но требует контроля специалиста. Врач оценивает общее состояние, длительность запоя и выраженность симптомов, после чего принимает решение о формате помощи при алкоголизме. Важно, что лечение начинается сразу после осмотра, без необходимости ожидания госпитализации. При необходимости можно заказать услуги на сайте клиники или получить консультацию специалистов.
Разобраться лучше – http://vyvod-iz-zapoya-na-domu-sankt-peterburg-8.ru
Первичный этап включает сбор анамнеза, лабораторные исследования и оценку неврологического статуса. На основании полученных данных формируется план лечения, который может корректироваться в процессе наблюдения.
Получить дополнительную информацию – https://narkologicheskaya-klinika-khabarovsk0.ru/
Наиболее частыми причинами обращения становятся выраженная слабость, тремор, нарушение сна, тревога, учащенный пульс, скачки артериального давления, тошнота и признаки обезвоживания. Эти симптомы могут сочетаться между собой и усиливаться после прекращения употребления алкоголя, особенно после нескольких дней запоя.
Углубиться в тему – вызвать нарколога на дом в екатеринбурге
Реабилитация алкоголиков с индивидуальной программой — это комплексный подход, включающий медицинскую, психотерапевтическую и социальную поддержку, направленный на восстановление человека после длительного злоупотребления алкоголем. Программа подбирается с учетом всех особенностей пациента, его состояния, сопутствующих заболеваний и эмоциональных проблем. Реабилитация не ограничивается только детоксикацией, но включает также работу с психологом и социальную адаптацию. В некоторых случаях может быть рекомендован выезд на дом для проведения лечения, а также кодирование, чтобы помочь пациенту справиться с зависимостью на всех этапах восстановления. Наркоманическая зависимость может требовать дополнительной терапии и профессиональной помощи для успешного преодоления всех трудностей.
Детальнее – reabilitacziya-alkogolikov-moskva.ru/
Отдельно стоит выделить ситуации, когда семья сталкивается не только с алкоголем, но и с употреблением наркотиков. В таких случаях врачебная консультация особенно важна, поскольку последствия интоксикации могут отличаться, а признаки наркомании и алкоголизма иногда накладываются друг на друга. Если речь идет о смешанном употреблении, подход к помощи на дому требует особой осторожности.
Подробнее можно узнать тут – запой нарколог на дом екатеринбург
За выездом врача чаще обращаются тогда, когда человеку тяжело добраться до клиники, он ослаблен после нескольких дней употребления алкоголя или родственникам важно быстрее понять, какая тактика будет безопасной. После осмотра можно определить, нужна ли капельница, достаточно ли детоксикации на дому, требуется ли повторное наблюдение, а в дальнейшем — консультация по лечению алкоголизма, кодирование или реабилитация. В части случаев уже первый звонок позволяет понять, идет ли речь только о временном ухудшении самочувствия или о состоянии, при котором может потребоваться вывод из запоя в стационаре.
Изучить вопрос глубже – narkolog-na-dom-ekaterinburg-3.ru/
Детоксикация в стационаре — это не разовая процедура, а последовательный процесс, разделенный на диагностику, активное выведение токсинов, стабилизацию функций и подготовку к противорецидивному этапу. При поступлении врач проводит первичный осмотр, собирает подробный анамнез, оценивает неврологический статус и при необходимости назначает лабораторные исследования. На основе полученных данных формируется индивидуальный протокол, учитывающий возраст, вес, длительность запоя, наличие сопутствующих патологий и переносимость лекарственных средств. Мы применяем только сертифицированные медикаменты, зарегистрированные в РФ, и строго соблюдаем клинические рекомендации Минздрава, исключая псевдонаучные методики. Все вмешательства документируются в электронной медицинской карте, доступ к которой имеют только лечащие специалисты.
Исследовать вопрос подробнее – вывод из запоя в стационаре в нижнем новгороде
Осмотр на дому особенно важен в тех случаях, когда больному трудно вставать, пить воду, принимать пищу, спокойно лежать или ориентироваться в собственном состоянии. Чем тяжелее переносится выход из употребления, тем выше значение очной оценки, потому что по телефону невозможно полноценно определить границы безопасной помощи. При выраженных симптомах может потребоваться срочный выезд, чтобы вовремя оценить риски и определить, допустим ли вывод из запоя дома или необходимо наблюдение в стационаре.
Получить больше информации – http://narkolog-na-dom-moskva-18.ru/
Запой сопровождается выраженной интоксикацией, нарушением работы сердечно-сосудистой системы, тревожностью и бессонницей, что характерно для алкоголизма и хронического употребления алкоголя. При длительном течении организм человека теряет способность к самостоятельному восстановлению, и вмешательство становится необходимым. Стационар в этом случае позволяет контролировать динамику состояния больного и корректировать терапию в режиме реального времени, особенно при тяжелом течении алкоголизма.
Исследовать вопрос подробнее – наркология вывод из запоя в стационаре в нижнем новгороде
Процесс лечения в «ВолгаМед Баланс» выстроен логично и последовательно. Каждый этап направлен на достижение конкретных медицинских и психологических целей. Ниже приведена таблица, описывающая ключевые стадии терапии.
Изучить вопрос глубже – наркологическая клиника вывод из запоя
Процедура начинается с осмотра пациента. Врач оценивает основные показатели, включая давление и пульс, а также выраженность симптомов. После этого формируется состав капельницы и определяется тактика лечения, что позволяет эффективно провести вывод из запоя.
Подробнее можно узнать тут – капельница от похмелья вызов на дом
Процесс вывода из запоя состоит из нескольких последовательных этапов, каждый из которых направлен на устранение конкретных нарушений. Ниже представлена таблица с ключевыми стадиями терапии.
Узнать больше – скорая вывод из запоя
Процесс терапии делится на последовательные этапы, каждый из которых направлен на решение конкретной медицинской задачи. Лечение включает физическую детоксикацию, медикаментозную коррекцию и психотерапевтическую поддержку. В таблице ниже отражены ключевые этапы лечебного процесса.
Получить дополнительные сведения – наркологическая клиника стационар в хабаровске
Чаще всего домашний формат применяется при следующих состояниях:
Разобраться лучше – вывод из запоя на дому анонимно в санкт-петербурге
Реабилитация алкоголиков с индивидуальной программой — это комплексный подход, включающий медицинскую, психотерапевтическую и социальную поддержку, направленный на восстановление человека после длительного злоупотребления алкоголем. Программа подбирается с учетом всех особенностей пациента, его состояния, сопутствующих заболеваний и эмоциональных проблем. Реабилитация не ограничивается только детоксикацией, но включает также работу с психологом и социальную адаптацию. В некоторых случаях может быть рекомендован выезд на дом для проведения лечения, а также кодирование, чтобы помочь пациенту справиться с зависимостью на всех этапах восстановления. Наркоманическая зависимость может требовать дополнительной терапии и профессиональной помощи для успешного преодоления всех трудностей.
Углубиться в тему – реабилитация алкоголиков в москве
Терапевтический процесс в стационаре строится по принципу последовательного выполнения клинических задач: диагностика, стабилизация, медикаментозная поддержка и подготовка к амбулаторному этапу. При поступлении врач проводит детальный осмотр, собирает анамнез, оценивает неврологический статус и при необходимости назначает лабораторные исследования. На основе полученных данных формируется индивидуальный протокол, учитывающий возраст, длительность интоксикации, наличие сопутствующих патологий и переносимость лекарственных компонентов. Мы применяем только сертифицированные препараты, зарегистрированные в РФ, и строго соблюдаем клинические рекомендации Минздрава, исключая псевдонаучные методики.
Получить больше информации – стационар вывод из запоя санкт-петербург
Эта доказательная статья представляет собой глубокое погружение в успехи и вызовы лечения зависимостей. Мы обращаемся к научным исследованиям и опыту специалистов, чтобы предоставить читателям надежные данные об эффективности различных методик. Изучите, что работает лучше всего, и получите информацию от экспертов.
Давай разберёмся досконально – наркологическая клиника телефон
Эта услуга позволяет людям, которые не могут или не хотят покидать свой дом, получить профессиональную помощь и избавиться от зависимости без госпитализации. К тому же, вывод из запоя на дому позволяет избежать стресса, связанного с нахождением в медицинских учреждениях, при этом можно заказать вызов специалистов с учетом их опыта и лет работы, а также данных больного.
Получить дополнительную информацию – vyvod-iz-zapoya-na-domu-ekaterinburg-18.ru/
Вывод из запоя на дому с быстрым облегчением в Екатеринбурге является эффективным методом для тех, кто хочет быстро избавиться от неприятных симптомов абстиненции, не выходя из дома. Основное преимущество этого метода — это быстрый результат, минимальные риски для здоровья и отсутствие необходимости в стационарном лечении. Процедура, проводимая опытным медицинским специалистом, помогает не только устранить симптомы похмелья, но и восстановить нормальное состояние организма без стресса и неудобств для пациента.
Подробнее можно узнать тут – вывод из запоя на дому цена в екатеринбурге
References:
Slot machine wins forum.xingsi.org
Основные показания для проведения процедуры:
Подробнее – http://kapelnicza-ot-pokhmelya-voronezh-4.ru/
Нарколог на дом в Екатеринбурге востребован в ситуациях, когда человеку нужна врачебная помощь после употребления алкоголя, при запое, выраженном похмельном синдроме, нарушении сна, тревоге, скачках давления, слабости и других признаках ухудшения самочувствия. Такой формат обращения часто выбирают семьи, которые хотят вызвать врача без поездки в клинику и быстро получить консультацию по состоянию больного. Домашний выезд особенно важен тогда, когда требуется детоксикация, наблюдение после нескольких дней употребления спиртного и оценка рисков, связанных с последствиями алкоголизма.
Ознакомиться с деталями – narkolog-na-dom-ekaterinburg-2.ru/
За выездом врача чаще обращаются тогда, когда человеку тяжело добраться до клиники, он ослаблен после нескольких дней употребления алкоголя или родственникам важно быстрее понять, какая тактика будет безопасной. После осмотра можно определить, нужна ли капельница, достаточно ли детоксикации на дому, требуется ли повторное наблюдение, а в дальнейшем — консультация по лечению алкоголизма, кодирование или реабилитация. В части случаев уже первый звонок позволяет понять, идет ли речь только о временном ухудшении самочувствия или о состоянии, при котором может потребоваться вывод из запоя в стационаре.
Подробнее можно узнать тут – нарколог на дом вывод в екатеринбурге
Хорошая статья о том, почему «цифровой бетон» (техническая база) важнее красивого фасада. Автор объясняет, что SEO — это не про внешний лоск, а про прочность фундамента: скорость загрузки, мобильная адаптация, чистая структура URL. Без этого никакой красивый дизайн не поможет. Тем, кто только начинает продвижение, обязательно к прочтению: https://avto-dom-tumen.ru/stati/seo-kak-fundament-biznesa-pochemu-cifrovoj-beton-vazhnee-krasivogo-fasada/
Все методики подбираются строго индивидуально. Комбинация физиологической и психотерапевтической поддержки помогает восстановить здоровье и устойчивость пациента. Такой подход снижает вероятность рецидивов и способствует длительному сохранению трезвости.
Подробнее – наркологическая клиника нарколог в тольятти
Вывод из запоя на дому — это медицинская помощь, направленная на стабилизацию состояния пациента без госпитализации. Такой формат позволяет начать лечение сразу после обращения и снизить нагрузку на организм, связанную с транспортировкой. В наркологической клинике «Частный медик 24» помощь оказывается с выездом врача, который проводит диагностику и подбирает терапию в зависимости от текущего состояния.
Разобраться лучше – вывод из запоя на дому анонимно в санкт-петербурге
Такие симптомы требуют медицинского вмешательства, поскольку могут приводить к ухудшению состояния. Капельница помогает стабилизировать самочувствие и снизить нагрузку на организм. Услуги могут предоставляться анонимно, а при необходимости пациент направляется на лечение в стационаре.
Подробнее можно узнать тут – http://kapelnicza-ot-pokhmelya-voronezh-7.ru/
В клинике «АвтоГрад МедСтаб» применяется комплексное лечение, направленное не только на выведение этанола, но и на восстановление функций всех систем организма. В таблице представлены ключевые терапевтические методы и их результаты.
Ознакомиться с деталями – срочный вывод из запоя в тольятти
Нарколог на дом в Екатеринбурге: анонимная помощь при алкоголизме, вывод из запоя и поддержка специалистов в наркологической клинике «НЕО+».
Детальнее – врач нарколог на дом екатеринбург
References:
Casino az https://pbase.com/
Все препараты, применяемые при выезде, сертифицированы и подобраны с учётом общего состояния пациента, наличия хронических заболеваний и степени алкогольной интоксикации. Такой подход обеспечивает безопасность процедуры и предсказуемый результат уже в первые часы терапии.
Подробнее тут – вызов нарколога на дом в тольятти
Запой сопровождается выраженной интоксикацией, нарушением сна, слабостью, тревожностью и колебаниями давления, что характерно для алкоголизма и других форм зависимости. При этом самостоятельный выход из состояния часто оказывается затруднённым из-за ухудшения самочувствия и невозможности контролировать симптомы. В таких случаях выезд нарколога позволяет начать лечение без задержек и помочь пациенту снизить нагрузку на организм за счёт отсутствия транспортировки.
Подробнее тут – вывод из запоя на дому санкт-петербург
Комбинированное воздействие обеспечивает быстрое улучшение состояния пациента и позволяет стабилизировать организм даже при тяжёлой интоксикации. Врач контролирует все реакции и корректирует дозировки при необходимости.
Исследовать вопрос подробнее – частный нарколог на дом в тольятти
Помощь на дому рассматривают при состояниях, связанных с острым ухудшением самочувствия после алкоголя. Чаще всего это несколько дней запоя, тяжелое похмелье, бессонница, тревога, дрожь в руках, слабость, отсутствие аппетита, тошнота, сухость во рту и ощущение истощения. В подобных случаях врачебный осмотр нужен для оценки общего состояния и выбора безопасной тактики.
Получить дополнительную информацию – http://www.domen.ru
В Санкт-Петербурге вывод из запоя на дому используется в ситуациях, когда состояние пациента требует медицинской помощи, но позволяет обойтись без лечения в стационаре. Врач проводит консультацию, оценивает длительность запоя, выраженность симптомов и общее состояние, анализируя данные пациента, после чего принимает решение о тактике лечения при алкоголизме. При необходимости можно оформить вызов специалиста или заказать услугу заранее.
Узнать больше – http://vyvod-iz-zapoya-na-domu-sankt-peterburg-11.ru/
Диагностическая оценка позволяет определить степень интоксикации и выявить возможные риски осложнённого течения состояния.
Подробнее – наркология вывод из запоя тольятти
Нарколог на дом в Москве — это формат медицинской помощи, который рассматривают при состояниях после употребления алкоголя, когда больному требуется осмотр врача без поездки в клинику. Чаще всего обращение связано с запоем, выраженным похмельным синдромом, бессонницей, тревогой, слабостью, тремором, обезвоживанием, скачками давления, сердцебиением и общим ухудшением самочувствия. Дальнейшая тактика зависит от состояния больного на момент осмотра, продолжительности употребления алкоголя и сопутствующих заболеваний.
Получить дополнительную информацию – https://narkolog-na-dom-moskva-17.ru
Затяжной запой перестает быть бытовой проблемой в тот момент, когда организм теряет способность самостоятельно восстанавливаться после интоксикации. Накопление ацетальдегида, нарушение водно-электролитного баланса, истощение запасов витаминов и перегрузка сердечно-сосудистой системы создают состояние, при котором домашние методы перестают быть безопасными. Срочно стабилизировать самочувствие и быстро купировать абстинентный синдром позволяет только контролируемая медицинская среда. Вывод из запоя в стационаре в Нижнем Новгороде становится клинически обоснованным решением, когда требуется не просто снятие симптомов, а комплексная детоксикация под круглосуточным наблюдением врачей. Наркологическая клиника «Стармед» организует процесс лечения в соответствии с актуальными стандартами доказательной медицины, обеспечивая безопасность пациента, прозрачность процедур и плавный переход к противорецидивной терапии. Мы понимаем, что решение о госпитализации часто принимается в состоянии стресса, поэтому наша работа начинается с четкой диагностики, честного объяснения плана лечения и соблюдения строгих протоколов конфиденциальности. Опытные специалисты клиники помогут вызвать доверие к процессу восстановления уже на этапе первого контакта.
Ознакомиться с деталями – наркология вывод из запоя в стационаре нижний новгород
Процедура вывода из запоя на дому включает несколько этапов, каждый из которых имеет важное значение для общего улучшения состояния пациента. Главная цель — это не только устранение симптомов абстиненции, но и восстановление нормальной работы органов и систем организма. Врач, который проводит процедуру, использует медикаментозные средства для восстановления водно-солевого баланса, нормализации работы печени, почек и других органов, пострадавших от алкоголя. Также в процесс включаются препараты, которые способствуют снятию нервного напряжения и психоэмоционального стресса.
Разобраться лучше – http://vyvod-iz-zapoya-na-domu-ekaterinburg-19.ru/
Процедура капельницы от похмелья с контролем врача в Самаре начинается с первичной консультации, на которой врач осматривает пациента, измеряет его основные показатели (давление, пульс, температуру) и оценивает общее состояние. На основе этих данных выбирается оптимальный состав капельницы, которая может включать в себя различные компоненты, такие как солевые растворы, витамины, антиоксиданты и медикаменты для снятия симптомов похмелья.
Разобраться лучше – капельница от похмелья на дому в самаре
Процедура начинается с осмотра пациента. Врач измеряет давление, пульс, оценивает общее состояние и выраженность симптомов. На основании этих данных формируется состав капельницы и план лечения. Такой подход позволяет учитывать индивидуальные особенности пациента и эффективно провести вывод из запоя.
Подробнее можно узнать тут – капельница от похмелья анонимно воронеж
При выводе из запоя на дому с быстрым облегчением используются различные медикаменты, направленные на быстрое восстановление водно-солевого баланса, улучшение функции печени и почек, а также снижение симптомов алкогольного абстинентного синдрома. Важно, что состав препаратов подбирается в зависимости от состояния пациента, и все препараты вводятся под контролем квалифицированного медицинского специалиста.
Подробнее – вывод из запоя на дому анонимно екатеринбург
Для региона характерна потребность в системном подходе к лечению зависимостей, так как клиническая картина нередко сопровождается соматическими и неврологическими нарушениями. Организация лечения направлена на снижение рисков осложнений и восстановление физиологических функций организма.
Изучить вопрос глубже – http://narkologicheskaya-klinika-v-tolyatti0.ru/narkolog-tolyatti-otzyvy/
Вывод из запоя на дому — это медицинская помощь, направленная на стабилизацию состояния пациента без госпитализации. Такой формат позволяет начать лечение сразу после обращения и снизить нагрузку на организм, связанную с транспортировкой. В наркологической клинике «Частный медик 24» помощь оказывается с выездом врача, который проводит диагностику и подбирает терапию в зависимости от текущего состояния.
Подробнее – вывод из запоя на дому санкт-петербург
Домашний выезд обычно выбирают тогда, когда человеку трудно добраться до медицинского учреждения, он ослаблен после нескольких дней употребления спиртного или родственникам важно быстро получить врачебную оценку состояния. После осмотра определяют, допустим ли домашний формат, нужна ли капельница, достаточно ли наблюдения на дому или следует рассматривать другой объем помощи. Уже на этапе первичного обращения нередко уточняют, как вызвать врача, какие наркологическая услуги доступны на дому, возможен ли срочный выезд круглосуточно и в каких случаях вывод из запоя безопаснее проводить не дома, а в стационаре.
Исследовать вопрос подробнее – вызов нарколога на дом
Такие состояния требуют медицинского вмешательства, поскольку могут ухудшаться без лечения. Капельница позволяет стабилизировать состояние и снизить нагрузку на организм. Услуги могут предоставляться анонимно, а при тяжёлых случаях рассматривается лечение в стационаре.
Получить дополнительную информацию – https://kapelnicza-ot-pokhmelya-voronezh-4.ru
References:
Casino bet 182.237.3.195
Нарколог на дом в Москве: срочный выезд врача, капельницы и помощь при запое в наркологической клинике «Клиника доктора Калюжной».
Узнать больше – врач нарколог на дом
Вывод из запоя на дому в Екатеринбурге: эффективное лечение, детоксикация и восстановление организма в наркологической клинике «Детокс»
Подробнее тут – вывод из запоя на дому
Вывод из запоя на дому в Санкт-Петербурге с анонимным выездом врача, снятием интоксикации и поддержкой в наркологической клинике «Частный медик 24»
Разобраться лучше – вывод из запоя на дому цена в санкт-петербурге
Перечисленные состояния требуют профессионального вмешательства и не предполагают самостоятельного медикаментозного воздействия без врачебного контроля.
Подробнее – выезд нарколога на дом
Такой подход обеспечивает не только устранение симптомов зависимости, но и глубокое восстановление личности. Пациенты получают поддержку врачей на каждом этапе, что делает процесс безопасным и контролируемым.
Углубиться в тему – narcologicheskaya-klinika-v-rostove19.ru/
Между прочим, если вас интересует Обзор актуальных событий Архангельской области: новости, культура и туризм, загляните сюда.
Вот, делюсь ссылкой:
https://29media.ru
Медицинский подход к выводу из запоя предполагает не только устранение внешних симптомов, но и стабилизацию внутренних процессов организма, что особенно важно при повторяющихся или затяжных эпизодах.
Изучить вопрос глубже – вывод из запоя круглосуточно в тольятти
За выездом врача чаще обращаются тогда, когда человеку тяжело добраться до клиники, он ослаблен после нескольких дней употребления алкоголя или родственникам важно быстрее понять, какая тактика будет безопасной. После осмотра можно определить, нужна ли капельница, достаточно ли детоксикации на дому, требуется ли повторное наблюдение, а в дальнейшем — консультация по лечению алкоголизма, кодирование или реабилитация. В части случаев уже первый звонок позволяет понять, идет ли речь только о временном ухудшении самочувствия или о состоянии, при котором может потребоваться вывод из запоя в стационаре.
Выяснить больше – вызвать нарколога на дом екатеринбург
Медицинская помощь начинается с детального осмотра и сбора анамнестических данных. Врач оценивает длительность запоя, объем употребляемого алкоголя, наличие хронических заболеваний и ранее перенесенных осложнений. Эти сведения необходимы для выбора корректной тактики лечения и исключения потенциальных рисков.
Подробнее можно узнать тут – вывод из запоя круглосуточно хабаровск
В клинике применяются современные медицинские технологии, направленные на восстановление организма и стабилизацию психоэмоционального состояния. Ниже представлена таблица с описанием основных методов и их терапевтического значения.
Получить дополнительные сведения – наркологическая клиника нарколог в тольятти
Капельница от похмелья — это медицинская процедура, направленная на быстрое устранение симптомов алкогольной интоксикации и восстановление нормальной работы организма. При выраженном похмельном синдроме самостоятельные методы часто оказываются недостаточными, поскольку не воздействуют на причины состояния. В наркологической клинике «Похмельная служба» используется инфузионная терапия с круглосуточным выездом специалиста, что позволяет начать лечение сразу после обращения.
Исследовать вопрос подробнее – https://kapelnicza-ot-pokhmelya-voronezh-7.ru/
Комплексная терапия проводится в течение 1–3 суток в зависимости от состояния пациента. В особо тяжёлых случаях врачи расширяют курс лечения, включив контрольные анализы и консультации смежных специалистов.
Изучить вопрос глубже – http://vyvod-iz-zapoya-tolyatti0.ru/vyvod-iz-zapoya-tolyatti-na-domu/
Отдельно стоит выделить ситуации, когда семья сталкивается не только с алкоголем, но и с употреблением наркотиков. В таких случаях врачебная консультация особенно важна, поскольку последствия интоксикации могут отличаться, а признаки наркомании и алкоголизма иногда накладываются друг на друга. Если речь идет о смешанном употреблении, подход к помощи на дому требует особой осторожности.
Получить дополнительную информацию – вызвать нарколога на дом
Медицинский подход к выводу из запоя предполагает не только устранение внешних симптомов, но и стабилизацию внутренних процессов организма, что особенно важно при повторяющихся или затяжных эпизодах.
Получить дополнительные сведения – анонимный вывод из запоя в тольятти
Процедура вывода из запоя на дому включает несколько ключевых этапов, которые обеспечивают максимально быстрое и безопасное восстановление пациента. Эти этапы тщательно контролируются врачом, что минимизирует риски и помогает достичь наилучших результатов.
Детальнее – вывод из запоя на дому круглосуточно
Нарколог на дом в Москве: срочный выезд врача, капельницы и помощь при запое в наркологической клинике «Клиника доктора Калюжной».
Подробнее тут – https://narkolog-na-dom-moskva-17.ru
Домашний вызов нарколога удобен в случаях, когда человеку тяжело ехать в клинику, он отказывается от поездки или родственники хотят как можно быстрее заказать медицинскую помощь на месте. Формат выезда позволяет врачу оценить самочувствие, определить тяжесть состояния и подобрать дальнейшую тактику. Если ситуация требует расширенного подхода, может обсуждаться последующая консультация в центре, лечение алкоголизма, кодирование, а в более сложных случаях — длительная реабилитация.
Углубиться в тему – вызов нарколога на дом
К основным показаниям относятся:
Разобраться лучше – https://vyvod-iz-zapoya-na-domu-sankt-peterburg-8.ru
Выезд нарколога на дом позволяет быстро устранить эти симптомы, нормализовать состояние пациента и предотвратить дальнейшее ухудшение здоровья.
Получить дополнительные сведения – https://kapelnicza-ot-pokhmelya-ekaterinburg-8.ru
Первичный осмотр включает оценку витальных показателей, уровня сознания, выраженности симптомов и факторов риска. После этого врач определяет объём вмешательства и приступает к терапии. В большинстве случаев применяется инфузионное лечение, направленное на восстановление водного баланса и выведение токсинов.
Детальнее – http://www.domen.ru
Решение о помещении пациента в стационар принимается на основе объективных медицинских критериев, а не только по желанию родственников. К показаниям относятся: запой длительностью более 72 часов, выраженная абстиненция с тахикардией, артериальной гипертензией, профузным потоотделением, наличие в анамнезе алкогольных делириев или судорожных эпизодов, сопутствующие хронические заболевания печени, сердца, поджелудочной железы. В сложные ситуации, когда интоксикация затрагивает несколько систем одновременно, резкое прекращение употребления без медицинской поддержки может спровоцировать отек мозга, острую сердечную недостаточность или желудочно-кишечное кровотечение. При сочетанных расстройствах, когда в анамнезе присутствует наркомании, протоколы адаптируются под специфику психоактивных соединений и включают усиленный нейрологический контроль. Стационар позволяет провести полноценную диагностику, включая ЭКГ, экспресс-анализы крови, УЗИ внутренних органов и мониторинг сатурации, что формирует точную картину состояния и исключает шаблонные назначения.
Исследовать вопрос подробнее – нарколог вывод из запоя в стационаре в санкт-петербурге
После оформления вызова нарколог приезжает к пациенту и проводит комплексную оценку состояния. Врач измеряет давление, частоту пульса, оценивает уровень сознания и выраженность симптомов. На основании полученных данных формируется план лечения, который реализуется сразу на месте.
Исследовать вопрос подробнее – вызов нарколога на дом
References:
Hollywood casino toledo oh swimmingwiki.site
Эта публикация исследует взаимосвязь зависимости и психологии. Мы обсудим, как психологические аспекты влияют на появление зависимостей и процесс выздоровления. Читатели смогут понять важность профессиональной поддержки и применения научных подходов в терапии.
Получить профессиональную консультацию – нарколог на дом 24
Эта медицинская заметка содержит сжатую информацию о новых находках и методах в области здравоохранения. Мы предлагаем читателям свежие данные о заболеваниях, профилактике и лечении. Наша цель — быстро и доступно донести важную информацию, которая поможет в повседневной жизни и понимании здоровья.
Тыкай сюда — узнаешь много интересного – нарколог дом
Этот процесс не занимает много времени — обычно процедура длится от 30 до 60 минут. Важно, что врач контролирует все этапы, обеспечивая безопасность пациента и корректируя терапию по мере необходимости. Такой подход позволяет быстро и эффективно облегчить симптомы похмелья и вернуться к нормальной жизнедеятельности.
Получить дополнительную информацию – http://kapelnicza-ot-pokhmelya-samara-13.ru/
Эта публикация исследует взаимосвязь зависимости и психологии. Мы обсудим, как психологические аспекты влияют на появление зависимостей и процесс выздоровления. Читатели смогут понять важность профессиональной поддержки и применения научных подходов в терапии.
Разобраться лучше – нарколог на дом москва
Этот информационный материал собраны данные, которые помогут лучше понять текущие тенденции и процессы в различных сферах жизни. Мы предоставляем четкий анализ, графики и примеры, чтобы информация была не только понятной, но и практичной для принятия решений.
Полная информация здесь – алкоголизм клиника лечение принудительно
Для жителей Екатеринбурга наркологическая клиника «Частный медик 24» предлагает услуги выезда нарколога на дом для проведения капельницы от похмелья. Это удобный и эффективный способ лечения, особенно если пациент испытывает тяжёлые симптомы похмелья и не может поехать в клинику. Выезд нарколога на дом позволяет начать лечение сразу, не тратя время на поездку и ожидания в клинике. Врач приезжает с необходимыми препаратами и оборудованием, проводит осмотр и назначает необходимую терапию.
Разобраться лучше – капельница от похмелья екатеринбург
References:
Chuzzle deluxe online ktmoli.com
Нарколог на дом в Екатеринбурге востребован в ситуациях, когда человеку нужна врачебная помощь после употребления алкоголя, при запое, выраженном похмельном синдроме, нарушении сна, тревоге, скачках давления, слабости и других признаках ухудшения самочувствия. Такой формат обращения часто выбирают семьи, которые хотят вызвать врача без поездки в клинику и быстро получить консультацию по состоянию больного. Домашний выезд особенно важен тогда, когда требуется детоксикация, наблюдение после нескольких дней употребления спиртного и оценка рисков, связанных с последствиями алкоголизма.
Узнать больше – вызов нарколога на дом в екатеринбурге
В данной статье рассматриваются проблемы общественного здоровья и социальные факторы, влияющие на него. Мы акцентируем внимание на значении профилактики и осведомленности в защите здоровья на уровне общества. Читатели смогут узнать о новых инициативах и программах, направленных на улучшение здоровья населения.
Получить профессиональную консультацию – лечение наркомании нижний новгород
В Нижнем Новгороде выезд нарколога на дом используется при состояниях, требующих оперативной медицинской оценки и начала терапии. Врач приезжает с необходимыми препаратами, проводит осмотр и формирует план лечения на месте. Такой формат позволяет сократить время до начала помощи и снизить нагрузку на пациента.
Исследовать вопрос подробнее – наркологическая помощь нижний новгород
В этом обзоре представлены различные методы избавления от зависимости, включая терапевтические и психологические подходы. Мы сравниваем их эффективность и предоставляем рекомендации для тех, кто хочет вернуться к трезвой жизни. Читатели смогут найти информацию о реабилитационных центрах и поддерживающих группах.
Ознакомьтесь поближе – наркологическая клиника телефон
References:
Live online casino coolpot.stream
В этой статье собраны факты, которые освещают целый ряд важных вопросов. Мы стремимся предложить читателям четкую, достоверную информацию, которая поможет сформировать собственное мнение и лучше понять сложные аспекты рассматриваемой темы.
ТОП-5 причин узнать больше – вызвать врача нарколога
Процедура капельницы от похмелья с контролем врача в Самаре начинается с первичной консультации, на которой врач осматривает пациента, измеряет его основные показатели (давление, пульс, температуру) и оценивает общее состояние. На основе этих данных выбирается оптимальный состав капельницы, которая может включать в себя различные компоненты, такие как солевые растворы, витамины, антиоксиданты и медикаменты для снятия симптомов похмелья.
Углубиться в тему – капельница от похмелья в самаре
Нарколог на дом в Нижнем Новгороде с быстрым приездом специалиста, детоксикацией и медицинской поддержкой в наркологической клинике «Частный медик 24»
Получить дополнительные сведения – врач нарколог на дом нижний новгород
В этой статье представлен занимательный и актуальный контент, который заставит вас задуматься. Мы обсуждаем насущные вопросы и проблемы, а также освещаем истории, которые вдохновляют на действия и изменения. Узнайте, что стоит за событиями нашего времени!
Не упусти шанс – вывод из запоя санкт петербург стационар
Этот информационный материал подробно освещает проблему наркозависимости, ее причины и последствия. Мы предлагаем информацию о методах лечения, профилактики и поддерживающих программах. Цель статьи — повысить осведомленность и продвигать идеи о необходимости борьбы с зависимостями.
Узнай первым! – наркология на дом
В Санкт-Петербурге вывод из запоя на дому рассматривается, когда состояние пациента позволяет проводить лечение вне стационара, но требует контроля специалиста. Врач оценивает общее состояние, длительность запоя и выраженность симптомов, после чего принимает решение о формате помощи при алкоголизме. Важно, что лечение начинается сразу после осмотра, без необходимости ожидания госпитализации. При необходимости можно заказать услуги на сайте клиники или получить консультацию специалистов.
Разобраться лучше – вывод из запоя на дому санкт-петербург
References:
Green bay casino bsq.cc
Вывод из запоя на дому в Санкт-Петербурге с выездом специалиста, стабилизацией состояния и медицинской поддержкой в наркологической клинике «Частный медик 24»
Получить больше информации – http://vyvod-iz-zapoya-na-domu-sankt-peterburg-11.ru/
References:
Fitz casino https://yatirimciyiz.net/user/berryroot12
В статье по вопросам здоровья мы рассматриваем актуальные проблемы, с которыми сталкивается общество. Обсуждаются заболевания, факторы риска и важные аспекты профилактики. Читатели получат полезные советы о том, как сохранить здоровье и улучшить качество жизни.
Более того — здесь – вызвать врача нарколога на дом
References:
Wind creek casino https://gratisafhalen.be/author/plowscrew59/
References:
Emploi restomontreal https://theflatearth.win/wiki/Post:Das_kostenlose_Online_Casino_Jetzt_spielen
В этой заметке мы представляем шаги, которые помогут в процессе преодоления зависимостей. Рассматриваются стратегии поддержки и чек-листы для тех, кто хочет сделать первый шаг к выздоровлению. Наша цель — вдохновить читателей на положительные изменения и поддержать их в трудных моментах.
Лучшее решение — прямо здесь – лечение наркомании в нижнем новгороде
В Нижнем Новгороде стационарный формат лечения применяется при наличии факторов, повышающих риск осложнений или снижающих эффективность домашней терапии. Врач принимает решение на основании осмотра, консультации и анализа данных, оценивая текущее состояние пациента и его реакцию на предыдущие попытки лечения. При необходимости можно заранее обратиться в центр лечения алкоголизма и наркомании или заказать услугу по телефону.
Ознакомиться с деталями – врач вывод из запоя в нижнем новгороде
Эта информационная публикация освещает широкий спектр тем из мира медицины. Мы предлагаем читателям ясные и понятные объяснения современных заболеваний, методов профилактики и лечения. Информация будет полезна как пациентам, так и медицинским работникам, желающим поддержать уровень своих знаний.
Это ещё не всё… – нарколог на дом телефон
Этот медицинский обзор сосредоточен на последних достижениях, которые оказывают влияние на пациентов и медицинскую практику. Мы разбираем инновационные методы лечения и исследований, акцентируя внимание на их значимости для общественного здоровья. Читатели узнают о свежих данных и их возможном применении.
Кликни и узнай всё! – наркологическая клиника нижний новгород
Статья посвящена анализу текущих трендов в медицине и их влиянию на жизнь людей. Мы рассмотрим новые технологии, методы лечения и значение профилактики в обеспечении долголетия и здоровья.
Что ещё? Расскажи всё! – капельница на дому анонимно
Процесс лечения капельницей помогает улучшить состояние пациента уже через короткий период. Важно, что процедура не только снимает симптомы похмелья, но и восстанавливает нормальную работу печени, почек и других органов, пострадавших от токсического воздействия алкоголя. Это помогает предотвратить долгосрочные последствия интоксикации, такие как хроническая усталость, проблемы с органами и психоэмоциональные расстройства.
Подробнее можно узнать тут – капельница от похмелья
В этой статье мы обсудим процесс восстановления после зависимостей, акцентируя внимание на различных методах и подходах к реабилитации. Читатели узнают, как создать план выздоровления и использовать полезные ресурсы для достижения устойчивых изменений.
Полная информация здесь – выезд на дом нарколога анонимно
Эта публикация содержит ценные советы и рекомендации по избавлению от зависимости. Мы обсуждаем различные стратегии, которые могут помочь в процессе выздоровления и важность обращения за помощью. Читатели смогут использовать полученные знания для улучшения своего состояния.
Нажмите, чтобы узнать больше – нарколога на дом
Этот информативный текст отличается привлекательным содержанием и актуальными данными. Мы предлагаем читателям взглянуть на привычные вещи под новым углом, предоставляя интересный и доступный материал. Получите удовольствие от чтения и расширьте кругозор!
Продолжить изучение – принудительное лечение от алкоголизма наркология
Этот увлекательный информационный материал подарит вам массу новых знаний и ярких эмоций. Мы собрали для вас интересные факты и сведения, которые обогатят ваш опыт. Откройте для себя увлекательный мир информации и насладитесь процессом изучения!
Желаете узнать подробности? – вывод из запоя в стационаре спб
Bu arada soyleyeyim, eger uzun sacl? futbolcular konusuyla ilgileniyorsan?z, buray? inceleyin. Kendiniz gorun: https://takimgiyim.com/articles/futbolcu-uzun-sac-modelleri/
В данной обзорной статье представлены интригующие факты, которые не оставят вас равнодушными. Мы критикуем и анализируем события, которые изменили наше восприятие мира. Узнайте, что стоит за новыми открытиями и как они могут изменить ваше восприятие реальности.
Хочешь знать всё? – цена на вывод из запоя в стационаре
Bu arada, eger terrex ne demek konusuyla ilgileniyorsan?z, buray? inceleyin. Iste link: https://dinamizsport.com/articles/adidas-terrex-spor-ayakkabi-estetik-performans/
В этой статье мы рассматриваем разрушительное влияние зависимости на жизнь человека. Обсуждаются аспекты, такие как здоровье, отношения и профессиональные достижения. Читатели узнают о необходимости обращения за помощью и о путях к восстановлению.
Рассмотреть проблему всесторонне – нарколог капельницу на дому
Эта разъяснительная статья содержит простые и доступные разъяснения по актуальным вопросам. Мы стремимся сделать информацию понятной для широкой аудитории, чтобы каждый смог разобраться в предмете и извлечь из него максимум пользы.
Выяснить больше – https://kapelnicza-ot-pokhmelya-samara-13.ru/
В данном обзоре представлены основные направления и тренды в области медицины. Мы обсудим актуальные проблемы здравоохранения, свежие открытия и новые подходы, которые меняют представление о лечении и профилактике заболеваний. Эта информация будет полезна как специалистам, так и широкой публике.
Секреты успеха внутри – принудительное лечение от алкогольной зависимости
Доброго!
Гинекологи объясняют, как проходит кольпоскопия шейки матки детально. Осмотр под увеличением выявляет патологические участки слизистой оболочки. Обработка растворами помогает отличить здоровые ткани от измененных. При необходимости врач берет биопсию для гистологического анализа. Процедура безболезненна и обеспечивает точную диагностику предраковых состояний.
Лаборанты учат как расшифровать общий анализ крови самостоятельно базово. Уровень гемоглобина, лейкоцитов и тромбоцитов отражает состояние здоровья. Повышение СОЭ часто указывает на воспалительный процесс в организме. Однако точный диагноз может поставить только врач, учитывая клиническую картину. Самодиагностика полезна для общего понимания, но не заменяет специалиста.
Больше информации по ссылке – https://www.med-edu.ru/all_news/827
как проходит кольпоскопия шейки матки, гирудотерапия при бесплодии эффективность, ультразвуковая терапия при гинекологических заболеваниях
лечение бронхита ингаляциями небулайзером, лечение нефроптоза почки упражнения, безопасность физиотерапии при миоме матки
Здоровья и долголетия!
Этот процесс не занимает много времени — обычно процедура длится от 30 до 60 минут. Важно, что врач контролирует все этапы, обеспечивая безопасность пациента и корректируя терапию по мере необходимости. Такой подход позволяет быстро и эффективно облегчить симптомы похмелья и вернуться к нормальной жизнедеятельности.
Получить дополнительную информацию – капельница от похмелья в самаре
Добрый день!
Терапевты изучают причины хронической усталости и слабости комплексно. Дефицит витаминов, анемия и проблемы с щитовидной железой часто виноваты. Стресс и нарушение режима сна истощают ресурсы организма. Полное обследование помогает выявить скрытые заболевания и дефициты. Коррекция образа жизни и прием добавок возвращают энергию и бодрость.
Пациенты часто спрашивают, как часто можно делать КТ без вреда для здоровья. Частота исследований зависит от клинической необходимости и полученной лучевой нагрузки. Врачи стараются минимизировать риски, назначая процедуру только по строгим показаниям. Современные аппараты позволяют снизить дозу облучения при сохранении качества снимков. Обсудите с врачом альтернативные методы диагностики, если это возможно.
Больше информации по ссылке – https://doktor21.ru/directions/ginekologiya/konsultatsiya-vracha-ginekologa-onlayn/
норма эстрадиола у женщин по дням цикла, лечение гипертонической болезни начальной стадии, гигиена полости рта правила чистки
связь щитовидной железы и менструального цикла, подготовка к сдаче анализа на глюкозу, когда делать маммографию по возрасту
Здоровья и долголетия!
В обзорной статье вы найдете собрание важных фактов и аналитики по самым разнообразным темам. Мы рассматриваем как современные исследования, так и исторические контексты, чтобы вы могли получить полное представление о предмете. Погрузитесь в мир знаний и сделайте шаг к пониманию!
Более подробно об этом – капельница от алкоголя в стационаре
Этот краткий обзор предлагает сжатую информацию из области медицины, включая ключевые факты и последние новости. Мы стремимся сделать информацию доступной и понятной для широкой аудитории, что позволит читателям оставаться в курсе актуальных событий в здравоохранении.
Узнать напрямую – balashiha.stop-alko.com
Доброго!
Точные транзакционные ключи для продаж привлекают аудиторию с высокой готовностью к покупке и увеличивают конверсию. Мы выявляем фразы с коммерческим интентом и оптимизируем под них посадочные страницы. Поисковые системы показывают такие материалы пользователям на финальной стадии воронки продаж. Вы получаете горячий трафик, который быстро конвертируется в заказы и прибыль. Работайте с транзакционными ключами профессионально и максимизируйте доход от органического поиска.
Детальная микроразметка отзывов и рейтингов добавляет звёзды и оценки прямо в результаты поиска. Мы структурируем пользовательские оценки в машиночитаемый формат для корректного отображения алгоритмами. Поисковые системы выделяют такие сниппеты и повышают их кликабельность среди конкурентов. Вы получаете социальное доказательство качества и увеличиваете поток целевых переходов. Размечайте отзывы профессионально и усиливайте доверие к бренду в органической выдаче.
Больше информации по ссылке – http://5btc.ru/category/seo/index.html
профилактика наложения санкций, влияние отзывов на ранжирование, вебинары и онлайн-мероприятия
оценка эффективности SEO, инфографика для вирусного линкбилдинга, инфографика и визуальный контент
Удачи!
К основным показаниям относятся:
Подробнее можно узнать тут – вывод из запоя в стационаре в нижнем новгороде
Реабилитация алкоголиков невозможна без участия высококвалифицированных специалистов. Это врачи-наркологи, психологи, психотерапевты и социальные работники, каждый из которых вносит свой вклад в восстановление пациента. Психологическая поддержка особенно важна на всех этапах лечения, поскольку помогает пациенту осознать проблему, справиться с внутренними конфликтами и выработать стратегии для предотвращения рецидивов. В некоторых случаях, например, при длительном запое или наркомании, может быть рекомендован выезд на дом для предоставления первой медицинской помощи и дальнейшей реабилитации.
Исследовать вопрос подробнее – клиника реабилитации алкоголиков
Запой – это не просто пьянство, а состояние, когда организм становится зависимым от алкоголя. Накопление токсинов приводит к сбоям в работе органов и ослаблению защиты организма. Самостоятельный выход из запоя может быть опасен и только усугубить состояние. Мы предлагаем лечение запоя на дому, чтобы избежать больницы и создать комфорт. Наши специалисты быстро приедут к вам и окажут всю необходимую помощь круглосуточно. Запой приводит к серьезным проблемам со здоровьем, ухудшает качество жизни и угрожает жизни. Очень важно вовремя обратиться за помощью, чтобы избежать необратимых последствий.
Исследовать вопрос подробнее – http://vyvod-iz-zapoya-krasnoyarsk0.ru/vyvod-iz-zapoya-kruglosutochno-krasnoyarsk
whbi9w
Thanks for sharing excellent informations. Your web-site is so cool. I am impressed by the details that you’ve on this website. It reveals how nicely you understand this subject. Bookmarked this website page, will come back for more articles. You, my friend, ROCK! I found simply the info I already searched everywhere and just couldn’t come across. What a great web-site.
Первичный осмотр включает оценку витальных показателей, уровня сознания, выраженности симптомов и факторов риска. После этого врач определяет объём вмешательства и приступает к терапии. В большинстве случаев применяется инфузионное лечение, направленное на восстановление водного баланса и выведение токсинов.
Изучить вопрос глубже – вызов наркологической помощи нижний новгород
Существует ряд ситуаций, при которых вызов специалиста на дом является обоснованным решением:
Получить дополнительные сведения – нарколог на дом
Этот процесс не занимает много времени — обычно процедура длится от 30 до 60 минут. Важно, что врач контролирует все этапы, обеспечивая безопасность пациента и корректируя терапию по мере необходимости. Такой подход позволяет быстро и эффективно облегчить симптомы похмелья и вернуться к нормальной жизнедеятельности.
Выяснить больше – kapelnicza-ot-pokhmelya-samara-13.ru/
Непрерывный мониторинг витальных показателей — ключевое отличие стационарного формата, обеспечивающее безопасную детоксикацию. В палатах клиники «Элегия Мед» установлены системы отслеживания частоты пульса, сатурации, температуры и артериального давления, данные с которых автоматически передаются в электронную медицинскую карту. Медицинский персонал дежурит круглосуточно, что обеспечивает мгновенную реакцию на ухудшение состояния: коррекцию инфузионной терапии, введение симптоматических препаратов, привлечение смежных специалистов при необходимости. Такая организация процесса исключает хаотичное назначение средств, предотвращает полипрагмазию и гарантирует, что каждый этап детоксикации проходит под строгим клиническим контролем. При необходимости применяются дополнительные методы очищения крови, включая плазмаферез, который эффективно помогает вывести стойкие токсины и метаболиты, не удаляемые стандартной инфузионной терапией.
Подробнее можно узнать тут – нарколог вывод из запоя в стационаре в санкт-петербурге
Для жителей Екатеринбурга наркологическая клиника «Частный медик 24» предлагает услуги выезда нарколога на дом для проведения капельницы от похмелья. Это удобный и эффективный способ лечения, особенно если пациент испытывает тяжёлые симптомы похмелья и не может поехать в клинику. Выезд нарколога на дом позволяет начать лечение сразу, не тратя время на поездку и ожидания в клинике. Врач приезжает с необходимыми препаратами и оборудованием, проводит осмотр и назначает необходимую терапию.
Разобраться лучше – капельница от похмелья анонимно
Состояние после длительного употребления алкоголя или наркотических веществ сопровождается комплексом симптомов: обезвоживание, нарушение работы сердечно-сосудистой системы, тревожность, бессонница, слабость. В таких случаях важно не откладывать помощь, поскольку самостоятельное восстановление организма может быть затруднено. Наркологическая помощь на дому позволяет быстро стабилизировать показатели и начать контролируемое лечение.
Получить больше информации – нарколог на дом анонимно в нижнем новгороде
Помощь на дому рассматривают при состояниях, которые сопровождаются заметным ухудшением самочувствия после алкоголя. Обычно это запой на протяжении нескольких дней, тяжелое похмелье, выраженная слабость, бессонница, тревога, дрожь в руках, сухость во рту, отсутствие аппетита, тошнота, раздражительность и ощущение истощения. В подобных случаях врачебный осмотр нужен для того, чтобы оценить тяжесть состояния и определить, безопасен ли домашний формат в конкретной ситуации.
Узнать больше – нарколог на дом вывод в москве
Этот текст представляет собой обзор свежих данных и исследований в области медицины. Он призван помочь читателям понять, как научные достижения влияют на лечение, диагностику и общее состояние системы здравоохранения.
Перейти к полной версии – вызвать наркологическую помощь
В этой статье мы рассматриваем разрушительное влияние зависимости на жизнь человека. Обсуждаются аспекты, такие как здоровье, отношения и профессиональные достижения. Читатели узнают о необходимости обращения за помощью и о путях к восстановлению.
Слушай внимательно — тут важно – narcology clinic ростов на дону
Здравствуйте!
Ремонт в ванной — это важный этап, который влияет на комфорт вашей квартиры. Мы предлагаем ремонт в ванной, где внимание уделяется каждому элементу, от плитки до сантехники. В процессе ремонта мы используем только качественные и долговечные материалы. Ремонт в ванной — это удобство и стиль для вашего пространства. Ремонт в ванной под ключ — это качественно и красиво.
Строительство дачи — это возможность создать уютное место для отдыха вдали от городской суеты. Мы занимаемся строительством дач, которые идеально подходят для сезонного проживания и отдыха. Строительство дачи — это проект, который будет радовать вас долгие годы. Строительство дачи — это идеальное место для вашего отдыха.
Больше информации по ссылке – https://remont-kuxni.ru/2025/01/kak-vybrat-kachestvennyj-laminat-dlja-kuhni.html
ремонт на дому в краснодаре, для отделки цоколя дома, семейная ипотека строительство дома
пеноблок для строительство дома, ремонт квартиры стоимость работы, ремонта компьютеров на дому
Удачи!
プライバシーを守りながら生活することは、とても大切です。現代人は特に、心のケアを忘れがちになります。この記事は、そんな私たちに気づきを与えてくれます。ゆっくりと心を整える時間を持つことが、本当に重要だと感じました。今後も読み続けたいと思います。
Вывод из запоя на дому — это формат наркологической помощи, при котором лечение проводится в привычной для пациента обстановке с выездом врача. Такой подход применяется в ситуациях, когда состояние требует медицинского вмешательства, но не предполагает обязательной госпитализации. В наркологической клинике «Частный медик 24» помощь на дому выстраивается по принципу поэтапной стабилизации: сначала устраняются острые проявления, затем оценивается динамика и при необходимости корректируется терапия.
Подробнее можно узнать тут – вывод из запоя на дому цена санкт-петербург
Atlantis Resort Bahamas has a white sand Beach and mesmerizing locations if you want to make your day special on the island hire our luxury and SUV’s cars for the trip to Nassau Airport to Atlantis
Эта публикация раскрывает психологические механизмы зависимости и их роль в развитии расстройств. Читатель узнает о том, как психология влияет на формирование зависимостей и как профессиональная помощь может изменить ситуацию.
Не пропусти важное – цены на лечение алкоголизма
В этом обзоре представлены различные методы избавления от зависимости, включая терапевтические и психологические подходы. Мы сравниваем их эффективность и предоставляем рекомендации для тех, кто хочет вернуться к трезвой жизни. Читатели смогут найти информацию о реабилитационных центрах и поддерживающих группах.
Кликни и узнай всё! – лечение алкоголизма в ростове
Эта публикация раскрывает психологические механизмы зависимости и их роль в развитии расстройств. Читатель узнает о том, как психология влияет на формирование зависимостей и как профессиональная помощь может изменить ситуацию.
Получить полную информацию – narcology clinic
В этой статье рассматриваются способы преодоления зависимости и успешные истории людей, которые справились с этой проблемой. Мы обсудим важность поддержки со стороны близких и профессионалов, а также стратегии, которые могут помочь в процессе выздоровления. Научитесь первоочередным шагам к новой жизни.
Узнать напрямую – частный медик 24
Нарколог на дом в Нижнем Новгороде с быстрым приездом специалиста, детоксикацией и медицинской поддержкой в наркологической клинике «Частный медик 24»
Углубиться в тему – вызвать нарколога на дом в нижнем новгороде
Процедура капельницы от похмелья с контролем врача в Самаре начинается с первичной консультации, на которой врач осматривает пациента, измеряет его основные показатели (давление, пульс, температуру) и оценивает общее состояние. На основе этих данных выбирается оптимальный состав капельницы, которая может включать в себя различные компоненты, такие как солевые растворы, витамины, антиоксиданты и медикаменты для снятия симптомов похмелья.
Получить дополнительные сведения – капельница от похмелья анонимно в самаре
Между прочим, если вас интересует Новости и события Костромской области, посмотрите сюда.
Ссылка ниже:
https://44media.ru
Добрый день!
Критичный LCP Largest Contentful Paint определяет скорость отображения основного контента страницы для пользователя. Мы оптимизируем сервер, изображения и ресурсы для мгновенной загрузки главного элемента. Поисковые системы учитывают этот параметр при ранжировании и могут понижать медленные страницы. Вы удерживаете внимание посетителей с первых секунд и снижаете показатель отказов. Оптимизируйте LCP профессионально и получайте бонусы от поисковых алгоритмов.
Важный FID First Input Delay измеряет время отклика сайта на первое взаимодействие пользователя. Мы минимизируем выполнение JavaScript и оптимизируем главную нить для мгновенной реакции. Поисковые алгоритмы ценят интерактивные ресурсы и улучшают их позиции в выдаче. Ваши посетители не сталкиваются с задержками и охотнее совершают целевые действия. Улучшайте FID профессионально и повышайте конверсию органического трафика.
Больше информации по ссылке – https://azbuka-ineta.ru/cat/45
особенности ранжирования в Яндексе, микроразметка отзывов и рейтингов, активность в соцсетях для трафика
сбор семантического ядра, структурирование данных для машин, уникальность текстов проверка
Удачи!
В практике лечения на дому применяются следующие этапы медицинского воздействия:
Выяснить больше – https://narkolog-na-dom-v-rnd19.ru/narkolog-rostov-baumana
Эта публикация обращает внимание на важность профилактики зависимостей. Мы обсудим, как осведомленность и образование могут помочь в предотвращении возникновения зависимости. Читатели смогут ознакомиться с полезными советами и ресурсами, которые способствуют здоровому образу жизни.
Где почитать поподробнее? – «Похмельная служба» в Анапе
В этой заметке мы представляем шаги, которые помогут в процессе преодоления зависимостей. Рассматриваются стратегии поддержки и чек-листы для тех, кто хочет сделать первый шаг к выздоровлению. Наша цель — вдохновить читателей на положительные изменения и поддержать их в трудных моментах.
Открыть полностью – кодировка от алкоголизма
2qgwjx
В этой статье рассматриваются различные аспекты избавления от зависимости, включая физические и психологические методы. Мы обсудим поддержку, мотивацию и стратегии, которые помогут в процессе выздоровления. Читатели узнают, как преодолеть трудности и двигаться к новой жизни без зависимости.
Нажми и узнай всё – narcology clinic
Этот обзор содержит информацию о передовых достижениях в области медицины. Мы разберем инновационные технологии, которые меняют подход к лечению и диагностике, а также их влияние на эффективность оказания медицинской помощи.
Информация доступна здесь – Похмельная служба Балашиха
Вывод из запоя на дому в Санкт-Петербурге с выездом нарколога, детоксикацией и восстановлением состояния в наркологической клинике «Частный медик 24»
Получить больше информации – вывод из запоя на дому
Существует ряд ситуаций, при которых вызов специалиста на дом является обоснованным решением:
Подробнее можно узнать тут – нарколог на дом вывод
На каждом этапе лечения нарколог контролирует витальные показатели, оценивает динамику восстановления и при необходимости корректирует терапию. Такой подход исключает резкие перепады давления, нарушения сердечного ритма и другие побочные эффекты, часто возникающие при попытках вывести пациента из запоя без медицинского участия.
Подробнее можно узнать тут – скорая вывод из запоя
Эта публикация обращает внимание на важность профилактики зависимостей. Мы обсудим, как осведомленность и образование могут помочь в предотвращении возникновения зависимости. Читатели смогут ознакомиться с полезными советами и ресурсами, которые способствуют здоровому образу жизни.
Доступ к полной версии – Наркологическая клиника «Похмельная служба» в Анапе.
Текст посвящён распространённым мифам о зависимости и их развенчанию. Мы предоставим научно обоснованную информацию и дадим рекомендации по выбору эффективного способа борьбы с зависимым поведением.
Подробности по ссылке – стоп алко балашиха
Добрый день!
Ремонт пола с укладкой плитки — это классическое решение для тех, кто ценит долговечность и практичность. Мы выполняем ремонт пола с укладкой плитки, выбирая материалы, которые будут служить вам долгие годы. Ремонт пола с укладкой плитки — это надежность и долговечность. Ремонт пола с укладкой плитки — это идеальный выбор для вашего дома.
По ремонту квартир мы предлагаем услуги под ключ, включая разработку дизайна, подбор материалов и выполнение всех строительных работ. Мы специализируемся на ремонте квартир любой сложности, от малых до крупных проектов. Наша команда профессионалов обеспечит качественное выполнение работ в установленные сроки. Вы можете быть уверены, что ремонт вашей квартиры будет выполнен с учетом всех современных стандартов и ваших предпочтений. Наши работы всегда выполнены с вниманием к деталям и качеству.
Больше информации по ссылке – http://specmp.ru/jeto-interesno/v-chjom-otlichie-kvarcvinilovogo-laminata-i.html
ремонт газовых плиты на дому, подмосковье под строительство дома, ремонт подъездов многоквартирных дома
телевизор самсунг ремонт на дому, кап ремонта дома, строительство отделка и ремонт бани
Удачи!
Далее выполняется медицинская детоксикация: корректируется водно-электролитный баланс, снимается интоксикация, поддерживается работа сердечно-сосудистой системы, снижается тремор, стабилизируется сон и тревожность. Важно, что схема подбирается индивидуально: при разных рисках объём поддержки будет различаться. В ряде случаев достаточно амбулаторного наблюдения и рекомендаций, в других — нужен стационар, чтобы контролировать динамику и вовремя корректировать терапию.
Выяснить больше – вывод из запоя на дому москва недорого
456tr1
Далее выполняется медицинская детоксикация: корректируется водно-электролитный баланс, снимается интоксикация, поддерживается работа сердечно-сосудистой системы, снижается тремор, стабилизируется сон и тревожность. Важно, что схема подбирается индивидуально: при разных рисках объём поддержки будет различаться. В ряде случаев достаточно амбулаторного наблюдения и рекомендаций, в других — нужен стационар, чтобы контролировать динамику и вовремя корректировать терапию.
Подробнее можно узнать тут – москва вывод из запоя на дому
Разовая стабилизация снимает страдание, но не убирает причину употребления. Частая ошибка — воспринимать детокс как «финал». На практике зависимость поддерживается привычными сценариями: стресс, бессонница, конфликт, усталость, «пустота» после отмены, тяга как способ быстро переключить эмоции. Поэтому после острого этапа важно перейти к диагностике зависимости, работе с триггерами и профилактике рецидивов. Это особенно актуально для тех, у кого уже были срывы после коротких периодов трезвости или кто видит повторяющийся цикл: напряжение — употребление — ухудшение — временная ремиссия — повтор.
Детальнее – клиника наркологии и психиатрии москва
Запой опасен не только продолжительностью, но и тем, как именно организм реагирует на отмену. У кого-то на первом плане давление и тахикардия, у кого-то — паника и бессонница, у кого-то — выраженное обезвоживание и рвота. Чем точнее оценка состояния, тем безопаснее решение: можно ли начинать дома или нужен стационарный формат.
Детальнее – https://vyvod-iz-zapoya-klin12.ru/vyvod-iz-zapoya-cena-v-klinu
Публикация охватывает основные направления развития современной медицины. Мы обсудим значимость научных исследований, инноваций в лечении и роли общественного участия в формировании системы здравоохранения.
Смотрите также – сколько стоит лечение наркозависимости
Когда зависимость начинает управлять распорядком и решениями, важно получить помощь, которая строится на медицинской оценке, а не на общих обещаниях. В условиях мегаполиса люди часто тянут до последнего: пытаются «перетерпеть», закрывают симптомы таблетками, откладывают визит из-за работы и семьи. В итоге острый период только усиливается: растут тревога и бессонница, скачет давление, появляется тремор, нарушается дыхание, усиливаются панические реакции. Наркологическая клиника нужна не для формальности, а для того, чтобы снять непосредственные риски и затем выстроить план лечения зависимости так, чтобы не возвращаться к той же точке через несколько дней или недель. В клинике «Свет Баланса» акцент делается на двух вещах: безопасность в остром состоянии и понятная дорожная карта восстановления после стабилизации.
Изучить вопрос глубже – narkologicheskaya-klinika-moskva12.ru/
Перед перечнем важно пояснить: эти симптомы не означают, что всё обязательно закончится осложнением, но они указывают на высокий риск и требуют профессиональной оценки состояния.
Узнать больше – вывод из запоя на дому клин
Эта информационная публикация освещает широкий спектр тем из мира медицины. Мы предлагаем читателям ясные и понятные объяснения современных заболеваний, методов профилактики и лечения. Информация будет полезна как пациентам, так и медицинским работникам, желающим поддержать уровень своих знаний.
Переходите по ссылке ниже – частный медик 24 ростов на дону
Такие состояния требуют не только лечения, но и наблюдения, поскольку динамика может меняться в течение короткого времени. Стационар позволяет минимизировать риски и обеспечить безопасность пациента. При этом услуга может предоставляться анонимно, а цена лечения зависит от состояния пациента.
Подробнее – наркологический вывод из запоя нижний новгород
Запой редко начинается «в один день». Чаще это накопленный стресс, бессонница, усталость, попытка снять напряжение алкоголем, а затем — потеря контроля. В Москве ситуация усугубляется темпом: работа, дороги, ответственность, постоянные дедлайны. Человек может держаться внешне, но организм постепенно истощается: нарушается сон, растёт тревога, скачет давление, усиливается тремор, появляются перебои в сердце, тошнота, рвота, панические реакции. В какой-то момент становится ясно, что «перетерпеть» не получится, а самостоятельные попытки резко прекратить употребление только повышают риск осложнений. Вывод из запоя в наркологической клинике «Точка Равновесия» — это медицинская помощь, цель которой безопасно остановить употребление, снять интоксикацию и стабилизировать состояние так, чтобы человек мог восстановиться без опасных «качелей» и с понятным планом на ближайшие сутки и недели.
Исследовать вопрос подробнее – moskva-vyvod-iz-zapoya-na-domu
Эта публикация исследует взаимосвязь зависимости и психологии. Мы обсудим, как психологические аспекты влияют на появление зависимостей и процесс выздоровления. Читатели смогут понять важность профессиональной поддержки и применения научных подходов в терапии.
Откройте для себя больше – частный медик 24
Детоксикация — это медицинская стабилизация при интоксикации и тяжёлой отмене. Она помогает снизить нагрузку на организм, скорректировать обезвоживание и водно-электролитные нарушения, уменьшить выраженность тремора, потливости, тошноты, стабилизировать давление и пульс, снизить тревогу и восстановить сон. Но важно понимать границы результата: после длительного запоя организм не восстанавливается мгновенно, слабость и эмоциональная неустойчивость могут сохраняться в первые сутки.
Изучить вопрос глубже – https://narkologicheskaya-klinika-orekhovo-zuevo12.ru/
В этом обзоре представлены различные методы избавления от зависимости, включая терапевтические и психологические подходы. Мы сравниваем их эффективность и предоставляем рекомендации для тех, кто хочет вернуться к трезвой жизни. Читатели смогут найти информацию о реабилитационных центрах и поддерживающих группах.
Лови подробности – стоп алко анапа
Состояние пациента при интоксикации может развиваться по-разному: от умеренной слабости и головной боли до выраженной дезориентации, тахикардии и нарушений сна. В таких ситуациях важно не откладывать обращение за помощью. Наркологическая помощь на дому рассматривается, когда требуется быстрое вмешательство и контроль состояния без транспортировки пациента.
Подробнее тут – https://narkologicheskaya-pomoshh-nizhnij-novgorod-8.ru/
Капельница от похмелья в Самаре: эффективное восстановление, снятие интоксикации и помощь специалистов в наркологической клинике «Детокс»
Исследовать вопрос подробнее – капельница от похмелья вызов на дом самара
Алкогольная зависимость сопровождается не только физическими, но и глубокими психоэмоциональными проблемами. Психотерапевтическая помощь играет важную роль в лечении, помогая пациенту осознать причины зависимости и разработать стратегии для предотвращения рецидивов.
Получить дополнительные сведения – https://narcolog-na-dom-ufa0.ru/narkolog-na-dom-ufa-czeny/
Выбор формата — ключевой момент. Нельзя ориентироваться только на удобство, потому что в ряде случаев «домашний» вариант создаёт иллюзию безопасности, когда на самом деле нужен контроль. В клинике «Свет Баланса» формат подбирается по состоянию: оценивают симптомы, риски осложнений, способность пациента соблюдать назначения и необходимость наблюдения.
Подробнее – клиника наркологии москва
Главная задача — сделать состояние управляемым: уменьшить тошноту, тремор, потливость, головную боль, «туман» в голове, снизить тревогу, выровнять показатели, помочь восстановить сон. При этом важно сохранять реалистичные ожидания: после длительного запоя организм истощён, поэтому слабость и эмоциональная нестабильность могут сохраняться некоторое время. Ключевой показатель качества помощи — не обещание «идеально за час», а безопасная динамика и понятные ориентиры на первые сутки.
Ознакомиться с деталями – vyvod-iz-zapoya-kapelnica
Резервное копирование настроили автоматически — каждую ночь данные уходят на защищённый сервер. После этого сплю спокойно, риск потерять базу сведён к нулю. 1С УНФ для строительства
Ключевой критерий правильного выбора — способность обеспечить контроль динамики. Если состояние нестабильное, симптомы нарастают волнами, есть риск резкого ухудшения ночью или уже наблюдаются опасные признаки (например, выраженная спутанность сознания, судороги, боли в груди, нарушения дыхания), безопаснее стационар. Если риски умеренные, пациент контактный и способен соблюдать рекомендации, возможна выездная помощь и дальнейшее наблюдение по плану.
Получить дополнительную информацию – http://narkologicheskaya-klinika-pushkino12.ru/
Алкогольная зависимость часто удерживается страхом отмены: человек пьёт не ради удовольствия, а чтобы избежать ухудшения. Наркотическая зависимость нередко сопровождается нестабильностью психического состояния и рисками со стороны сердца и дыхания, особенно при смешивании веществ. В обоих случаях задача клиники — не только остановить острое состояние, но и выстроить программу, которая поможет удержаться в реальной жизни: при стрессе, недосыпе, конфликтах и тех ситуациях, где зависимость обычно возвращается.
Получить больше информации – http://narkologicheskaya-klinika-orekhovo-zuevo12.ru
Добрый день!
Строительство домов под ключ — это лучший способ получить готовый дом, не тратя время и усилия на организацию отдельных этапов. Мы занимаемся строительством домов под ключ и предлагаем решения, которые соответствуют вашим требованиям и бюджету. Наши специалисты помогут вам на каждом этапе: от проектирования до отделки. Строительство домов под ключ — это ваш уютный дом, построенный с учетом всех ваших пожеланий. Строительство домов под ключ — это просто и надежно.
Строительство дач под ключ — это удобное решение для тех, кто хочет построить дачу, не заботясь о строительных хлопотах. Мы занимаемся строительством дач под ключ, начиная от проекта до отделки. Строительство дач под ключ — это комфорт и готовность вашего загородного дома. Строительство дач под ключ — это ваш уютный уголок.
Больше информации по ссылке – https://kr74-online.ru/category/news/kultura
дом строительство схема, размеры домов строительство, готовая отделка в квартире
ремонт сталинских домах, ремонт телевизора с выездом мастера на дом, ремонты квартир в хрущевке
Удачи!
В клинике «Вектор Восстановления» логика маршрута строится по этапам. Первый этап — оценка состояния и рисков: длительность употребления, тяжесть отмены, давление, пульс, обезвоживание, хронические заболевания, прошлые осложнения, препараты, которые пациент уже принимал дома. Второй этап — стабилизация: снижение интоксикации, коррекция состояния, восстановление сна, уменьшение тревоги. Третий этап — сопровождение первых суток и переход к восстановлению: план на 24–72 часа, контроль динамики и профилактика «вечернего отката». Четвёртый этап — работа с зависимостью как с привычкой и системой поведения: триггеры, стресс, режим, поддержка семьи, навыки отказа, профилактика рецидива.
Узнать больше – lechenie-alkogolizma-domu
Сервисный договор для небольшого предприятия — полностью оправдан. Не нужен штатный механик широкого профиля, все вопросы решаются профессионально на аутсорсе в короткие сроки. трактор промышленный Казахстан
Такой подход позволяет наркологической клинике в Ростове-на-Дону выстраивать лечение в безопасных и психологически комфортных условиях.
Исследовать вопрос подробнее – https://narkologicheskaya-klinika-v-rostove19.ru/narkolog-rostov-na-donu/
Непрерывный мониторинг витальных показателей — ключевое отличие стационарного формата, обеспечивающее безопасную детоксикацию. В палатах клиники «Элегия Мед» установлены системы отслеживания частоты пульса, сатурации, температуры и артериального давления, данные с которых автоматически передаются в электронную медицинскую карту. Медицинский персонал дежурит круглосуточно, что обеспечивает мгновенную реакцию на ухудшение состояния: коррекцию инфузионной терапии, введение симптоматических препаратов, привлечение смежных специалистов при необходимости. Такая организация процесса исключает хаотичное назначение средств, предотвращает полипрагмазию и гарантирует, что каждый этап детоксикации проходит под строгим клиническим контролем. При необходимости применяются дополнительные методы очищения крови, включая плазмаферез, который эффективно помогает вывести стойкие токсины и метаболиты, не удаляемые стандартной инфузионной терапией.
Разобраться лучше – стационар вывод из запоя
Состояние пациента при интоксикации может развиваться по-разному: от умеренной слабости и головной боли до выраженной дезориентации, тахикардии и нарушений сна. В таких ситуациях важно не откладывать обращение за помощью. Наркологическая помощь на дому рассматривается, когда требуется быстрое вмешательство и контроль состояния без транспортировки пациента.
Разобраться лучше – вызов наркологической помощи нижний новгород
Эта публикация обращает внимание на важность профилактики зависимостей. Мы обсудим, как осведомленность и образование могут помочь в предотвращении возникновения зависимости. Читатели смогут ознакомиться с полезными советами и ресурсами, которые способствуют здоровому образу жизни.
Подробная информация доступна по запросу – Реабилитация наркозависимых
Когда симптомы становятся настолько выраженными, что они мешают нормальному функционированию, капельница становится необходимостью. Она помогает избавиться от дискомфорта и значительно ускоряет процесс восстановления, давая организму все необходимые вещества для нормализации его работы, при этом может проводиться наркологическая детоксикация. Контроль врача на протяжении всей процедуры гарантирует, что капельница будет введена правильно и безопасно, с учетом всех показателей пациента, а при необходимости можно заказать дальнейшую реабилитацию и кодирование.
Детальнее – капельница от похмелья на дому
Our bus service in Annapolis, Maryland, offers versatile transportation solutions. Whether it’s charter bus service Annapolis Maryland for events, shuttle bus services Annapolis for commuters, or wedding transportation Annapolis, we cover all your needs, including airport transfer Annapolis and motor coach bus rental Annapolis.
Make your airport transfer in the Bahamas smooth and efficient. Our airport shuttle service offers a range of vehicles for your comfort, including private cars, luxury transport, and convenient pickups for all travelers.
Limousine Service Atlantis ensures a relaxing journey with modern limousines and expert drivers. Perfect for VIP events or romantic evenings, our Atlantis Limo Services guarantee premium experiences. Trust Limo Services Atlantis for smooth and elegant travel.
Алкогольная зависимость часто удерживается страхом отмены: человек пьёт не ради удовольствия, а чтобы избежать ухудшения. Наркотическая зависимость нередко сопровождается нестабильностью психического состояния и рисками со стороны сердца и дыхания, особенно при смешивании веществ. В обоих случаях задача клиники — не только остановить острое состояние, но и выстроить программу, которая поможет удержаться в реальной жизни: при стрессе, недосыпе, конфликтах и тех ситуациях, где зависимость обычно возвращается.
Получить больше информации – https://narkologicheskaya-klinika-orekhovo-zuevo12.ru/horoshaya-narkologicheskaya-klinika-v-orekhovo-zuevo/
Текст посвящён распространённым мифам о зависимости и их развенчанию. Мы предоставим научно обоснованную информацию и дадим рекомендации по выбору эффективного способа борьбы с зависимым поведением.
Изучить аспект более тщательно – стоп алко дмодедово
Indulge in a premium cruise port transfer Nassau with our service. Our Nassau Cruise Port transfers feature chauffeur-driven vehicles, the standard in luxury transportation Nassau.
We are a professional full-service transportation company and we provide the best party transportation in Abu dhabi, Sharjah, and Dubai.
Travel comfortably with Van Services Dubai, offering Airport Van Services Dubai and Chauffeur Van Service Dubai. Whether you need Corporate Van Services Dubai or Private Van Services Dubai, our fleet ensures smooth and Reliable Van Services Dubai.
Airport Transfer Abu Dhabi delivers Luxury Airport Transfer Abu Dhabi and Premium Airport Transfer Abu Dhabi with Chauffeur Service Abu Dhabi Airport, Airport Taxi Abu Dhabi, and Abu Dhabi Airport Shuttle Service. Easy Book Airport Transfer Abu Dhabi Online for Airport Transfer From Abu Dhabi Airport To City routes.
Affordable HVAC Installation Dubai services provide HVAC Unit Installation Dubai, HVAC System Setup Dubai, and New HVAC System Installation Dubai. Our experienced HVAC Technician Dubai team delivers efficient installation and reliable climate control systems across Dubai.
Shuttle from Fontana to LAX or from Chino to LAX is now easy with our daily services. Ontario Airport to LAX Shuttle is affordable and timely. Book our Shuttle Services Ontario to LAX and enjoy smooth travel for departures and arrivals without any delays.
In Chicago, residents have access to proficient fridge repair services located within the city. There’s no need to search any further if you’re seeking assistance from subzerorepair247.com.
Reliable Maytag appliance repair Chicago from certified experts. We handle Maytag washer repair near me, Maytag dryer repair Chicago, and Maytag oven repair Chicago. Call for affordable Maytag repair Chicago with same day support.
Executive Chauffeur Dubai ensures seamless transportation with Chauffeur Service Dubai. Choose from Luxury Car with Driver Dubai or VIP Chauffeur Service Dubai, managed by Professional Chauffeur Dubai for corporate, airport, and leisure transfers.
Hire a driver in Dubai through Call Driver in Dubai for reliable and affordable service. From airport driver service Dubai to chauffeur service Dubai, we offer hourly, monthly, or driver on demand Dubai options with professional and personal touch.
Houston Airport to Galveston Shuttle guarantees timely and comfortable transfers from IAH and Hobby. Choose between private, black car, or shared rides for a smooth journey. Experience the best Galveston to Houston Shuttle for airport and cruise terminal transfers.
Our web designers in Iowa can help you create professional and affordable website design and Web Design strategies with measurable commercial advantage
Важно и то, что симптомы могут быть волнообразными. Сегодня стало легче — через несколько часов снова накрывает тревогой, потливостью, тахикардией или паникой. Медицинский подход учитывает эту динамику: назначается поддержка, формируется план контроля и объясняются признаки, при которых нужно срочно усиливать наблюдение. Это снижает вероятность осложнений и помогает избежать типичного сценария, когда человек, испугавшись ухудшения ночью, снова начинает пить «чтобы отпустило».
Получить больше информации – http://vyvod-iz-zapoya-moskva1-12.ru/vyvod-iz-zapoya-v-moskve-stacionar/https://vyvod-iz-zapoya-moskva1-12.ru
К основным показаниям относятся:
Углубиться в тему – вывод из запоя на дому круглосуточно нижний новгород
В этом обзоре представлены различные методы избавления от зависимости, включая терапевтические и психологические подходы. Мы сравниваем их эффективность и предоставляем рекомендации для тех, кто хочет вернуться к трезвой жизни. Читатели смогут найти информацию о реабилитационных центрах и поддерживающих группах.
Кликни и узнай всё! – вывод из запоя на дому ростов-на-дону
Затяжной запой — это не бытовая слабость, а медицинское состояние, требующее профессионального вмешательства. Когда организм истощен длительной интоксикацией, нарушен сон, отсутствует аппетит, а попытки самостоятельно прекратить употребление сопровождаются тремором, тревогой и скачками давления, единственным безопасным решением становится стационарная детоксикация. Наркологическая клиника «Элегия Мед» в Санкт-Петербурге предоставляет безопасную детоксикацию, индивидуальную медикаментозную терапию и всестороннюю поддержку специалистов на всех этапах восстановления. Мы работаем круглосуточно, обеспечивая быстрое реагирование на обращения, четкую диагностику при поступлении и прозрачное взаимодействие с родственниками. Все процедуры выполняются с соблюдением протоколов доказательной медицины, стандартов Минздрава РФ и строгих правил конфиденциальности. Первичная оценка состояния начинается с дистанционной консультации, что позволяет врачам заранее подготовить необходимое оборудование и скорректировать план госпитализации еще до прибытия пациента. При необходимости позвонить на горячую линию или оформить вызов бригады, помощь доступна в любое время суток.
Детальнее – наркология вывод из запоя в стационаре
Процесс начинается с оценки состояния. Врач уточняет длительность запоя, время последнего приёма алкоголя, выраженность симптомов, наличие хронических заболеваний, перенесённых осложнений, аллергий, принимаемых препаратов. После этого проводится осмотр: давление, пульс, дыхание, температура, уровень сознания, признаки обезвоживания, неврологический статус. На основании этой картины подбирается план детоксикации и поддержки.
Узнать больше – вывод из запоя москва вызов нарколога капельница
В этой публикации мы исследуем ключевые аспекты здоровья, включая влияние образа жизни на благополучие. Читатели узнают о важности правильного питания, физической активности и психического здоровья. Мы предоставим практические советы и рекомендации для поддержания здоровья и развития профилактических подходов.
Узнать больше – Частный Медик 24 проводит реабилитацию зависимых
Эта публикация посвящена актуальным вопросам современной медицины и здравоохранения. Мы обсудим новейшие технологии диагностики и лечения, а также их влияние на продолжительность и качество жизни. Читатель найдет здесь информацию о научных исследованиях и перспективных разработках, доступно изложенную для широкой аудитории.
Нажмите, чтобы узнать больше – вывод из запоя ростов
Запой — это не «просто много выпил», а состояние, при котором организм уже не справляется с нагрузкой от алкоголя и продуктов его распада. Человек может обещать себе остановиться «с утра», но утром становится хуже: дрожь, потливость, тошнота, сердцебиение, скачки давления, сильная тревога, бессонница. В таких условиях алкоголь начинает восприниматься как единственный быстрый способ облегчить симптомы, и запой продолжается. Опасность в том, что с каждым днём растут риски осложнений — со стороны сердца, сосудов, нервной системы, печени, поджелудочной железы, а также повышается вероятность травм и непредсказуемых поступков на фоне интоксикации.
Подробнее тут – https://vyvod-iz-zapoya-klin12.ru/vyvod-iz-zapoya-cena-v-klinu
В данной статье мы акцентируем внимание на важности поддержки в процессе выздоровления. Мы обсудим, как друзья, семья и профессионалы могут помочь тем, кто сталкивается с зависимостями. Читатели получат практические советы, как поддерживать близких на пути к новой жизни.
Нажми и узнай всё – частный медик 24 рнд
Первичный осмотр включает оценку витальных показателей, уровня сознания, выраженности симптомов и факторов риска. После этого врач определяет объём вмешательства и приступает к терапии. В большинстве случаев применяется инфузионное лечение, направленное на восстановление водного баланса и выведение токсинов.
Получить дополнительную информацию – https://narkologicheskaya-pomoshh-nizhnij-novgorod-8.ru/
Вызов капельницы от похмелья с контролем врача в Самаре рекомендуется, когда симптомы похмелья становятся особенно тяжелыми и мешают нормальной жизнедеятельности. Несмотря на то, что многие пытаются справиться с похмельем с помощью домашних методов, такие как прием жидкости или таблеток, они не всегда оказываются достаточно эффективными. В случае сильных симптомов похмелья, капельница с врачебным контролем — это более безопасное и быстрое решение, при этом возможен вывод в стационаре, анонимное лечение и консультации по вопросам наркомании с учетом актуальной цены услуг.
Детальнее – капельница от похмелья на дом самара
Капельница от похмелья с контролем врача в Самаре представляет собой эффективную терапевтическую процедуру, позволяющую значительно улучшить самочувствие пациента за короткий срок. Врач, контролируя весь процесс, может точно определить, какие компоненты необходимы для каждого пациента. Состав капельницы зависит от симптомов похмелья, состояния пациента и его индивидуальных потребностей. Это позволяет обеспечить максимально безопасное и эффективное лечение, которое помогает организму быстро восстановиться.
Подробнее можно узнать тут – капельница от похмелья цена самара
Медицинский вывод из запоя — это организованный процесс, где цель не «резко прекратить любой ценой», а безопасно стабилизировать состояние, снизить интоксикацию и пройти отмену так, чтобы человек смог спать, пить воду, есть и восстановиться без повторного витка. Важно и то, что помощь должна учитывать динамику первых суток: нередко днём становится легче, а к вечеру и ночью симптомы возвращаются волной — тревога растёт, сон не приходит, и риск сорваться максимален. Поэтому грамотная тактика включает не только стартовую стабилизацию, но и понятный план на 24–72 часа.
Детальнее – http://vyvod-iz-zapoya-klin12.ru/vyvod-iz-zapoya-cena-v-klinu/
Такой подход позволяет наркологической клинике в Ростове-на-Дону выстраивать лечение в безопасных и психологически комфортных условиях.
Детальнее – http://narkologicheskaya-klinika-v-rostove19.ru
Для жителей Ростова-на-Дону клиника «Южный МедКонтроль» предлагает два формата помощи: лечение в стационаре и амбулаторные визиты врача на дом. Стационар оборудован всем необходимым для круглосуточного медицинского наблюдения, проведения инфузионных процедур и лабораторной диагностики. Пациентам предоставляется комфортное размещение, спокойная обстановка и постоянный контроль состояния. При выезде на дом врачи действуют оперативно — приезжают в течение часа, проводят осмотр, устанавливают капельницы, купируют абстиненцию и дают рекомендации по дальнейшему лечению.
Исследовать вопрос подробнее – наркологическая клиника лечение алкоголизма ростов-на-дону
Анонимность в клинике «Северный Вектор» является неотъемлемой частью лечебного процесса. Наркологическая клиника в Ростове-на-Дону обеспечивает конфиденциальность на всех этапах взаимодействия с пациентом, начиная с первичного обращения и заканчивая медицинским наблюдением. Клиническая практика показывает, что сохранение анонимности снижает уровень тревожности и повышает готовность пациента к полноценному лечению, что напрямую влияет на стабильность результатов.
Подробнее можно узнать тут – наркологическая клиника ростов-на-дону
Если человек страдает от алкоголизма, запойное состояние требует незамедлительного вмешательства, особенно если признаки токсического отравления начинают угрожать жизни. Признаки запоя — это не только физическая зависимость, но и эмоциональные и психические расстройства, такие как тревога, агрессия и галлюцинации.
Подробнее можно узнать тут – нарколог на дом недорого
Ahaa, its pleasant conversation about this post here at this webpage, I have read all that, so at this time me also commenting here.
Этот обзор посвящен успешным стратегиям избавления от зависимости, включая реальные примеры и советы. Мы разоблачим мифы и предоставим читателям достоверную информацию о различных подходах. Получите опыт многообразия методов и найдите подходящий способ для себя!
Расширить кругозор по теме – Наркологическая клиника «Похмельная служба» в Домодедово
Читатели получат представление о том, как современные технологии влияют на развитие медицины. Обсуждаются новые методы лечения, персонализированный подход и роль цифровых решений в повышении качества медицинских услуг.
Не упусти шанс – narcology clinic
Наркотическая зависимость отличается непредсказуемостью симптомов. На картину влияет состав вещества, сочетания, частота употребления, истощение, нарушения сна и психики. Иногда состояние выглядит относительно «ровным», а затем резко ухудшается: скачет давление, появляется выраженная тревога, панические реакции, агрессия или сильная подавленность. Поэтому здесь особенно важно не ориентироваться на «советы из интернета», а получить медицинскую оценку и безопасный маршрут.
Выяснить больше – http://narkologicheskaya-klinika-orekhovo-zuevo2-12.ru/narkologicheskaya-klinika-sajt-v-orekhovo-zuevo/
Эта публикация обращает внимание на важность профилактики зависимостей. Мы обсудим, как осведомленность и образование могут помочь в предотвращении возникновения зависимости. Читатели смогут ознакомиться с полезными советами и ресурсами, которые способствуют здоровому образу жизни.
Только для своих – стоп алко дмодедово
В этой статье мы рассмотрим современные достижения в области медицины, включая инновационные методы лечения и диагностики. Мы обсудим важность профилактики заболеваний и роль технологий в улучшении качества здравоохранения. Читатели узнают о влиянии медицины на повседневную жизнь и ее значение для современного общества.
Получить дополнительные сведения – стоп алко балашиха
В этой статье рассматриваются актуальные вопросы, связанные с развитием медицинской науки и её внедрением в повседневную практику. Особое внимание уделено вопросам профилактики, ранней диагностики и использованию технологий для улучшения здоровья человека.
Смотрите также – narcology clinic ростов на дону
Непрерывный мониторинг витальных показателей — ключевое отличие стационарного формата, обеспечивающее безопасную детоксикацию. В палатах клиники «Элегия Мед» установлены системы отслеживания частоты пульса, сатурации, температуры и артериального давления, данные с которых автоматически передаются в электронную медицинскую карту. Медицинский персонал дежурит круглосуточно, что обеспечивает мгновенную реакцию на ухудшение состояния: коррекцию инфузионной терапии, введение симптоматических препаратов, привлечение смежных специалистов при необходимости. Такая организация процесса исключает хаотичное назначение средств, предотвращает полипрагмазию и гарантирует, что каждый этап детоксикации проходит под строгим клиническим контролем. При необходимости применяются дополнительные методы очищения крови, включая плазмаферез, который эффективно помогает вывести стойкие токсины и метаболиты, не удаляемые стандартной инфузионной терапией.
Детальнее – наркология вывод из запоя в стационаре санкт-петербург
После поступления звонка специалисты нашей клиники оперативно выезжают по адресу пациента в Новосибирске. Врач начинает работу с детальной диагностики: измеряет пульс, артериальное давление, сатурацию (уровень кислорода в крови), оценивает состояние нервной и сердечно-сосудистой систем, уточняет наличие хронических заболеваний, аллергических реакций, длительность и тяжесть запоя.
Получить дополнительные сведения – вывод из запоя новосибирск.
ayd?nl?k gosteren en cok kullan?lan boya renkleri hakk?ndaki makaleyi tavsiye ederim. Link burada: https://diydostlar.com/articles/aydinlik-hissiyati-icin-favori-duvar-boya-renkleri/
Стационарный формат выбирают, когда цена ошибки слишком высока. Основная ценность стационара — круглосуточный контроль и возможность быстро корректировать лечение, если динамика ухудшается. Это особенно важно при длительном запое, тяжёлой абстиненции, нестабильном давлении, выраженной тахикардии, повторяющейся рвоте, обезвоживании, а также при подозрении на осложнения со стороны сердца и сосудов. Нередко стационар рекомендуют и тогда, когда пациент живёт один, нет возможности обеспечить наблюдение близких или ранее уже были «ночные провалы», когда состояние резко ухудшалось и приводило к повторному употреблению.
Получить дополнительные сведения – http://narkologicheskaya-klinika-pushkino12.ru/telefon-narkologicheskoj-kliniki-v-pushkino/https://narkologicheskaya-klinika-pushkino12.ru
Эта публикация содержит ценные советы и рекомендации по избавлению от зависимости. Мы обсуждаем различные стратегии, которые могут помочь в процессе выздоровления и важность обращения за помощью. Читатели смогут использовать полученные знания для улучшения своего состояния.
Что ещё нужно знать? – вывод из запоя в ростове на дону
В данной статье мы поговорим о будущем медицины, акцентируя внимание на прорывных разработках и их потенциале. Читатель узнает о новых подходах к лечению, роли искусственного интеллекта и возможностях персонализированной медицины.
Секреты успеха внутри – частный медик 24
В данной статье рассматриваются проблемы общественного здоровья и социальные факторы, влияющие на него. Мы акцентируем внимание на значении профилактики и осведомленности в защите здоровья на уровне общества. Читатели смогут узнать о новых инициативах и программах, направленных на улучшение здоровья населения.
Получить дополнительные сведения – вывод из запоя ростов на дону на дому
Этот обзор содержит информацию о передовых достижениях в области медицины. Мы разберем инновационные технологии, которые меняют подход к лечению и диагностике, а также их влияние на эффективность оказания медицинской помощи.
Желаете узнать подробности? – narcology clinic ростов на дону
Запой – это неконтролируемое употребление алкоголя, которое приводит к серьезным последствиям. Алкогольное отравление организма приводит к серьезным проблемам со здоровьем. Выходить из запоя самостоятельно – рискованно и неэффективно. Мы предлагаем помощь при запое на дому, в привычных для вас условиях. Круглосуточная помощь при запое с выездом на дом за 30-60 минут. Длительный запой разрушает организм и может быть смертельным. Чем раньше вы обратитесь за помощью, тем больше шансов на выздоровление.
Детальнее – вывод из запоя стационар красноярск
В этой публикации мы обсуждаем современные методы лечения различных заболеваний. Читатели узнают о новых медикаментах, терапиях и исследованиях, которые активно применяются для лечения. Мы нацелены на то, чтобы предоставить практические знания, которые могут помочь в борьбе с недугами.
Связаться за уточнением – Похмельная служба в Екатеринбурге
В этой статье обсуждаются актуальные медицинские вопросы, которые волнуют общество. Мы обращаем внимание на проблемы, касающиеся здравоохранения и лечения, а также на новшества в области медицины. Читатели будут осведомлены о последних событиях и смогут следить за тенденциями в медицине.
Более того — здесь – капельница от запоя ростов на дону
В этой статье мы подробно рассматриваем проверенные методы борьбы с зависимостями, включая психотерапию, медикаментозное лечение и поддержку со стороны общества. Мы акцентируем внимание на важности комплексного подхода и возможности успешного восстановления для людей, столкнувшихся с этой проблемой.
Узнайте всю правду – Частный Медик 24 проводит реабилитацию зависимых
Медицинская публикация представляет собой свод актуальных исследований, экспертных мнений и новейших достижений в сфере здравоохранения. Здесь вы найдете информацию о новых методах лечения, прорывных технологиях и их практическом применении. Мы стремимся сделать актуальные медицинские исследования доступными и понятными для широкой аудитории.
Погрузиться в научную дискуссию – вывод из запоя в ростове на дону
Этот краткий обзор предлагает сжатую информацию из области медицины, включая ключевые факты и последние новости. Мы стремимся сделать информацию доступной и понятной для широкой аудитории, что позволит читателям оставаться в курсе актуальных событий в здравоохранении.
Обратитесь за информацией – вывод из запоя в ростове
Медицинская публикация представляет собой свод актуальных исследований, экспертных мнений и новейших достижений в сфере здравоохранения. Здесь вы найдете информацию о новых методах лечения, прорывных технологиях и их практическом применении. Мы стремимся сделать актуальные медицинские исследования доступными и понятными для широкой аудитории.
Изучите внимательнее – нарколог на дом в ростове
Запой сопровождается быстрым накоплением токсинов, что может привести к нарушению работы сердца, печени и почек. Использование капельничного метода позволяет оперативно ввести современные препараты для детоксикации, что способствует быстрому восстановлению обменных процессов и нормализации работы внутренних органов. Оперативное лечение на дому особенно актуально, когда каждая минута имеет значение для спасения здоровья.
Получить дополнительную информацию – после капельницы от запоя в тюмени
В этой статье мы рассматриваем разрушительное влияние зависимости на жизнь человека. Обсуждаются аспекты, такие как здоровье, отношения и профессиональные достижения. Читатели узнают о необходимости обращения за помощью и о путях к восстановлению.
Перейти к полной версии – частный медик 24
После диагностики начинается активная фаза медикаментозного вмешательства. Препараты вводятся капельничным методом, что способствует быстрому снижению уровня токсинов в крови, нормализации обменных процессов и стабилизации работы таких органов, как печень, почки и сердце.
Узнать больше – наркология вывод из запоя мурманск
В этой статье рассматриваются способы преодоления зависимости и успешные истории людей, которые справились с этой проблемой. Мы обсудим важность поддержки со стороны близких и профессионалов, а также стратегии, которые могут помочь в процессе выздоровления. Научитесь первоочередным шагам к новой жизни.
Наши рекомендации — тут – капельница от запоя ростов-на-дону
В клинике «Пульс» процесс оказания помощи начинается сразу после вашего обращения. Наша бригада оперативно выезжает на дом, где врач проводит первичный осмотр пациента: измеряет давление, пульс, оценивает степень интоксикации и собирает анамнез. На основе полученных данных подбирается индивидуальный состав капельницы.
Получить дополнительную информацию – https://kapelnica-ot-zapoya-krasnodar7.ru/kapelnicza-ot-zapoya-na-domu-v-krasnodare
Алкогольная зависимость сопровождается не только физическими, но и глубокими психоэмоциональными проблемами. Психотерапевтическая помощь играет важную роль в лечении, помогая пациенту осознать причины зависимости и разработать стратегии для предотвращения рецидивов.
Исследовать вопрос подробнее – частный нарколог на дом в уфе
В этой статье рассматриваются различные аспекты избавления от зависимости, включая физические и психологические методы. Мы обсудим поддержку, мотивацию и стратегии, которые помогут в процессе выздоровления. Читатели узнают, как преодолеть трудности и двигаться к новой жизни без зависимости.
Расширить кругозор по теме – частный медик 24 рнд
В этой статье рассматриваются различные аспекты избавления от зависимости, включая физические и психологические методы. Мы обсудим поддержку, мотивацию и стратегии, которые помогут в процессе выздоровления. Читатели узнают, как преодолеть трудности и двигаться к новой жизни без зависимости.
Провести детальное исследование – вывод из запоя на дому ростов-на-дону
В данной статье рассматриваются физиологические и эмоциональные аспекты зависимости. Мы обсудим, как организм реагирует на зависимое поведение, и какие методы помогают восстановить здоровье и внутреннее равновесие.
Перейти к полной версии – нарколог на дом ростов на дону
В этой статье мы говорим о важности поддержки в процессе выздоровления. Рассматриваются семьи, группы поддержки, специалисты и онлайн-ресурсы, которые могут сыграть решающую роль в избавлении от зависимости.
Узнайте всю правду – вывод из запоя в ростове-на-дону
Публикация знакомит читателей с различными подходами к реабилитации. От традиционных методов до современных программ — вы узнаете, как выбрать оптимальный путь к выздоровлению и преодолеть препятствия на этом пути.
Что ещё? Расскажи всё! – narcology clinic ростов на дону
Самостоятельно подбирать препараты, дозы и лекарственные средства опасно. При алкогольной интоксикации, запойном состоянии и заболеваниях внутренних органов неправильное лечение может привести к осложнениям. Поэтому вызов врача нарколога на дом является более безопасным способом получить квалифицированную медицинскую помощь, особенно если у пациента уже есть хронические болезни, проблемы с давлением, сердцем, печенью или психическими расстройствами.
Подробнее можно узнать тут – narkolog-na-dom-moskva13.ru/
Публикация посвящена жизненным историям людей, успешно справившихся с зависимостью. Мы покажем, что выход есть, и он начинается с первого шага — принятия проблемы и желания измениться.
Практические советы ждут тебя – капельница от запоя ростов на дону
В этой статье рассматриваются различные аспекты избавления от зависимости, включая физические и психологические методы. Мы обсудим поддержку, мотивацию и стратегии, которые помогут в процессе выздоровления. Читатели узнают, как преодолеть трудности и двигаться к новой жизни без зависимости.
Ознакомиться с деталями – врач нарколог на дом в ростове
В этой статье мы рассматриваем разрушительное влияние зависимости на жизнь человека. Обсуждаются аспекты, такие как здоровье, отношения и профессиональные достижения. Читатели узнают о необходимости обращения за помощью и о путях к восстановлению.
Получить больше информации – нарколог на дом в ростове
Вызвать нарколога на дом стоит не только при длительном запое. Поводом для обращения может быть сильное похмелье, резкое ухудшение самочувствия после алкоголя, абстинентный синдром, тревога, бессонница, нарушение поведения, отказ от еды и воды, признаки отравления или риск осложнений со стороны сердечно-сосудистой системы. Если человек уже несколько лет употребляет спиртное регулярно, лечение алкоголизма лучше начинать с консультации специалиста, а не с самостоятельного подбора препаратов.
Подробнее – narkolog na dom tsena
В этой статье мы говорим о важности поддержки в процессе выздоровления. Рассматриваются семьи, группы поддержки, специалисты и онлайн-ресурсы, которые могут сыграть решающую роль в избавлении от зависимости.
Изучить материалы по теме – вывод из запоя ростов на дону
В этой статье мы обсудим процесс восстановления после зависимостей, акцентируя внимание на различных методах и подходах к реабилитации. Читатели узнают, как создать план выздоровления и использовать полезные ресурсы для достижения устойчивых изменений.
Это ещё не всё… – капельница от запоя ростов-на-дону
Выбор наркологической клиники — решение, от которого зависит не только здоровье, но и будущее человека. В «Триумфе» понимают, что зависимость затрагивает всю семью, поэтому программы лечения алкоголизма обязательно включают работу с родственниками, групп психологической поддержки и формирование устойчивой мотивации на трезвость. За годы деятельности мы помогли сотням людей вернуть контроль над своей жизнью, и каждый новый пациент для нас — не просто история болезни, а человек, заслуживающий уважения, сострадания и профессиональной помощи. Наши специалисты успешно лечат как алкогольную, так и наркотическую зависимость, а также помогают справиться с игроманией и другими видами расстройств. Если вам нужна наркологическая клиника в Москве, где работают настоящие профессионалы, — звоните в «Триумф». Очень важно не откладывать обращение, ведь на счету каждая минута, и наша скорая наркологическая помощь доступна круглосуточно.
Подробнее – http://narkologicheskaya-klinika-moskva13.ru/
Особенно понравился материал про Тренды и инвестиции в экономике России.
Вот, можете почитать:
https://rubl-journal.ru
В данной статье рассматриваются физиологические и эмоциональные аспекты зависимости. Мы обсудим, как организм реагирует на зависимое поведение, и какие методы помогают восстановить здоровье и внутреннее равновесие.
Изучить материалы по теме – капельница от запоя ростов
Наркологическая клиника в Ростове-на-Дону рассматривается как специализированное медицинское учреждение, где лечение зависимостей выстраивается с учётом необходимости анонимности и круглосуточной доступности помощи. В клинике «Северный Вектор» работа организована таким образом, чтобы пациент мог обратиться за лечением в любое время суток без риска раскрытия персональной информации. Такой формат особенно важен при острых состояниях, требующих немедленного врачебного вмешательства и медицинского контроля.
Подробнее можно узнать тут – платная наркологическая клиника ростов-на-дону
Клиника располагает собственным стационаром, отвечающим строгим медицинским стандартам. Круглосуточное наблюдение дежурных врачей и среднего медицинского персонала позволяет безопасно купировать острые состояния, такие как алкогольный психоз, тяжёлая интоксикация, судорожные припадки и абстинентный синдром. В нашем центре созданы все условия для эффективного лечения алкоголизма и наркомании, а подробнее о каждой программе вы можете узнать по телефону. В распоряжении центра — необходимое диагностическое оборудование, собственная лаборатория и комфортный палатный фонд с возможностью выбора палаты эконом, стандарт или VIP. Лечение проходит в условиях полной конфиденциальности: данные пациента не передаются в государственные наркологические диспансеры. Мы гарантируем анонимное лечение и анонимную помощь всем, кто к нам обращается.
Получить дополнительную информацию – http://narkologicheskaya-klinika-moskva13.ru/
Нарколог на дом в Москве требуется в ситуации, когда человек после алкоголя не может самостоятельно восстановиться, находится в состоянии выраженной интоксикации, запоя, похмельного синдрома или абстиненции. В таком случае вызов врача на дом помогает быстро оценить состояние пациента, провести осмотр, подобрать препараты и начать лечение без лишней транспортировки. Дом становится местом первичной медицинской помощи, если врач видит, что процедуры можно провести безопасно в домашних условиях.
Подробнее тут – narkolog na dom tsena
Мы проводим инфузионное введение детоксикационных коктейлей. Очищение крови позволяет восстановить баланс и нормализовать функции мозга уже в первые часы. Стоимость услуги остаётся доступной, а срочный выезд бригады к больному в любом районе и области осуществляется 24/7. В базовый состав лечения входят солевые растворы, витамины группы B, гепатопротекторы и седативные компоненты. Такая комбинация помогает купировать ломки, снять тревогу и бессонницу, стабилизировать давление. Мы также обязательно добавляем кардиопротекторы, улучшающие мозговое кровообращение.
Узнать больше – moskva-vyvod-iz-zapoya
Публикация охватывает основные направления развития современной медицины. Мы обсудим значимость научных исследований, инноваций в лечении и роли общественного участия в формировании системы здравоохранения.
Получить полную информацию – нарколог на дом ростов
После первичной стабилизации важен второй шаг — закрепление результата. Если человек просто почувствовал облегчение, но не восстановил сон, не снизил тревогу и не понял, как действовать вечером и ночью, запой часто возвращается. Поэтому клиника делает акцент на понятном маршруте: что происходит с организмом в ближайшие сутки, как меняется самочувствие, какие признаки требуют повторной оценки и как снизить риск повторного употребления.
Разобраться лучше – http://narkologicheskaya-klinika-orekhovo-zuevo2-12.ru/
Эта публикация обращает внимание на важность профилактики зависимостей. Мы обсудим, как осведомленность и образование могут помочь в предотвращении возникновения зависимости. Читатели смогут ознакомиться с полезными советами и ресурсами, которые способствуют здоровому образу жизни.
Хочу знать больше – частный медик 24 ростов на дону
Наши опытные специалисты используют современные методики выведения из запоя, применяя эффективные препараты, которые быстро восстанавливают организм после интоксикации алкоголя. В схему лечения мы включаем сильные сорбенты, гепатопротекторы, успокоительные средства и комплексы витаминов для поддержки сердечно-сосудистой системы. Благодаря инфузионной терапии уже в первые сутки у пациента улучшается самочувствие, проходит тошнота, тремор и нормализуется сон. Важно понимать, что капельница от запоя на дому — это полноценная медицинская процедура, которая требует контроля со стороны опытного нарколога. Врач остается с пациентом до стабилизации состояния, отслеживает динамику и корректирует состав введения.
Исследовать вопрос подробнее – http://vyvod-iz-zapoya-moskva1-13.ru/vyvod-iz-zapoya-moskva-stacionar/
В этой статье рассматриваются различные аспекты избавления от зависимости, включая физические и психологические методы. Мы обсудим поддержку, мотивацию и стратегии, которые помогут в процессе выздоровления. Читатели узнают, как преодолеть трудности и двигаться к новой жизни без зависимости.
Не упусти важное! – вывод из запоя ростов на дону
Наркологическая клиника нужна, чтобы разорвать этот сценарий безопасно и без хаотичных решений. В клинике «Баланс Плюс» лечение выстраивается по этапам: оценка состояния и рисков, стабилизация (в том числе детоксикация при показаниях), подбор формата — стационар, амбулаторно или помощь на дому — и обязательно план на первые 24–72 часа. Эти дни критичны: именно в этот период чаще всего усиливаются тревога и бессонница, и без понятных ориентиров человек легко возвращается к алкоголю или веществам «чтобы отпустило».
Узнать больше – https://narkologicheskaya-klinika-orekhovo-zuevo2-12.ru/narkologicheskaya-klinika-sajt-v-orekhovo-zuevo/
Клиника располагает собственным стационаром, отвечающим строгим медицинским стандартам. Круглосуточное наблюдение дежурных врачей и среднего медицинского персонала позволяет безопасно купировать острые состояния, такие как алкогольный психоз, тяжёлая интоксикация, судорожные припадки и абстинентный синдром. В нашем центре созданы все условия для эффективного лечения алкоголизма и наркомании, а подробнее о каждой программе вы можете узнать по телефону. В распоряжении центра — необходимое диагностическое оборудование, собственная лаборатория и комфортный палатный фонд с возможностью выбора палаты эконом, стандарт или VIP. Лечение проходит в условиях полной конфиденциальности: данные пациента не передаются в государственные наркологические диспансеры. Мы гарантируем анонимное лечение и анонимную помощь всем, кто к нам обращается.
Углубиться в тему – клиника наркологии и психиатрии москва
В данном материале представлены ключевые тенденции в сфере медицинской науки и практики. Вы узнаете о последних открытиях, инновационных подходах к терапии и важности профилактики заболеваний. Особое внимание уделено практическому применению новых методов в клинической практике.
Практические советы ждут тебя – частный медик 24 рнд
Наши опытные специалисты используют современные методики выведения из запоя, применяя эффективные препараты, которые быстро восстанавливают организм после интоксикации алкоголя. В схему лечения мы включаем сильные сорбенты, гепатопротекторы, успокоительные средства и комплексы витаминов для поддержки сердечно-сосудистой системы. Благодаря инфузионной терапии уже в первые сутки у пациента улучшается самочувствие, проходит тошнота, тремор и нормализуется сон. Важно понимать, что капельница от запоя на дому — это полноценная медицинская процедура, которая требует контроля со стороны опытного нарколога. Врач остается с пациентом до стабилизации состояния, отслеживает динамику и корректирует состав введения.
Подробнее – https://vyvod-iz-zapoya-moskva1-13.ru
Наркологическая клиника нужна, чтобы разорвать этот сценарий безопасно и без хаотичных решений. В клинике «Баланс Плюс» лечение выстраивается по этапам: оценка состояния и рисков, стабилизация (в том числе детоксикация при показаниях), подбор формата — стационар, амбулаторно или помощь на дому — и обязательно план на первые 24–72 часа. Эти дни критичны: именно в этот период чаще всего усиливаются тревога и бессонница, и без понятных ориентиров человек легко возвращается к алкоголю или веществам «чтобы отпустило».
Детальнее – https://narkologicheskaya-klinika-orekhovo-zuevo2-12.ru/narkologicheskaya-klinika-sajt-v-orekhovo-zuevo
В «Южном МедКонтроле» лечение зависимостей строится поэтапно, с постепенным восстановлением физиологических функций и эмоциональной устойчивости. Врачи используют современные методы детоксикации, фармакотерапию и психотерапию, которые действуют комплексно. Каждый этап направлен на достижение конкретного результата: очищение организма, снятие симптомов абстиненции, стабилизацию состояния и профилактику срывов.
Углубиться в тему – наркологическая клиника в ростове-на-дону
Такой курс не только очищает организм от токсинов, но и помогает вернуть эмоциональное равновесие. После завершения терапии пациент чувствует себя отдохнувшим, восстанавливает аппетит и сон, уходит тревожность и раздражительность.
Ознакомиться с деталями – https://vyvod-iz-zapoya-v-krasnodare19.ru/vyvod-iz-zapoya-krasnodar-otzyvy
По окончании курса детоксикации нарколог дает пациенту и его близким подробные рекомендации, помогающие быстрее восстановить здоровье и предотвратить повторные случаи запоев.
Подробнее тут – вывод из запоя новосибирск.
В практике круглосуточного лечения применяются следующие этапы:
Исследовать вопрос подробнее – https://narcologicheskaya-klinika-v-krd19.ru/narkolog-krasnodar-anonimno/
Читатели получат представление о том, как современные технологии влияют на развитие медицины. Обсуждаются новые методы лечения, персонализированный подход и роль цифровых решений в повышении качества медицинских услуг.
Не упусти шанс – вызов нарколога на дом в ростове
Наши врачи работают ежедневно и круглосуточно по всей Москве и Московской области, поэтому выезд нарколога на дом осуществляется оперативно и быстро, в любое удобное для вас время.
Углубиться в тему – https://narkolog-na-dom-moskva13.ru/narkolog-na-dom-moskva-kruglosutochno
Ayr?ca, eger mutfakta kombi dolab? modelleri konusuyla ilgileniyorsan?z, suraya bak?n. Suradan okuyabilirsiniz: https://yapevleri.com/articles/mutfakta-kombi-dolabi-modelleri/
Детоксикация наркоманов — первый и жизненно важный этап на пути к избавлению от наркозависимости. В нашей частной наркологической клинике в Москве эта процедура проводится строго под круглосуточным наблюдением опытных врачей. Главная цель детоксикации — безопасное и эффективное очищение организма от наркотиков и токсичных метаболитов, а также устранение тяжелых симптомов абстинентного синдрома и снятие ломки. Лечение наркомании невозможно без качественного вывода токсинов, и наша наркологическая клиника предлагает полный спектр услуг по лечению зависимости. Очищение крови от токсичных продуктов полураспада химических веществ необходима после употребления любых наркотических средств. Мы используем современные медицинские методики, инфузионную терапию и специальные лекарственные препараты, чтобы стабилизировать состояние больного и подготовить его к дальнейшему лечению. В нашем центре работают высококвалифицированные специалисты, чей многолетний стаж и персональный подход к каждому пациенту гарантируют максимальную эффективность лечения зависимости. ООО «Рехаб Фэмили» — это место, где возвращают к жизни, и мы гордимся тем, что наша деятельность носит исключительно медицинский и реабилитационный характер. Лечение наркомании в Москве требует особого подхода, и мы предоставляем его на высшем уровне.
Подробнее тут – http://detoksikaciya-narkomanov-moskva13.ru
Лечение в круглосуточном режиме выстраивается по принципу медицинской последовательности и непрерывного наблюдения. Даже при экстренном обращении терапия не ограничивается разовым вмешательством, а рассматривается как часть целостного лечебного процесса.
Получить больше информации – анонимная наркологическая клиника ростов-на-дону
В данной статье рассматриваются физиологические и эмоциональные аспекты зависимости. Мы обсудим, как организм реагирует на зависимое поведение, и какие методы помогают восстановить здоровье и внутреннее равновесие.
Получить полную информацию – вывод из запоя ростов на дону
Сразу после вызова нарколог приезжает на дом для проведения первичного осмотра и диагностики. На этом этапе проводится сбор анамнеза, измеряются жизненно важные показатели (пульс, артериальное давление, температура) и определяется степень алкогольной интоксикации. Эти данные являются основой для разработки индивидуального плана лечения.
Подробнее – http://kapelnica-ot-zapoya-tyumen0.ru
На данном этапе врач уточняет длительность запоя, тип употребляемого алкоголя и наличие сопутствующих заболеваний. Тщательный анализ этих данных позволяет подобрать оптимальные методы детоксикации и снизить риск осложнений.
Углубиться в тему – narkolog-vyvod-iz-zapoya murmansk
Нарколог на дом в Москве требуется в ситуации, когда человек после алкоголя не может самостоятельно восстановиться, находится в состоянии выраженной интоксикации, запоя, похмельного синдрома или абстиненции. В таком случае вызов врача на дом помогает быстро оценить состояние пациента, провести осмотр, подобрать препараты и начать лечение без лишней транспортировки. Дом становится местом первичной медицинской помощи, если врач видит, что процедуры можно провести безопасно в домашних условиях.
Получить дополнительные сведения – вызов врача нарколога на дом
В экстренных ситуациях, когда состояние больного стремительно ухудшается, а промедление грозит серьёзными осложнениями, наши специалисты готовы немедленно оказать следующую помощь. Лечение запоя — одна из самых востребованных услуг наркологической клиники, и мы оказываем её в любое время суток. Если ваш близкий сильно страдает, не ждите — скорая помощь приедет быстро, а консультацию можно получить бесплатно по телефону.
Получить дополнительные сведения – anonimnaya-narkologicheskaya-klinika-moskva
Длительное и бесконтрольное употребление алкоголя может привести к состоянию запоя — опасному и тяжелому состоянию, при котором человек не способен самостоятельно отказаться от спиртного. Во время запоя организм постепенно накапливает токсины, что негативно сказывается на работе всех внутренних органов и систем. В таких случаях пациенту необходима экстренная врачебная помощь, и специалисты наркологической клиники «АнтиТокс» готовы оперативно оказать профессиональную медицинскую поддержку на дому в Новосибирске.
Подробнее тут – срочный вывод из запоя новосибирск
Игнорирование этих симптомов может привести к тяжелым последствиям для здоровья, включая алкогольный психоз и повреждение внутренних органов.
Получить дополнительную информацию – капельница от запоя на дому недорого в краснодаре
Для пациентов с опиоидной зависимостью (героин, метадон) применяется УБОД. Это эффективная процедура, которая проводится под общим наркозом с использованием налтрексона. Она позволяет быстро и безболезненно очистить опиоидные рецепторы, устранить ломку и предотвратить дальнейшее действие наркотиков. После УБОД пациенту требуется несколько дней для восстановления, но синдром отмены протекает значительно легче. Эта методика требует наличия реанимационного оборудования и высокой квалификации врачей, поэтому проводится исключительно в стационаре. Наши реаниматологи круглосуточно следят за жизненно важными показателями. УБОД — один из лучших способов вывода из опиоидной зависимости, и он успешно применяется в нашей наркологической клинике в Москве.
Разобраться лучше – narkologicheskaya-pomoshch-detoksikaciya-moskva
Современные методы лечения при выводе из запоя включают как медикаментозную детоксикацию, так и психологическую реабилитацию. В Уфе наркологи используют капельничное введение лекарственных средств, которые помогают быстро вывести токсины, нормализовать обмен веществ и стабилизировать работу внутренних органов. Одновременно с этим проводится психологическая поддержка для снижения эмоционального стресса, связанного с запоем.
Подробнее – http://narcolog-na-dom-ufa0.ru
Многие родственники пациентов задают вопросы о том, есть ли шанс сразу решить проблему запрета на алкоголь. Действительно, на первом этапе после снятия острой интоксикации возможно провести кодирование, чтобы человек получил поддержку на пути к трезвости. Однако в некоторых случаях есть возможность провести кодировку сразу после вывода из запоя и полной детоксикации организма на дому. Решение об этом принимает врач, оценивая реакцию сосудов и психическое самочувствие зависимого. Мы никогда не навязываем лечение принудительно, так как эффективность кодирования зависит от мотивации человека.
Узнать больше – http://vyvod-iz-zapoya-moskva1-13.ru/
Пребывание в стационаре даёт целый ряд неоспоримых преимуществ, которые делают этот этап незаменимым для многих пациентов, особенно на начальной стадии терапии и в случаях тяжёлой интоксикации. Большое внимание мы уделяем качеству медицинских услуг и комфорту каждого пациента. В нашей частной клинике работают кандидаты медицинских наук и врачи высшей категории, что является гарантией успешного лечения алкоголизма и наркомании. Сейчас мы готовы принять вас в любом районе Москвы и Московской области.
Детальнее – наркологическая клиника москва
После первичной стабилизации важен второй шаг — закрепление результата. Если человек просто почувствовал облегчение, но не восстановил сон, не снизил тревогу и не понял, как действовать вечером и ночью, запой часто возвращается. Поэтому клиника делает акцент на понятном маршруте: что происходит с организмом в ближайшие сутки, как меняется самочувствие, какие признаки требуют повторной оценки и как снизить риск повторного употребления.
Получить дополнительные сведения – http://
Сразу после вызова нарколог приезжает на дом для проведения первичного осмотра и диагностики. На этом этапе проводится сбор анамнеза, измеряются жизненно важные показатели (пульс, артериальное давление, температура) и определяется степень алкогольной интоксикации. Эти данные являются основой для разработки индивидуального плана лечения.
Узнать больше – капельницу от запоя в тюмени
Когда запой начинает оказывать разрушительное воздействие на организм, своевременная помощь становится критически важной для предотвращения серьезных осложнений. В Мурманске квалифицированные наркологи на дому обеспечивают оперативную детоксикацию, восстановление обменных процессов и стабилизацию работы внутренних органов. Лечение проводится в комфортной домашней обстановке, что позволяет избежать лишнего стресса и сохранить полную конфиденциальность.
Узнать больше – http://
Мы работаем круглосуточно и готовы оперативно помочь в решении проблемы зависимости в любое время. Наша наркологическая клиника для жителей в Москве работает круглосуточно, поэтому вы всегда можете позвонить нам по указанному номеру и получить консультацию или записаться на обследование и дальнейшую помощь. Вы сможете быстро связаться с нами в любое время суток и получить экстренную помощь на дому и в стационаре. Детоксикация — это сложный медицинский процесс, который требует комплексного подхода, так как появление тяжелых осложнений, таких как делирий или психоз, может быть опасным для жизни. Поэтому мы рекомендуем проводить процедуры исключительно под наблюдением врача-нарколога и психиатра в условиях стационара. Срочная скорая помощь доступна без выходных, и мы принимаем пациентов в любое время дня и ночи. Лечение алкоголизма и вывод из запоя также доступны в нашей клинике, и мы имеем богатый опыт в этой сфере.
Выяснить больше – detoksikaciya-narkomanov-moskva13.ru/
Такой подход позволяет наркологической клинике в Ростове-на-Дону выстраивать лечение в безопасных и психологически комфортных условиях.
Получить дополнительную информацию – запой наркологическая клиника ростов-на-дону
Он оценит состояние зависимого и примет решение о том, можно ли быстро выводить его из запоя на дому в Москве или требуется постепенный выход из запоя в условиях стационара. В сложных случаях, когда есть галлюцинации или серьезные хронические патологии, мы рекомендуем не рисковать и начинать терапию под круглосуточным наблюдением. Такое решение в клинике принимается строго в интересах пациента, потому что алкоголизм — это болезнь, разрушающая системы организма. Только в стационаре можно провести полный объем лабораторной диагностики, включая ЭКГ и оценку функций печени. Реабилитация в стационарных условиях дает больше шансов на успех.
Ознакомиться с деталями – вывод из запоя в стационаре москва
Когда запой начинает оказывать разрушительное воздействие на организм, своевременная помощь становится критически важной для предотвращения серьезных осложнений. В Мурманске квалифицированные наркологи на дому обеспечивают оперативную детоксикацию, восстановление обменных процессов и стабилизацию работы внутренних органов. Лечение проводится в комфортной домашней обстановке, что позволяет избежать лишнего стресса и сохранить полную конфиденциальность.
Изучить вопрос глубже – вывод из запоя мурманская область
Зависимость редко начинается как «сразу серьёзная проблема». Сначала алкоголь или вещества используются как способ снять напряжение, заглушить тревогу или уснуть. Потом это постепенно превращается в устойчивый механизм: трезвость даётся тяжело, сон ломается, появляется внутренняя дрожь, раздражительность, скачки давления, тревога, а утро всё чаще начинается с мысли «нужно поправиться, иначе не выдержу». В Орехово-Зуево многие долго надеются справиться самостоятельно, потому что стыдно, нет времени или кажется, что «в этот раз точно получится». Но зависимость устроена так, что без грамотной помощи чаще всего возвращает человека в один и тот же круг: попытка прекратить — тяжёлая отмена — снова употребление — ухудшение здоровья и отношений.
Изучить вопрос глубже – http://narkologicheskaya-klinika-orekhovo-zuevo2-12.ru/vrach-narkologicheskaya-klinika-v-orekhovo-zuevo/https://narkologicheskaya-klinika-orekhovo-zuevo2-12.ru
В клинике «Пульс» процесс оказания помощи начинается сразу после вашего обращения. Наша бригада оперативно выезжает на дом, где врач проводит первичный осмотр пациента: измеряет давление, пульс, оценивает степень интоксикации и собирает анамнез. На основе полученных данных подбирается индивидуальный состав капельницы.
Узнать больше – https://kapelnica-ot-zapoya-krasnodar7.ru/kapelnicza-ot-zapoya-na-domu-v-krasnodare
Когда запой приводит к критическому ухудшению состояния, оперативное лечение становится жизненно необходимым. В Тюмени доступна услуга капельничного вывода из запоя на дому, которая позволяет начать детоксикацию организма незамедлительно и в комфортной для пациента обстановке. Такой формат терапии помогает не только вывести токсины, но и значительно снизить риск осложнений, сохраняя при этом полную конфиденциальность.
Подробнее тут – капельница от запоя тюменская область
Наркологическая помощь на дом позволяет провести первые действия быстро: врач осматривает пациента, уточняет данные о длительности употребления, наличии хронических заболеваний, реакции на лекарства и предыдущем опыте лечения. После этого подбирается капельница, медикаментозное снятие интоксикации, средства для стабилизации давления, сна, нервной системы и общего состояния организма. В некоторых случаях требуется вывод из запоя, дальнейшее лечение зависимости, психотерапия, кодирование или реабилитация. Особое внимание уделяем женскому алкоголизму, поскольку физические и психические последствия злоупотребления у женщин зачастую развиваются стремительнее.
Ознакомиться с деталями – вызов врача нарколога на дом москва
Основные этапы лечения:
Выяснить больше – http://kapelnica-ot-zapoya-krasnodar7.ru/
Запой – это неконтролируемое употребление алкоголя, которое приводит к серьезным последствиям. Алкогольное отравление организма приводит к серьезным проблемам со здоровьем. Выходить из запоя самостоятельно – рискованно и неэффективно. Мы предлагаем помощь при запое на дому, в привычных для вас условиях. Круглосуточная помощь при запое с выездом на дом за 30-60 минут. Длительный запой разрушает организм и может быть смертельным. Чем раньше вы обратитесь за помощью, тем больше шансов на выздоровление.
Подробнее тут – вывод из запоя цена красноярск
Обращение за помощью на дому имеет ряд значительных преимуществ, которые делают данный метод лечения предпочтительным для многих пациентов:
Получить больше информации – http://narcolog-na-dom-ufa0.ru
Этот процесс не занимает много времени — обычно процедура длится от 30 до 60 минут. Важно, что врач контролирует все этапы, обеспечивая безопасность пациента и корректируя терапию по мере необходимости. Такой подход позволяет быстро и эффективно облегчить симптомы похмелья и вернуться к нормальной жизнедеятельности.
Изучить вопрос глубже – капельница от похмелья на дому
Круглосуточный режим работы в клинике «Северный Вектор» обусловлен спецификой течения зависимостей, при которых ухудшение состояния может происходить внезапно. Наркологическая клиника в Ростове-на-Дону обеспечивает постоянную готовность медицинского персонала к приёму пациентов, что позволяет сократить время между возникновением симптомов и началом лечения. Такой подход снижает риск осложнений и повышает клиническую безопасность.
Выяснить больше – наркологическая клиника ростов-на-дону
Услуга вывода из запоя на дому в Мурманске разработана для того, чтобы оперативно снизить токсическую нагрузку и вернуть организм в нормальное состояние. При поступлении вызова специалист проводит детальный осмотр, собирает анамнез и измеряет жизненно важные показатели. На основании полученных данных составляется индивидуальный план терапии, который может включать капельничное введение медикаментов, использование автоматизированных систем дозирования и психологическую поддержку. Такой комплексный подход позволяет обеспечить высокую эффективность лечения даже в условиях экстренной необходимости.
Выяснить больше – вывод из запоя недорого в мурманске
Запой – это серьезная проблема, когда организм перестает работать без постоянного поступления алкоголя. Из-за запоя токсины отравляют организм, нарушая работу органов и снижая иммунитет. Попытки самостоятельно бросить пить во время запоя могут привести к ухудшению самочувствия. «Семья и Здоровье» лечит запой на дому – это удобно и снижает стресс. Мы приедем в любое время суток и проведем все процедуры для восстановления здоровья. Длительное пьянство может привести к опасным для жизни осложнениям. Нельзя затягивать с лечением запоя, это может привести к серьезным последствиям.
Получить дополнительные сведения – вывод из запоя в красноярске
Современные методы лечения при выводе из запоя включают как медикаментозную детоксикацию, так и психологическую реабилитацию. В Уфе наркологи используют капельничное введение лекарственных средств, которые помогают быстро вывести токсины, нормализовать обмен веществ и стабилизировать работу внутренних органов. Одновременно с этим проводится психологическая поддержка для снижения эмоционального стресса, связанного с запоем.
Получить дополнительную информацию – http://narcolog-na-dom-ufa0.ru
После диагностики начинается активная фаза медикаментозного вмешательства. Препараты вводятся капельничным методом, что способствует быстрому снижению уровня токсинов в крови, нормализации обменных процессов и стабилизации работы таких органов, как печень, почки и сердце.
Получить дополнительную информацию – https://vyvod-iz-zapoya-murmansk00.ru/vyvod-iz-zapoya-kruglosutochno-murmansk
Наркологическая клиника «АнтиДот» предлагает срочный вызов нарколога на дом в Воронеже и Воронежской области. Наша служба экстренной наркологической помощи доступна круглосуточно и позволяет быстро справиться с тяжелыми состояниями, вызванными алкогольной и наркотической зависимостью. Опытные врачи проведут детоксикацию организма, помогут снять абстинентный синдром и стабилизировать общее состояние пациента в комфортных домашних условиях.
Углубиться в тему – нарколог на дом вывод воронеж
Капельница от запоя в Краснодаре рекомендуется при первых признаках алкогольной интоксикации или тяжелого похмелья. Без своевременного медицинского вмешательства состояние человека может резко ухудшиться, привести к развитию осложнений и даже стать угрозой для жизни. Срочная помощь необходима в таких случаях:
Подробнее тут – капельница от запоя цена
Постановка капельницы от запоя специалистами клиники «Пульс» в Воронеже обеспечивает пациентам оперативную помощь и быстрое облегчение состояния благодаря экстренному выезду врача на дом. Наши услуги доступны круглосуточно, включая ночное время и праздничные дни, что особенно важно при внезапных и критических ситуациях. Мы гарантируем полную конфиденциальность и защиту персональных данных пациентов, что позволяет получить необходимую помощь без риска огласки. Индивидуальный подход к каждому случаю обеспечивает максимальную эффективность лечения, а наши опытные наркологи используют только сертифицированные препараты, которые безопасно и быстро выводят токсины и стабилизируют состояние здоровья. Прозрачность ценообразования, предварительное согласование всех расходов и отсутствие скрытых доплат делают услуги клиники «Пульс» удобными и доступными для всех жителей Воронежа.
Подробнее тут – капельница от запоя на дому недорого в краснодаре
Это основа детоксикации. Внутривенно вводятся солевые растворы, витаминные комплексы, гепатопротекторы и другие препараты, которые очищают кровь от токсинов, восстанавливают водно-электролитный баланс и поддерживают работу сердца и почек. Такая терапия эффективно снимает симптомы абстиненции, нормализует сон и общее самочувствие пациента. Врач контролирует дозировку и состав капельницы в зависимости от состояния больного и результатов анализов. Процедура чистка организма от токсинов позволяет не только вывести наркотики, но и восстановить работу печени и сердечно-сосудистой системы. Это базовый этап лечения зависимости, без которого невозможна полноценная реабилитация.
Получить дополнительные сведения – http://detoksikaciya-narkomanov-moskva13.ru
Доброго!
Экологичные приборы создают атмосферу аутентичной восточной трапезы за вашим столом. Палочки для суши изготавливаются из натурального бамбука или дерева без лакового покрытия. Каждая пара проходит контроль качества для обеспечения удобства и безопасности использования. Приборы поставляются в индивидуальной упаковке для гигиеничного хранения и транспортировки. Закажите традиционные палочки и погрузитесь в культуру японского приема пищи.
Специальная рецептура исключает пшеницу и другие источники глютена без потери вкуса. Безглютеновые суши готовятся в отдельной зоне кухни с индивидуальным инвентарем. Каждая позиция маркируется специальным значком для удобства выбора клиентами с ограничениями. Ингредиенты проходят проверку на отсутствие следов аллергенов перед использованием в приготовлении. Закажите безопасное удовольствие и наслаждайтесь японской кухней без компромиссов для здоровья.
Больше информации по ссылке – https://www.good-cook.ru/articles/2026/02/27g-r-pochemu-nelzja-razmeshivat-vasabi-v-soevom-souse-etiket-sushi-barov.shtml
отслеживание заказа онлайн, франшиза суши доставки, рис для суши
дракон ролл, влажные салфетки в доставке, праздничные суши
Удачи!
Не стоит медлить с вызовом врача-нарколога, если у человека проявляются тревожные признаки ухудшения состояния. Среди наиболее серьезных симптомов, требующих немедленного вмешательства врача, можно выделить продолжительный запой (более двух дней подряд), частую рвоту, невыносимую головную боль, выраженный тремор рук и тела, повышение артериального давления, нарушение ритма сердца, а также психические нарушения, включая тревогу, галлюцинации и бессонницу. Чем раньше пациент обратится за профессиональной помощью, тем выше шансы избежать серьезных осложнений и быстро вернуться к нормальной жизни.
Углубиться в тему – вывод из запоя новосибирск
В этой статье мы рассматриваем разные способы борьбы с алкогольной зависимостью. Обсуждаются методы лечения, программы реабилитации и советы для поддержки близких. Читатели получат информацию о том, как преодолеть зависимость и добиться успешного выздоровления.
Ознакомиться с отчётом – вызов нарколога на дом в ростове
Эта публикация посвящена актуальным вопросам современной медицины и здравоохранения. Мы обсудим новейшие технологии диагностики и лечения, а также их влияние на продолжительность и качество жизни. Читатель найдет здесь информацию о научных исследованиях и перспективных разработках, доступно изложенную для широкой аудитории.
Продолжить чтение – вызов нарколога на дом ростов на дону
Мы работаем круглосуточно и готовы оперативно помочь в решении проблемы зависимости в любое время. Наша наркологическая клиника для жителей в Москве работает круглосуточно, поэтому вы всегда можете позвонить нам по указанному номеру и получить консультацию или записаться на обследование и дальнейшую помощь. Вы сможете быстро связаться с нами в любое время суток и получить экстренную помощь на дому и в стационаре. Детоксикация — это сложный медицинский процесс, который требует комплексного подхода, так как появление тяжелых осложнений, таких как делирий или психоз, может быть опасным для жизни. Поэтому мы рекомендуем проводить процедуры исключительно под наблюдением врача-нарколога и психиатра в условиях стационара. Срочная скорая помощь доступна без выходных, и мы принимаем пациентов в любое время дня и ночи. Лечение алкоголизма и вывод из запоя также доступны в нашей клинике, и мы имеем богатый опыт в этой сфере.
Детальнее – http://www.domen.ru
beyaza yak?san renkler hakk?ndaki yaz?y? tavsiye ederim. Kendiniz gorun: https://fikirdronu.com/articles/beyaza-hangi-renk-gider/
В этой заметке мы представляем шаги, которые помогут в процессе преодоления зависимостей. Рассматриваются стратегии поддержки и чек-листы для тех, кто хочет сделать первый шаг к выздоровлению. Наша цель — вдохновить читателей на положительные изменения и поддержать их в трудных моментах.
Давай разберёмся досконально – narcology clinic
В практике круглосуточного лечения применяются следующие этапы:
Ознакомиться с деталями – платная наркологическая клиника в ростове-на-дону
Добрый день!
Термическая обработка раскрывает новые грани аромата используемых ингредиентов. Сырная шапка равномерно подрумянивается формируя аппетитную корочку на поверхности. Начинка прогревается до безопасной температуры сохраняя все полезные свойства. Процесс запекания контролируется таймером для исключения пересыхания рисовой основы. Закажите горячие запеченные роллы и согрейтесь уютным вечером в компании друзей.
Мобильный формат позволяет организовать японскую кухню в любой локации без стационарной кухни. Выездной суши бар включает оборудование ингредиенты и персонал для приготовления на месте. Каждая позиция готовится непосредственно перед подачей для максимальной свежести и зрелищности процесса. Система позволяет выбрать формат работы интерактивный мастер-класс или тихую подачу готовых блюд. Создайте незабываемое гастрономическое шоу и удивите гостей мастерством приготовления в реальном времени.
Больше информации по ссылке – https://modnayamoda.by/interesnoe/rolly-iskusstvo-yaponskoj-kuhni-v-kazhdom-kusochke.html
коллекционные роллы, имбирь в комплекте, лимонад имбирный с доставкой
запеченные роллы, калифорния ролл, зож меню с суши
Удачи!
Анонимность в клинике «Северный Вектор» является неотъемлемой частью лечебного процесса. Наркологическая клиника в Ростове-на-Дону обеспечивает конфиденциальность на всех этапах взаимодействия с пациентом, начиная с первичного обращения и заканчивая медицинским наблюдением. Клиническая практика показывает, что сохранение анонимности снижает уровень тревожности и повышает готовность пациента к полноценному лечению, что напрямую влияет на стабильность результатов.
Подробнее можно узнать тут – частная наркологическая клиника в ростове-на-дону
Запой – тяжелое состояние, когда организм не может функционировать без алкоголя. Токсины накапливаются, органы перестают работать, иммунитет слабеет. Это очень опасно. Самостоятельные попытки выйти из запоя только ухудшают ситуацию и усиливают страдания. Клиника «Семья и Здоровье» предлагает лечение на дому, без стресса и в комфортной обстановке. Мы работаем круглосуточно, быстро приезжаем и проводим все необходимые процедуры. Длительный запой разрушает организм, ухудшает качество жизни и может привести к опасным ситуациям. Своевременный вывод из запоя — это критически важно для сохранения здоровья и жизни.
Получить больше информации – vivod iz zapoya krasnoyarsk
Эта публикация содержит ценные советы и рекомендации по избавлению от зависимости. Мы обсуждаем различные стратегии, которые могут помочь в процессе выздоровления и важность обращения за помощью. Читатели смогут использовать полученные знания для улучшения своего состояния.
Всё самое вкусное внутри – вызов нарколога на дом в ростове
Особенно понравился материал про Актуальные финансовые новости России.
Вот, можете почитать:
https://media-rubl.ru
Этот текст посвящён сложным аспектам зависимости и её влиянию на жизнь человека. Мы обсудим психологические, физические и социальные последствия зависимого поведения, а также важность своевременного обращения за помощью.
Смотрите также… – частный медик 24 рнд
В этой статье рассматривается комплексный подход к избавлению от зависимости. Читатель узнает, как сочетание физического, психологического и духовного восстановления помогает достичь стойкого выздоровления.
Изучить эмпирические данные – стоп алко анапа
В этой статье обсуждаются актуальные медицинские вопросы, которые волнуют общество. Мы обращаем внимание на проблемы, касающиеся здравоохранения и лечения, а также на новшества в области медицины. Читатели будут осведомлены о последних событиях и смогут следить за тенденциями в медицине.
Как достичь результата? – Наркологическая клиника «Похмельная служба» в Екатеринбурге.
В этой статье рассматриваются различные аспекты избавления от зависимости, включая физические и психологические методы. Мы обсудим поддержку, мотивацию и стратегии, которые помогут в процессе выздоровления. Читатели узнают, как преодолеть трудности и двигаться к новой жизни без зависимости.
Изучить эмпирические данные – narcology clinic ростов на дону
В этой статье мы рассматриваем разрушительное влияние зависимости на жизнь человека. Обсуждаются аспекты, такие как здоровье, отношения и профессиональные достижения. Читатели узнают о необходимости обращения за помощью и о путях к восстановлению.
Секреты успеха внутри – стоп алко
В этой статье мы рассматриваем разрушительное влияние зависимости на жизнь человека. Обсуждаются аспекты, такие как здоровье, отношения и профессиональные достижения. Читатели узнают о необходимости обращения за помощью и о путях к восстановлению.
Перейти к полной версии – Наркологическая клиника «Похмельная служба» в Геленджике
Эта медицинская заметка содержит сжатую информацию о новых находках и методах в области здравоохранения. Мы предлагаем читателям свежие данные о заболеваниях, профилактике и лечении. Наша цель — быстро и доступно донести важную информацию, которая поможет в повседневной жизни и понимании здоровья.
Как достичь результата? – стоп алко
Согласно данным Федерального наркологического центра, своевременный выезд врача снижает риск осложнений и повторных госпитализаций.
Углубиться в тему – запой нарколог на дом каменск-уральский
В этой статье мы рассмотрим современные достижения в области медицины, включая инновационные методы лечения и диагностики. Мы обсудим важность профилактики заболеваний и роль технологий в улучшении качества здравоохранения. Читатели узнают о влиянии медицины на повседневную жизнь и ее значение для современного общества.
Всё самое вкусное внутри – стоп алко москва
Привет всем!
Охлажденные ингредиенты сохраняют естественную свежесть и натуральный вкус морепродуктов. Рисовая основа остается упругой и приятной на ощупь при подаче. Начинка нарезается тонкими ломтиками для идеального баланса текстур. Блюдо подается с традиционными соусами усиливающими вкусовые качества. Попробуйте наши изысканные холодные роллы и оцените чистоту вкуса.
Гибкий конструктор позволяет создать идеальное блюдо под ваши предпочтения и ограничения. Индивидуальный подбор ингредиентов включает замену компонентов исключение аллергенов и добавление любимых позиций. Каждая модификация отражается в цене и времени приготовления для прозрачности заказа. Система запоминает ваши настройки для быстрого оформления повторных заказов с персональными настройками. Создавайте блюдо мечты и получайте именно то что хотите без компромиссов.
Больше информации по ссылке – https://minchanka.by/rajon/preimushhestva-zakaza-rolla-drakon-cherez-servis-dostavki-yaponskoj-edy/
ежедневная поставка рыбы, курьер с холодильником, праздничные суши
электронный чек суши, скидка на роллы, электронный чек суши
Удачи!
Особую опасность представляет белая горячка (алкогольный психоз). У пациента возникают галлюцинации, приступы паники, агрессивное поведение, дезориентация во времени и пространстве. Это состояние требует незамедлительного вмешательства врача, так как человек может представлять опасность для себя и окружающих.
Получить дополнительные сведения – https://narcolog-na-dom-novokuznetsk00.ru/narkolog-na-dom-czena-novokuzneczk
В данной статье мы поговорим о будущем медицины, акцентируя внимание на прорывных разработках и их потенциале. Читатель узнает о новых подходах к лечению, роли искусственного интеллекта и возможностях персонализированной медицины.
Ознакомиться с полной информацией – Наркологическая клиника «Похмельная служба» в Москве.
В этой медицинской статье мы погрузимся в актуальные вопросы здравоохранения и лечения заболеваний. Читатели узнают о современных подходах, методах диагностики и новых открытий в научных исследованиях. Наша цель — донести важную информацию и повысить уровень осведомленности о здоровье.
Следуйте по ссылке – Похмельная служба в Москве
Эта статья освещает различные аспекты освобождения от зависимости и пути к выздоровлению. Мы обсуждаем важность осознания своей проблемы и обращения за помощью. Читатели получат практические советы о том, как преодолевать трудности и строить новую жизнь без зависимости.
Смотрите также… – Похмельная служба в Мытищах
Перед перечнем важно пояснить: эти симптомы не означают, что всё обязательно закончится осложнением, но они указывают на высокий риск и требуют профессиональной оценки состояния.
Подробнее – vyvod-iz-zapoya-v-klinu
В этой заметке мы представляем шаги, которые помогут в процессе преодоления зависимостей. Рассматриваются стратегии поддержки и чек-листы для тех, кто хочет сделать первый шаг к выздоровлению. Наша цель — вдохновить читателей на положительные изменения и поддержать их в трудных моментах.
Кликни и узнай всё! – стоп алко люберцы
В данной статье мы акцентируем внимание на важности поддержки в процессе выздоровления. Мы обсудим, как друзья, семья и профессионалы могут помочь тем, кто сталкивается с зависимостями. Читатели получат практические советы, как поддерживать близких на пути к новой жизни.
Уникальные данные только сегодня – Наркологическая клиника «Похмельная служба» в Мытищах.
Главная задача — сделать состояние управляемым: уменьшить тошноту, тремор, потливость, головную боль, «туман» в голове, снизить тревогу, выровнять показатели, помочь восстановить сон. При этом важно сохранять реалистичные ожидания: после длительного запоя организм истощён, поэтому слабость и эмоциональная нестабильность могут сохраняться некоторое время. Ключевой показатель качества помощи — не обещание «идеально за час», а безопасная динамика и понятные ориентиры на первые сутки.
Получить больше информации – vyvod-iz-zapoya-na-domu-klin
Медицинская публикация представляет собой свод актуальных исследований, экспертных мнений и новейших достижений в сфере здравоохранения. Здесь вы найдете информацию о новых методах лечения, прорывных технологиях и их практическом применении. Мы стремимся сделать актуальные медицинские исследования доступными и понятными для широкой аудитории.
ТОП-5 причин узнать больше – Наркологическая клиника «Похмельная служба» в Калининграде
Для жителей Ростова-на-Дону клиника «Южный МедКонтроль» предлагает два формата помощи: лечение в стационаре и амбулаторные визиты врача на дом. Стационар оборудован всем необходимым для круглосуточного медицинского наблюдения, проведения инфузионных процедур и лабораторной диагностики. Пациентам предоставляется комфортное размещение, спокойная обстановка и постоянный контроль состояния. При выезде на дом врачи действуют оперативно — приезжают в течение часа, проводят осмотр, устанавливают капельницы, купируют абстиненцию и дают рекомендации по дальнейшему лечению.
Получить больше информации – лечение в наркологической клинике ростов-на-дону
Врач проводит полное обследование и определяет тактику лечения в зависимости от состояния пациента. Важным аспектом является возможность применения комплексных мер, включающих:
Получить больше информации – нарколог на дом недорого
Запой — это не «просто много выпил», а состояние, при котором организм уже не справляется с нагрузкой от алкоголя и продуктов его распада. Человек может обещать себе остановиться «с утра», но утром становится хуже: дрожь, потливость, тошнота, сердцебиение, скачки давления, сильная тревога, бессонница. В таких условиях алкоголь начинает восприниматься как единственный быстрый способ облегчить симптомы, и запой продолжается. Опасность в том, что с каждым днём растут риски осложнений — со стороны сердца, сосудов, нервной системы, печени, поджелудочной железы, а также повышается вероятность травм и непредсказуемых поступков на фоне интоксикации.
Получить дополнительную информацию – http://vyvod-iz-zapoya-klin12.ru/vyvod-iz-zapoya-na-domu-v-klinu/
Читатели получат представление о том, как современные технологии влияют на развитие медицины. Обсуждаются новые методы лечения, персонализированный подход и роль цифровых решений в повышении качества медицинских услуг.
Продолжить чтение – Похмельная служба Геленджик
В этой статье рассматриваются различные аспекты избавления от зависимости, включая физические и психологические методы. Мы обсудим поддержку, мотивацию и стратегии, которые помогут в процессе выздоровления. Читатели узнают, как преодолеть трудности и двигаться к новой жизни без зависимости.
Следуйте по ссылке – Наркологическая клиника «Похмельная служба» в Екатеринбурге
В данном материале представлены ключевые тенденции в сфере медицинской науки и практики. Вы узнаете о последних открытиях, инновационных подходах к терапии и важности профилактики заболеваний. Особое внимание уделено практическому применению новых методов в клинической практике.
Подробности по ссылке – стоп алко
Вызвать нарколога на дом можно в любой район Москвы, врач приезжает в течение часа.
Получить дополнительную информацию – narkolog na dom kruglosutochno
Медицинская публикация представляет собой свод актуальных исследований, экспертных мнений и новейших достижений в сфере здравоохранения. Здесь вы найдете информацию о новых методах лечения, прорывных технологиях и их практическом применении. Мы стремимся сделать актуальные медицинские исследования доступными и понятными для широкой аудитории.
Получить больше информации – Похмельная служба Москва
В этой статье рассматривается комплексный подход к избавлению от зависимости. Читатель узнает, как сочетание физического, психологического и духовного восстановления помогает достичь стойкого выздоровления.
Детальнее – Похмельная служба в Москве
Explore budget-friendly transportation services in Washington DC and Maryland with KV Limo. Whether you require a charter bus or motor coach, KV Limo provides reliable options with a focus on affordability and passenger satisfaction.
Travel in style with Nassau Airport to Warwick Paradise Island transportation. Opt for a luxury car to Warwick Paradise Nassau or a convenient Nassau airport ride to Warwick hotel. Shuttle from Nassau airport to Warwick Paradise ensures timely arrival. Private transfer also available.
We’re excited to provide professional transportation from Nassau Airport to the amazing Baha Mar. As the leading provider of transportation and special event services, we value trust and hospitality.
Airport transfers service Nassau Bahamas providing express transportation (Private Hire), services for to and from Bahamas Airports, Bahamas Cruise Ports to and from anywhere in the Bahamas.
Travel from Dubai Airport to Atlantis The Palm in 30-45 minutes over 30 kilometers. Taxis are a straightforward option, while a limo service brings an elevated experience for your stay.
Experience top-tier mobility with Luxury Van Rental Dubai. Whether you need Dubai Luxury Group Transport for meetings or family events, our modern fleet and professional chauffeurs are at your service. Rely on Executive Van Service Dubai and VIP Van Hire Dubai for a secure and stylish Private Van Rental Dubai.
Let your Dubai journey begin with a Rolls Royce Chauffeur Dubai experience like no other. Enjoy elegance with our Chauffeur Driven Rolls Royce Dubai for city tours, airport transfers, or exclusive functions. Book today and travel in ultimate comfort with a professional VIP Chauffeur Rolls Royce Dubai.
Trusted Heating Service Dubai providers deliver Furnace Repair Dubai, Emergency Heating Repair Dubai, and professional Heating Maintenance Dubai. Our experienced Heating Technician Dubai team ensures efficient Heating System Repair Dubai and reliable heating comfort.
Book your John Wayne Airport Transfer Shuttle today! Our efficient John Wayne Airport Shuttle Service connects you to Los Angeles, Orange, Riverside, and San Bernardino Counties, offering rides from Ontario, Montclair, and La Verne to the airport and beyond.
Choose hotel transfer Dubai for comfort and convenience. Whether hotel to airport transfer Dubai or airport to hotel transfer Dubai, we offer luxury hotel transfer Dubai and executive hotel transfer Dubai.
Эта публикация посвящена актуальным вопросам современной медицины и здравоохранения. Мы обсудим новейшие технологии диагностики и лечения, а также их влияние на продолжительность и качество жизни. Читатель найдет здесь информацию о научных исследованиях и перспективных разработках, доступно изложенную для широкой аудитории.
Рассмотреть проблему всесторонне – Похмельная служба Москва
If your wolf microwave oven is not heating your food, you can consider the Subzerorepair247.com care will help you figure out the cause of the problem and how to solve it
Best dishwasher repair service Chicago trusted for dishwasher maintenance Chicago IL and dishwasher leak repair Chicago. Get same day dishwasher repair Chicago from licensed dishwasher technician Chicago. Affordable dishwasher repair near me for all major brands.
Experience smooth ride from Hobby Airport to Galveston Island with our private car services or shuttles. From Galveston Cruise Port to Moody Gardens, we offer reliable transportation options, including round-trip transfers between Galveston Beach and Hobby Airport.
Our web designers in San Fransisco can help you create professional and affordable website design and Web Design strategies with measurable commercial advantage
В этой статье мы рассматриваем разрушительное влияние зависимости на жизнь человека. Обсуждаются аспекты, такие как здоровье, отношения и профессиональные достижения. Читатели узнают о необходимости обращения за помощью и о путях к восстановлению.
Как это работает — подробно – Похмельная служба Люберцы
Этот краткий обзор предлагает сжатую информацию из области медицины, включая ключевые факты и последние новости. Мы стремимся сделать информацию доступной и понятной для широкой аудитории, что позволит читателям оставаться в курсе актуальных событий в здравоохранении.
Все материалы собраны здесь – Похмельная служба Москва
В данном материале представлены ключевые тенденции в сфере медицинской науки и практики. Вы узнаете о последних открытиях, инновационных подходах к терапии и важности профилактики заболеваний. Особое внимание уделено практическому применению новых методов в клинической практике.
Получить профессиональную консультацию – Наркологическая клиника «Похмельная служба» в Москве.
Читатели получат представление о том, как современные технологии влияют на развитие медицины. Обсуждаются новые методы лечения, персонализированный подход и роль цифровых решений в повышении качества медицинских услуг.
Получить профессиональную консультацию – Наркологическая клиника «Похмельная служба» в Москве.
В этой медицинской статье мы погрузимся в актуальные вопросы здравоохранения и лечения заболеваний. Читатели узнают о современных подходах, методах диагностики и новых открытий в научных исследованиях. Наша цель — донести важную информацию и повысить уровень осведомленности о здоровье.
Ознакомьтесь поближе – Похмельная служба Казань
В этой статье мы обсудим процесс восстановления после зависимостей, акцентируя внимание на различных методах и подходах к реабилитации. Читатели узнают, как создать план выздоровления и использовать полезные ресурсы для достижения устойчивых изменений.
Кликни и узнай всё! – «Похмельная служба» в Казани
Этот обзор сосредоточен на различных подходах к избавлению от зависимости. Мы изучим традиционные и альтернативные методы, а также их сочетание для достижения максимальной эффективности. Читатели смогут открыть для себя новые стратегии и подходы, которые помогут в их борьбе с зависимостями.
Все материалы собраны здесь – Наркологическая клиника «Похмельная служба» в Москве
Наши опытные специалисты используют современные методики выведения из запоя, применяя эффективные препараты, которые быстро восстанавливают организм после интоксикации алкоголя. В схему лечения мы включаем сильные сорбенты, гепатопротекторы, успокоительные средства и комплексы витаминов для поддержки сердечно-сосудистой системы. Благодаря инфузионной терапии уже в первые сутки у пациента улучшается самочувствие, проходит тошнота, тремор и нормализуется сон. Важно понимать, что капельница от запоя на дому — это полноценная медицинская процедура, которая требует контроля со стороны опытного нарколога. Врач остается с пациентом до стабилизации состояния, отслеживает динамику и корректирует состав введения.
Детальнее – vyvod-iz-zapoya-moskva-vyzov-narkologa-na-dom
В «Южном МедКонтроле» лечение зависимостей строится поэтапно, с постепенным восстановлением физиологических функций и эмоциональной устойчивости. Врачи используют современные методы детоксикации, фармакотерапию и психотерапию, которые действуют комплексно. Каждый этап направлен на достижение конкретного результата: очищение организма, снятие симптомов абстиненции, стабилизацию состояния и профилактику срывов.
Получить больше информации – наркологические клиники алкоголизм ростов-на-дону
Статья посвящена анализу текущих трендов в медицине и их влиянию на жизнь людей. Мы рассмотрим новые технологии, методы лечения и значение профилактики в обеспечении долголетия и здоровья.
Как это работает — подробно – Похмельная служба в Ногинске
Когда необходима наркологическая помощь на дому, а когда — госпитализация в стационар? Врач-нарколог всегда проводит полный сбор данных, определяет тяжесть состояния и наличие сопутствующих заболеваний. Опытный специалист понимает, что быстро вывести человека из запоя можно только при стабильных показателях здоровья. Длительность процедуры лечения подбирается индивидуально с учетом психиатрических показаний. Наши врачи используют многолетний опыт работы с зависимыми, что гарантирует безопасность каждого этапа терапии.
Получить дополнительные сведения – vyvod-iz-zapoya-v-moskve-nedorogo
Мы рассмотрим современные вызовы здравоохранения и пути их решения с помощью технологий и научных исследований. В статье собраны данные о новых лекарствах, методах диагностики и системном подходе к улучшению здоровья населения.
Получить больше информации – Похмельная служба в Нижнем Новгороде
rs795f
В этой статье рассматриваются способы преодоления зависимости и успешные истории людей, которые справились с этой проблемой. Мы обсудим важность поддержки со стороны близких и профессионалов, а также стратегии, которые могут помочь в процессе выздоровления. Научитесь первоочередным шагам к новой жизни.
Узнать больше > – «Похмельная служба» в Новороссийске
Эта доказательная статья представляет собой глубокое погружение в успехи и вызовы лечения зависимостей. Мы обращаемся к научным исследованиям и опыту специалистов, чтобы предоставить читателям надежные данные об эффективности различных методик. Изучите, что работает лучше всего, и получите информацию от экспертов.
Подробности по ссылке – «Похмельная служба» в Новороссийске
Этот обзор содержит информацию о передовых достижениях в области медицины. Мы разберем инновационные технологии, которые меняют подход к лечению и диагностике, а также их влияние на эффективность оказания медицинской помощи.
Подробнее тут – Похмельная служба Геленджик
В этой статье мы рассматриваем разные способы борьбы с алкогольной зависимостью. Обсуждаются методы лечения, программы реабилитации и советы для поддержки близких. Читатели получат информацию о том, как преодолеть зависимость и добиться успешного выздоровления.
Переходите по ссылке ниже – Наркологическая клиника «Похмельная служба» в Новосибирске
Вызвать нарколога на дом можно в любой район Москвы, врач приезжает в течение часа.
Получить дополнительные сведения – vyzov vracha narkologa na dom moskva
Опытные специалисты знают, что запой может развиваться по-разному. У одного человека симптомы появляются уже на второй день, у другого тяжелый абстинентный синдром формируется после недели употребления. Поэтому наркологи не используют один и тот же метод для всех. Наркологу важно увидеть пациента, задать вопросы, оценить общее здоровье и понять, можно ли вывести человека из запоя дома или лучше сразу направить его в клинику.
Изучить вопрос глубже – http://vyvod-iz-zapoya-moskva13-1.ru/vyvod-iz-zapoya-moskva-stacionar/https://vyvod-iz-zapoya-moskva13-1.ru
Наши опытные специалисты используют современные методики выведения из запоя, применяя эффективные препараты, которые быстро восстанавливают организм после интоксикации алкоголя. В схему лечения мы включаем сильные сорбенты, гепатопротекторы, успокоительные средства и комплексы витаминов для поддержки сердечно-сосудистой системы. Благодаря инфузионной терапии уже в первые сутки у пациента улучшается самочувствие, проходит тошнота, тремор и нормализуется сон. Важно понимать, что капельница от запоя на дому — это полноценная медицинская процедура, которая требует контроля со стороны опытного нарколога. Врач остается с пациентом до стабилизации состояния, отслеживает динамику и корректирует состав введения.
Подробнее тут – https://vyvod-iz-zapoya-moskva1-13.ru/vyvod-iz-zapoya-moskva-na-domu
Круглосуточная помощь нарколога на дом особенно важна, когда состояние пациента меняется в течение дня или ночи: усиливаются симптомы, появляется тревога, нарушается сон, повышается давление, возникают боли, тошнота, страх, тремор, рвота, признаки опьянения или тяжелого выхода из запоя. Врач нарколог приезжает на дом, проводит диагностику, оценивает работу сердца, нервной системы, печени и других органов, после чего принимает решение о лечении на месте, повторном выезде или госпитализации в стационар.
Выяснить больше – narkolog-na-dom-moskva13.ru/
Вывод из запоя в Москве требуется, когда человек несколько дней употребляет алкоголь, не может самостоятельно остановиться и постепенно теряет физические силы. Запойное состояние сопровождается интоксикацией, обезвоживанием, нарушением сна, тревогой, тремором, скачками артериального давления, тошнотой, рвотой и выраженной слабостью. В такой ситуации домашние способы часто оказываются недостаточными, а бесконтрольный прием лекарственных средств может ухудшить состояние. Врачебный контроль помогает оценить риски, подобрать безопасное лечение, провести выведение продуктов распада этилового спирта и начать восстановление организма без лишней нагрузки.
Изучить вопрос глубже – https://vyvod-iz-zapoya-moskva13-1.ru/vyvod-iz-zapoya-moskva-stacionar/
Наркологическая клиника «Южный МедКонтроль» объединяет современные медицинские технологии, опыт специалистов и уважительное отношение к каждому пациенту. Здесь создаются условия для безопасного и результативного лечения зависимостей любой сложности — от алкогольной до полинаркотической. Центр работает в круглосуточном режиме, предлагая выезд врачей на дом, детоксикацию, кодирование и длительные программы реабилитации. Основная цель специалистов — восстановление физического и психологического равновесия человека, возвращение способности к полноценной жизни без зависимости.
Подробнее тут – https://narkologicheskaya-clinika-v-rostove19.ru/narkologiya-rostov-kruglosutochno/
Мы рассмотрим современные вызовы здравоохранения и пути их решения с помощью технологий и научных исследований. В статье собраны данные о новых лекарствах, методах диагностики и системном подходе к улучшению здоровья населения.
Разобраться лучше – стоп алко
nc39sz
Статья посвящена анализу текущих трендов в медицине и их влиянию на жизнь людей. Мы рассмотрим новые технологии, методы лечения и значение профилактики в обеспечении долголетия и здоровья.
Доступ к полной версии – стоп алко
Нарколог на дом в Москве требуется в ситуации, когда человек после алкоголя не может самостоятельно восстановиться, находится в состоянии выраженной интоксикации, запоя, похмельного синдрома или абстиненции. В таком случае вызов врача на дом помогает быстро оценить состояние пациента, провести осмотр, подобрать препараты и начать лечение без лишней транспортировки. Дом становится местом первичной медицинской помощи, если врач видит, что процедуры можно провести безопасно в домашних условиях.
Разобраться лучше – http://narkolog-na-dom-moskva13.ru/
Медицинский вывод из запоя направлен на снятие интоксикации, нормализацию сна, восстановление водно-солевого баланса, снижение тревоги, поддержку сердца, печени, нервной системы, мозга и внутренних органов. Нарколог оценивает состояние больного, уточняет длительность запоя, количество алкоголя, наличие хронических заболеваний, прием таблеток, прошлое лечение алкоголизма, возможные противопоказания и признаки алкогольного абстинентного синдрома. После обследования подбирается индивидуальная терапия: инфузионная капельница, очищающая детоксикация, гепатопротекторы, кардиопротекторы, витамины, успокоительные средства, медикаменты для стабилизации показателей и рекомендации по дальнейшему наблюдению.
Подробнее можно узнать тут – vyvod-iz-zapoya-moskovskaya-oblast-moskva
Он оценит состояние зависимого и примет решение о том, можно ли быстро выводить его из запоя на дому в Москве или требуется постепенный выход из запоя в условиях стационара. В сложных случаях, когда есть галлюцинации или серьезные хронические патологии, мы рекомендуем не рисковать и начинать терапию под круглосуточным наблюдением. Такое решение в клинике принимается строго в интересах пациента, потому что алкоголизм — это болезнь, разрушающая системы организма. Только в стационаре можно провести полный объем лабораторной диагностики, включая ЭКГ и оценку функций печени. Реабилитация в стационарных условиях дает больше шансов на успех.
Детальнее – http://
В этой статье рассматривается комплексный подход к избавлению от зависимости. Читатель узнает, как сочетание физического, психологического и духовного восстановления помогает достичь стойкого выздоровления.
Не пропусти важное – Похмельная служба в Нижнем Новгороде
В этой заметке мы представляем шаги, которые помогут в процессе преодоления зависимостей. Рассматриваются стратегии поддержки и чек-листы для тех, кто хочет сделать первый шаг к выздоровлению. Наша цель — вдохновить читателей на положительные изменения и поддержать их в трудных моментах.
Слушай внимательно — тут важно – стоп алко казань
Наркологическая клиника «Южный МедКонтроль» объединяет современные медицинские технологии, опыт специалистов и уважительное отношение к каждому пациенту. Здесь создаются условия для безопасного и результативного лечения зависимостей любой сложности — от алкогольной до полинаркотической. Центр работает в круглосуточном режиме, предлагая выезд врачей на дом, детоксикацию, кодирование и длительные программы реабилитации. Основная цель специалистов — восстановление физического и психологического равновесия человека, возвращение способности к полноценной жизни без зависимости.
Получить дополнительные сведения – наркологическая клиника клиника помощь в ростове-на-дону
Этот обзор посвящен успешным стратегиям избавления от зависимости, включая реальные примеры и советы. Мы разоблачим мифы и предоставим читателям достоверную информацию о различных подходах. Получите опыт многообразия методов и найдите подходящий способ для себя!
Практические советы ждут тебя – Наркологическая клиника «Похмельная служба» в Москве
Эта публикация исследует взаимосвязь зависимости и психологии. Мы обсудим, как психологические аспекты влияют на появление зависимостей и процесс выздоровления. Читатели смогут понять важность профессиональной поддержки и применения научных подходов в терапии.
Получить профессиональную консультацию – стоп алко ногинск
В этом исследовании рассмотрены методы лечения зависимостей и их эффективность. Мы проанализируем различные подходы, используемые в реабилитационных центрах, и представим данные о результативности программ. Читатели получат надежные и научно обоснованные сведения о данной проблеме.
Не упусти важное! – стоп алко нижний новгород
Назначение
Получить дополнительную информацию – врача капельницу от запоя в первоуральске
Эффективное лечение требует поэтапного подхода, который реализуется следующим образом:
Подробнее можно узнать тут – наркологическая клиника цены в рязани
Наши опытные специалисты используют современные методики выведения из запоя, применяя эффективные препараты, которые быстро восстанавливают организм после интоксикации алкоголя. В схему лечения мы включаем сильные сорбенты, гепатопротекторы, успокоительные средства и комплексы витаминов для поддержки сердечно-сосудистой системы. Благодаря инфузионной терапии уже в первые сутки у пациента улучшается самочувствие, проходит тошнота, тремор и нормализуется сон. Важно понимать, что капельница от запоя на дому — это полноценная медицинская процедура, которая требует контроля со стороны опытного нарколога. Врач остается с пациентом до стабилизации состояния, отслеживает динамику и корректирует состав введения.
Подробнее – http://vyvod-iz-zapoya-moskva1-13.ru/vyvod-iz-zapoya-moskva-na-domu/
Клиника «ТоксинНет» предлагает профессиональную помощь при алкогольной зависимости и запоях в Нижнем Новгороде. Наши опытные наркологи круглосуточно выезжают на дом для оказания экстренной медицинской помощи. Основным методом лечения является капельница от запоя, которая позволяет оперативно снять интоксикацию и стабилизировать общее состояние пациента. Мы обеспечиваем конфиденциальность, индивидуальный подход и высокий уровень безопасности процедур.
Получить дополнительную информацию – http://
Этот информативный текст сочетает в себе темы здоровья и зависимости. Мы обсудим, как хронические заболевания могут усугубить зависимости и наоборот, как зависимость может влиять на общее состояние здоровья. Читатели получат представление о комплексном подходе к лечению как физического, так и психического состояния.
Получить профессиональную консультацию – стоп алко новороссийск
В этой статье мы обсудим процесс восстановления после зависимостей, акцентируя внимание на различных методах и подходах к реабилитации. Читатели узнают, как создать план выздоровления и использовать полезные ресурсы для достижения устойчивых изменений.
Ознакомиться с полной информацией – Наркологическая клиника «Похмельная служба» в Геленджике.
В этой заметке мы представляем шаги, которые помогут в процессе преодоления зависимостей. Рассматриваются стратегии поддержки и чек-листы для тех, кто хочет сделать первый шаг к выздоровлению. Наша цель — вдохновить читателей на положительные изменения и поддержать их в трудных моментах.
Более того — здесь – стоп алко новосибирск
После первичной диагностики начинается активная фаза детоксикации. Современные препараты вводятся капельничным методом, что позволяет быстро снизить концентрацию токсинов в крови и восстановить нормальные обменные процессы. Этот этап является основополагающим для стабилизации работы внутренних органов, таких как печень, почки и сердце.
Подробнее можно узнать тут – kapelnica ot zapoya
Клинические протоколы стационарной терапии рекомендуют госпитализацию при средней и тяжёлой степени интоксикации.
Исследовать вопрос подробнее – http://vyvod-iz-zapoya-v-ryazani12.ru/vyvod-iz-zapoya-czena-v-ryazani/
Специалист уточняет продолжительность запоя, тип употребляемого алкоголя и наличие сопутствующих заболеваний. Такой подробный анализ позволяет подобрать оптимальные методы детоксикации и снизить риск осложнений.
Получить дополнительные сведения – капельницы от запоя на дому цена луганск
Look for high-quality designs with real steel boning for structure that will last for years,sexy lingerieand closures at both the front and back for easy dressing and undressing.
В Москве помощь при запое может проводиться на дому, в клинике, в наркологическом центре или в стационаре. Домашний формат подходит, если пациент находится в сознании, контактирует с врачом и нет признаков тяжелого психоза, судорог, опасного поведения или выраженного нарушения дыхания. Если состояние тяжелое, нарколог может рекомендовать стационарное лечение, потому что в клинике доступно круглосуточно организованное наблюдение, диагностика, ЭКГ, анализ крови, коррекция терапии и контроль осложнений.
Детальнее – вывод из запоя москве
По теме “Новости столичного футбола: события Москвы и регионов”, нашел много полезного.
Вот, можете почитать:
https://moskvaexpress.ru
Вывод из запоя показан при:
Детальнее – вывод из запоя на дому в мурманске
В этой медицинской статье мы погрузимся в актуальные вопросы здравоохранения и лечения заболеваний. Читатели узнают о современных подходах, методах диагностики и новых открытий в научных исследованиях. Наша цель — донести важную информацию и повысить уровень осведомленности о здоровье.
Наши рекомендации — тут – Наркологическая клиника «Похмельная служба» в Новосибирске
babydoll lingerie鈥?/a>.. We have even more pretty things for your perusal! Our best inspiration for this blog post is all up on Pinterest,including lingerie-inspired outfit ideas,
“camasir makinesi kotu koku nasil gider” konusu icin cok faydal? bir yaz? buldum. Link burada: https://yapevleri.com/articles/camasir-makinesi-kokusu-temizleme-yontemleri/
Самостоятельное лечение при запое рискованно. Человек может принимать несовместимые препараты, неправильно оценивать тяжесть состояния или пытаться облегчить симптомы новой дозой алкоголя. Такие действия усиливают интоксикацию, приводят к ухудшению здоровья и повышают риск серьезных последствий. Медицинский вывод из запоя позволяет действовать последовательно: сначала оценить состояние, затем провести снятие острых симптомов, восстановить организм и определить дальнейшую тактику лечения алкогольной зависимости.
Разобраться лучше – vyvod-iz-zapoya-v-moskve-v-stacionare
Эта статья сочетает познавательный и занимательный контент, что делает ее идеальной для любителей глубоких исследований. Мы рассмотрим увлекательные аспекты различных тем и предоставим вам новые знания, которые могут оказаться полезными в будущем.
Читать полностью – Наркологическая клиника «Похмельная служба» в Реутове.стоп алко
Эта публикация обращает внимание на важность профилактики зависимостей. Мы обсудим, как осведомленность и образование могут помочь в предотвращении возникновения зависимости. Читатели смогут ознакомиться с полезными советами и ресурсами, которые способствуют здоровому образу жизни.
Уникальные данные только сегодня – Наркологическая клиника «Похмельная служба» в Ростове на Дону
Нарколог на дом в Москве требуется в ситуации, когда человек после алкоголя не может самостоятельно восстановиться, находится в состоянии выраженной интоксикации, запоя, похмельного синдрома или абстиненции. В таком случае вызов врача на дом помогает быстро оценить состояние пациента, провести осмотр, подобрать препараты и начать лечение без лишней транспортировки. Дом становится местом первичной медицинской помощи, если врач видит, что процедуры можно провести безопасно в домашних условиях. Нам часто задают вопросы, и мы подробнее расскажем обо всех особенностях процесса, а также о том, какие документы и лицензии подтверждают качество нашей работы. Наши профессионалы предлагают действительно эффективное и комплексное лечение, позволяющее избавиться даже от самых тяжелых форм зависимости.
Углубиться в тему – https://narkolog-na-dom-moskva13-1.ru/vrach-narkolog-na-dom-moskva
В нашей клинике “Сила воли” в Иркутске вы можете получить помощь как в стационаре, так и на дому. Мы предлагаем два вида услуг:
Детальнее – http://www.domen.ru
Эта статья для ознакомления предлагает читателям общее представление об актуальной теме. Мы стремимся представить ключевые факты и идеи, которые помогут читателям получить представление о предмете и решить, стоит ли углубляться в изучение.
Изучить эмпирические данные – стоп алко подольск
Этот обзор посвящен успешным стратегиям избавления от зависимости, включая реальные примеры и советы. Мы разоблачим мифы и предоставим читателям достоверную информацию о различных подходах. Получите опыт многообразия методов и найдите подходящий способ для себя!
Погрузиться в детали – «Похмельная служба» в Севастополе
Комплексная терапия при выводе из запоя на дому включает в себя два основных направления: медикаментозную детоксикацию и психологическую поддержку. Такой подход позволяет добиться быстрого и устойчивого эффекта, минимизируя риск осложнений и обеспечивая долгосрочную ремиссию.
Разобраться лучше – врач нарколог выезд на дом
“boyun kas? gelistirme” hakk?nda bilgi arayanlar icin burada harika bilgiler var. Suradan okuyabilirsiniz: https://dinamizsport.com/articles/boyun-guclendirme-egzersizleri-saglikli-boyun/
Эта публикация содержит ценные советы и рекомендации по избавлению от зависимости. Мы обсуждаем различные стратегии, которые могут помочь в процессе выздоровления и важность обращения за помощью. Читатели смогут использовать полученные знания для улучшения своего состояния.
Это стоит прочитать полностью – «Похмельная служба» в Красноярске
В этой публикации мы исследуем ключевые аспекты здоровья, включая влияние образа жизни на благополучие. Читатели узнают о важности правильного питания, физической активности и психического здоровья. Мы предоставим практические советы и рекомендации для поддержания здоровья и развития профилактических подходов.
Обратитесь за информацией – Похмельная служба в Санкт Петербурге
В данном обзоре представлены основные направления и тренды в области медицины. Мы обсудим актуальные проблемы здравоохранения, свежие открытия и новые подходы, которые меняют представление о лечении и профилактике заболеваний. Эта информация будет полезна как специалистам, так и широкой публике.
Эксклюзивная информация – Наркологическая клиника «Похмельная служба» в Самаре
Этот обзор сосредоточен на различных подходах к избавлению от зависимости. Мы изучим традиционные и альтернативные методы, а также их сочетание для достижения максимальной эффективности. Читатели смогут открыть для себя новые стратегии и подходы, которые помогут в их борьбе с зависимостями.
Читать дальше – Похмельная служба Санкт Петербург
«Триумф» предоставляет широкий спектр наркологических услуг, покрывающий все этапы работы с зависимостью. Независимо от того, требуется ли экстренное выведение из запоя, плановое кодирование или длительная реабилитация, наши врачи подбирают эффективные и безопасные методы, соответствующие тяжести конкретного случая. Мы успешно лечим алкоголизм, наркоманию, игроманию, неврозы и другие расстройства. Подробнее ознакомиться с перечнем услуг можно на страницах сайта или по телефону. Наши специалисты — кандидаты наук, психиатры высшей категории, такие как Марина Олеговна, Александр Игоревич, Евгений Юрьевич и другие, — имеют огромный опыт борьбы с зависимостями. Чтобы записаться на приём или вызвать врача на дом, оставьте заявку онлайн на официальном сайте.
Изучить вопрос глубже – luchshaya-narkologicheskaya-klinika-v-moskve-otzyvy
В данной статье мы поговорим о будущем медицины, акцентируя внимание на прорывных разработках и их потенциале. Читатель узнает о новых подходах к лечению, роли искусственного интеллекта и возможностях персонализированной медицины.
Только факты! – стоп алко симферополь
Наркологическая клиника «Южный МедКонтроль» объединяет современные медицинские технологии, опыт специалистов и уважительное отношение к каждому пациенту. Здесь создаются условия для безопасного и результативного лечения зависимостей любой сложности — от алкогольной до полинаркотической. Центр работает в круглосуточном режиме, предлагая выезд врачей на дом, детоксикацию, кодирование и длительные программы реабилитации. Основная цель специалистов — восстановление физического и психологического равновесия человека, возвращение способности к полноценной жизни без зависимости.
Исследовать вопрос подробнее – http://narkologicheskaya-clinika-v-rostove19.ru
Этот обзор посвящен успешным стратегиям избавления от зависимости, включая реальные примеры и советы. Мы разоблачим мифы и предоставим читателям достоверную информацию о различных подходах. Получите опыт многообразия методов и найдите подходящий способ для себя!
Читать дальше – Похмельная служба в Самаре
You can do the exercise at any time — at the workplace,セックス ドールwhile driving,
В этой статье мы подробно рассматриваем проверенные методы борьбы с зависимостями, включая психотерапию, медикаментозное лечение и поддержку со стороны общества. Мы акцентируем внимание на важности комплексного подхода и возможности успешного восстановления для людей, столкнувшихся с этой проблемой.
Лучшее решение — прямо здесь – стоп алко
Эти действия помогают быстро восстановить водно-электролитный баланс и снизить нагрузку на внутренние органы. После проведения процедур врач дает рекомендации по дальнейшему наблюдению и реабилитации.
Подробнее можно узнать тут – частный нарколог на дом
Вызвать нарколога на дом можно в любой район Москвы, врач приезжает в течение часа.
Детальнее – https://narkolog-na-dom-moskva13.ru/narkolog-na-dom-moskva-ceny/
Этот документ охватывает важные аспекты медицинской науки, сосредотачиваясь на ключевых вопросах, касающихся здоровья населения. Мы рассматриваем свежие исследования, клинические рекомендации и лучшие практики, которые помогут улучшить качество лечения и профилактики заболеваний. Читатели получат возможность углубиться в различные медицинские дисциплины.
Изучить рекомендации специалистов – Похмельная служба в Химках
Миссия нашей клиники заключается в оказании высококачественной помощи людям, страдающим от зависимостей. Мы стремимся создать безопасное и поддерживающее пространство для лечения, где каждый пациент получает необходимую поддержку и понимание. Наша задача — не только помочь избавиться от зависимости, но и вернуть полноценную жизнедеятельность человека, восстановив его социальные связи и жизненные ориентиры.
Получить дополнительную информацию – http://
Этот обзор содержит информацию о передовых достижениях в области медицины. Мы разберем инновационные технологии, которые меняют подход к лечению и диагностике, а также их влияние на эффективность оказания медицинской помощи.
Всё самое вкусное внутри – Наркологическая клиника «Похмельная служба» в Новосибирске.
Наши врачи уделяют внимание не только медицинским аспектам, но также социальным и психологическим факторам. Мы помогаем пациентам находить новый смысл в жизни, формировать новые увлечения и восстанавливать старые связи с близкими.
Ознакомиться с деталями – http://kapelnica-ot-zapoya-irkutsk.ru
Этот медицинский обзор сосредоточен на последних достижениях, которые оказывают влияние на пациентов и медицинскую практику. Мы разбираем инновационные методы лечения и исследований, акцентируя внимание на их значимости для общественного здоровья. Читатели узнают о свежих данных и их возможном применении.
Получить больше информации – «Похмельная служба» в Севастополе
References:
Jackpot capital casino https://gitea.goldendeliverer.com/arlenkbn498243/5683831/wiki/Best-Mobile-Casinos-in-Australia%3A-Top-Casino-Apps-for-2026
В статье рассматриваются различные стратегии борьбы с зависимостями, включая проверенные методы и реальные истории успеха. Читатель узнает, какие подходы наиболее эффективны и как начать путь к выздоровлению.
Смотри, что ещё есть – Похмельная служба в Реутове
В этой публикации мы исследуем ключевые аспекты здоровья, включая влияние образа жизни на благополучие. Читатели узнают о важности правильного питания, физической активности и психического здоровья. Мы предоставим практические советы и рекомендации для поддержания здоровья и развития профилактических подходов.
Хочешь знать всё? – Похмельная служба Севастополь
References:
Casino twist https://git.sleepingforest.co.uk/estellablewett
Лечение хронического алкоголизма начинается с купирования абстинентного синдрома, после чего проводятся мероприятия по нормализации работы печени, сердечно-сосудистой и нервной системы. Назначаются гепатопротекторы, ноотропы, витамины группы B. Также проводится противорецидивная терапия.
Подробнее тут – наркологические клиники алкоголизм
References:
Hollywood casino toledo oh http://tm-jikayo.com:8081/marcellacoldir
References:
Gila river casinos https://gitlab.oc3.ru/u/vqemarisol9454
References:
Casinos en mexico https://testgitea.educoder.net/juanagiroux808
References:
Bally slot machines https://git.sleepingforest.co.uk/jeffdisher3391
References:
Pokie machines https://www.maxjobs.ro/employer/instant-withdrawal-casinos-in-australia-fast-payout-sites/
References:
Craps strategies https://aeterna.cim.mcgill.ca/carmelsherlock
References:
Plenty jackpots https://career.wg-dcard.com/employer/best-online-casinos-australia-2025-top-10-aussie-casino-sites/
Публикация знакомит читателей с различными подходами к реабилитации. От традиционных методов до современных программ — вы узнаете, как выбрать оптимальный путь к выздоровлению и преодолеть препятствия на этом пути.
Подробности по ссылке – Наркологическая клиника «Похмельная служба» в Пушкино.
References:
Microgaming casino bonus https://actsolution.iptime.org:3000/molliecamara65
Этот обзор сосредоточен на различных подходах к избавлению от зависимости. Мы изучим традиционные и альтернативные методы, а также их сочетание для достижения максимальной эффективности. Читатели смогут открыть для себя новые стратегии и подходы, которые помогут в их борьбе с зависимостями.
Посмотреть всё – Похмельная служба Новосибирск
References:
Club one casino https://complete-jobs.co.uk/employer/safe-online-casinos-in-the-us-for-2026-top-secure-casino-sites
References:
Craps system https://git.bp-web.app/camillabeazley
Этот обзор посвящен успешным стратегиям избавления от зависимости, включая реальные примеры и советы. Мы разоблачим мифы и предоставим читателям достоверную информацию о различных подходах. Получите опыт многообразия методов и найдите подходящий способ для себя!
Только для своих – Наркологическая клиника «Похмельная служба» в Реутове.стоп алко
В этом обзоре представлены различные методы избавления от зависимости, включая терапевтические и психологические подходы. Мы сравниваем их эффективность и предоставляем рекомендации для тех, кто хочет вернуться к трезвой жизни. Читатели смогут найти информацию о реабилитационных центрах и поддерживающих группах.
Получить дополнительную информацию – «Похмельная служба» в Сочи
References:
Encore casino https://www.searchmerajob.in/employer/best-minimum-deposit-online-casinos-in-australia-2026
References:
Silver nugget casino http://uniprint.co.kr/bbs/board.php?bo_table=free&wr_id=290171
Обзор посвящён процессу восстановления после зависимостей. Мы расскажем о различных этапах реабилитации, поддерживающих ресурсах и важности мотивации в достижении устойчивого выздоровления.
Жми сюда — получишь ответ – стоп алко сочи
На первом этапе участник программы сталкивается с признанием бессилия перед зависимостью. Для многих пациентов это трудность, потому что человек может считать, что он способен справиться самостоятельно, что употребление не разрушает его жизнь или что лечение зависимости ему не нужно. В процессе работы он замечает, как болезнь влияет на отношения, работу, здоровье, самооценку, поведение, мысли, эмоции и способность принимать ответственные решения.
Получить дополнительные сведения – https://reabilitaciya-12-shagov-moskva13-1.ru/
References:
Win at roulette http://newchanpin.yuntangkeji.cn:33009/aguedahardin95/microgaming-cashback-bonus8659/wiki/Microgaming-Casinos-List%3A-Best-Casino-Bonuses-%26-Free-Spins
References:
Roulette colors https://gitea.avixc-nas.myds.me/doylehutcheson
References:
Spirit mountain casino http://gitlab.alpaedu.co.kr:8000/elizabethfranc
References:
Pioneer casino laughlin https://7yue.net/rodgerquan7769
Мы работаем круглосуточно, принимаем заявки по телефону, оказываем помощь анонимно и конфиденциально. Вы можете позвонить сейчас, оставить заявку через форму сайта или заказать обратный звонок. Бесплатная первичная консультация помогает понять, какой метод подойдет в конкретной ситуации: капельница, детоксикация, вывод из запоя, снятие ломки, кодирование, амбулаторное лечение, стационар или реабилитация.
Исследовать вопрос подробнее – http://
Вывод из запоя — это только первый шаг в лечении алкогольной зависимости. Без последующей терапии риск рецидива очень высок. Наш наркологический центр предлагает полный курс лечения алкоголизма, включая кодирование и психотерапию. Кодирование на дому проводится различными методами: уколом (Торпедо, Эспераль, Налтрексон, Аквилонг), медикаментозным вшиванием (дисульфирам, Вивитрол), гипнозом по Довженко, а также двойным блоком. Каждый метод подбирается врачом индивидуально, с согласия пациента и при отсутствии противопоказаний. Опытный нарколог объяснит, какая кодировка подойдёт именно вам, учитывая стаж и форму зависимости.
Выяснить больше – narkolog-na-dom-balashiha
Эта доказательная статья представляет собой глубокое погружение в успехи и вызовы лечения зависимостей. Мы обращаемся к научным исследованиям и опыту специалистов, чтобы предоставить читателям надежные данные об эффективности различных методик. Изучите, что работает лучше всего, и получите информацию от экспертов.
Раскрыть тему полностью – Наркологическая клиника «Похмельная служба» в Краснодаре.
В данной статье рассматриваются физиологические и эмоциональные аспекты зависимости. Мы обсудим, как организм реагирует на зависимое поведение, и какие методы помогают восстановить здоровье и внутреннее равновесие.
Читать далее > – Похмельная служба Сочи
Этот информационный материал подробно освещает проблему наркозависимости, ее причины и последствия. Мы предлагаем информацию о методах лечения, профилактики и поддерживающих программах. Цель статьи — повысить осведомленность и продвигать идеи о необходимости борьбы с зависимостями.
Изучить материалы по теме – Наркологическая клиника «Похмельная служба» в Краснодаре
в таких случаях вызов нарколога на дом предоставляет возможность оценить состояние пациента и предложить амбулаторное лечение.
Углубиться в тему – врач нарколог на дом республика татарстан
Эта доказательная статья представляет собой глубокое погружение в успехи и вызовы лечения зависимостей. Мы обращаемся к научным исследованиям и опыту специалистов, чтобы предоставить читателям надежные данные об эффективности различных методик. Изучите, что работает лучше всего, и получите информацию от экспертов.
Познакомиться с результатами исследований – Наркологическая клиника «Похмельная служба» в Краснодаре.
В этой публикации мы обсуждаем современные методы лечения различных заболеваний. Читатели узнают о новых медикаментах, терапиях и исследованиях, которые активно применяются для лечения. Мы нацелены на то, чтобы предоставить практические знания, которые могут помочь в борьбе с недугами.
Осуществить глубокий анализ – Похмельная служба Краснодар
Программа 12 шагов применяется много лет и используется при наркомании, алкоголизме, сочетанных зависимостях, зависимости от аптечных препаратов, марихуаны, гашиша, спайсов, солей, опиатов, стимуляторов и других наркотиков. Человек не просто отказывается употреблять наркотик, а меняет мышление, учится видеть болезнь без оправданий, проходит шаг за шагом личную работу и получает инструменты для трезвого поведения после центра. Такая программа помогает не заменить одну зависимость другой, а осознать природу аддикции, выявить корни употребления и начать действовать иначе.
Выяснить больше – programma-12-shagov-samostoyatelno
Этот текст представляет собой обзор свежих данных и исследований в области медицины. Он призван помочь читателям понять, как научные достижения влияют на лечение, диагностику и общее состояние системы здравоохранения.
Провести детальное исследование – Наркологическая клиника «Похмельная служба» в Краснодаре.
Медикаментозное лечение включает также таблетированные формы: налтрексон, дисульфирам (Эспераль), Аквилонг, Алгоминал, а также препараты для двойного блока. Эти средства помогают снизить тягу к спиртному и предотвратить рецидив. Лечение алкогольной зависимости требует длительной фармакотерапии. Наши врачи проводят полный курс лечения с учётом всех особенностей организма. Лечение должно быть непрерывным и последовательным. Важно помнить, что для успешного выздоровления нужно пройти длительный процесс, который может занять несколько месяцев или даже больше, в зависимости от степени зависимости. Лечение алкоголизма невозможно без психотерапии, которая помогает пациенту осознать причины болезни, сформировать установку на трезвость и получить поддержку на всех этапах лечения. Психотерапевт работает индивидуально и в группах, используя гипнозом, метод Довженко, когнитивно-поведенческую терапию. Психологическая поддержка — залог успешного лечения. Часто пациенты не могут справиться самостоятельно, и тогда мы рекомендуем прибегнуть к помощи профессионалов, которые убедят больного начать терапию. Если пациент соглашается на лечение добровольно, эффективность возрастает в разы.
Ознакомиться с деталями – http://vyvod-iz-zapoya-balashiha13-1.ru/
В данной статье мы поговорим о будущем медицины, акцентируя внимание на прорывных разработках и их потенциале. Читатель узнает о новых подходах к лечению, роли искусственного интеллекта и возможностях персонализированной медицины.
Познакомиться с результатами исследований – Похмельная служба Краснодар
Эта публикация обращает внимание на важность профилактики зависимостей. Мы обсудим, как осведомленность и образование могут помочь в предотвращении возникновения зависимости. Читатели смогут ознакомиться с полезными советами и ресурсами, которые способствуют здоровому образу жизни.
Исследовать вопрос подробнее – Похмельная служба Санкт Петербург
Наркологическая клиника в Казани работает круглосуточно: врач приезжает на дому, проводит осмотр пациента, оценивает тяжесть состояния, подбирает препараты и объясняет, как будет проходить вывод. При необходимости лечение продолжается в клинике или в стационаре, а после стабилизации предлагаются кодирование, психотерапевтических консультации и реабилитация.
Углубиться в тему – вывод из запоя в казани
В данной статье рассматриваются проблемы общественного здоровья и социальные факторы, влияющие на него. Мы акцентируем внимание на значении профилактики и осведомленности в защите здоровья на уровне общества. Читатели смогут узнать о новых инициативах и программах, направленных на улучшение здоровья населения.
Личный опыт — читайте сами – Наркологическая клиника «Похмельная служба» в Краснодаре.
Помощь оказывается только при согласии пациента или его законного представителя. Данные не передаются соседям, на работу или третьим лицам: анонимность, учет персональных данных, обработка сведений и защита личной информации выполняются в соответствии с политикой конфиденциальности, пользовательским соглашением и действующими требованиями РФ.
Получить дополнительные сведения – анонимный вывод из запоя
вызов нарколога на дом круглосуточно позволяет получить профессиональную помощь в любое время суток.
Получить дополнительную информацию – нарколог на дом недорого в казани
В этой статье мы подробно рассматриваем проверенные методы борьбы с зависимостями, включая психотерапию, медикаментозное лечение и поддержку со стороны общества. Мы акцентируем внимание на важности комплексного подхода и возможности успешного восстановления для людей, столкнувшихся с этой проблемой.
Изучить вопрос глубже – Наркологическая клиника «Похмельная служба» в Краснодаре.
Этот текст представляет собой обзор свежих данных и исследований в области медицины. Он призван помочь читателям понять, как научные достижения влияют на лечение, диагностику и общее состояние системы здравоохранения.
Углубить понимание вопроса – Похмельная служба Краснодар
Публикация посвящена жизненным историям людей, успешно справившихся с зависимостью. Мы покажем, что выход есть, и он начинается с первого шага — принятия проблемы и желания измениться.
Более того — здесь – Похмельная служба Краснодар
Эта статья освещает различные аспекты освобождения от зависимости и пути к выздоровлению. Мы обсуждаем важность осознания своей проблемы и обращения за помощью. Читатели получат практические советы о том, как преодолевать трудности и строить новую жизнь без зависимости.
Что ещё? Расскажи всё! – стоп алко
Нарколог на дом в Казани — это срочная медицинская помощь пациенту при запое, похмелья, интоксикации, абстинентного синдрома, наркотической ломки и других ситуациях, когда человеку сложно самостоятельно обратиться в клинику. Врач приезжает на дом, проводит осмотр, диагностику состояния, подбирает препараты, ставит капельница и дает рекомендации по дальнейшему лечению зависимости.
Исследовать вопрос подробнее – нарколог на дом вывод в казани
Врач нарколог проводит первичный осмотр пациента, уточняет, сколько дней длится запой, какие напитки употреблялись, есть ли боль, рвотные позывы, бессонница, панические атаки, судороги, галлюцинации, повышенная тревожность или признаки белой горячки. После этого врач определяет, можно ли проводить вывод запоя на дому или лучше организовать лечение в стационаре.
Разобраться лучше – наркология вывод из запоя казань
Этот обзор посвящен успешным стратегиям избавления от зависимости, включая реальные примеры и советы. Мы разоблачим мифы и предоставим читателям достоверную информацию о различных подходах. Получите опыт многообразия методов и найдите подходящий способ для себя!
Это ещё не всё… – «Похмельная служба» в Краснодаре
Эта статья освещает различные аспекты освобождения от зависимости и пути к выздоровлению. Мы обсуждаем важность осознания своей проблемы и обращения за помощью. Читатели получат практические советы о том, как преодолевать трудности и строить новую жизнь без зависимости.
Познакомиться с результатами исследований – «Похмельная служба» в Краснодаре
В данном обзоре представлены основные направления и тренды в области медицины. Мы обсудим актуальные проблемы здравоохранения, свежие открытия и новые подходы, которые меняют представление о лечении и профилактике заболеваний. Эта информация будет полезна как специалистам, так и широкой публике.
Перейти к статье – Похмельная служба в Краснодаре
Запоя лечение в клинике Сочи: вывод из запоя на дому, помощь нарколога, капельница, детоксикация, стационар, кодирование алкоголизма и реабилитация.
Углубиться в тему – вывод из запоя капельница в сочи
Этот информативный текст отличается привлекательным содержанием и актуальными данными. Мы предлагаем читателям взглянуть на привычные вещи под новым углом, предоставляя интересный и доступный материал. Получите удовольствие от чтения и расширьте кругозор!
Хочешь знать всё? – Похмельная служба Краснодар
Добрый день!
Салала муссоны оман превращают пустыню в зеленый оазис летом. Водопады и туманы создают уникальный климат для этого региона. Плантации ладана здесь считаются лучшими в мире по качеству. Туристы приезжают сюда чтобы спастись от жары соседних стран.
Полная информация по ссылке – https://aldita.net/
семейный отдых с детьми, Пакистан горы, Европа австрия вена
Адлер пляжи и парк, Екатеринбург граница европы азии, Музей янтаря солнечный камень
Всего наилучшего и хорошей информации!
В этой статье мы обсудим процесс восстановления после зависимостей, акцентируя внимание на различных методах и подходах к реабилитации. Читатели узнают, как создать план выздоровления и использовать полезные ресурсы для достижения устойчивых изменений.
Рассмотреть проблему всесторонне – капельница от запоя на дому
В этой статье рассматриваются различные аспекты избавления от зависимости, включая физические и психологические методы. Мы обсудим поддержку, мотивацию и стратегии, которые помогут в процессе выздоровления. Читатели узнают, как преодолеть трудности и двигаться к новой жизни без зависимости.
Запросить дополнительные данные – Похмельная служба Краснодар
Хочу выделить материал про Советы и руководства по продаже недвижимости.
Ссылка ниже:
https://flat-media.ru
Программа 12 шагов применяется много лет и используется при наркомании, алкоголизме, сочетанных зависимостях, зависимости от аптечных препаратов, марихуаны, гашиша, спайсов, солей, опиатов, стимуляторов и других наркотиков. Человек не просто отказывается употреблять наркотик, а меняет мышление, учится видеть болезнь без оправданий, проходит шаг за шагом личную работу и получает инструменты для трезвого поведения после центра. Такая программа помогает не заменить одну зависимость другой, а осознать природу аддикции, выявить корни употребления и начать действовать иначе.
Ознакомиться с деталями – программа 12 шагов для созависимых самостоятельно
Добрый день!
Париж Эйфелева башня сверкает тысячами огней каждый вечер часа. Подъем на лифте или лестнице открывает виды на весь город. Пикники на Марсовом поле популярны среди местных жителей. Билеты на верхний уровень лучше покупать онлайн заранее.
Полная информация по ссылке – https://aldita.net/
Америка коста рика природа, Ворота города исторические, Шорты летняя жара
Индия тадж махал, Азия гонконг небоскребы, Азия монголия степи
Всего наилучшего и хорошей информации!
Добрый день!
Пусан пляж Хэундэ популярен среди серферов и любителей моря. Летние фестивали превращают побережье в одну большую вечеринку. Свежие морепродукты на рыбном рынке Джagalchi стоит попробовать обязательно. Город сочетает пляжный релакс с urban-атмосферой.
Полная информация по ссылке – https://aldita.net/
Европа венгрия будапешт, горнолыжные курорты Европы, Правдинск фридланд музей
Мюллеровские дюны песок, Крем солнцезащитный спф, Ницца лазурный берег
Всего наилучшего и хорошей информации!
В этом обзоре мы обсудим современные методы борьбы с зависимостями, включая медикаментозную терапию и психотерапию. Мы представим последние исследования и их результаты, чтобы читатели могли быть в курсе наиболее эффективных подходов к лечению и поддержке.
Выяснить больше – стоп алко краснодар
В этой статье рассматриваются различные аспекты избавления от зависимости, включая физические и психологические методы. Мы обсудим поддержку, мотивацию и стратегии, которые помогут в процессе выздоровления. Читатели узнают, как преодолеть трудности и двигаться к новой жизни без зависимости.
Изучить рекомендации специалистов – Наркологическая клиника «Похмельная служба» в Краснодаре.
Добрый день!
Адлер пляжи и парк южных культур предлагают субтропическую растительность для прогулок тенисто. Орнитологический парк привлекает любителей наблюдения за птицами редких видов здесь. Близость к аэропорту делает район удобным для транзитных туристов кратко. Рынок Адлера известен свежими фруктами и специями по доступным ценам.
Полная информация по ссылке – https://aldita.net/
Чайная церемония традиции, Паблик спорт трансляции, Это интересно самые дешевые перелеты
Молдова винодельни, Челябинск таганай парк, Гамбург порт и рыба
Всего наилучшего и хорошей информации!
Добрый день!
Венеция гондолы прокат позволяют почувствовать романтику каналов города. Гондольеры часто поют серенады во время неторопливой прогулки. Площадь Сан Марко и мост Вздохов находятся совсем рядом. Избегайте сезона acqua alta для комфортного передвижения пешком.
Полная информация по ссылке – https://aldita.net/
Америка мексика канкун, Советы по прохождению таможни, Компас ориентир направление
Иркутск байкал ворота, Зонт дождь защита, Анапа детские курорты
Всего наилучшего и хорошей информации!
Доброго!
Дилижан маленькая швейцария окружена густыми лесами и горными реками чистыми. Старая улица с мастерскими художников и музыкантов сохраняет колорит прошлого. Монастыри Агарцин и Гошаванк скрыты в лесах недалеко от города тихо. Воздух здесь насыщен ароматами хвои и лекарственных трав целебных.
Полная информация по ссылке – https://aldita.net/
Россия чечня ландшафт, Россия карелия леса, Азия оман маскат
Марсель старый порт, Азия северная корея, круизы по Средиземному морю
Всего наилучшего и хорошей информации!
Доброго!
Бахрейн формула 1 трасса проходит прямо через городские улицы столицы. Гран-при привлекает тысячи фанатов автоспорта со всего мира ежегодно. Древние курганы и крепость Калат аль-Бахрейн дополняют программу. Остров соединен с Саудовской Аравией длинным мостом короля Фахда.
Полная информация по ссылке – https://aldita.net/
Банджи джампинг тарзанка, Скейтпарк трюки молодежь, пляжный отдых лучшие курорты
Европа словения любляна, Высота эфа смотровая площадка, Исфахан площадь имама
Всего наилучшего и хорошей информации!
Эта публикация раскрывает психологические механизмы зависимости и их роль в развитии расстройств. Читатель узнает о том, как психология влияет на формирование зависимостей и как профессиональная помощь может изменить ситуацию.
Подробнее – вывод из запоя на дому
В этой статье рассматриваются различные аспекты избавления от зависимости, включая физические и психологические методы. Мы обсудим поддержку, мотивацию и стратегии, которые помогут в процессе выздоровления. Читатели узнают, как преодолеть трудности и двигаться к новой жизни без зависимости.
Только для своих – Похмельная служба Краснодар
Этот обзор медицинских исследований собрал самое важное из последних публикаций в области медицины. Мы проанализировали ключевые находки и представили их в доступной форме, чтобы читатели могли легко ориентироваться в актуальных темах. Этот материал станет отличным подспорьем для изучения медицины.
Подробности по ссылке – Похмельная служба в Краснодаре
Доброго!
Флоренция галерея Уффици хранит шедевры эпохи Возрождения мира. Билеты на популярное время раскупаются очень быстро туристами. Статуя Давида в Академии изящных искусств поражает реалистичностью. Мост Понте Веккьо с ювелирными лавками красив на закате.
Полная информация по ссылке – https://aldita.net/
Америка канада ванкувер, Родос рыцарский замок, Чимбулак горнолыжка
Краков вавельский замок, горящие туры в Турцию, Зубная щетка паста гигиена
Всего наилучшего и хорошей информации!
В этой статье мы рассматриваем разрушительное влияние зависимости на жизнь человека. Обсуждаются аспекты, такие как здоровье, отношения и профессиональные достижения. Читатели узнают о необходимости обращения за помощью и о путях к восстановлению.
Смотрите также… – Наркологическая клиника «Похмельная служба» в Краснодаре
В данной статье мы акцентируем внимание на важности поддержки в процессе выздоровления. Мы обсудим, как друзья, семья и профессионалы могут помочь тем, кто сталкивается с зависимостями. Читатели получат практические советы, как поддерживать близких на пути к новой жизни.
Всё, что нужно знать – Похмельная служба в Краснодаре
В этой публикации мы предложим ряд рекомендаций по избавлению от зависимостей и успешному восстановлению. Мы обсудим методы привлечения поддержки и важность самосознания. Эти советы помогут людям вернуться к нормальной жизни и стать на путь выздоровления.
Углубиться в тему – вывод из запоя
Вы получаете не просто разовую процедуру, а комплекс медицинской помощи. Врач нарколога может объяснить родственникам, как говорить с зависимым, что делать после капельницы, какие препараты принимать, когда необходимо лечение в клинике и почему кодирование алкоголизма или реабилитация часто становятся следующим этапом. Такой подход помогает не только вывести пациента из запоя, но и начать полноценное восстановление.
Подробнее тут – вывод из запоя капельница
врач приезжает по указанному адресу в течение 1 часа после обращения (возможна и более быстрая реакция при необходимости).
Изучить вопрос глубже – врач нарколог на дом
“?hlamur kaynat?l?r m?” konusu icin cok faydal? bir yaz? buldum. Iste link: https://evhobisi.com/articles/ihlamur-kaynatma-yontemleri-faydalari/
Вывод из запоя на дому в Туле осуществляется по строго отлаженной схеме, которая включает несколько последовательных этапов. Такой комплексный подход позволяет не только быстро вывести токсины из организма, но и обеспечить всестороннюю поддержку пациента, включая психологическую реабилитацию.
Подробнее тут – вывод из запоя на дому цена в туле
В данной статье мы поговорим о будущем медицины, акцентируя внимание на прорывных разработках и их потенциале. Читатель узнает о новых подходах к лечению, роли искусственного интеллекта и возможностях персонализированной медицины.
См. подробности – Наркологическая клиника «Похмельная служба» в Краснодаре
При алкогольной интоксикации поведение пациента может стать неадекватным: появляется агрессия, страх, раздражительность, потеря памяти, психозов, галлюцинаций, тревожность, депрессии. В таких случаях врач должен оценить состояние пациента и определить, возможен ли вывод из запоя на дому или необходимо лечение в стационаре.
Исследовать вопрос подробнее – врач вывод из запоя сочи
В данном обзоре представлены основные направления и тренды в области медицины. Мы обсудим актуальные проблемы здравоохранения, свежие открытия и новые подходы, которые меняют представление о лечении и профилактике заболеваний. Эта информация будет полезна как специалистам, так и широкой публике.
Ссылка на источник – Наркологическая клиника «Похмельная служба» в Краснодаре
Добрый день!
В Жезказгане свежие объявления о продаже домов и квартир доступны на доске объявлений. Бесплатные объявления с фото и подробными описаниями помогут вам найти идеальное жилье. Объявления Жезказгана обновляются ежедневно, поэтому вы всегда будете в курсе новых предложений. Подать объявление можно прямо сейчас, и оно появится в разделе свежие объявления. Объявления Жезказгана помогут вам быстро найти то, что нужно.
Полная информация по ссылке – https://natumbe.kz
стирка штор тюли, ремонт телефонов шымкент, удаленная работа из дома
сантехник вызов шымкент, котел газовый двухконтурный, Товары для животных
Всего наилучшего и хорошей информации!
Добрый день!
Откройте для себя морские просторы, где доступна аренда яхты Владивосток для незабываемых путешествий вдоль живописного побережья. Наши современные суда оснащены всем необходимым для комфортного отдыха большой компании друзей или семьи. Опытный капитан проложит оптимальный маршрут к самым красивым бухтам Приморского края. Вы сможете насладиться свежим морским бризом и уникальными пейзажами Русского острова. Забронируйте свое идеальное приключение уже сегодня и почувствуйте свободу открытого моря.
Полная информация по ссылке – https://aldita.ru/
Аренда катера, Аренда катера Дунай, Аренда Ролс-Ройс
Аренда катера Выборг, , Аренда виллы Пхукет
Всего наилучшего и хорошей информации!
В этой статье мы рассматриваем разные способы борьбы с алкогольной зависимостью. Обсуждаются методы лечения, программы реабилитации и советы для поддержки близких. Читатели получат информацию о том, как преодолеть зависимость и добиться успешного выздоровления.
Осуществить глубокий анализ – Наркологическая клиника «Похмельная служба» в Краснодаре
8xz6y0
Привет всем!
Величие, статус и аура исключительности, которые невозможно игнорировать, дарит аренда Ролс-Ройс тем, кто привык к самому лучшему и не принимает компромиссов. Каждый элемент интерьера создан вручную мастерами с многолетним опытом, а двигатели обеспечивают тягу и мощность, недоступную другим маркам масс-маркета. Вы будете чувствовать себя монархом на дороге, окруженным заботой, вниманием и предугадыванием желаний со стороны нашего персонала 24 часа в сутки. Возможность заказа уникальных опций, индивидуальной подготовки автомобиля и особых пожеланий делает каждое получение ключей особенным, волнительным событием. Проведите свой самый важный день в автомобиле, который является вечным символом абсолютного успеха, власти и безграничных человеческих возможностей.
Полная информация по ссылке – https://aldita.ru/
Аренда форд, Услуги экскурсовода Владивосток, Аренда Chevrolet
Аренда Хонда, , Аренда авто без водителя Пхукет
Всего наилучшего и хорошей информации!
Привет всем!
Тропическая свобода становится реальностью с услугой аренда авто без водителя Пхукет, популярной среди туристов со всего мира. Вы сможете объехать весь остров, заглянуть в секретные бухты и посетить храмы в горах без привязки к гидам и группам. Международные права признаются на острове, а процесс получения машины максимально упрощен для иностранных гостей. Страховые пакеты покрывают основные риски, давая уверенность при движении по левостороннему движению Таиланда. Арендуйте байк или автомобиль и откройте для себя настоящий Пхукет, скрытый от глаз организованных туристов.
Полная информация по ссылке – https://aldita.ru/
Гастрономические экскурсии, Аренда авто С водителем Владивосток, Аренда катера Владивосток
Аренда Седан Владивосток, , Экскурсии Иркутск
Всего наилучшего и хорошей информации!
Добрый день!
В Усть-Каменогорске свежие объявления о продаже домов и квартир доступны на доске объявлений. Бесплатные объявления с фото и подробными описаниями помогут вам найти идеальное жилье. Объявления Каменогорска обновляются ежедневно, поэтому вы всегда будете в курсе новых предложений. Подать объявление можно прямо сейчас, и оно появится в разделе свежие объявления. Объявления Усть-Каменогорска помогут вам быстро найти то, что нужно.
Полная информация по ссылке – https://natumbe.kz
кастрюли наборы нержавейка, телевизор smart tv 4k, теплый пол водяной электрический
турбина ремонт дизель, коттеджи аренда посуточно, Оборудование
Всего наилучшего и хорошей информации!
Привет всем!
Если вы ищете недвижимость в Усть-Каменогорске, обратите внимание на свежие объявления на доске объявлений Natumbe. Здесь вы найдете объявления о продаже домов и квартир с фото и подробными описаниями. Бесплатные объявления доступны всем жителям города. Подать объявление можно прямо сейчас, и оно появится в разделе свежие объявления. Объявления Каменогорска помогут вам быстро найти то, что нужно.
Полная информация по ссылке – https://natumbe.kz
бойлер накопительный электрический, розетки выключатели легранд, фаркоп установка цена
Прочие детские товары, утилизация бытовой техники, посуда тефаль теfal
Всего наилучшего и хорошей информации!
Привет всем!
Тропический рай открывается иначе, когда доступна аренда байка Пхукет для самостоятельного исследования острова. Вы легко объедете все популярные пляжи, посетите скрытые лагуны и доберетесь до смотровых площадок без пробок. Прокатные пункты предлагают гибкие тарифы и полное страхование для спокойствия туристов на дорогах Таиланда. Мотоцикл станет вашим верным спутником в поисках лучших кафе, рынков и закатных точек острова. Не упустите шанс ощутить настоящий дух свободы в окружении пальм и лазурного моря.
Полная информация по ссылке – https://aldita.ru/
Аренда катера Владивосток, Аренда виллы Пхукет, Пешие экскурсии
Услуги экскурсовода Владивосток, , Аренда Минивэн
Всего наилучшего и хорошей информации!
Доброго!
Для любителей активного шага и детального осмотра достопримечательностей идеально подходят пешие экскурсии по историческим центрам городов. Вы пройдете там, куда не проедет транспорт, заметите архитектурные детали и услышите истории, скрытые от беглого взгляда. Опытные инструкторы подберут маршрут оптимальной длины и сложности, чтобы прогулка была в радость людям любого возраста. Такие туры часто включают остановки в уютных кофейнях, мастер-классах и местах для лучших панорамных снимков. Наденьте удобную обувь и отправляйтесь в путь, чтобы открыть город с самой аутентичной и живой стороны.
Полная информация по ссылке – https://aldita.ru/
Экскурсии Иркутск, Аренда авто без водителя Пхукет, Туристический портал Самара
Аренда коттеджа Пхукет, , Аренда парусной яхты Владивосток
Всего наилучшего и хорошей информации!
Добрый день!
В Усть-Каменогорске свежие объявления о продаже домов и квартир доступны на сайте Natumbe. Бесплатные объявления с фото и подробными описаниями помогут вам найти идеальное жилье. Объявления Каменогорска обновляются ежедневно, поэтому вы всегда будете в курсе новых предложений. Подать объявление можно прямо сейчас, и оно появится в разделе свежие объявления. Объявления Усть-Каменогорска помогут вам быстро найти то, что нужно.
Полная информация по ссылке – https://natumbe.kz
перфоратор макита б у, ремонт холодильников на дому, шаровые опоры замена
видеокарта nvidia rtx, солярий домашний ультрафиолет, воск пчелиный натуральный
Всего наилучшего и хорошей информации!
Привет всем!
Вкусы и ароматы региона станут главными героями вашего путешествия, если вы выберете гастрономические экскурсии с дегустациями. Вы посетите местные фермы, рынки и рестораны, где шеф-повара раскроют секреты национальной кухни. В программу включены мастер-классы по приготовлению блюд, посещение виноделен и производство сыров или сладостей. Гиды подберут идеальные пары еды и напитков, чтобы вы насладились полным спектром вкусовых ощущений. Это путешествие для гурманов, которые хотят понять душу места через его кулинарные традиции.
Полная информация по ссылке – https://aldita.ru/
Аренда авто Пхукет, Аренда виллы Пхукет, Туристическая недвижимость
Аренда вертолета Владивосток, , Аренда авто Адлер
Всего наилучшего и хорошей информации!
Привет всем!
Легендарная надежность, неприхотливость и доступность делают предложение, где аренда Toyota, самым популярным и разумным выбором для миллионов водителей по всему земному шару. От неприхотливых седанов Королла до легендарных внедорожников Ленд Крузер, способных пройти там, где другие сдаются — наш парк удовлетворит абсолютно любой запрос. Экономичность обслуживания, высокий остаточный ресурс агрегатов и ликвидность гарантируют отсутствие проблем и лишних трат в течение всего срока аренды. Мы предлагаем максимально прозрачные условия, честные фиксированные цены и быстрое оформление без бюрократии для экономии вашего драгоценного времени. Выберите Тойоту и получите проверенного временем партнера для своих путешествий по городу, трассе и самому жесткому бездорожью.
Полная информация по ссылке – https://aldita.ru/
Аренда байка Пхукет, Аренда катера, Услуги гида
Аренда авто Посуточно Пхукет, , Аренда виллы Пхукет
Всего наилучшего и хорошей информации!
Доброго!
В Усть-Каменогорске свежие объявления о продаже домов и квартир доступны на сайте Natumbe. Бесплатные объявления с фото и подробными описаниями помогут вам найти идеальное жилье. Объявления Каменогорска обновляются ежедневно, поэтому вы всегда будете в курсе новых предложений. Подать объявление можно прямо сейчас, и оно появится в разделе свежие объявления. Объявления Усть-Каменогорска помогут вам быстро найти то, что нужно.
Полная информация по ссылке – https://natumbe.kz
рыболовные снасти магазин, подушки безопасности airbag, держатель для телефона авто
кран манипулятор заказ, массажер шейный электрический, кофемолка электрическая ручная
Всего наилучшего и хорошей информации!
Здравствуйте!
В Усть-Каменогорске свежие объявления о продаже домов и квартир доступны на сайте Natumbe. Бесплатные объявления с фото и подробными описаниями помогут вам найти идеальное жилье. Объявления Каменогорска обновляются ежедневно, поэтому вы всегда будете в курсе новых предложений. Подать объявление можно прямо сейчас, и оно появится в разделе свежие объявления. Объявления Усть-Каменогорска помогут вам быстро найти то, что нужно.
Полная информация по ссылке – https://natumbe.kz
горелка газовая туристическая, демонтаж зданий сооружений, Компьютеры
телевизор smart tv 4k, Телефоны, детский мир караганда
Всего наилучшего и хорошей информации!
Привет всем!
На доске объявлений вы найдете множество свежих объявлений о продаже недвижимости в Усть-Каменогорске. Объявления о продаже домов и квартир обновляются регулярно. Бесплатные объявления с фото и подробными описаниями помогут вам сделать правильный выбор. Подать объявление можно легко и быстро, просто заполнив форму на сайте. Объявления Каменогорска помогут вам найти идеальное жилье.
Полная информация по ссылке – https://natumbe.kz
каршеринг алматы, весы напольные электронные, Детский транспорт
шлагбаум установка автоматика, Товары для школы, ступицы подшипники авто
Всего наилучшего и хорошей информации!
Доброго!
Загородный шик и простор для компании предоставляет аренда коттеджа Пхукет с частным бассейном и садом. Эти дома идеально подходят для семей с детьми, которым нужно много места для игр, и компаний друзей, планирующих вечеринки. Полная изоляция от соседей, собственный повар и возможность организовать трансфер делают отдых максимально расслабленным. Интерьеры выполнены в современном тайском стиле с использованием дерева, камня и панорамного остекления. Забронируйте коттедж на Пхукете и проведите незабываемый отпуск в атмосфере полной приватности и роскоши.
Полная информация по ссылке – https://aldita.ru/
Экскурсии Иркутск, Услуги гидов Владивосток, Аренда вертолета Владивосток
Аренда Автобус Владивосток, , Аренда яхты
Всего наилучшего и хорошей информации!
В этой статье рассматриваются различные аспекты избавления от зависимости, включая физические и психологические методы. Мы обсудим поддержку, мотивацию и стратегии, которые помогут в процессе выздоровления. Читатели узнают, как преодолеть трудности и двигаться к новой жизни без зависимости.
Ознакомиться с отчётом – Похмельная служба в Краснодаре
parmak boyas? nas?l kullan?l?r hakk?ndaki makaleyi cok sevdim. Iste link: https://toycenneti.com/articles/parmak-boya-calismasi-yaraticilik-gelistirme/
вызов нарколога на дом круглосуточно позволяет получить профессиональную помощь в любое время суток.
Детальнее – нарколог на дом цена в казани
Добрый день!
Если вы ищете недвижимость в Усть-Каменогорске, обратите внимание на свежие объявления на доске объявлений Natumbe. Здесь вы найдете объявления о продаже домов и квартир с фото и подробными описаниями. Бесплатные объявления доступны всем жителям города. Подать объявление можно прямо сейчас, и оно появится в разделе свежие объявления. Объявления Каменогорска помогут вам быстро найти то, что нужно.
Полная информация по ссылке – https://natumbe.kz
лодки пвх алматы, леска плетенка шнур, маточное молочко адское
Коммерческая недвижимость, прицел оптический ночной, вязальная машина электронная
Всего наилучшего и хорошей информации!
Вывод запоя в клинике Сочи: лечение алкогольной интоксикации, капельница, детоксикация, помощь нарколога на дому и в стационаре круглосуточно, анонимно
Выяснить больше – вывод из запоя клиника сочи
Добрый день!
Ароматизаторы в машину какие лучше создают приятную атмосферу в салоне. Легкие запахи не должны вызывать головную боль у водителя и пассажиров. Выбирайте натуральные масла или качественные синтетические композиции брендов. Обновляйте аромат регулярно для поддержания свежести воздуха внутри авто.
Полная информация по ссылке – https://na-tumbe.kz/
подбор аккумулятора по марке автомобиля, как перенести данные с Android на iOS, как выбрать смартфон до 150000 тенге
каршертинг Bipo или Beepoo какой лучше, фотобокс для предметной съемки DIY, агрессия у собаки причины и коррекция
Всего наилучшего и хорошей информации!
Предлагаем вашему вниманию интересную справочную статью, в которой собраны ключевые моменты и нюансы по актуальным вопросам. Эта информация будет полезна как для профессионалов, так и для тех, кто только начинает изучать тему. Узнайте ответы на важные вопросы и расширьте свои знания!
Связаться за уточнением – Наркологическая клиника «Похмельная служба» в Краснодаре
Обзор посвящён процессу восстановления после зависимостей. Мы расскажем о различных этапах реабилитации, поддерживающих ресурсах и важности мотивации в достижении устойчивого выздоровления.
Это стоит прочитать полностью – «Похмельная служба» в Краснодаре
Кстати, если вас интересует Аналитика и мнения о финансах в России, посмотрите сюда.
Вот, делюсь ссылкой:
https://journal-rubl.ru
Эта доказательная статья представляет собой глубокое погружение в успехи и вызовы лечения зависимостей. Мы обращаемся к научным исследованиям и опыту специалистов, чтобы предоставить читателям надежные данные об эффективности различных методик. Изучите, что работает лучше всего, и получите информацию от экспертов.
См. подробности – стоп алко
Добрый день!
Срочный выкуп квартир Алматы деньги за недвижимость за 1 день cash. Компания покупает квартиру в любом состоянии и с любыми документами offer. Быстрое оформление и выплата наличных или на счет speed. Решение для тех, кому нужны деньги срочно need.
Полная информация по ссылке – https://na-tumbe.kz/
экшн-камера GoPro или Insta360, продажа доли в квартире трудности, выставка собак подготовка документы
мои сообщения чат с продавцом, набор инструментов для автомобилиста список, диета для кошки с мочекаменной болезнью
Всего наилучшего и хорошей информации!
Добрый день!
Как найти соседей по квартире сервисы и доски объявлений в РК find. Совместная аренда снижает расходы на жилье cost. Четкие правила проживания и совместимость характеров важны harmony. Используйте проверенные платформы и собеседуйте кандидатов interview.
Полная информация по ссылке – https://na-tumbe.kz/
сезонная замена шин когда менять по закону, покупка готового бизнеса с помещением, авто из Кореи под заказ отзывы
Dyson vs Xiaomi пылесосы сравнение, охрана коттеджных поселков Almaty Premium, как выбрать фургон для бизнеса
Всего наилучшего и хорошей информации!
В этой статье мы рассматриваем разрушительное влияние зависимости на жизнь человека. Обсуждаются аспекты, такие как здоровье, отношения и профессиональные достижения. Читатели узнают о необходимости обращения за помощью и о путях к восстановлению.
Давай разберёмся досконально – Наркологическая клиника «Похмельная служба» в Таупсе
Доброго!
Общедомовые нужды как рассчитываются прозрачность счетов в РК billing. Плата за освещение подъездов и уборку территории входит в bill. Требуйте детализацию расходов от управляющей компании regularly. Боритесь с завышенными нормативами и незаконными начислениями rights.
Полная информация по ссылке – https://na-tumbe.kz/
когтеточка для кошки обзор видов, выписка из ЕГРН аналог в Казахстане, чехлы на сиденья экокожа или алькантара
осциллограф бытовой применение, восстановление данных с жесткого диска, трейд-ин недвижимости как работает
Всего наилучшего и хорошей информации!
В этой публикации мы обсуждаем современные методы лечения различных заболеваний. Читатели узнают о новых медикаментах, терапиях и исследованиях, которые активно применяются для лечения. Мы нацелены на то, чтобы предоставить практические знания, которые могут помочь в борьбе с недугами.
Узнать напрямую – Похмельная служба в Воронеже
В этой статье мы рассматриваем разрушительное влияние зависимости на жизнь человека. Обсуждаются аспекты, такие как здоровье, отношения и профессиональные достижения. Читатели узнают о необходимости обращения за помощью и о путях к восстановлению.
Ознакомиться с деталями – balashikha detox24
Эта публикация содержит ценные советы и рекомендации по избавлению от зависимости. Мы обсуждаем различные стратегии, которые могут помочь в процессе выздоровления и важность обращения за помощью. Читатели смогут использовать полученные знания для улучшения своего состояния.
Нажми и узнай всё – лечение наркомании краснодар
В этом исследовании рассмотрены методы лечения зависимостей и их эффективность. Мы проанализируем различные подходы, используемые в реабилитационных центрах, и представим данные о результативности программ. Читатели получат надежные и научно обоснованные сведения о данной проблеме.
А есть ли продолжение? – detox center for men
Здравствуйте!
Сезон навигации открывается, и лодка должна быть готова. Обслуживание катера перед сезоном включает проверку мотора и корпуса. Смазка узлов и замена расходников предотвратят поломки в рейсе. Встречайте лето на воде с полностью исправной техникой.
Полная информация по ссылке – https://na-tumbe.kz/
помощь на дороге выездной сервис, холодильник No Frost или капельный, курс послушания ОКД нормативы
корм для рыбок сухой или живой, Kindle или бумажная книга плюсы, быстрая зарядка GaN адаптер выбор
Всего наилучшего и хорошей информации!
В данной статье мы поговорим о будущем медицины, акцентируя внимание на прорывных разработках и их потенциале. Читатель узнает о новых подходах к лечению, роли искусственного интеллекта и возможностях персонализированной медицины.
Слушай внимательно — тут важно – «Похмельная служба» в Краснодаре
В этой статье рассматриваются актуальные вопросы, связанные с развитием медицинской науки и её внедрением в повседневную практику. Особое внимание уделено вопросам профилактики, ранней диагностики и использованию технологий для улучшения здоровья человека.
Не упусти важное! – детоксикация наркозависимых
Доброго!
Трейд-ин недвижимости как работает обмен старого на новое в РК service. Застройщики выкупают вашу вторичку в счет оплаты новой квартиры deal. Быстрая оценка и зачет стоимости упрощают процесс переезда move. Избавьтесь от старой квартиры и купите новую в одном месте one-stop.
Полная информация по ссылке – https://na-tumbe.kz/
электронная книга с подсветкой выбор, консьерж-сервис в жилых комплексах, apartments in Astana for foreigners
кулер для процессора тихий и мощный, стрижка когтей собаке самостоятельно, умная колонка Яндекс Станция или SberBox
Всего наилучшего и хорошей информации!
В этой статье мы обсудим процесс восстановления после зависимостей, акцентируя внимание на различных методах и подходах к реабилитации. Читатели узнают, как создать план выздоровления и использовать полезные ресурсы для достижения устойчивых изменений.
Переходите по ссылке ниже – «Похмельная служба» в Краснодаре
Эта публикация содержит ценные советы и рекомендации по избавлению от зависимости. Мы обсуждаем различные стратегии, которые могут помочь в процессе выздоровления и важность обращения за помощью. Читатели смогут использовать полученные знания для улучшения своего состояния.
Читать далее > – Похмельная служба в Волгограде
Привет всем!
Инвестиции в коммерческую недвижимость доходность в РК 2026 analysis. Офисы, торговые точки и склады приносят стабильный рентный доход investors. Рост стоимости квадратного метра увеличивает капиталовложения со временем value. Диверсифицируйте портфель недвижимости для снижения рисков market fluctuations.
Полная информация по ссылке – https://na-tumbe.kz/
договор купли продажи квартиры образец, вспышка внешняя для фотоаппарата, проблемы с коробкой DSG Volkswagen
как выбрать смартфон до 150000 тенге, краудфандинг в недвижимости платформы, документы для вывоза кошки за границу
Всего наилучшего и хорошей информации!
В этой статье мы рассматриваем разрушительное влияние зависимости на жизнь человека. Обсуждаются аспекты, такие как здоровье, отношения и профессиональные достижения. Читатели узнают о необходимости обращения за помощью и о путях к восстановлению.
Проследить причинно-следственные связи – detox24 в анапе
oashoa
В этой статье рассматриваются актуальные вопросы, связанные с развитием медицинской науки и её внедрением в повседневную практику. Особое внимание уделено вопросам профилактики, ранней диагностики и использованию технологий для улучшения здоровья человека.
Запросить дополнительные данные – лечение наркомании краснодар
В данном обзоре представлены основные направления и тренды в области медицины. Мы обсудим актуальные проблемы здравоохранения, свежие открытия и новые подходы, которые меняют представление о лечении и профилактике заболеваний. Эта информация будет полезна как специалистам, так и широкой публике.
Следуйте по ссылке – Наркологическая клиника «Похмельная служба» в Краснодаре
Эта доказательная статья представляет собой глубокое погружение в успехи и вызовы лечения зависимостей. Мы обращаемся к научным исследованиям и опыту специалистов, чтобы предоставить читателям надежные данные об эффективности различных методик. Изучите, что работает лучше всего, и получите информацию от экспертов.
Узнать больше > – Наркологическая клиника «Похмельная служба» в Таупсе.
Bu arada, eger elbisedeki boya nas?l c?kar konusuyla ilgileniyorsan?z, suraya bir goz at?n. Suradan okuyabilirsiniz: https://kendimacera.com/articles/kiyafetlerde-boya-lekesi-cikarma-yontemleri/
Этот текст представляет собой обзор свежих данных и исследований в области медицины. Он призван помочь читателям понять, как научные достижения влияют на лечение, диагностику и общее состояние системы здравоохранения.
Практические советы ждут тебя – detox center for men
Привет всем!
У вас есть старая машина и желание новую? Обмен старого авто на новый trade-in это быстрый способ обновить парк дилера. Узнайте, как получить максимальную выгоду при оценке вашего текущего автомобиля. Экономьте время на продаже и сразу садитесь за руль новой модели.
Полная информация по ссылке – https://na-tumbe.kz/
игровая мышь рейтинг топ 10, установка сигнализации с автозапуском StarLine, срочный выкуп квартир Алматы
фрисби с собакой обучение трюкам, содержание домашних животных в квартире, пусковое устройство для аккумулятора рейтинг
Всего наилучшего и хорошей информации!
В этой статье мы рассматриваем разрушительное влияние зависимости на жизнь человека. Обсуждаются аспекты, такие как здоровье, отношения и профессиональные достижения. Читатели узнают о необходимости обращения за помощью и о путях к восстановлению.
Всё самое вкусное внутри – Наркологическая клиника «Похмельная служба» в Воронеже
Эта публикация посвящена актуальным вопросам современной медицины и здравоохранения. Мы обсудим новейшие технологии диагностики и лечения, а также их влияние на продолжительность и качество жизни. Читатель найдет здесь информацию о научных исследованиях и перспективных разработках, доступно изложенную для широкой аудитории.
Эксклюзивная информация – наркологическая клиника в краснодаре
Этот информационный материал подробно освещает проблему наркозависимости, ее причины и последствия. Мы предлагаем информацию о методах лечения, профилактики и поддерживающих программах. Цель статьи — повысить осведомленность и продвигать идеи о необходимости борьбы с зависимостями.
Есть чему поучиться – Похмельная служба в Таупсе
Эта публикация исследует взаимосвязь зависимости и психологии. Мы обсудим, как психологические аспекты влияют на появление зависимостей и процесс выздоровления. Читатели смогут понять важность профессиональной поддержки и применения научных подходов в терапии.
Посмотреть всё – наркологическая клиника в краснодаре
В этой заметке мы представляем шаги, которые помогут в процессе преодоления зависимостей. Рассматриваются стратегии поддержки и чек-листы для тех, кто хочет сделать первый шаг к выздоровлению. Наша цель — вдохновить читателей на положительные изменения и поддержать их в трудных моментах.
Давай разберёмся досконально – детоксикация от алкоголя
В статье по вопросам здоровья мы рассматриваем актуальные проблемы, с которыми сталкивается общество. Обсуждаются заболевания, факторы риска и важные аспекты профилактики. Читатели получат полезные советы о том, как сохранить здоровье и улучшить качество жизни.
Исследовать вопрос подробнее – лечение алкоголизма в краснодаре
Наш центр оказывает помощь при запое на дому, амбулаторно и в стационаре. Врач нарколог приезжает по адресу, проводит осмотр, оценивает физическое и психическое состояние пациента, подбирает препараты, ставит капельницу, дает рекомендации после процедуры и помогает выбрать дальнейшее лечение алкоголизма.
Разобраться лучше – вывод из запоя на дому
Читатели получат представление о том, как современные технологии влияют на развитие медицины. Обсуждаются новые методы лечения, персонализированный подход и роль цифровых решений в повышении качества медицинских услуг.
Посмотреть всё – Похмельная служба в Воронеже
Эта статья освещает различные аспекты освобождения от зависимости и пути к выздоровлению. Мы обсуждаем важность осознания своей проблемы и обращения за помощью. Читатели получат практические советы о том, как преодолевать трудности и строить новую жизнь без зависимости.
Осуществить глубокий анализ – Похмельная служба Краснодар
Статья посвящена анализу текущих трендов в медицине и их влиянию на жизнь людей. Мы рассмотрим новые технологии, методы лечения и значение профилактики в обеспечении долголетия и здоровья.
Подробнее – «Похмельная служба» в Воронеже
В этой статье мы обсудим процесс восстановления после зависимостей, акцентируя внимание на различных методах и подходах к реабилитации. Читатели узнают, как создать план выздоровления и использовать полезные ресурсы для достижения устойчивых изменений.
Связаться за уточнением – detox24
Врач контролирует состояние пациента на протяжении всей процедуры — от первого введения препаратов до стабилизации самочувствия. Обычно уже через час после постановки капельницы уходит тошнота, нормализуется сон, снижается тревожность и тяга к спиртному. По завершении инфузионной терапии нарколог оставляет необходимые медикаменты на несколько дней, дает чёткие инструкции по их приёму и рекомендует дальнейшие шаги: амбулаторное наблюдение, кодирование или реабилитацию. После вывода из запоя обязательно даются рекомендации по продолжению лечения алкоголизма, включая кодирование и реабилитацию. Во многих случаях — да: в частной клинике платная помощь включает выездную стабилизацию, чтобы анонимно и быстро провести необходимые процедуры на месте.
Получить дополнительную информацию – запой нарколог на дом
Статья на тему внутриигровой профилактики
секс с игрушками русское
Публикация посвящена жизненным историям людей, успешно справившихся с зависимостью. Мы покажем, что выход есть, и он начинается с первого шага — принятия проблемы и желания измениться.
Запросить дополнительные данные – balashikha detox24
Эта доказательная статья представляет собой глубокое погружение в успехи и вызовы лечения зависимостей. Мы обращаемся к научным исследованиям и опыту специалистов, чтобы предоставить читателям надежные данные об эффективности различных методик. Изучите, что работает лучше всего, и получите информацию от экспертов.
Изучить материалы по теме – detox24
Запоя лечение в клинике Сочи: вывод из запоя на дому и в стационаре, помощь нарколога, капельница, детоксикация, кодирование алкоголизма анонимно
Ознакомиться с деталями – вывод из запоя на дому цена
poghw5
В этом обзоре мы обсудим современные методы борьбы с зависимостями, включая медикаментозную терапию и психотерапию. Мы представим последние исследования и их результаты, чтобы читатели могли быть в курсе наиболее эффективных подходов к лечению и поддержке.
Практические советы ждут тебя – детокс24
На данном этапе специалист уточняет, как долго продолжается запой, какой вид алкоголя употребляется и имеются ли сопутствующие заболевания. Тщательный анализ информации позволяет оперативно определить степень интоксикации и выбрать оптимальные методы терапии для быстрого и безопасного вывода из запоя.
Получить больше информации – срочный вывод из запоя
Вызов нарколога на дому удобен, когда близкий человек не готов ехать в клинику, стесняется обращаться за медицинской помощью или боится огласки. Доктор приезжает по месту проживания, проводит диагностику, подбирает индивидуально необходимые лекарства и начинает выведение токсинов.
Исследовать вопрос подробнее – нарколог вывод из запоя в казани
Вы получаете не просто капельницу, а комплекс медицинской помощи: осмотр пациента, подбор растворов, применение седативных средств при необходимости, витамины, противорвотные, обезболивающие, препараты для нормализации давления, поддержки печени и нервного состояния. Такой подход помогает не только прервать запой, но и начать путь к лечению алкоголизма, если пациент готов продолжить восстановление.
Исследовать вопрос подробнее – нарколог вывод из запоя
Нарколог на дом в Казани — это срочная медицинская помощь пациенту при запое, похмелья, интоксикации, абстинентного синдрома, наркотической ломки и других ситуациях, когда человеку сложно самостоятельно обратиться в клинику. Врач приезжает на дом, проводит осмотр, диагностику состояния, подбирает препараты, ставит капельница и дает рекомендации по дальнейшему лечению зависимости.
Получить дополнительные сведения – нарколог на дом
Краткий отчет о текущих альфа-тестах
секс игрушки вибратор
Этот обзор медицинских исследований собрал самое важное из последних публикаций в области медицины. Мы проанализировали ключевые находки и представили их в доступной форме, чтобы читатели могли легко ориентироваться в актуальных темах. Этот материал станет отличным подспорьем для изучения медицины.
Узнайте всю правду – наркологическая клиника детокс
Вывод запоя нужен не только при тяжелых осложнениях. Даже если пациент говорит, что «сам справится», запой может быстро привести к отравлении этанола, обезвоживанию, нарушению давления, делирия, галлюцинаций, судорожных реакций, инфаркта или инсульта. Чем дольше человек продолжает пить, тем выше риск серьезные последствий для организма.
Разобраться лучше – вывод из запоя круглосуточно
Эта статья подробно расскажет о процессе выздоровления, который включает в себя эмоциональную, физическую и психологическую реабилитацию. Мы обсуждаем значимость поддержки и наличие профессиональных программ. Читатели узнают, как строить новую жизнь и не возвращаться к старым привычкам.
Смотрите также – detox24
В данной статье мы акцентируем внимание на важности поддержки в процессе выздоровления. Мы обсудим, как друзья, семья и профессионалы могут помочь тем, кто сталкивается с зависимостями. Читатели получат практические советы, как поддерживать близких на пути к новой жизни.
Кликни и узнай всё! – detox24
Вывод из запоя в Казани требуется, когда человек не может самостоятельно остановиться после длительного употребления алкоголя, теряет физическое и психическое равновесие, плохо спит, испытывает тревогу, дрожь, тошноту, скачки давления и сильную тягу к очередной дозе спиртного. В такой ситуации важно не ждать, пока состояние пациента ухудшится, а быстро вызвать врача нарколога на дом или обратиться в наркологический центр.
Подробнее тут – нарколог вывод из запоя в казани
В этой статье мы обсудим процесс восстановления после зависимостей, акцентируя внимание на различных методах и подходах к реабилитации. Читатели узнают, как создать план выздоровления и использовать полезные ресурсы для достижения устойчивых изменений.
ТОП-5 причин узнать больше – прокапывания от похмелья
Запой опасен не только похмелья и слабостью. При запойным употреблении нарушается сон, повышается тревожность, страдает печень, сердце, сосудистая система, желудка и поджелудочной железы. Потеря контроля, очередной прием спиртного и сильная тягу к алкоголю могут приводить к белой горячки, психоза, судороги, инфаркт или инсульта.
Подробнее тут – скорая вывод из запоя в казани
Эта медицинская заметка содержит сжатую информацию о новых находках и методах в области здравоохранения. Мы предлагаем читателям свежие данные о заболеваниях, профилактике и лечении. Наша цель — быстро и доступно донести важную информацию, которая поможет в повседневной жизни и понимании здоровья.
Почему это важно? – детокс24
Между прочим, если вас интересует Все о российском футболе: новости и победы, загляните сюда.
Вот, можете почитать:
https://biathlonmedia.ru
В этой публикации мы предложим ряд рекомендаций по избавлению от зависимостей и успешному восстановлению. Мы обсудим методы привлечения поддержки и важность самосознания. Эти советы помогут людям вернуться к нормальной жизни и стать на путь выздоровления.
А есть ли продолжение? – detox24
В этом обзоре мы обсудим современные методы борьбы с зависимостями, включая медикаментозную терапию и психотерапию. Мы представим последние исследования и их результаты, чтобы читатели могли быть в курсе наиболее эффективных подходов к лечению и поддержке.
Посмотреть всё – детокс24
В данном обзоре представлены основные направления и тренды в области медицины. Мы обсудим актуальные проблемы здравоохранения, свежие открытия и новые подходы, которые меняют представление о лечении и профилактике заболеваний. Эта информация будет полезна как специалистам, так и широкой публике.
Секреты успеха внутри – detox24 в краснодаре
В статье по вопросам здоровья мы рассматриваем актуальные проблемы, с которыми сталкивается общество. Обсуждаются заболевания, факторы риска и важные аспекты профилактики. Читатели получат полезные советы о том, как сохранить здоровье и улучшить качество жизни.
Хочешь знать всё? – detox24
В этой публикации мы предложим ряд рекомендаций по избавлению от зависимостей и успешному восстановлению. Мы обсудим методы привлечения поддержки и важность самосознания. Эти советы помогут людям вернуться к нормальной жизни и стать на путь выздоровления.
Подробнее можно узнать тут – «Похмельная служба» в Краснодаре
Этот обзор посвящен успешным стратегиям избавления от зависимости, включая реальные примеры и советы. Мы разоблачим мифы и предоставим читателям достоверную информацию о различных подходах. Получите опыт многообразия методов и найдите подходящий способ для себя!
Эксклюзивная информация – наркологическая клиника в краснодаре
В этой статье рассматриваются способы преодоления зависимости и успешные истории людей, которые справились с этой проблемой. Мы обсудим важность поддержки со стороны близких и профессионалов, а также стратегии, которые могут помочь в процессе выздоровления. Научитесь первоочередным шагам к новой жизни.
Расширить кругозор по теме – платной консультации врача-психиатра
В статье по вопросам здоровья мы рассматриваем актуальные проблемы, с которыми сталкивается общество. Обсуждаются заболевания, факторы риска и важные аспекты профилактики. Читатели получат полезные советы о том, как сохранить здоровье и улучшить качество жизни.
Следуйте по ссылке – вызов психиатра на дом
В данной статье мы акцентируем внимание на важности поддержки в процессе выздоровления. Мы обсудим, как друзья, семья и профессионалы могут помочь тем, кто сталкивается с зависимостями. Читатели получат практические советы, как поддерживать близких на пути к новой жизни.
Как достичь результата? – детокс клиника
Мы рассмотрим современные вызовы здравоохранения и пути их решения с помощью технологий и научных исследований. В статье собраны данные о новых лекарствах, методах диагностики и системном подходе к улучшению здоровья населения.
Изучить вопрос глубже – платной консультации врача-психиатра
В этой статье рассматриваются актуальные вопросы, связанные с развитием медицинской науки и её внедрением в повседневную практику. Особое внимание уделено вопросам профилактики, ранней диагностики и использованию технологий для улучшения здоровья человека.
Обратитесь за информацией – детокс24
Эта публикация раскрывает психологические механизмы зависимости и их роль в развитии расстройств. Читатель узнает о том, как психология влияет на формирование зависимостей и как профессиональная помощь может изменить ситуацию.
Тыкай сюда — узнаешь много интересного – платной консультации врача-психиатра
Этот обзор содержит информацию о передовых достижениях в области медицины. Мы разберем инновационные технологии, которые меняют подход к лечению и диагностике, а также их влияние на эффективность оказания медицинской помощи.
Читать полностью – detox24
В данном материале представлены ключевые тенденции в сфере медицинской науки и практики. Вы узнаете о последних открытиях, инновационных подходах к терапии и важности профилактики заболеваний. Особое внимание уделено практическому применению новых методов в клинической практике.
Смотрите также – Психиатры клиники
В этой статье рассматриваются различные аспекты избавления от зависимости, включая физические и психологические методы. Мы обсудим поддержку, мотивацию и стратегии, которые помогут в процессе выздоровления. Читатели узнают, как преодолеть трудности и двигаться к новой жизни без зависимости.
А что дальше? – наркологическая помощь круглосуточно
“adidas eski modeller” hakk?nda bilgi arayanlar icin burada harika bilgiler var. Link burada: https://takimgiyim.com/articles/eski-adidas-spor-ayakkabi-modelleri/
Публикация посвящена жизненным историям людей, успешно справившихся с зависимостью. Мы покажем, что выход есть, и он начинается с первого шага — принятия проблемы и желания измениться.
Ознакомьтесь поближе – капельница на дому иркутск
Публикация знакомит читателей с различными подходами к реабилитации. От традиционных методов до современных программ — вы узнаете, как выбрать оптимальный путь к выздоровлению и преодолеть препятствия на этом пути.
Изучите внимательнее – детокс24
Публикация посвящена жизненным историям людей, успешно справившихся с зависимостью. Мы покажем, что выход есть, и он начинается с первого шага — принятия проблемы и желания измениться.
Посмотреть всё – Реабилитация наркотической зависимости в Краснодаре
В этой статье рассматриваются способы преодоления зависимости и успешные истории людей, которые справились с этой проблемой. Мы обсудим важность поддержки со стороны близких и профессионалов, а также стратегии, которые могут помочь в процессе выздоровления. Научитесь первоочередным шагам к новой жизни.
Читать дальше – капельница от запоя на дому
В данной статье рассматриваются физиологические и эмоциональные аспекты зависимости. Мы обсудим, как организм реагирует на зависимое поведение, и какие методы помогают восстановить здоровье и внутреннее равновесие.
Давай разберёмся досконально – капельница от запоя на дому
Bu arada soyleyeyim, eger sivrisinekten korunma konusuyla ilgileniyorsan?z, buray? inceleyin. Iste link: https://kendimacera.com/articles/sivrisineklerden-korunma-yontemleri/
В этой статье мы обсудим процесс восстановления после зависимостей, акцентируя внимание на различных методах и подходах к реабилитации. Читатели узнают, как создать план выздоровления и использовать полезные ресурсы для достижения устойчивых изменений.
Погрузиться в детали – врач на дом цена
Этот информативный текст сочетает в себе темы здоровья и зависимости. Мы обсудим, как хронические заболевания могут усугубить зависимости и наоборот, как зависимость может влиять на общее состояние здоровья. Читатели получат представление о комплексном подходе к лечению как физического, так и психического состояния.
Только факты! – кодирование от алкоголизма брянск
В этой публикации мы рассматриваем важную тему борьбы с зависимостями, включая алкогольную и наркотическую зависимости. Мы обсудим методы лечения, реабилитации и поддержку, которые могут помочь людям, столкнувшимся с этой проблемой. Читатели узнают о перспективах выздоровления и важности комплексного подхода.
Получить дополнительную информацию – кодирование от алкоголизма в люберцах
Коллеги, это полноценное руководство по выбору SEO-стратегии! Автор разбирает три модели продвижения: по позициям, по трафику и с оплатой за лиды. Отдельно радует блок про выбор подрядчика — как не ошибиться, какие вопросы задавать и почему не стоит верить обещаниям «быстрого топа». Есть чек-лист готовности бизнеса к SEO. Очень рекомендую: https://mandaringpd.ru/stati/kak-vybrat-jeffektivnoe-seo-prodvizhenie-dlja-biznesa-polnoe-rukovodstvo-po-vyboru-strategii/
В этой статье рассматриваются различные аспекты избавления от зависимости, включая физические и психологические методы. Мы обсудим поддержку, мотивацию и стратегии, которые помогут в процессе выздоровления. Читатели узнают, как преодолеть трудности и двигаться к новой жизни без зависимости.
Секреты успеха внутри – прокапаться от алкоголя балашиха
Привет всем!
TCO медицинской мебели: анализ совокупной стоимости владения для разных марок стали
Морговое оборудование: выбор между стандартными и специализированными моделями столов
Специфика работы патологоанатома: требования к освещению и поверхности макростола
Больше информации по ссылке – https://aptekifz.ru/blog/pravila-sushki-i-hraneniya-gibkih-endoskopov-pochemu-spetsializirovannyj-shkaf-iz-stali-prodlevaet-zhizn-oborudovaniya-v-2-raza
бортики на полках стеллажей, стеллажи для склада медикаментов, стол секционный нержавеющий
готовые комплекты мебели, продление срока службы эндоскопов, BIM проектирование больниц
Удачи!
Доброго!
Обработка сварных швов: критическая важность гладкости поверхности в стерильных зонах
Технологии бесшовной сварки: обеспечение монолитности и герметичности конструкций из стали
Стеллажи для стерильного: почему нержавейка выигрывает у пластика в центральных стерилизационных
Больше информации по ссылке – https://miniteh.com/specs/polnyj-spisok-osnashheniya-patologo-anatomicheskogo-byuro
экспертиза проектов медучреждений, ультразвуковая мойка инструментов, аптечные стеллажи из металла
биопленка на поверхностях, AISI 304 в медицине, чертежи медицинской мебели
Удачи!
Привет всем!
GMP стандарты: почему радиусные соединения в мебели обязательны для фармпроизводств
Нержавейка в фитнесе: гигиеничные решения для тренажерных залов и бассейнов
Бюджетирование закупок: сравнение цен и срока службы мебели из AISI 304 и AISI 316
Больше информации по ссылке – https://factories.by/producers/artinoks
мебель Артинокс, стеллажи для ЦСО, химический состав AISI 304
учет инструментария, эргономика рабочего места врача, устойчивость к вибрациям
Удачи!
Эта публикация исследует взаимосвязь зависимости и психологии. Мы обсудим, как психологические аспекты влияют на появление зависимостей и процесс выздоровления. Читатели смогут понять важность профессиональной поддержки и применения научных подходов в терапии.
А что дальше? – наркологическая клиника в красногорске
Добрый день!
Специальные столы для патологоанатомов: требования к устойчивости и гигиене поверхностей
Питтинговая коррозия: механизмы разрушения AISI 304 в условиях постоянной влажной уборки
Технология сварки и полировки: обеспечение микробиологической чистоты медицинских изделий
Больше информации по ссылке – https://aptekifz.ru/blog/pravila-sushki-i-hraneniya-gibkih-endoskopov-pochemu-spetsializirovannyj-shkaf-iz-stali-prodlevaet-zhizn-oborudovaniya-v-2-raza
защита от брызгов в мойке, уход за нержавеющей сталью, интеграция мебели и ПО
частные медицинские объекты, биобезопасность в лаборатории, высота рабочих столов в медицине
Удачи!
Здравствуйте!
Радиусные углы в медмебели: требование СанПиН для предотвращения накопления бактерий
Защита от йода и формалина: почему AISI 316 необходима в патолого-анатомических отделениях
Радиусные углы в медмебели: стандарт биобезопасности, а не просто дизайнерское решение
Больше информации по ссылке – https://smokehouse.by/sv/proizvodstvo/specifika-svarnyh-shvov-v-mebeli-dlya-chistyh-zon-pochemu-polirovka-eto-ne-tolko-estetika
СанПиН медицинская мебель, чертежи медицинской мебели, предотвращение перекрестного заражения
индивидуальное проектирование, очистка поверхностей из AISI 316, вентиляционные системы лабораторий
Удачи!
В данной статье мы поговорим о будущем медицины, акцентируя внимание на прорывных разработках и их потенциале. Читатель узнает о новых подходах к лечению, роли искусственного интеллекта и возможностях персонализированной медицины.
Хочешь знать всё? – кодирование от алкоголизма люберцы
Доброго!
Молибден в стали AISI 316: защита от точечной коррозии в агрессивных медицинских средах
Сертификация мебели: соответствие международным стандартам для экспорта и внутренних нужд
Экономия на качестве: как низкая цена мебели увеличивает расходы на ремонт и замену
Больше информации по ссылке – https://www.hiperinfo.ru/blog/2014-06-07-618
стеллажи для ЦСО, медицинская сталь ГОСТ, умная медицинская мебель
HEPA фильтры для шкафов, Ra параметр шероховатости, гистологическая лаборатория мебель
Удачи!
Эта медицинская заметка содержит сжатую информацию о новых находках и методах в области здравоохранения. Мы предлагаем читателям свежие данные о заболеваниях, профилактике и лечении. Наша цель — быстро и доступно донести важную информацию, которая поможет в повседневной жизни и понимании здоровья.
См. подробности – detox24
Добрый день!
Влияние мебели на HVAC: как плотность расстановки стеллажей влияет на эффективность вентиляции
Сварные швы в стерильных зонах: важность электрополировки для микробиологической безопасности
Сертификация мебели для фармы: соответствие требованиям ЕС и РФ по чистым помещениям
Больше информации по ссылке – https://truckmix.ru/articles/patologoanatomicheskoe-loje-i-ychebnii-modyl-chem-morgovoe-oborydovanie-tryoh-tipov-razlichaetsya-mejdy-soboi
сервисное обслуживание мебели, нержавейка vs пластик медицина, быстровозводимые решения
прочность медицинских стеллажей, прочность к ударам, хлорсодержащие средства и сталь
Удачи!
В данной статье мы поговорим о будущем медицины, акцентируя внимание на прорывных разработках и их потенциале. Читатель узнает о новых подходах к лечению, роли искусственного интеллекта и возможностях персонализированной медицины.
Кликни и узнай всё! – детокс24
В этой статье мы говорим о важности поддержки в процессе выздоровления. Рассматриваются семьи, группы поддержки, специалисты и онлайн-ресурсы, которые могут сыграть решающую роль в избавлении от зависимости.
Полезно знать – прокапаться от алкоголя балашиха
Эта медицинская заметка содержит сжатую информацию о новых находках и методах в области здравоохранения. Мы предлагаем читателям свежие данные о заболеваниях, профилактике и лечении. Наша цель — быстро и доступно донести важную информацию, которая поможет в повседневной жизни и понимании здоровья.
Связаться за уточнением – кодирование от алкоголя саратов
В статье по вопросам здоровья мы рассматриваем актуальные проблемы, с которыми сталкивается общество. Обсуждаются заболевания, факторы риска и важные аспекты профилактики. Читатели получат полезные советы о том, как сохранить здоровье и улучшить качество жизни.
Почему это важно? – elektrostal detox24
В данном материале представлены ключевые тенденции в сфере медицинской науки и практики. Вы узнаете о последних открытиях, инновационных подходах к терапии и важности профилактики заболеваний. Особое внимание уделено практическому применению новых методов в клинической практике.
Прочитать подробнее – детокс24 владимир
Эта публикация раскрывает психологические механизмы зависимости и их роль в развитии расстройств. Читатель узнает о том, как психология влияет на формирование зависимостей и как профессиональная помощь может изменить ситуацию.
См. подробности – вывод из запоя электросталь
Привет всем!
Технологии в морге: автоматизация процессов вскрытия и забора биоматериала для анализа
Репутация больницы: связь между качеством оснащения и уровнем доверия пациентов к врачу
Экономия на качестве: как низкая цена мебели увеличивает расходы на ремонт и замену
Больше информации по ссылке – https://www.rosmed.ru/brands/show/934
устойчивость к кислотам сталь, устойчивость к вибрациям, коррозийная стойкость AISI 316
аудит медицинского учреждения, регулировка высоты столов, устойчивость к кислотам сталь
Удачи!
Текст посвящён распространённым мифам о зависимости и их развенчанию. Мы предоставим научно обоснованную информацию и дадим рекомендации по выбору эффективного способа борьбы с зависимым поведением.
Читать полностью – наркология на дом
В данном материале представлены ключевые тенденции в сфере медицинской науки и практики. Вы узнаете о последних открытиях, инновационных подходах к терапии и важности профилактики заболеваний. Особое внимание уделено практическому применению новых методов в клинической практике.
Связаться за уточнением – лечение игромании екатеринбург
Эта публикация посвящена актуальным вопросам современной медицины и здравоохранения. Мы обсудим новейшие технологии диагностики и лечения, а также их влияние на продолжительность и качество жизни. Читатель найдет здесь информацию о научных исследованиях и перспективных разработках, доступно изложенную для широкой аудитории.
Подробная информация доступна по запросу – прокапаться от алкоголя краснодар
В этой статье обсуждаются актуальные медицинские вопросы, которые волнуют общество. Мы обращаем внимание на проблемы, касающиеся здравоохранения и лечения, а также на новшества в области медицины. Читатели будут осведомлены о последних событиях и смогут следить за тенденциями в медицине.
Проследить причинно-следственные связи – детокс24 краснодар
Эта информационная публикация освещает широкий спектр тем из мира медицины. Мы предлагаем читателям ясные и понятные объяснения современных заболеваний, методов профилактики и лечения. Информация будет полезна как пациентам, так и медицинским работникам, желающим поддержать уровень своих знаний.
Более того — здесь – прокапаться от алкоголя балашиха
В этой статье мы обсудим процесс восстановления после зависимостей, акцентируя внимание на различных методах и подходах к реабилитации. Читатели узнают, как создать план выздоровления и использовать полезные ресурсы для достижения устойчивых изменений.
Обратитесь за информацией – detox24 в краснодаре
Эта публикация посвящена актуальным вопросам современной медицины и здравоохранения. Мы обсудим новейшие технологии диагностики и лечения, а также их влияние на продолжительность и качество жизни. Читатель найдет здесь информацию о научных исследованиях и перспективных разработках, доступно изложенную для широкой аудитории.
Подробнее можно узнать тут – вывод из запоя на дому в краснодаре
В этой статье мы рассматриваем разрушительное влияние зависимости на жизнь человека. Обсуждаются аспекты, такие как здоровье, отношения и профессиональные достижения. Читатели узнают о необходимости обращения за помощью и о путях к восстановлению.
Только для своих – выведение из запоя краснодар
В данной статье мы поговорим о будущем медицины, акцентируя внимание на прорывных разработках и их потенциале. Читатель узнает о новых подходах к лечению, роли искусственного интеллекта и возможностях персонализированной медицины.
Только факты! – наркологических клиник в Донецке
В этой публикации мы рассматриваем важную тему борьбы с зависимостями, включая алкогольную и наркотическую зависимости. Мы обсудим методы лечения, реабилитации и поддержку, которые могут помочь людям, столкнувшимся с этой проблемой. Читатели узнают о перспективах выздоровления и важности комплексного подхода.
Желаете узнать подробности? – прокапаться от алкоголя краснодар
Публикация охватывает основные направления развития современной медицины. Мы обсудим значимость научных исследований, инноваций в лечении и роли общественного участия в формировании системы здравоохранения.
Расширить кругозор по теме – детокс24 краснодар
В этом исследовании рассмотрены методы лечения зависимостей и их эффективность. Мы проанализируем различные подходы, используемые в реабилитационных центрах, и представим данные о результативности программ. Читатели получат надежные и научно обоснованные сведения о данной проблеме.
Смотрите также… – наркологическая клиника в симферополе
В данной статье мы поговорим о будущем медицины, акцентируя внимание на прорывных разработках и их потенциале. Читатель узнает о новых подходах к лечению, роли искусственного интеллекта и возможностях персонализированной медицины.
Раскрыть тему полностью – вывод из запоя на дому краснодар
В данной статье рассматриваются физиологические и эмоциональные аспекты зависимости. Мы обсудим, как организм реагирует на зависимое поведение, и какие методы помогают восстановить здоровье и внутреннее равновесие.
Неизвестные факты о… – детокс24
Читатели получат представление о том, как современные технологии влияют на развитие медицины. Обсуждаются новые методы лечения, персонализированный подход и роль цифровых решений в повышении качества медицинских услуг.
Смотрите также – detox24 в краснодаре
Эта публикация посвящена актуальным вопросам современной медицины и здравоохранения. Мы обсудим новейшие технологии диагностики и лечения, а также их влияние на продолжительность и качество жизни. Читатель найдет здесь информацию о научных исследованиях и перспективных разработках, доступно изложенную для широкой аудитории.
Всё самое вкусное внутри – вывод из запоя на дому в краснодаре
В статье по вопросам здоровья мы рассматриваем актуальные проблемы, с которыми сталкивается общество. Обсуждаются заболевания, факторы риска и важные аспекты профилактики. Читатели получат полезные советы о том, как сохранить здоровье и улучшить качество жизни.
Погрузиться в детали – выведение из запоя краснодар
Этот информационный материал подробно освещает проблему наркозависимости, ее причины и последствия. Мы предлагаем информацию о методах лечения, профилактики и поддерживающих программах. Цель статьи — повысить осведомленность и продвигать идеи о необходимости борьбы с зависимостями.
Ознакомьтесь поближе – нарколог на дом в Краснодаре
Публикация охватывает основные направления развития современной медицины. Мы обсудим значимость научных исследований, инноваций в лечении и роли общественного участия в формировании системы здравоохранения.
Запросить дополнительные данные – кодировка в волгограде от алкоголя
Этот обзор посвящен успешным стратегиям избавления от зависимости, включая реальные примеры и советы. Мы разоблачим мифы и предоставим читателям достоверную информацию о различных подходах. Получите опыт многообразия методов и найдите подходящий способ для себя!
Получить исчерпывающие сведения – detox24
В этой статье мы говорим о важности поддержки в процессе выздоровления. Рассматриваются семьи, группы поддержки, специалисты и онлайн-ресурсы, которые могут сыграть решающую роль в избавлении от зависимости.
Прочитать подробнее – кодировка от алкоголя люберцы
Эта информационная публикация освещает широкий спектр тем из мира медицины. Мы предлагаем читателям ясные и понятные объяснения современных заболеваний, методов профилактики и лечения. Информация будет полезна как пациентам, так и медицинским работникам, желающим поддержать уровень своих знаний.
Прочесть заключение эксперта – detox24 в краснодаре
Этот информативный текст сочетает в себе темы здоровья и зависимости. Мы обсудим, как хронические заболевания могут усугубить зависимости и наоборот, как зависимость может влиять на общее состояние здоровья. Читатели получат представление о комплексном подходе к лечению как физического, так и психического состояния.
Углубить понимание вопроса – detox24 в краснодаре
В этом обзоре представлены различные методы избавления от зависимости, включая терапевтические и психологические подходы. Мы сравниваем их эффективность и предоставляем рекомендации для тех, кто хочет вернуться к трезвой жизни. Читатели смогут найти информацию о реабилитационных центрах и поддерживающих группах.
Изучить аспект более тщательно – detox24
В этом обзоре представлены различные методы избавления от зависимости, включая терапевтические и психологические подходы. Мы сравниваем их эффективность и предоставляем рекомендации для тех, кто хочет вернуться к трезвой жизни. Читатели смогут найти информацию о реабилитационных центрах и поддерживающих группах.
Давай разберёмся досконально – вывод из запоя на дому краснодар
В этой статье мы подробно рассматриваем проверенные методы борьбы с зависимостями, включая психотерапию, медикаментозное лечение и поддержку со стороны общества. Мы акцентируем внимание на важности комплексного подхода и возможности успешного восстановления для людей, столкнувшихся с этой проблемой.
ТОП-5 причин узнать больше – вывод из запоя владимир
В этой публикации мы рассматриваем важную тему борьбы с зависимостями, включая алкогольную и наркотическую зависимости. Мы обсудим методы лечения, реабилитации и поддержку, которые могут помочь людям, столкнувшимся с этой проблемой. Читатели узнают о перспективах выздоровления и важности комплексного подхода.
Ознакомьтесь с аналитикой – вывод из запоя в симферополе
В статье по вопросам здоровья мы рассматриваем актуальные проблемы, с которыми сталкивается общество. Обсуждаются заболевания, факторы риска и важные аспекты профилактики. Читатели получат полезные советы о том, как сохранить здоровье и улучшить качество жизни.
Связаться за уточнением – наркологическая клиника краснодар
В этой статье мы обсудим процесс восстановления после зависимостей, акцентируя внимание на различных методах и подходах к реабилитации. Читатели узнают, как создать план выздоровления и использовать полезные ресурсы для достижения устойчивых изменений.
Выяснить больше – наркологическая клиника в краснодаре
Для тех, кто ищет информацию по теме “Узнайте последние новости автоспорта в России”, нашел много полезного.
Ссылка ниже:
https://роп43.рф
Текст посвящён распространённым мифам о зависимости и их развенчанию. Мы предоставим научно обоснованную информацию и дадим рекомендации по выбору эффективного способа борьбы с зависимым поведением.
Откройте для себя больше – прокапаться от алкоголя краснодар
В этой статье рассматриваются различные аспекты избавления от зависимости, включая физические и психологические методы. Мы обсудим поддержку, мотивацию и стратегии, которые помогут в процессе выздоровления. Читатели узнают, как преодолеть трудности и двигаться к новой жизни без зависимости.
Наши рекомендации — тут – нарколог на дом в Краснодаре
В этом обзоре представлены различные методы избавления от зависимости, включая терапевтические и психологические подходы. Мы сравниваем их эффективность и предоставляем рекомендации для тех, кто хочет вернуться к трезвой жизни. Читатели смогут найти информацию о реабилитационных центрах и поддерживающих группах.
Перейти к статье – лечение созависимости 12 шагов
scorub
Этот обзор посвящен успешным стратегиям избавления от зависимости, включая реальные примеры и советы. Мы разоблачим мифы и предоставим читателям достоверную информацию о различных подходах. Получите опыт многообразия методов и найдите подходящий способ для себя!
Интересует подробная информация – детокс24
В этой медицинской статье мы погрузимся в актуальные вопросы здравоохранения и лечения заболеваний. Читатели узнают о современных подходах, методах диагностики и новых открытий в научных исследованиях. Наша цель — донести важную информацию и повысить уровень осведомленности о здоровье.
Уникальные данные только сегодня – детокс24 краснодар
Коллеги, это стратегическое руководство РїРѕ выбору SEO-продвижения! Автор разбирает 6 ключевых шагов: РѕС‚ определения бизнес-целей (РЅРµ просто «позиции», Р° конверсия) РґРѕ оценки состояния сайта, контент-стратегии (E-E-A-T), выбора модели взаимодействия (агентство/фриланс/инхаус), трендов (РР, локальное SEO, поведенческие факторы) Рё бюджетирования. Особенно ценно РїСЂРѕ СЃСЂРѕРєРё — SEO это марафон РЅР° 6–12 месяцев. Обязательно Рє прочтению: https://frankbooks.ru/stati/kak-vybrat-jeffektivnoe-seo-prodvizhenie-dlja-biznesa-strategischeskoe-rukovodstvo/
evde yemek yap?p satma uygulamas? hakk?ndaki bolumu gercekten begendim. Iste link: https://hobiyapma.com/articles/evde-yemek-yapip-satma-rehberi/
Логичное деление на вольфрамовый, молибденовый и титановый прокат
https://redmetsplav.ru/store/kobalt/rossiyskie-splavy-3/kobalt-ep483/truba-kobaltovaya-ep483/
Happy Cactus Cactus Cactus Cactus Cactus Cactus
Happy Cactus Cactus Cactus Cactus Cactus Cactus
Happy Cactus Cactus Cactus Cactus Cactus Cactus
Happy Cactus Cactus Cactus Cactus Cactus Cactus
Happy Cactus Cactus Cactus Cactus Cactus Cactus
Happy Cactus Cactus Cactus Cactus Cactus Cactus
https://kaktus1.site
zopval
Заказывали партию молибденовых листов для производства, качество металла идеальное, все сертификаты в наличии.
https://xn--80aeedb0bfzeok.xn--p1ai/catalog/latunnaia-polosa/latunnaia-polosa-8×350-mm-l68-gost-931-90/
Экспертная консультация при выборе сплавов помогает клиентам оптимизировать затраты и избежать технологических ошибок.
https://rms-ekb.ru/catalog/ugolok-stalnoi/ugolok-iz-konstruktsionnoi-stali-130kh130kh12-mm-x2crnimon29-7-2-en-10088-3/
Раздел «Цены на металлы» полезен для мониторинга рынка
https://redmetsplav.ru/store/magniy-i-ego-splavy/rossiyskie-splavy-1/magniy-az-91a—tu-1714-001-00545484-96/prutok-magnievyy-az-91a—tu-1714-001-00545484-96/
Общее впечатление: надежный информационный ресурс для снабженцев.
https://redmetsplav.ru/store/kobalt/stellite/kobalt-stellite-f/pokovka-kobaltovaya-stellite-f/
Использование системы менеджмента качества гарантирует строгий контроль продукции на всех этапах отгрузки.
https://rms-ekb.ru/catalog/stalnoi-list/stalnoi-list-10khsnd-2-2x1100x1250-gost-19903-2006-gladkii-chernyi-goriachekatanyi/
Этот информативный текст сочетает в себе темы здоровья и зависимости. Мы обсудим, как хронические заболевания могут усугубить зависимости и наоборот, как зависимость может влиять на общее состояние здоровья. Читатели получат представление о комплексном подходе к лечению как физического, так и психического состояния.
Изучить вопрос глубже – donetsk detox24
Спасибо команде за профессионализм и помощь в реализации нашего сложного промышленного проекта!
https://xn--80aeedb0bfzeok.xn--p1ai/catalog/latunnaia-polosa/latunnaia-polosa-2×150-mm-l63-gost-931-90/
Отраслевой охват впечатляет: от медицины до космической промышленности
https://redmetsplav.ru/store/kobalt/stellite/kobalt-stellite-250/lenta-kobaltovaya-stellite-250/
Продукция находит применение в производстве электротехники благодаря наличию специализированной электротехнической стали.
https://rms-ekb.ru/catalog/truba-konstruktsionnaia/truba-konstruktsionnaia-ep-51-vi-108×4-gost-8734-75/
Текст посвящён распространённым мифам о зависимости и их развенчанию. Мы предоставим научно обоснованную информацию и дадим рекомендации по выбору эффективного способа борьбы с зависимым поведением.
Узнать больше – детокс24 краснодар
Когда нет конкретной идеи для просмотра, удобнее открыть каталог и посмотреть варианты по жанрам или темам https://movietut.top/filmy/best/kitajskie/2025/ лучшие китайские фильмы 2025 года скачать через торрент на русском можно найти на movietut.top
Фольга из редких металлов часто требуется для высокотехнологичных лабораторий
https://redmetsplav.ru/store/kobalt/rossiyskie-splavy-3/kobalt-yundk31t3ba/truba-kobaltovaya-yundk31t3ba/
Приятно удивлены скоростью обработки запроса на сайте, менеджер связался очень быстро.
https://xn--80aeedb0bfzeok.xn--p1ai/catalog/mednyi-perekhodnoi-troinik-press/mednyi-perekhodnoi-press-troinik-40-5kh21-mm-m3m-gost-r-52948-2008/
Ассортимент компании включает более 100 000 позиций, что позволяет закрыть практически любые потребности металлургического производства.
https://rms-ekb.ru/catalog/ugolok-stalnoi/ugolok-iz-konstruktsionnoi-stali-40kh25kh4-mm-x2crnin23-4-en-10088-3/
Ориентация на долгосрочные отношения с клиентами позволяет компании формировать индивидуальные условия оплаты и графики поставок.
https://rms-ekb.ru/catalog/plity/plita-u8a-105x200x80-gost-19903-74/
Поставка продукции возможна не только в промышленных, но и в малых лабораторных объемах для исследовательских целей.
https://rms-ekb.ru/catalog/ugolok-stalnoi/ugolok-stalnoi-s345-25x25x3-gost-19771-93/
Фольга из редких металлов часто требуется для высокотехнологичных лабораторий
https://redmetsplav.ru/store/kobalt/rossiyskie-splavy-3/kobalt-ei416/truba-kobaltovaya-ei416/
Эта публикация исследует взаимосвязь зависимости и психологии. Мы обсудим, как психологические аспекты влияют на появление зависимостей и процесс выздоровления. Читатели смогут понять важность профессиональной поддержки и применения научных подходов в терапии.
Кликни, не пожалеешь – lugansk detox24
Компания работает с изделиями из драгоценных и благородных металлов, что требует высокого уровня квалификации и ответственности.
https://rms-ekb.ru/catalog/list/list-khvsg-2x700x700-gost-19903-74/
Возможность заказа висмута — достаточно редкое предложение на рынке
https://redmetsplav.ru/store/volfram/splavy-volframa-1/volfram-w-cu25-1/provoloka-volframovaya-w-cu25/
Спецстали для машиностроения закупаем только здесь, надежность материала подтверждена испытаниями.
https://xn--80aeedb0bfzeok.xn--p1ai/catalog/melkhiorovaia-truba/melkhiorovaia-truba-35kh1-5kh13000-mm-mnzhmts10-1-1-gost-10092-2006/
Четкая структура меню позволяет быстро найти нужный металл
https://redmetsplav.ru/store/volfram/splavy-volframa-1/volfram-vnm-2-1-1/folga-volframovaya-vnm-2-1/
Компания осуществляет поставки базового металлургического сырья, включая олово, свинец и цинк в чушках.
https://rms-ekb.ru/catalog/stalnoi-list/stalnoi-list-03kh21n21m4gb-0-45x1600x1200-gost-19903-2006-gladkii-belyi-goriachekatanyi/
Весь металл проходит строгий входной контроль, за всё время работы ни одного случая брака.
https://xn--80aeedb0bfzeok.xn--p1ai/catalog/mednye-dvukhrastrubnye-mufty-pod-paiku/mednaiadvukhrastrubnaia-podvizhnaiamufta-pod-paiku70kh1-4mmm3mgost-32590-2013/
Информация об обработке IP-адреса для определения региона — современный подход
https://redmetsplav.ru/store/volfram/splavy-volframa-1/volfram-mr-47zvp/lenta-volframovaya-mr-47zvp/
Этот текст посвящён сложным аспектам зависимости и её влиянию на жизнь человека. Мы обсудим психологические, физические и социальные последствия зависимого поведения, а также важность своевременного обращения за помощью.
Читать далее > – lugansk detox24
Поставка продукции возможна не только в промышленных, но и в малых лабораторных объемах для исследовательских целей.
https://rms-ekb.ru/catalog/ugolok-stalnoi/ugolok-stalnoi-45khn-63x63x4-gost-8509-93/
Спецстали для машиностроения закупаем только здесь, надежность материала подтверждена испытаниями.
https://xn--80aeedb0bfzeok.xn--p1ai/catalog/latunnaia-kapilliarnaia-trubka/latunnaia-kapilliarnaia-trubka-2-4kh0-55kh100000-mm-l70-gost-2624-2016/
В этой статье мы рассматриваем разные способы борьбы с алкогольной зависимостью. Обсуждаются методы лечения, программы реабилитации и советы для поддержки близких. Читатели получат информацию о том, как преодолеть зависимость и добиться успешного выздоровления.
Открыть полностью – нарколога домой в Королёве
https://t.me/Asiapsi
В этой заметке мы представляем шаги, которые помогут в процессе преодоления зависимостей. Рассматриваются стратегии поддержки и чек-листы для тех, кто хочет сделать первый шаг к выздоровлению. Наша цель — вдохновить читателей на положительные изменения и поддержать их в трудных моментах.
Давай разберёмся досконально – detox24
Эта публикация исследует взаимосвязь зависимости и психологии. Мы обсудим, как психологические аспекты влияют на появление зависимостей и процесс выздоровления. Читатели смогут понять важность профессиональной поддержки и применения научных подходов в терапии.
Открыть полностью – частного нарколога на дом
Поковки и штабики — важные заготовки для металлургических предприятий
https://redmetsplav.ru/store/vismut/zarubezhnye-splavy-3/vismut-sn96-9bi1-7cu0-8in0-6—iso-9453/krug-vismutovyy-sn96-9bi1-7cu0-8in0-6—iso-9453/
Наличие никелевых сплавов гарантирует высокую коррозийную стойкость оборудования, создаваемого заказчиками.
https://rms-ekb.ru/catalog/stalnoi-list/list-stalnoi-07kh1000kh4000-mm-1-4510-en-iso-9444-2/
Эта публикация исследует взаимосвязь зависимости и психологии. Мы обсудим, как психологические аспекты влияют на появление зависимостей и процесс выздоровления. Читатели смогут понять важность профессиональной поддержки и применения научных подходов в терапии.
Разобраться лучше – mytischi detox24
Высокая квалификация персонала, знают специфику редких металлов и особенности их применения.
https://xn--80aeedb0bfzeok.xn--p1ai/catalog/mednye-krestoviny-pod-paiku/mednaia-krestovina-pod-paiku-40kh35kh1-1-mm-10kh12-mm-tverdaia-paika-m2r-gost-r-52922-2008/
В этой статье мы обсудим процесс восстановления после зависимостей, акцентируя внимание на различных методах и подходах к реабилитации. Читатели узнают, как создать план выздоровления и использовать полезные ресурсы для достижения устойчивых изменений.
Прочесть всё о… – наркологическая клиника в краснодаре
В этой статье мы рассматриваем разрушительное влияние зависимости на жизнь человека. Обсуждаются аспекты, такие как здоровье, отношения и профессиональные достижения. Читатели узнают о необходимости обращения за помощью и о путях к восстановлению.
Узнать больше – выведение из запоя краснодар
Возможность изготовления деталей по чертежам заказчика — это большой плюс
https://redmetsplav.ru/store/vismut/zarubezhnye-splavy-3/vismut-l54829—uns/poroshok-vismutovyy-l54829—uns/
Публикация посвящена жизненным историям людей, успешно справившихся с зависимостью. Мы покажем, что выход есть, и он начинается с первого шага — принятия проблемы и желания измениться.
Проследить причинно-следственные связи – maykop detox24
Компания осуществляет поставки базового металлургического сырья, включая олово, свинец и цинк в чушках.
https://rms-ekb.ru/catalog/truba-konstruktsionnaia/truba-konstruktsionnaia-stal-20-76×7-gost-21729-76/
diyarbak?r forma satan yerler hakk?ndaki makaleyi gercekten begendim. Kendiniz gorun: https://sporfikir.com/articles/diyarbakir-forma-satan-yerler/
Долго искали надежного поставщика циркония, в Редметсплав предложили лучшие условия и чистоту металла.
https://xn--80aeedb0bfzeok.xn--p1ai/catalog/latunnye-naruzhnye-stopornye-koltsa-po-din/latunoe-naruzhnoe-stopornoe-pruzhinnoe-koltso-m137-128kh4-mm-l63-din-471/
В этой статье мы подробно рассматриваем проверенные методы борьбы с зависимостями, включая психотерапию, медикаментозное лечение и поддержку со стороны общества. Мы акцентируем внимание на важности комплексного подхода и возможности успешного восстановления для людей, столкнувшихся с этой проблемой.
Почему это важно? – mytischi detox24
В этом обзоре представлены различные методы избавления от зависимости, включая терапевтические и психологические подходы. Мы сравниваем их эффективность и предоставляем рекомендации для тех, кто хочет вернуться к трезвой жизни. Читатели смогут найти информацию о реабилитационных центрах и поддерживающих группах.
Нажми и узнай всё – Прокапаться от алкоголя
Этот обзор медицинских исследований собрал самое важное из последних публикаций в области медицины. Мы проанализировали ключевые находки и представили их в доступной форме, чтобы читатели могли легко ориентироваться в актуальных темах. Этот материал станет отличным подспорьем для изучения медицины.
Следуйте по ссылке – detox24 в мариуполе
В этой статье обсуждаются актуальные медицинские вопросы, которые волнуют общество. Мы обращаем внимание на проблемы, касающиеся здравоохранения и лечения, а также на новшества в области медицины. Читатели будут осведомлены о последних событиях и смогут следить за тенденциями в медицине.
Прочесть заключение эксперта – наркологическая клиника Пробуждение в Краснодаре
В этой статье мы рассматриваем разрушительное влияние зависимости на жизнь человека. Обсуждаются аспекты, такие как здоровье, отношения и профессиональные достижения. Читатели узнают о необходимости обращения за помощью и о путях к восстановлению.
Жми сюда — получишь ответ – detox24 в геленджике
Раздел «Цены на металлы» полезен для мониторинга рынка
https://redmetsplav.ru/store/vismut/zarubezhnye-splavy-3/vismut-cacin903—jis-h-2202-2016/poroshok-vismutovyy-cacin903—jis-h-2202-2016/
Экспертная консультация при выборе сплавов помогает клиентам оптимизировать затраты и избежать технологических ошибок.
https://rms-ekb.ru/catalog/ugolok-stalnoi/ugolok-iz-konstruktsionnoi-stali-40kh25kh4-mm-15nicr13-din-59370/
Покупали изделия из драгметаллов для лаборатории, всё соответствует заявленным характеристикам.
https://xn--80aeedb0bfzeok.xn--p1ai/catalog/dvutavr-aliuminievyi/aliuminievyi-dvutavr-amg3-2x30x35-gost-13621-90/
Happy Cactus Cactus Cactus Cactus Cactus Cactus
Happy Cactus Cactus Cactus Cactus Cactus Cactus
Happy Cactus Cactus Cactus Cactus Cactus Cactus
Happy Cactus Cactus Cactus Cactus Cactus Cactus
Happy Cactus Cactus Cactus Cactus Cactus Cactus
Happy Cactus Cactus Cactus Cactus Cactus Cactus
https://t.me/hi79602565606/2
В данной публикации мы поговорим о процессе восстановления от зависимости, о том, как вернуть себе нормальную жизнь. Мы обсудим преодоление трудностей, значимость поддержки и наличие программ реабилитации. Читатели смогут узнать о ключевых шагах к успешному восстановлению.
Нажмите, чтобы узнать больше – обратиться за наркологической помощью
Эта информационная публикация освещает широкий спектр тем из мира медицины. Мы предлагаем читателям ясные и понятные объяснения современных заболеваний, методов профилактики и лечения. Информация будет полезна как пациентам, так и медицинским работникам, желающим поддержать уровень своих знаний.
Раскрыть тему полностью – вывод из запоя в Мариуполе
Использование современных технологий защиты данных пользователей
https://redmetsplav.ru/store/vismut/zarubezhnye-splavy-3/vismut-c99740—uns/polosa-vismutovaya-c99740—uns/
Использование системы менеджмента качества гарантирует строгий контроль продукции на всех этапах отгрузки.
https://rms-ekb.ru/catalog/krug-iz-instrumentalnoi-stali/krug-13kh-24-gost-5950-2000/
В этой статье рассматриваются способы преодоления зависимости и успешные истории людей, которые справились с этой проблемой. Мы обсудим важность поддержки со стороны близких и профессионалов, а также стратегии, которые могут помочь в процессе выздоровления. Научитесь первоочередным шагам к новой жизни.
Получить исчерпывающие сведения – detox24
Порадовало наличие вольфрамовых прутков редких диаметров, менеджер оперативно помог с подбором.
https://xn--80aeedb0bfzeok.xn--p1ai/catalog/latunnye-naruzhnye-stopornye-koltsa-po-din/latunoe-naruzhnoe-stopornoe-pruzhinnoe-koltso-m8-7-4kh0-8-mm-lts14k3s3-din-471/
В этой статье мы рассматриваем разрушительное влияние зависимости на жизнь человека. Обсуждаются аспекты, такие как здоровье, отношения и профессиональные достижения. Читатели узнают о необходимости обращения за помощью и о путях к восстановлению.
Смотрите также… – вывод из запоя в Луганске
В этой публикации мы обсуждаем современные методы лечения различных заболеваний. Читатели узнают о новых медикаментах, терапиях и исследованиях, которые активно применяются для лечения. Мы нацелены на то, чтобы предоставить практические знания, которые могут помочь в борьбе с недугами.
Проследить причинно-следственные связи – smolensk alco rehab
Этот текст посвящён сложным аспектам зависимости и её влиянию на жизнь человека. Мы обсудим психологические, физические и социальные последствия зависимого поведения, а также важность своевременного обращения за помощью.
Исследовать вопрос подробнее – clinica plus
В данном обзоре представлены основные направления и тренды в области медицины. Мы обсудим актуальные проблемы здравоохранения, свежие открытия и новые подходы, которые меняют представление о лечении и профилактике заболеваний. Эта информация будет полезна как специалистам, так и широкой публике.
Лови подробности – detox24
Представлен полный цикл изделий: от фольги и проволоки до крупных поковок
https://redmetsplav.ru/store/vismut/zarubezhnye-splavy-3/vismut-c89520—uns/list-vismutovyy-c89520—uns/
В этой заметке мы представляем шаги, которые помогут в процессе преодоления зависимостей. Рассматриваются стратегии поддержки и чек-листы для тех, кто хочет сделать первый шаг к выздоровлению. Наша цель — вдохновить читателей на положительные изменения и поддержать их в трудных моментах.
Прочесть всё о… – Вызов частного нарколога
ООО «РМС» поставляет вольфрамовые порошки, соответствующие строгим техническим условиям (например, ТУ 48-4205-112-2017).
https://rms-ekb.ru/catalog/ugolok-stalnoi/ugolok-stalnoi-15khsnd-70x45x5-gost-8509-93/
References:
Mahjong time http://warblog.hys.cz/user/nurseharp24/
Прозрачное оформление документов и быстрое выставление счетов, приятно работать с профессионалами.
https://xn--80aeedb0bfzeok.xn--p1ai/catalog/dvutavr-aliuminievyi/aliuminievyi-dvutavr-amts-5x40x150-gost-13621-90/
Публикация знакомит читателей с различными подходами к реабилитации. От традиционных методов до современных программ — вы узнаете, как выбрать оптимальный путь к выздоровлению и преодолеть препятствия на этом пути.
Как достичь результата? – детокс24 краснодар
В этой публикации мы исследуем ключевые аспекты здоровья, включая влияние образа жизни на благополучие. Читатели узнают о важности правильного питания, физической активности и психического здоровья. Мы предоставим практические советы и рекомендации для поддержания здоровья и развития профилактических подходов.
Всё, что нужно знать – smolensk alco rehab
В этой статье мы обсудим процесс восстановления после зависимостей, акцентируя внимание на различных методах и подходах к реабилитации. Читатели узнают, как создать план выздоровления и использовать полезные ресурсы для достижения устойчивых изменений.
Слушай внимательно — тут важно – выводу из запоя в Луганске
Между прочим, если вас интересует Спортивный Дом: Захватывающие новости и тайны закулис, загляните сюда.
Вот, делюсь ссылкой:
https://tottenham-family.ru
Большой опыт работы, судя по копирайту с 2013 года
https://redmetsplav.ru/store/vismut/zarubezhnye-splavy-3/vismut-bi08a—en-61190-1-3/prutok-vismutovyy-bi08a—en-61190-1-3/
В статье рассматриваются различные стратегии борьбы с зависимостями, включая проверенные методы и реальные истории успеха. Читатель узнает, какие подходы наиболее эффективны и как начать путь к выздоровлению.
См. подробности – наркологическая помощь в Балашихе
ООО «РМС» специализируется на поставках редких и тугоплавких металлов, таких как ниобий и вольфрам.
https://rms-ekb.ru/catalog/list/list-khvg-14x700x700-gost-19903-74/
Индивидуальный подход к нестандартным заказам — изготовили детали по нашим чертежам точно в размер.
https://xn--80aeedb0bfzeok.xn--p1ai/catalog/melkhiorovaia-truba/melkhiorovaia-truba-26kh1-5kh13000-mm-mnzhmts30-1-1-gost-10092-2006/
В данной статье рассматриваются физиологические и эмоциональные аспекты зависимости. Мы обсудим, как организм реагирует на зависимое поведение, и какие методы помогают восстановить здоровье и внутреннее равновесие.
Личный опыт — читайте сами – korolev detox24
Этот краткий обзор предлагает сжатую информацию из области медицины, включая ключевые факты и последние новости. Мы стремимся сделать информацию доступной и понятной для широкой аудитории, что позволит читателям оставаться в курсе актуальных событий в здравоохранении.
Жми сюда — получишь ответ – Вывод из запоя в Химках
Описание преимуществ компании подчеркивает надежность поставок
https://redmetsplav.ru/store/vismut/zarubezhnye-splavy-3/vismut-42-3740—csnstn-423740/krug-vismutovyy-42-3740—csnstn-423740/
Эта медицинская заметка содержит сжатую информацию о новых находках и методах в области здравоохранения. Мы предлагаем читателям свежие данные о заболеваниях, профилактике и лечении. Наша цель — быстро и доступно донести важную информацию, которая поможет в повседневной жизни и понимании здоровья.
Разобраться лучше – вывод из запоя на дому в краснодаре
ООО «РМС» обеспечивает поставки специализированных сварочных материалов для сложных условий эксплуатации.
https://rms-ekb.ru/catalog/krug-iz-instrumentalnoi-stali/krug-khvsg-70-gost-2590-2006/
В этой статье рассматривается комплексный подход к избавлению от зависимости. Читатель узнает, как сочетание физического, психологического и духовного восстановления помогает достичь стойкого выздоровления.
Подробнее тут – наркологическая помощь в Балашихе
References:
Slotmachines https://bookmarkpress.space/item/online-casino-deutschland-top-anbieter-2026-im-test
В статье по вопросам здоровья мы рассматриваем актуальные проблемы, с которыми сталкивается общество. Обсуждаются заболевания, факторы риска и важные аспекты профилактики. Читатели получат полезные советы о том, как сохранить здоровье и улучшить качество жизни.
Почему это важно? – наркологическая клиника «Детокс» в Москве
Редкие и тугоплавкие металлы всегда в наличии или под заказ в короткие сроки, рекомендую.
https://xn--80aeedb0bfzeok.xn--p1ai/catalog/dvutavr-aliuminievyi/aliuminievyi-dvutavr-k48-2-4x60x70-gost-13621-90/
Общее впечатление: надежный информационный ресурс для снабженцев.
https://redmetsplav.ru/store/vanadiy-i-ego-splavy/vanadiy-vnm99-7—tu-1761-037-2587982-2002/provoloka-vanadievaya-vnm99-7—tu-1761-037-2587982-2002/
В этой статье мы рассматриваем разные способы борьбы с алкогольной зависимостью. Обсуждаются методы лечения, программы реабилитации и советы для поддержки близких. Читатели получат информацию о том, как преодолеть зависимость и добиться успешного выздоровления.
Все материалы собраны здесь – капельница от запоя на дому наркология
В каталоге представлены конденсаторные ниобиевые порошки высокой чистоты, необходимые для современной электроники.
https://rms-ekb.ru/catalog/stalnoi-list/list-stalnoi-1kh1500kh4000-mm-1-4510-en-iso-9444-1/
В этой публикации мы рассматриваем важную тему борьбы с зависимостями, включая алкогольную и наркотическую зависимости. Мы обсудим методы лечения, реабилитации и поддержку, которые могут помочь людям, столкнувшимся с этой проблемой. Читатели узнают о перспективах выздоровления и важности комплексного подхода.
Получить дополнительную информацию – detox24
В этой статье мы рассматриваем разрушительное влияние зависимости на жизнь человека. Обсуждаются аспекты, такие как здоровье, отношения и профессиональные достижения. Читатели узнают о необходимости обращения за помощью и о путях к восстановлению.
Секреты успеха внутри – detox24 в москве
Высокая квалификация персонала, знают специфику редких металлов и особенности их применения.
https://xn--80aeedb0bfzeok.xn--p1ai/catalog/melkhiorovaia-truba/melkhiorovaia-truba-38kh1-5kh7000-mm-mnzhmts30-1-1-gost-10092-2006/
В этой заметке мы представляем шаги, которые помогут в процессе преодоления зависимостей. Рассматриваются стратегии поддержки и чек-листы для тех, кто хочет сделать первый шаг к выздоровлению. Наша цель — вдохновить читателей на положительные изменения и поддержать их в трудных моментах.
Узнай первым! – сексолог волгоград
Раздел «Цены на металлы» полезен для мониторинга рынка
https://redmetsplav.ru/store/vanadiy-i-ego-splavy/vanadiy-50u0-6-2—tu-14-115-43-97/polosa-vanadievaya-50u0-6-2—tu-14-115-43-97/
Компания обеспечивает поставки оксовольфрамата гафния — редкого соединения для специфических нужд химической и атомной промышленности.
https://rms-ekb.ru/catalog/privarnye-skolziashchie-napravliaiushchie/
Индивидуальный подход к нестандартным заказам — изготовили детали по нашим чертежам точно в размер.
https://xn--80aeedb0bfzeok.xn--p1ai/catalog/dvutavr-aliuminievyi/aliuminievyi-dvutavr-1935-3x13x5-gost-13621-90/
Этот текст посвящён сложным аспектам зависимости и её влиянию на жизнь человека. Мы обсудим психологические, физические и социальные последствия зависимого поведения, а также важность своевременного обращения за помощью.
Исследовать вопрос подробнее – детокс24 люберцы
В данной статье рассматриваются физиологические и эмоциональные аспекты зависимости. Мы обсудим, как организм реагирует на зависимое поведение, и какие методы помогают восстановить здоровье и внутреннее равновесие.
Прочесть заключение эксперта – алко рехаб
Эта медицинская заметка содержит сжатую информацию о новых находках и методах в области здравоохранения. Мы предлагаем читателям свежие данные о заболеваниях, профилактике и лечении. Наша цель — быстро и доступно донести важную информацию, которая поможет в повседневной жизни и понимании здоровья.
Ознакомиться с деталями – детокс24 луганск
Корзина на сайте промышленного предприятия — удобный инструмент для формирования заявки
https://redmetsplav.ru/store/titan/rossiyskie-splavy-4/titan-vt21l—ost-1-90060-92/provoloka-titanovaya-vt21l—ost-1-90060-92/
В этой статье рассматриваются способы преодоления зависимости и успешные истории людей, которые справились с этой проблемой. Мы обсудим важность поддержки со стороны близких и профессионалов, а также стратегии, которые могут помочь в процессе выздоровления. Научитесь первоочередным шагам к новой жизни.
Что скрывают от вас? – detox24 в подольске
Компания предлагает не только металлы, но и химическую продукцию, используемую в смежных металлургических процессах.
https://rms-ekb.ru/catalog/stalnoi-list/stalnoi-list-stal-40-100x1200x1700-gost-r-52146-2003-polimernyi-otsinkovannyi-kholodnokatanyi/
В этой статье мы говорим о важности поддержки в процессе выздоровления. Рассматриваются семьи, группы поддержки, специалисты и онлайн-ресурсы, которые могут сыграть решающую роль в избавлении от зависимости.
Получить дополнительную информацию – детокс-капельница на дом
Индивидуальный подход к нестандартным заказам — изготовили детали по нашим чертежам точно в размер.
https://xn--80aeedb0bfzeok.xn--p1ai/catalog/melkhiorovaia-truba/melkhiorovaia-truba-76kh2kh8000-mm-mnzhmts11-06-06-gost-10092-2006/
В этой статье мы рассматриваем разные способы борьбы с алкогольной зависимостью. Обсуждаются методы лечения, программы реабилитации и советы для поддержки близких. Читатели получат информацию о том, как преодолеть зависимость и добиться успешного выздоровления.
Подробнее – нарколог на дом в Балашихе
В этой статье мы рассматриваем разрушительное влияние зависимости на жизнь человека. Обсуждаются аспекты, такие как здоровье, отношения и профессиональные достижения. Читатели узнают о необходимости обращения за помощью и о путях к восстановлению.
Изучить рекомендации специалистов – detox24 в мариуполе
Магниевый прокат представлен в достаточном ассортименте
https://redmetsplav.ru/store/titan/rossiyskie-splavy-4/titan-t25—gost-2171-90/poroshok-titanovyy-t25—gost-2171-90/
Этот обзор посвящен успешным стратегиям избавления от зависимости, включая реальные примеры и советы. Мы разоблачим мифы и предоставим читателям достоверную информацию о различных подходах. Получите опыт многообразия методов и найдите подходящий способ для себя!
Подробнее тут – вызвать нарколога на дом
Оперативная логистика и поддержка на всех этапах сделки позволяют минимизировать сроки простоя производственных линий заказчиков.
https://rms-ekb.ru/catalog/truba-konstruktsionnaia/truba-konstruktsionnaia-08kh18n10t-89×12-gost-21729-76/
References:
Duck creek casino https://youralareno.com/members/tiebag6/activity/357463/
Благодарим за оперативную поставку ниобиевых труб, выручили в очень сжатые сроки.
https://xn--80aeedb0bfzeok.xn--p1ai/catalog/ugolok-aliuminievyi/ugolok-aliuminievyi-20x20x1-2×3000-ad31t1/
References:
Slots for fun no download https://linkvault.win/story.php?title=hitnspin-casino-test-2026-ist-es-serioes
Логичное деление на вольфрамовый, молибденовый и титановый прокат
https://redmetsplav.ru/store/titan/rossiyskie-splavy-4/titan-erti-11/polosa-titanovaya-erti-11/
Поставки жаропрочных сплавов ориентированы на потребности авиационной и энергетической отраслей.
https://rms-ekb.ru/catalog/ugolok-stalnoi/ugolok-stalnoi-st3sp5-40x80x4-gost-8509-93/
Публикация знакомит читателей с различными подходами к реабилитации. От традиционных методов до современных программ — вы узнаете, как выбрать оптимальный путь к выздоровлению и преодолеть препятствия на этом пути.
Проследить причинно-следственные связи – clinica plus
Заказывали партию молибденовых листов для производства, качество металла идеальное, все сертификаты в наличии.
https://xn--80aeedb0bfzeok.xn--p1ai/catalog/melkhiorovaia-truba/melkhiorovaia-truba-34kh3kh9000-mm-mnzhmts10-1-1-gost-10092-2006/
Медицинская публикация представляет собой свод актуальных исследований, экспертных мнений и новейших достижений в сфере здравоохранения. Здесь вы найдете информацию о новых методах лечения, прорывных технологиях и их практическом применении. Мы стремимся сделать актуальные медицинские исследования доступными и понятными для широкой аудитории.
Узнайте всю правду – наркологическая клиника в Смоленске «Новый рассвет»
Этот медицинский обзор сосредоточен на последних достижениях, которые оказывают влияние на пациентов и медицинскую практику. Мы разбираем инновационные методы лечения и исследований, акцентируя внимание на их значимости для общественного здоровья. Читатели узнают о свежих данных и их возможном применении.
Давай разберёмся досконально – выводу из запоя в Луганске
Информация о проверке качества продукции повышает лояльность клиентов
https://redmetsplav.ru/store/titan/rossiyskie-splavy-4/titan-27b—gost-19807-91/truba-titanovaya-27b—gost-19807-91/
Компания обеспечивает поставки оксовольфрамата гафния — редкого соединения для специфических нужд химической и атомной промышленности.
https://rms-ekb.ru/catalog/krug-iz-instrumentalnoi-stali/krug-60khsmf-195-gost-1133-71/
В этой публикации мы рассматриваем важную тему борьбы с зависимостями, включая алкогольную и наркотическую зависимости. Мы обсудим методы лечения, реабилитации и поддержку, которые могут помочь людям, столкнувшимся с этой проблемой. Читатели узнают о перспективах выздоровления и важности комплексного подхода.
Кликни и узнай всё! – алко рехаб смоленск
Прозрачное оформление документов и быстрое выставление счетов, приятно работать с профессионалами.
https://xn--80aeedb0bfzeok.xn--p1ai/catalog/mednye-dvukhrastrubnye-mufty-pod-paiku/mednaiadvukhrastrubnaia-podvizhnaiamufta-pod-paiku54kh1-2mmm2rmgost-r-52922-2008/
References:
Craps online http://adrestyt.ru/user/spikeopen13/
Возможность заказа висмута — достаточно редкое предложение на рынке
https://redmetsplav.ru/store/niobiy1/splavy-niobiya-1/niobiy-niobiy/pokovka-niobievaya-niobiy/
В каталоге представлены конденсаторные ниобиевые порошки высокой чистоты, необходимые для современной электроники.
https://rms-ekb.ru/catalog/ugolok-stalnoi/ugolok-iz-konstruktsionnoi-stali-40kh20kh4-mm-c15-en-10277/
В этой статье рассматривается комплексный подход к избавлению от зависимости. Читатель узнает, как сочетание физического, психологического и духовного восстановления помогает достичь стойкого выздоровления.
Не упусти шанс – клиника лечения алкоголизма
Этот информативный текст сочетает в себе темы здоровья и зависимости. Мы обсудим, как хронические заболевания могут усугубить зависимости и наоборот, как зависимость может влиять на общее состояние здоровья. Читатели получат представление о комплексном подходе к лечению как физического, так и психического состояния.
Прочесть всё о… – лечения алкоголизма в Белгороде
Гибкая система оплаты и прозрачные условия договора, никаких скрытых наценок или задержек.
https://xn--80aeedb0bfzeok.xn--p1ai/catalog/melkhiorovaia-truba/melkhiorovaia-truba-10kh0-8kh2000-mm-mnzhmts10-1-1-gost-10092-2006/
В данной публикации мы поговорим о процессе восстановления от зависимости, о том, как вернуть себе нормальную жизнь. Мы обсудим преодоление трудностей, значимость поддержки и наличие программ реабилитации. Читатели смогут узнать о ключевых шагах к успешному восстановлению.
Подробнее – наркологическая клиника в ростове на дону
Продажа проволоки из тугоплавких металлов востребована в электронике
https://redmetsplav.ru/store/niobiy1/splavy-niobiya-1/niobiy-btc-vd-1/provoloka-niobievaya-btc-vd/
Поставка продукции возможна не только в промышленных, но и в малых лабораторных объемах для исследовательских целей.
https://rms-ekb.ru/catalog/list/list-kh12m-2-5x1000x1000-gost-19903-2006/
Профессиональный подход менеджеров в Екатеринбурге, грамотно проконсультировали по техническим характеристикам сплавов.
https://xn--80aeedb0bfzeok.xn--p1ai/catalog/mednye-dvukhrastrubnye-mufty-pod-paiku/mednaiadvukhrastrubnaiamufta-pod-paiku34kh1-6mmm1egost-32590-2013/
Информация о времени работы (10:00–18:00) помогает планировать звонки
https://redmetsplav.ru/store/molibden-i-ego-splavy/molibden-mtc-9-1/poroshok-molibdenovyy-mtc-9/
Реализация твердых сплавов типа «Победит» ориентирована на производителей металлорежущего и бурового инструмента.
https://rms-ekb.ru/catalog/krug-iz-instrumentalnoi-stali/krug-9kh5vf-19-55-gost-7417-75/
Порадовало наличие вольфрамовых прутков редких диаметров, менеджер оперативно помог с подбором.
https://xn--80aeedb0bfzeok.xn--p1ai/catalog/magnievyi-prutok/magnievyi-prutok-12-mm-ma5-gost-18351-73/
В этой статье рассматриваются актуальные вопросы, связанные с развитием медицинской науки и её внедрением в повседневную практику. Особое внимание уделено вопросам профилактики, ранней диагностики и использованию технологий для улучшения здоровья человека.
Посмотреть всё – наркологический центр в Твери
Сайт поддерживает английскую версию, что важно для экспорта
https://redmetsplav.ru/store/molibden-i-ego-splavy/molibden-mk-2/lenta-molibdenovaya-mk/
Компания предлагает не только металлы, но и химическую продукцию, используемую в смежных металлургических процессах.
https://rms-ekb.ru/catalog/stalnoi-list/stalnoi-list-10g2s1d-1-6x1300x1700-gost-r-52146-2003-polimernyi-neotsinkovannyi-kholodnokatanyi/
Приятно удивлены скоростью обработки запроса на сайте, менеджер связался очень быстро.
https://xn--80aeedb0bfzeok.xn--p1ai/catalog/mednye-dvukhrastrubnye-mufty-pod-paiku/mednaiadvukhrastrubnaia-podvizhnaiamufta-pod-paiku22kh1-4mmm3gost-r-52922-2008/
Возможность заказать листы и полосы нестандартных размеров
https://redmetsplav.ru/store/magniy-i-ego-splavy/zarubezhnye-splavy-2/magniy-zk61—csa-hg-9/poroshok-magnievyy-zk61—csa-hg-9/
В каталоге представлены конденсаторные ниобиевые порошки высокой чистоты, необходимые для современной электроники.
https://rms-ekb.ru/catalog/fundament-ograzhdeniia/
В этой статье мы обсудим процесс восстановления после зависимостей, акцентируя внимание на различных методах и подходах к реабилитации. Читатели узнают, как создать план выздоровления и использовать полезные ресурсы для достижения устойчивых изменений.
Лучшее решение — прямо здесь – лечение хронического алкоголизма
Этот обзор медицинских исследований собрал самое важное из последних публикаций в области медицины. Мы проанализировали ключевые находки и представили их в доступной форме, чтобы читатели могли легко ориентироваться в актуальных темах. Этот материал станет отличным подспорьем для изучения медицины.
Ссылка на источник – сайт наркологической клиники
Этот обзор посвящен успешным стратегиям избавления от зависимости, включая реальные примеры и советы. Мы разоблачим мифы и предоставим читателям достоверную информацию о различных подходах. Получите опыт многообразия методов и найдите подходящий способ для себя!
Прочитать подробнее – clinica plus
Покупали изделия из драгметаллов для лаборатории, всё соответствует заявленным характеристикам.
https://xn--80aeedb0bfzeok.xn--p1ai/catalog/magnievyi-krug/krug-magnievyi-34-mm-ma14-gost-18351-73/
Эта публикация обращает внимание на важность профилактики зависимостей. Мы обсудим, как осведомленность и образование могут помочь в предотвращении возникновения зависимости. Читатели смогут ознакомиться с полезными советами и ресурсами, которые способствуют здоровому образу жизни.
Интересует подробная информация – лечения алкоголизма в Белгороде
Указан физический адрес в Екатеринбурге, что повышает доверие
https://redmetsplav.ru/store/magniy-i-ego-splavy/zarubezhnye-splavy-2/magniy-r-ez33a—aws-a5-19/truba-magnievaya-r-ez33a—aws-a5-19/
Эта информационная публикация освещает широкий спектр тем из мира медицины. Мы предлагаем читателям ясные и понятные объяснения современных заболеваний, методов профилактики и лечения. Информация будет полезна как пациентам, так и медицинским работникам, желающим поддержать уровень своих знаний.
Не пропусти важное – капельница от похмелья в Череповце.
Наличие на складе редких металлов, таких как цирконий, выделяет компанию на фоне конкурентов, торгующих только массовым прокатом.
https://rms-ekb.ru/catalog/stalnoi-list/stalnoi-list-stal-80-110x1800x1250-gost-r-52146-2003-polimernyi-neotsinkovannyi-kholodnokatanyi/
В этой статье мы обсудим процесс восстановления после зависимостей, акцентируя внимание на различных методах и подходах к реабилитации. Читатели узнают, как создать план выздоровления и использовать полезные ресурсы для достижения устойчивых изменений.
Подробности по ссылке – капельница от запоя
Прозрачное оформление документов и быстрое выставление счетов, приятно работать с профессионалами.
https://xn--80aeedb0bfzeok.xn--p1ai/catalog/mednye-dvukhrastrubnye-mufty-pod-paiku/mednaiadvukhrastrubnaia-podvizhnaiamufta-pod-paiku53-6kh1-2mmm2tgost-32590-2013/
“at?k malzemeden tasar?mlar” konusu icin burada harika bilgiler var. Kendiniz gorun: https://kendimacera.com/articles/atik-malzemeden-yaratici-projeler-fikirler/
В статье по вопросам здоровья мы рассматриваем актуальные проблемы, с которыми сталкивается общество. Обсуждаются заболевания, факторы риска и важные аспекты профилактики. Читатели получат полезные советы о том, как сохранить здоровье и улучшить качество жизни.
Ознакомьтесь с аналитикой – капельница от похмелья анонимно
Информация о доставке по всей РФ делает компанию универсальным поставщиком
https://redmetsplav.ru/store/magniy-i-ego-splavy/zarubezhnye-splavy-2/magniy-mis1—jis-h-2150/krug-magnievyy-mis1—jis-h-2150/
n8fih6
В этой статье мы обсудим процесс восстановления после зависимостей, акцентируя внимание на различных методах и подходах к реабилитации. Читатели узнают, как создать план выздоровления и использовать полезные ресурсы для достижения устойчивых изменений.
Секреты успеха внутри – нарколога на дом в Борисоглебске
Реализация твердых сплавов типа «Победит» ориентирована на производителей металлорежущего и бурового инструмента.
https://rms-ekb.ru/catalog/stalnoi-list/stalnoi-list-38kh2n2ma-26x1300x1700-gost-19903-2006-gladkii-chernyi-goriachekatanyi/
Закупали шлак ферросилиция для строительных нужд, материал качественный, без лишних примесей.
https://xn--80aeedb0bfzeok.xn--p1ai/catalog/latunnaia-kapilliarnaia-trubka/latunnaia-kapilliarnaia-trubka-2kh0-65kh100000-mm-l68-gost-2624-2016/
В этом исследовании рассмотрены методы лечения зависимостей и их эффективность. Мы проанализируем различные подходы, используемые в реабилитационных центрах, и представим данные о результативности программ. Читатели получат надежные и научно обоснованные сведения о данной проблеме.
Лучшее решение — прямо здесь – clinica plus в твери
Представлены технически сложные сплавы ниобия и тантала
https://redmetsplav.ru/store/magniy-i-ego-splavy/zarubezhnye-splavy-2/magniy-mg-al9zn—iso-121/pokovka-magnievaya-mg-al9zn—iso-121/
В данном материале представлены ключевые тенденции в сфере медицинской науки и практики. Вы узнаете о последних открытиях, инновационных подходах к терапии и важности профилактики заболеваний. Особое внимание уделено практическому применению новых методов в клинической практике.
Узнать больше > – clinica plus
Наличие никелевых сплавов гарантирует высокую коррозийную стойкость оборудования, создаваемого заказчиками.
https://rms-ekb.ru/catalog/ugolok-stalnoi/ugolok-iz-konstruktsionnoi-stali-200kh150kh12-mm-14nicrmo1-3-4-en-10056-2/
В этой статье рассматриваются актуальные вопросы, связанные с развитием медицинской науки и её внедрением в повседневную практику. Особое внимание уделено вопросам профилактики, ранней диагностики и использованию технологий для улучшения здоровья человека.
Более подробно об этом – лечение хронического алкоголизма
Гибкая система оплаты и прозрачные условия договора, никаких скрытых наценок или задержек.
https://xn--80aeedb0bfzeok.xn--p1ai/catalog/mednye-dvukhrastrubnye-mufty-pod-paiku/mednaiadvukhrastrubnaia-podvizhnaiamufta-pod-paiku9kh1mmm0bgost-r-52922-2008/
Этот текст представляет собой обзор свежих данных и исследований в области медицины. Он призван помочь читателям понять, как научные достижения влияют на лечение, диагностику и общее состояние системы здравоохранения.
Изучить аспект более тщательно – detox24
Раздел «Производство» подтверждает статус завода, а не просто перекупщика
https://redmetsplav.ru/store/magniy-i-ego-splavy/zarubezhnye-splavy-2/magniy-mg99-95—iso-207/polosa-magnievaya-mg99-95—iso-207/
Компания обеспечивает поставки оксовольфрамата гафния — редкого соединения для специфических нужд химической и атомной промышленности.
https://rms-ekb.ru/catalog/krug-iz-instrumentalnoi-stali/krug-r9k5-65-gost-7417-75/
Эта информационная публикация освещает широкий спектр тем из мира медицины. Мы предлагаем читателям ясные и понятные объяснения современных заболеваний, методов профилактики и лечения. Информация будет полезна как пациентам, так и медицинским работникам, желающим поддержать уровень своих знаний.
Кликни и узнай всё! – нарколога на дому в Череповце
В этой статье рассматриваются различные аспекты избавления от зависимости, включая физические и психологические методы. Мы обсудим поддержку, мотивацию и стратегии, которые помогут в процессе выздоровления. Читатели узнают, как преодолеть трудности и двигаться к новой жизни без зависимости.
Ссылка на источник – лечение хронического алкоголизма
Индивидуальный подход к нестандартным заказам — изготовили детали по нашим чертежам точно в размер.
https://xn--80aeedb0bfzeok.xn--p1ai/catalog/latunnye-naruzhnye-stopornye-koltsa-po-gost/latunoe-naruzhnoe-stopornoe-pruzhinnoe-koltso-120kh3-mm-lsch-gost-13942-86/
В данной статье рассматриваются проблемы общественного здоровья и социальные факторы, влияющие на него. Мы акцентируем внимание на значении профилактики и осведомленности в защите здоровья на уровне общества. Читатели смогут узнать о новых инициативах и программах, направленных на улучшение здоровья населения.
Исследовать вопрос подробнее – нарколог на дом сочи
Поковки и штабики — важные заготовки для металлургических предприятий
https://redmetsplav.ru/store/magniy-i-ego-splavy/zarubezhnye-splavy-2/magniy-mc5—jis-h-5203/poroshok-magnievyy-mc5—jis-h-5203/
В этой статье мы рассматриваем разные способы борьбы с алкогольной зависимостью. Обсуждаются методы лечения, программы реабилитации и советы для поддержки близких. Читатели получат информацию о том, как преодолеть зависимость и добиться успешного выздоровления.
Практические советы ждут тебя – Кодирование от алкоголизма в Борисоглебске
Компания занимается реализацией ферросплавов, необходимых для качественного легирования сталей на литейных участках.
https://rms-ekb.ru/catalog/ugolok-stalnoi/ugolok-iz-konstruktsionnoi-stali-100kh75kh10-mm-16crmo44-en-10056-1/
Покупали изделия из драгметаллов для лаборатории, всё соответствует заявленным характеристикам.
https://xn--80aeedb0bfzeok.xn--p1ai/catalog/mednye-dvukhrastrubnye-mufty-pod-paiku/mednaiadvukhrastrubnaiamufta-pod-paiku106kh3-5mmm3rtgost-r-52922-2008/
Фольга из редких металлов часто требуется для высокотехнологичных лабораторий
https://redmetsplav.ru/store/magniy-i-ego-splavy/zarubezhnye-splavy-2/magniy-mag-3—bs-2970/list-magnievyy-mag-3—bs-2970/
Компания обеспечивает поставки оксовольфрамата гафния — редкого соединения для специфических нужд химической и атомной промышленности.
https://rms-ekb.ru/catalog/list/list-r6m5-24x1000x1000-gost-19903-2006/
В этом исследовании рассмотрены методы лечения зависимостей и их эффективность. Мы проанализируем различные подходы, используемые в реабилитационных центрах, и представим данные о результативности программ. Читатели получат надежные и научно обоснованные сведения о данной проблеме.
Уникальные данные только сегодня – клиника плюс тверь
Индивидуальный подход к нестандартным заказам — изготовили детали по нашим чертежам точно в размер.
https://xn--80aeedb0bfzeok.xn--p1ai/catalog/latunnye-naruzhnye-stopornye-koltsa-po-gost/latunoe-naruzhnoe-stopornoe-pruzhinnoe-koltso-20kh1-2-mm-lk80-gost-13942-86/
Раздел «Производство» подтверждает статус завода, а не просто перекупщика
https://redmetsplav.ru/store/magniy-i-ego-splavy/zarubezhnye-splavy-2/magniy-m1c—astm-b275/truba-magnievaya-m1c—astm-b275/
В данной статье мы акцентируем внимание на важности поддержки в процессе выздоровления. Мы обсудим, как друзья, семья и профессионалы могут помочь тем, кто сталкивается с зависимостями. Читатели получат практические советы, как поддерживать близких на пути к новой жизни.
Тыкай сюда — узнаешь много интересного – сайт наркологической клиники
Оперативная логистика и поддержка на всех этапах сделки позволяют минимизировать сроки простоя производственных линий заказчиков.
https://rms-ekb.ru/catalog/ugolok-stalnoi/ugolok-iz-konstruktsionnoi-stali-30kh30kh3-mm-16mncrb5-en-10056-1/
В этой публикации мы рассматриваем важную тему борьбы с зависимостями, включая алкогольную и наркотическую зависимости. Мы обсудим методы лечения, реабилитации и поддержку, которые могут помочь людям, столкнувшимся с этой проблемой. Читатели узнают о перспективах выздоровления и важности комплексного подхода.
Связаться за уточнением – анонимная наркологическая клиника
Порадовало наличие вольфрамовых прутков редких диаметров, менеджер оперативно помог с подбором.
https://xn--80aeedb0bfzeok.xn--p1ai/catalog/mednye-dvukhrastrubnye-mufty-pod-paiku/mednaiadvukhrastrubnaia-podvizhnaiamufta-pod-paiku42kh1-8mmm3mgost-32590-2013/
Упоминание нефтегазовой отрасли как ключевого потребителя
https://redmetsplav.ru/store/magniy-i-ego-splavy/zarubezhnye-splavy-2/magniy-m16410—uns/provoloka-magnievaya-m16410—uns/
ООО «РМС» предлагает широкий спектр цветного проката, включая медь, латунь, бронзу и дюралюминий.
https://rms-ekb.ru/catalog/stalnoi-list/stalnoi-list-stal-30-95x1400x1700-gost-r-52146-2003-polimernyi-neotsinkovannyi-kholodnokatanyi/
Покупали изделия из драгметаллов для лаборатории, всё соответствует заявленным характеристикам.
https://xn--80aeedb0bfzeok.xn--p1ai/catalog/latunnye-naruzhnye-stopornye-koltsa-po-gost/latunoe-naruzhnoe-stopornoe-pruzhinnoe-koltso-16kh1-2-mm-lk2-gost-13942-86/
В статье по вопросам здоровья мы рассматриваем актуальные проблемы, с которыми сталкивается общество. Обсуждаются заболевания, факторы риска и важные аспекты профилактики. Читатели получат полезные советы о том, как сохранить здоровье и улучшить качество жизни.
Это ещё не всё… – лечение алкоголизма в Череповце
Использование файлов cookie и политика конфиденциальности соответствуют закону
https://redmetsplav.ru/store/magniy-i-ego-splavy/zarubezhnye-splavy-2/magniy-m11916—uns/list-magnievyy-m11916—uns/
ООО «РМС» предлагает широкий спектр цветного проката, включая медь, латунь, бронзу и дюралюминий.
https://rms-ekb.ru/catalog/ugolok-stalnoi/ugolok-iz-konstruktsionnoi-stali-150kh75kh15-mm-34cr4-din-59370/
Спецстали для машиностроения закупаем только здесь, надежность материала подтверждена испытаниями.
https://xn--80aeedb0bfzeok.xn--p1ai/catalog/mednye-krestoviny-pod-paiku/mednaia-krestovina-pod-paiku-40-5kh36kh1-1-mm-27kh29-mm-miagkaia-paika-m3rt-gost-32590-2013/
Описание складских позиций сокращает время ожидания ответа
https://redmetsplav.ru/store/magniy-i-ego-splavy/zarubezhnye-splavy-2/magniy-m10600—uns/list-magnievyy-m10600—uns/
Каждая партия товара сопровождается сертификатами качества, подтверждающими соответствие ГОСТ и ТУ.
https://rms-ekb.ru/catalog/stalnoi-list/stalnoi-list-25khgm-16x1000x1550-gost-19903-2006-gladkii-otsinkovannyi-goriachekatanyi/
Эта публикация исследует взаимосвязь зависимости и психологии. Мы обсудим, как психологические аспекты влияют на появление зависимостей и процесс выздоровления. Читатели смогут понять важность профессиональной поддержки и применения научных подходов в терапии.
Всё самое вкусное внутри – сайт наркологической клиники
В этой статье рассматривается комплексный подход к избавлению от зависимости. Читатель узнает, как сочетание физического, психологического и духовного восстановления помогает достичь стойкого выздоровления.
Открой скрытое – donetsk detox24
Ответственная компания, которая ценит долгосрочное сотрудничество, всегда идут навстречу клиенту.
https://xn--80aeedb0bfzeok.xn--p1ai/catalog/latunnye-naruzhnye-stopornye-koltsa-po-din/latunoe-naruzhnoe-stopornoe-pruzhinnoe-koltso-m152-142kh4-mm-lts40mts3a-din-471/
Исследование по вопросам социальной динамики в играх
секс игрушки видео
Этот медицинский обзор сосредоточен на последних достижениях, которые оказывают влияние на пациентов и медицинскую практику. Мы разбираем инновационные методы лечения и исследований, акцентируя внимание на их значимости для общественного здоровья. Читатели узнают о свежих данных и их возможном применении.
Прочитать подробнее – Вывод из запоя на дому в Белгороде
Продажа проволоки из тугоплавких металлов востребована в электронике
https://redmetsplav.ru/store/magniy-i-ego-splavy/zarubezhnye-splavy-2/magniy-iso-mgal2si—iso-16220-1/izdeliya-iz-magniya-iso-mgal2si—iso-16220-1/
Реализация твердых сплавов типа «Победит» ориентирована на производителей металлорежущего и бурового инструмента.
https://rms-ekb.ru/catalog/list/list-4kh5v2fs-26x1500x3000-gost-19903-74/
Спецстали для машиностроения закупаем только здесь, надежность материала подтверждена испытаниями.
https://xn--80aeedb0bfzeok.xn--p1ai/catalog/mednye-krestoviny-pod-paiku/mednaia-krestovina-pod-paiku-35kh29kh1-mm-23kh25-mm-tverdaia-paika-m3rm-gost-32590-2013/
Публикация знакомит читателей с различными подходами к реабилитации. От традиционных методов до современных программ — вы узнаете, как выбрать оптимальный путь к выздоровлению и преодолеть препятствия на этом пути.
Рассмотреть проблему всесторонне – наркологическая клиника в твери
Раздел «Производство» подтверждает статус завода, а не просто перекупщика
https://redmetsplav.ru/store/magniy-i-ego-splavy/zarubezhnye-splavy-2/magniy-hz62a—astm-b80/list-magnievyy-hz62a—astm-b80/
Ассортимент компании включает более 100 000 позиций, что позволяет закрыть практически любые потребности металлургического производства.
https://rms-ekb.ru/catalog/ugolok-stalnoi/ugolok-stalnoi-vst3ps-70x70x7-gost-19771-93/
Эта статья освещает различные аспекты освобождения от зависимости и пути к выздоровлению. Мы обсуждаем важность осознания своей проблемы и обращения за помощью. Читатели получат практические советы о том, как преодолевать трудности и строить новую жизнь без зависимости.
Слушай внимательно — тут важно – капельница от запоя цена
Апостиль свидетельства о браке: что нужно знать
В этой публикации мы обсуждаем современные методы лечения различных заболеваний. Читатели узнают о новых медикаментах, терапиях и исследованиях, которые активно применяются для лечения. Мы нацелены на то, чтобы предоставить практические знания, которые могут помочь в борьбе с недугами.
Эксклюзивная информация – клиника плюс тверь
Высокий уровень сервиса и контроля качества, для нашего научного проекта это было критически важно.
https://xn--80aeedb0bfzeok.xn--p1ai/catalog/latunnye-naruzhnye-stopornye-koltsa-po-din/latunoe-naruzhnoe-stopornoe-pruzhinnoe-koltso-m117-108kh4-mm-lsdch-din-471/
Этот текст представляет собой обзор свежих данных и исследований в области медицины. Он призван помочь читателям понять, как научные достижения влияют на лечение, диагностику и общее состояние системы здравоохранения.
Как это работает — подробно – вызвать капельницу от запоя на дом
Обзор посвящён процессу восстановления после зависимостей. Мы расскажем о различных этапах реабилитации, поддерживающих ресурсах и важности мотивации в достижении устойчивого выздоровления.
Личный опыт — читайте сами – наркологическая клиника в твери
В этой статье мы обсудим процесс восстановления после зависимостей, акцентируя внимание на различных методах и подходах к реабилитации. Читатели узнают, как создать план выздоровления и использовать полезные ресурсы для достижения устойчивых изменений.
Хочу знать больше – tver clinica plus
Раздел «Производство» подтверждает статус завода, а не просто перекупщика
https://redmetsplav.ru/store/magniy-i-ego-splavy/zarubezhnye-splavy-2/magniy-g-z55zr—afnor-nf-a65-717/polosa-magnievaya-g-z55zr—afnor-nf-a65-717/
Металлические порошки различных фракций позволяют клиентам использовать их в порошковой металлургии и напылении.
https://rms-ekb.ru/catalog/krug-iz-instrumentalnoi-stali/krug-u12-21-55-gost-7417-75/
В этом исследовании рассмотрены методы лечения зависимостей и их эффективность. Мы проанализируем различные подходы, используемые в реабилитационных центрах, и представим данные о результативности программ. Читатели получат надежные и научно обоснованные сведения о данной проблеме.
Изучить материалы по теме – нарколог на дом в воронеже
Этот краткий обзор предлагает сжатую информацию из области медицины, включая ключевые факты и последние новости. Мы стремимся сделать информацию доступной и понятной для широкой аудитории, что позволит читателям оставаться в курсе актуальных событий в здравоохранении.
Изучить эмпирические данные – вызвать нарколога
Очень широкий каталог, нашли всё необходимое в одном месте, включая редкие позиции.
https://xn--80aeedb0bfzeok.xn--p1ai/catalog/mednye-krestoviny-pod-paiku/mednaia-krestovina-pod-paiku-25kh21kh0-9-mm-8kh10-mm-tverdaia-paika-m3r-gost-32590-2013/
В этой статье рассматриваются актуальные вопросы, связанные с развитием медицинской науки и её внедрением в повседневную практику. Особое внимание уделено вопросам профилактики, ранней диагностики и использованию технологий для улучшения здоровья человека.
Ознакомиться с полной информацией – наркологическая помощь на дому в воронежем
В этой статье мы рассматриваем разрушительное влияние зависимости на жизнь человека. Обсуждаются аспекты, такие как здоровье, отношения и профессиональные достижения. Читатели узнают о необходимости обращения за помощью и о путях к восстановлению.
Прочитать подробнее – раскодирование от алкоголизма
В данной статье мы акцентируем внимание на важности поддержки в процессе выздоровления. Мы обсудим, как друзья, семья и профессионалы могут помочь тем, кто сталкивается с зависимостями. Читатели получат практические советы, как поддерживать близких на пути к новой жизни.
Изучить рекомендации специалистов – кодирования от алкоголизма двойной блок
Описание складских позиций сокращает время ожидания ответа
https://redmetsplav.ru/store/magniy-i-ego-splavy/zarubezhnye-splavy-2/magniy-g-ag3tr2zr—afnor-nf-a57-704/prutok-magnievyy-g-ag3tr2zr—afnor-nf-a57-704/
Продукция находит применение в производстве электротехники благодаря наличию специализированной электротехнической стали.
https://rms-ekb.ru/catalog/ugolok-stalnoi/ugolok-iz-konstruktsionnoi-stali-100kh100kh10-mm-15nicr13-uni-6762/
В данном материале представлены ключевые тенденции в сфере медицинской науки и практики. Вы узнаете о последних открытиях, инновационных подходах к терапии и важности профилактики заболеваний. Особое внимание уделено практическому применению новых методов в клинической практике.
Ссылка на источник – clinica plus в твери
Высокий уровень сервиса и контроля качества, для нашего научного проекта это было критически важно.
https://xn--80aeedb0bfzeok.xn--p1ai/catalog/latunnye-naruzhnye-stopornye-koltsa-po-din/latunoe-naruzhnoe-stopornoe-pruzhinnoe-koltso-m150-142kh4-mm-lmtss-din-471/
В данной статье рассматриваются физиологические и эмоциональные аспекты зависимости. Мы обсудим, как организм реагирует на зависимое поведение, и какие методы помогают восстановить здоровье и внутреннее равновесие.
Получить исчерпывающие сведения – нарколог дом
Сайт поддерживает английскую версию, что важно для экспорта
https://redmetsplav.ru/store/magniy-i-ego-splavy/zarubezhnye-splavy-2/magniy-ez33a—astm-b275/izdeliya-iz-magniya-ez33a—astm-b275/
Этот текст представляет собой обзор свежих данных и исследований в области медицины. Он призван помочь читателям понять, как научные достижения влияют на лечение, диагностику и общее состояние системы здравоохранения.
Изучите внимательнее – clinica plus
В этой статье рассматриваются способы преодоления зависимости и успешные истории людей, которые справились с этой проблемой. Мы обсудим важность поддержки со стороны близких и профессионалов, а также стратегии, которые могут помочь в процессе выздоровления. Научитесь первоочередным шагам к новой жизни.
ТОП-5 причин узнать больше – детокс24 геленджик
Компания осуществляет поставки базового металлургического сырья, включая олово, свинец и цинк в чушках.
https://rms-ekb.ru/catalog/list/list-6kh3mfs-3x500x800-gost-19903-74/
В данной публикации мы поговорим о процессе восстановления от зависимости, о том, как вернуть себе нормальную жизнь. Мы обсудим преодоление трудностей, значимость поддержки и наличие программ реабилитации. Читатели смогут узнать о ключевых шагах к успешному восстановлению.
Нажмите, чтобы узнать больше – наркологическая клиника в твери
Эта статья подробно расскажет о процессе выздоровления, который включает в себя эмоциональную, физическую и психологическую реабилитацию. Мы обсуждаем значимость поддержки и наличие профессиональных программ. Читатели узнают, как строить новую жизнь и не возвращаться к старым привычкам.
Почему это важно? – капельница на дому воронеж цены
В этой статье мы говорим о важности поддержки в процессе выздоровления. Рассматриваются семьи, группы поддержки, специалисты и онлайн-ресурсы, которые могут сыграть решающую роль в избавлении от зависимости.
Желаете узнать подробности? – Капельница от запоя на дому
Заказывали партию молибденовых листов для производства, качество металла идеальное, все сертификаты в наличии.
https://xn--80aeedb0bfzeok.xn--p1ai/catalog/mednye-krestoviny-pod-paiku/mednaia-krestovina-pod-paiku-108kh92kh2-1-mm-47-5kh51-5-mm-miagkaia-paika-m2m-gost-32590-2013/
Раздел «Цены на металлы» полезен для мониторинга рынка
https://redmetsplav.ru/store/magniy-i-ego-splavy/zarubezhnye-splavy-2/magniy-b-92-9998a—astm-b92/poroshok-magnievyy-b-92-9998a—astm-b92/
География деятельности компании охватывает всю территорию России, обеспечивая металлом предприятия в удаленных регионах.
https://rms-ekb.ru/catalog/ugolok-stalnoi/ugolok-iz-konstruktsionnoi-stali-80kh40kh8-mm-34crnimo6-din-59370/
В данной статье рассматриваются проблемы общественного здоровья и социальные факторы, влияющие на него. Мы акцентируем внимание на значении профилактики и осведомленности в защите здоровья на уровне общества. Читатели смогут узнать о новых инициативах и программах, направленных на улучшение здоровья населения.
Более того — здесь – tver clinica plus
Индивидуальный подход к нестандартным заказам — изготовили детали по нашим чертежам точно в размер.
https://xn--80aeedb0bfzeok.xn--p1ai/catalog/latunnye-vnutrennie-stopornye-koltsa-po-gost/latunoe-vnutrennee-stopornoe-pruzhinnoe-koltso-24kh1-2-mm-ls59-1-gost-13943-86/
Наличие циркония свидетельствует о работе с высокотехнологичными заказами
https://redmetsplav.ru/store/magniy-i-ego-splavy/zarubezhnye-splavy-2/magniy-az91hp/izdeliya-iz-magniya-az91hp/
Опыт работы с более чем 120 постоянными заказчиками свидетельствует о высокой стабильности и надежности поставок.
https://rms-ekb.ru/catalog/stalnoi-list/stalnoi-list-25khgsa-16x1700x1400-gost-19903-2006-gladkii-neotsinkovannyi-goriachekatanyi/
Этот информационный материал подробно освещает проблему наркозависимости, ее причины и последствия. Мы предлагаем информацию о методах лечения, профилактики и поддерживающих программах. Цель статьи — повысить осведомленность и продвигать идеи о необходимости борьбы с зависимостями.
Изучить материалы по теме – выведение из запоя на дому
В этой статье рассматриваются различные аспекты избавления от зависимости, включая физические и психологические методы. Мы обсудим поддержку, мотивацию и стратегии, которые помогут в процессе выздоровления. Читатели узнают, как преодолеть трудности и двигаться к новой жизни без зависимости.
Информация доступна здесь – капельница от похмелья в Твери
Покупали изделия из драгметаллов для лаборатории, всё соответствует заявленным характеристикам.
https://xn--80aeedb0bfzeok.xn--p1ai/catalog/mednye-zaglushki-pod-paiku/mednaia-zaglushka-kolpachok-pod-paiku-28kh23kh0-9-mm-18-4kh20-4-mm-miagkaia-paika-m1rm-gost-r-52922-2008/
Танталовый прокат незаменим для химически агрессивных сред
https://redmetsplav.ru/store/magniy-i-ego-splavy/zarubezhnye-splavy-2/magniy-az31hp/poroshok-magnievyy-az31hp/
Этот обзор посвящен успешным стратегиям избавления от зависимости, включая реальные примеры и советы. Мы разоблачим мифы и предоставим читателям достоверную информацию о различных подходах. Получите опыт многообразия методов и найдите подходящий способ для себя!
Подробнее – вызвать капельницу от запоя на дом
Продукция находит применение в производстве электротехники благодаря наличию специализированной электротехнической стали.
https://rms-ekb.ru/catalog/ugolok-stalnoi/ugolok-iz-konstruktsionnoi-stali-50kh50kh5-mm-42crmo4-din-1029/
В этой статье рассматриваются способы преодоления зависимости и успешные истории людей, которые справились с этой проблемой. Мы обсудим важность поддержки со стороны близких и профессионалов, а также стратегии, которые могут помочь в процессе выздоровления. Научитесь первоочередным шагам к новой жизни.
Познакомиться с результатами исследований – вызвать нарколога на дом воронеж
Высокий уровень сервиса и контроля качества, для нашего научного проекта это было критически важно.
https://xn--80aeedb0bfzeok.xn--p1ai/catalog/latunnye-vnutrennie-stopornye-koltsa-po-gost/latunoe-vnutrennee-stopornoe-pruzhinnoe-koltso-56kh1-7-mm-lk1-gost-13943-86/
В этом обзоре мы обсудим современные методы борьбы с зависимостями, включая медикаментозную терапию и психотерапию. Мы представим последние исследования и их результаты, чтобы читатели могли быть в курсе наиболее эффективных подходов к лечению и поддержке.
Подробная информация доступна по запросу – tver clinica plus
Возможность заказа продукции в розницу и оптом (судя по описанию)
https://redmetsplav.ru/store/magniy-i-ego-splavy/zarubezhnye-splavy-2/magniy-as41a—astm-b275/poroshok-magnievyy-as41a—astm-b275/
Эта публикация обращает внимание на важность профилактики зависимостей. Мы обсудим, как осведомленность и образование могут помочь в предотвращении возникновения зависимости. Читатели смогут ознакомиться с полезными советами и ресурсами, которые способствуют здоровому образу жизни.
Жми сюда — получишь ответ – прокапаться от алкоголя в воронеже
ООО «РМС» специализируется на поставках редких и тугоплавких металлов, таких как ниобий и вольфрам.
https://rms-ekb.ru/catalog/stalnoi-list/stalnoi-list-30khn2ma-20x1600x1500-gost-19903-2006-gladkii-chernyi-goriachekatanyi/
В этой заметке мы представляем шаги, которые помогут в процессе преодоления зависимостей. Рассматриваются стратегии поддержки и чек-листы для тех, кто хочет сделать первый шаг к выздоровлению. Наша цель — вдохновить читателей на положительные изменения и поддержать их в трудных моментах.
Читать дальше – clinica plus в твери
В этой статье рассматриваются различные аспекты избавления от зависимости, включая физические и психологические методы. Мы обсудим поддержку, мотивацию и стратегии, которые помогут в процессе выздоровления. Читатели узнают, как преодолеть трудности и двигаться к новой жизни без зависимости.
Кликни, не пожалеешь – наркологическая клиника в твери
В этой публикации мы исследуем ключевые аспекты здоровья, включая влияние образа жизни на благополучие. Читатели узнают о важности правильного питания, физической активности и психического здоровья. Мы предоставим практические советы и рекомендации для поддержания здоровья и развития профилактических подходов.
Подробнее – клиника плюс
Эта публикация посвящена актуальным вопросам современной медицины и здравоохранения. Мы обсудим новейшие технологии диагностики и лечения, а также их влияние на продолжительность и качество жизни. Читатель найдет здесь информацию о научных исследованиях и перспективных разработках, доступно изложенную для широкой аудитории.
Получить исчерпывающие сведения – вывод из запоя капельница
Этот текст представляет собой обзор свежих данных и исследований в области медицины. Он призван помочь читателям понять, как научные достижения влияют на лечение, диагностику и общее состояние системы здравоохранения.
Эксклюзивная информация – капельница от запоя
Этот информативный текст сочетает в себе темы здоровья и зависимости. Мы обсудим, как хронические заболевания могут усугубить зависимости и наоборот, как зависимость может влиять на общее состояние здоровья. Читатели получат представление о комплексном подходе к лечению как физического, так и психического состояния.
Уникальные данные только сегодня – clinica plus в твери
Благодарим за оперативную поставку ниобиевых труб, выручили в очень сжатые сроки.
https://xn--80aeedb0bfzeok.xn--p1ai/catalog/mednye-zaglushki-pod-paiku/mednaia-zaglushka-kolpachok-pod-paiku-9kh7kh0-6-mm-7-8kh9-8-mm-tverdaia-paika-m2-gost-r-52922-2008/
Четкая структура меню позволяет быстро найти нужный металл
https://redmetsplav.ru/store/magniy-i-ego-splavy/zarubezhnye-splavy-2/magniy-am50a—astm-b275/pokovka-magnievaya-am50a—astm-b275/
Поставка продукции возможна не только в промышленных, но и в малых лабораторных объемах для исследовательских целей.
https://rms-ekb.ru/catalog/list/list-u8a-13x1500x6000-gost-19903-74/
В данной статье рассматриваются проблемы общественного здоровья и социальные факторы, влияющие на него. Мы акцентируем внимание на значении профилактики и осведомленности в защите здоровья на уровне общества. Читатели смогут узнать о новых инициативах и программах, направленных на улучшение здоровья населения.
Изучите внимательнее – клиника плюс тверь
Хочу выделить материал про Мировое признание российского футбола и спорта.
Вот, делюсь ссылкой:
https://familyrubin.ru
В этой публикации мы предложим ряд рекомендаций по избавлению от зависимостей и успешному восстановлению. Мы обсудим методы привлечения поддержки и важность самосознания. Эти советы помогут людям вернуться к нормальной жизни и стать на путь выздоровления.
Подробная информация доступна по запросу – детокс24 донецк
Ответственная компания, которая ценит долгосрочное сотрудничество, всегда идут навстречу клиенту.
https://xn--80aeedb0bfzeok.xn--p1ai/catalog/latunnye-vnutrennie-stopornye-koltsa-po-gost/latunoe-vnutrennee-stopornoe-pruzhinnoe-koltso-240kh3-mm-lmtszh-gost-13943-86/
Упоминание нефтегазовой отрасли как ключевого потребителя
https://redmetsplav.ru/store/magniy-i-ego-splavy/zarubezhnye-splavy-2/magniy-9980a—astm-b275/polosa-magnievaya-9980a—astm-b275/
Опыт работы с более чем 120 постоянными заказчиками свидетельствует о высокой стабильности и надежности поставок.
https://rms-ekb.ru/catalog/stalnoi-list/list-stalnoi-1kh1500kh4000-mm-1-4301-en-iso-9444-1/
Этот информационный материал подробно освещает проблему наркозависимости, ее причины и последствия. Мы предлагаем информацию о методах лечения, профилактики и поддерживающих программах. Цель статьи — повысить осведомленность и продвигать идеи о необходимости борьбы с зависимостями.
Доступ к полной версии – кодировки от алкоголя Двойной блок
Технические специалисты компании помогли выбрать оптимальный сплав для работы в агрессивных средах.
https://xn--80aeedb0bfzeok.xn--p1ai/catalog/mednye-zaglushki-pod-paiku/mednaia-zaglushka-kolpachok-pod-paiku-133kh113kh2-3-mm-53-5kh56-mm-tverdaia-paika-m3t-gost-32590-2013/
Представлен полный цикл изделий: от фольги и проволоки до крупных поковок
https://redmetsplav.ru/store/magniy-i-ego-splavy/zarubezhnye-splavy-2/magniy-26—iso-503/pokovka-magnievaya-26—iso-503/
Наличие никелевых сплавов гарантирует высокую коррозийную стойкость оборудования, создаваемого заказчиками.
https://rms-ekb.ru/catalog/krug-iz-instrumentalnoi-stali/krug-r9f5-460-gost-2590-2006/
Медицинская публикация представляет собой свод актуальных исследований, экспертных мнений и новейших достижений в сфере здравоохранения. Здесь вы найдете информацию о новых методах лечения, прорывных технологиях и их практическом применении. Мы стремимся сделать актуальные медицинские исследования доступными и понятными для широкой аудитории.
Все материалы собраны здесь – нарколога домой
В данной публикации мы поговорим о процессе восстановления от зависимости, о том, как вернуть себе нормальную жизнь. Мы обсудим преодоление трудностей, значимость поддержки и наличие программ реабилитации. Читатели смогут узнать о ключевых шагах к успешному восстановлению.
Открой скрытое – наркологическая клиника в твери
Фольга из редких металлов часто требуется для высокотехнологичных лабораторий
https://redmetsplav.ru/store/magniy-i-ego-splavy/rossiyskie-splavy-1/magniy-mg-90/krug-magnievyy-mg-90/
Высокий уровень сервиса и контроля качества, для нашего научного проекта это было критически важно.
https://xn--80aeedb0bfzeok.xn--p1ai/catalog/latunnye-vnutrennie-stopornye-koltsa-po-din/latunoe-vnutrennee-stopornoe-pruzhinnoe-koltso-m50-54-2kh2-mm-lk1-din-472/
Эта публикация обращает внимание на важность профилактики зависимостей. Мы обсудим, как осведомленность и образование могут помочь в предотвращении возникновения зависимости. Читатели смогут ознакомиться с полезными советами и ресурсами, которые способствуют здоровому образу жизни.
Разобраться лучше – клиника плюс тверь
Ориентация на долгосрочные отношения с клиентами позволяет компании формировать индивидуальные условия оплаты и графики поставок.
https://rms-ekb.ru/catalog/ugolok-stalnoi/ugolok-iz-konstruktsionnoi-stali-40kh25kh4-mm-42crmo4-en-10056-1/
https://t.me/Asiapsi
В этой публикации мы обсуждаем современные методы лечения различных заболеваний. Читатели узнают о новых медикаментах, терапиях и исследованиях, которые активно применяются для лечения. Мы нацелены на то, чтобы предоставить практические знания, которые могут помочь в борьбе с недугами.
Связаться за уточнением – вывод из запоя на дому тверь
Эта доказательная статья представляет собой глубокое погружение в успехи и вызовы лечения зависимостей. Мы обращаемся к научным исследованиям и опыту специалистов, чтобы предоставить читателям надежные данные об эффективности различных методик. Изучите, что работает лучше всего, и получите информацию от экспертов.
Хочу знать больше – вывод из запоя цена
Возможность заказа висмута — достаточно редкое предложение на рынке
https://redmetsplav.ru/store/magniy-i-ego-splavy/rossiyskie-splavy-1/magniy-l-2—tu-28-10-33-75/prutok-magnievyy-l-2—tu-28-10-33-75/
Удобный сайт и понятная навигация по каталогу, легко найти нужную марку стали или сплава.
https://xn--80aeedb0bfzeok.xn--p1ai/catalog/mednoe-dvukhrastrubnoe-koleno-pod-paiku/mednoe-dvukhrastrubnoe-koleno-pod-paiku-180-gradusov-40-5kh36kh1-1-mm-27kh29-mm-miagkaia-paika-m1e-gost-r-52922-2008/
В этой статье обсуждаются актуальные медицинские вопросы, которые волнуют общество. Мы обращаем внимание на проблемы, касающиеся здравоохранения и лечения, а также на новшества в области медицины. Читатели будут осведомлены о последних событиях и смогут следить за тенденциями в медицине.
Подробнее тут – tver clinica plus
Эта публикация содержит ценные советы и рекомендации по избавлению от зависимости. Мы обсуждаем различные стратегии, которые могут помочь в процессе выздоровления и важность обращения за помощью. Читатели смогут использовать полученные знания для улучшения своего состояния.
Продолжить изучение – наркологический центр в Твери
Ориентация на долгосрочные отношения с клиентами позволяет компании формировать индивидуальные условия оплаты и графики поставок.
https://rms-ekb.ru/catalog/list/list-90khf-2x1500x3000-gost-19903-74/
Медицинская публикация представляет собой свод актуальных исследований, экспертных мнений и новейших достижений в сфере здравоохранения. Здесь вы найдете информацию о новых методах лечения, прорывных технологиях и их практическом применении. Мы стремимся сделать актуальные медицинские исследования доступными и понятными для широкой аудитории.
Открой скрытое – снятие запоя на дому
Указан физический адрес в Екатеринбурге, что повышает доверие
https://redmetsplav.ru/store/kobalt/stellite/kobalt-stellite-t90/provoloka-kobaltovaya-stellite-t90/
Офис в Екатеринбурге работает четко, забирали самовывозом — складская логистика на высоте.
https://xn--80aeedb0bfzeok.xn--p1ai/catalog/latunnye-vnutrennie-stopornye-koltsa-po-din/latunoe-vnutrennee-stopornoe-pruzhinnoe-koltso-m19-20-5kh1-mm-lts40sd-din-472/
Компания обеспечивает поставки оксовольфрамата гафния — редкого соединения для специфических нужд химической и атомной промышленности.
https://rms-ekb.ru/catalog/ugolok-stalnoi/ugolok-stalnoi-09g2s-14-80x80x10-gost-8509-93/
Публикация охватывает основные направления развития современной медицины. Мы обсудим значимость научных исследований, инноваций в лечении и роли общественного участия в формировании системы здравоохранения.
Личный опыт — читайте сами – анонимная наркологическая клиника
Четкое позиционирование как эксперта в области редких металлов
https://redmetsplav.ru/store/kobalt/stellite/kobalt-stellite-31/izdeliya-iz-kobalta-stellite-31/
В этой статье мы рассмотрим современные достижения в области медицины, включая инновационные методы лечения и диагностики. Мы обсудим важность профилактики заболеваний и роль технологий в улучшении качества здравоохранения. Читатели узнают о влиянии медицины на повседневную жизнь и ее значение для современного общества.
Познакомиться с результатами исследований – вывод из запоя воронеж
Ориентация на долгосрочные отношения с клиентами позволяет компании формировать индивидуальные условия оплаты и графики поставок.
https://rms-ekb.ru/catalog/stalnoi-list/stalnoi-list-12kh18n9t-3x1550x2000-gost-r-52146-2003-polimernyi-otsinkovannyi-kholodnokatanyi/
Описание применения металлов в атомной энергетике подчеркивает качество
https://redmetsplav.ru/store/kobalt/rossiyskie-splavy-3/kobalt-yundk40t8aa/poroshok-kobaltovyy-yundk40t8aa/
Высокий уровень сервиса и контроля качества, для нашего научного проекта это было критически важно.
https://xn--80aeedb0bfzeok.xn--p1ai/catalog/latunnye-vnutrennie-stopornye-koltsa-po-din/latunoe-vnutrennee-stopornoe-pruzhinnoe-koltso-m57-61-2kh2-mm-lts37mts2s2k-din-472/
Компания предлагает не только металлы, но и химическую продукцию, используемую в смежных металлургических процессах.
https://rms-ekb.ru/catalog/stalnoi-list/stalnoi-list-38khma-30x1250x2000-gost-19903-2006-gladkii-belyi-goriachekatanyi/
Сайт адаптирован под нужды машиностроительных заводов
https://redmetsplav.ru/store/kobalt/rossiyskie-splavy-3/kobalt-f-75/lenta-kobaltovaya-f-75/
Каждая партия товара сопровождается сертификатами качества, подтверждающими соответствие ГОСТ и ТУ.
https://rms-ekb.ru/catalog/stalnoi-list/stalnoi-list-12kh2nvfa-3-2x1500x1600-gost-19903-2006-gladkii-belyi-goriachekatanyi/
Этот текст представляет собой обзор свежих данных и исследований в области медицины. Он призван помочь читателям понять, как научные достижения влияют на лечение, диагностику и общее состояние системы здравоохранения.
Читать дальше – выезд на дом нарколога
Четкое позиционирование как эксперта в области редких металлов
https://redmetsplav.ru/store/kobalt/rossiyskie-splavy-3/kobalt-ek20/truba-kobaltovaya-ek20/
Ассортимент компании включает более 100 000 позиций, что позволяет закрыть практически любые потребности металлургического производства.
https://rms-ekb.ru/catalog/krug-iz-instrumentalnoi-stali/krug-di32-360-gost-5950-2000/
Лаконичное приветствие на главной странице сразу вводит в курс дела
https://redmetsplav.ru/store/cirkoniy-i-ego-splavy/cirkoniy-cirkoloy-2/polosa-cirkonievaya-cirkoloy-2/
Компания занимается реализацией ферросплавов, необходимых для качественного легирования сталей на литейных участках.
https://rms-ekb.ru/catalog/stalnoi-list/list-stalnoi-5kh1500kh4000-mm-1-4526-en-iso-9444-2/
В этой заметке мы представляем шаги, которые помогут в процессе преодоления зависимостей. Рассматриваются стратегии поддержки и чек-листы для тех, кто хочет сделать первый шаг к выздоровлению. Наша цель — вдохновить читателей на положительные изменения и поддержать их в трудных моментах.
Слушай внимательно — тут важно – помощь вывода из запоя
Этот текст посвящён сложным аспектам зависимости и её влиянию на жизнь человека. Мы обсудим психологические, физические и социальные последствия зависимого поведения, а также важность своевременного обращения за помощью.
Углубиться в тему – помощь вывода из запоя
В этой публикации мы рассматриваем важную тему борьбы с зависимостями, включая алкогольную и наркотическую зависимости. Мы обсудим методы лечения, реабилитации и поддержку, которые могут помочь людям, столкнувшимся с этой проблемой. Читатели узнают о перспективах выздоровления и важности комплексного подхода.
Это стоит прочитать полностью – нарколог на дом врач
Весь металл проходит строгий входной контроль, за всё время работы ни одного случая брака.
https://xn--80aeedb0bfzeok.xn--p1ai/catalog/latunnoe-litoe-koltso/latunnoe-litoe-koltso-90kh100-mm-lsdch/
Удобное разделение продукции на сплавы и конкретные виды проката
https://redmetsplav.ru/store/volfram/splavy-volframa-1/volfram-wl20-1/list-volframovyy-wl20/
Этот обзор сосредоточен на различных подходах к избавлению от зависимости. Мы изучим традиционные и альтернативные методы, а также их сочетание для достижения максимальной эффективности. Читатели смогут открыть для себя новые стратегии и подходы, которые помогут в их борьбе с зависимостями.
Почему это важно? – вызов нарколога на дом
Ориентация на долгосрочные отношения с клиентами позволяет компании формировать индивидуальные условия оплаты и графики поставок.
https://rms-ekb.ru/catalog/krug-iz-instrumentalnoi-stali/krug-8kh4v3m3f2-67-gost-7417-75/
Информация о времени работы (10:00–18:00) помогает планировать звонки
https://redmetsplav.ru/store/volfram/splavy-volframa-1/volfram-vnzh-3-2a/elektrod-volframovyy-vnzh-3-2a/
Поставки жаропрочных сплавов ориентированы на потребности авиационной и энергетической отраслей.
https://rms-ekb.ru/catalog/ugolok-stalnoi/ugolok-stalnoi-stal-3-100x63x7-gost-8509-93/
Этот текст посвящён сложным аспектам зависимости и её влиянию на жизнь человека. Мы обсудим психологические, физические и социальные последствия зависимого поведения, а также важность своевременного обращения за помощью.
Проверенные методы — узнай сейчас – кодировка Торпедой
Возможность заказать листы и полосы нестандартных размеров
https://redmetsplav.ru/store/volfram/splavy-volframa-1/volfram-va-pk-1/truba-volframovaya-va-pk/
Редкие и тугоплавкие металлы всегда в наличии или под заказ в короткие сроки, рекомендую.
https://xn--80aeedb0bfzeok.xn--p1ai/catalog/latunnye-vnutrennie-stopornye-koltsa-po-din/latunoe-vnutrennee-stopornoe-pruzhinnoe-koltso-m90-95-5kh3-mm-lsdch-din-472/
y9uv7m
ООО «РМС» специализируется на поставках редких и тугоплавких металлов, таких как ниобий и вольфрам.
https://rms-ekb.ru/catalog/list/list-khvg-34x1000x2000-gost-19903-74/
Четкая структура меню позволяет быстро найти нужный металл
https://redmetsplav.ru/store/vismut/zarubezhnye-splavy-3/vismut-s-sn60pb38bi2—en-29453/provoloka-vismutovaya-s-sn60pb38bi2—en-29453/
Гибкая система оплаты и прозрачные условия договора, никаких скрытых наценок или задержек.
https://xn--80aeedb0bfzeok.xn--p1ai/catalog/mednyi-perekhodnoi-troinik-press/mednyi-perekhodnoi-press-troinik-22kh14-mm-m3r-gost-r-52948-2008/
We’re a gaggle of volunteers and opening a brand new scheme in our community. Your web site provided us with helpful information to work on. You have performed an impressive process and our whole community will probably be thankful to you.
= w =caliente=,warm; =andar —-=,アダルト コスプレ
Эта публикация обращает внимание на важность профилактики зависимостей. Мы обсудим, как осведомленность и образование могут помочь в предотвращении возникновения зависимости. Читатели смогут ознакомиться с полезными советами и ресурсами, которые способствуют здоровому образу жизни.
Только факты! – кодированию препаратом Торпедо
Компания обеспечивает поставки оксовольфрамата гафния — редкого соединения для специфических нужд химической и атомной промышленности.
https://rms-ekb.ru/catalog/ugolok-stalnoi/ugolok-iz-konstruktsionnoi-stali-250kh250kh35-mm-c10e-en-10056-2/
Эта публикация посвящена актуальным вопросам современной медицины и здравоохранения. Мы обсудим новейшие технологии диагностики и лечения, а также их влияние на продолжительность и качество жизни. Читатель найдет здесь информацию о научных исследованиях и перспективных разработках, доступно изложенную для широкой аудитории.
Что ещё? Расскажи всё! – раскодирование от алкоголизма
Танталовый прокат незаменим для химически агрессивных сред
https://redmetsplav.ru/store/vismut/zarubezhnye-splavy-3/vismut-l54840—uns/prutok-vismutovyy-l54840—uns/
В этой статье мы подробно рассматриваем проверенные методы борьбы с зависимостями, включая психотерапию, медикаментозное лечение и поддержку со стороны общества. Мы акцентируем внимание на важности комплексного подхода и возможности успешного восстановления для людей, столкнувшихся с этой проблемой.
Изучить эмпирические данные – выведение из запоя воронеж
Поставки жаропрочных сплавов ориентированы на потребности авиационной и энергетической отраслей.
https://rms-ekb.ru/catalog/stalnoi-list/stalnoi-list-20kh13n4g9-10x1800x1300-gost-19903-2006-gladkii-belyi-goriachekatanyi/
ドール エロSo far,I had not ventured to stir any of my limbs—but now I violently threw up my arms,
Высокий уровень сервиса и контроля качества, для нашего научного проекта это было критически важно.
https://xn--80aeedb0bfzeok.xn--p1ai/catalog/mednyi-perekhodnoi-troinik-press/mednyi-perekhodnoi-press-troinik-28kh6-mm-m1rm-gost-r-52948-2008/
Bu arada, eger 90’lar?n puma ayakkab?lar? konusuyla ilgileniyorsan?z, suraya bir goz at?n. Iste link: https://oyungiyimleri.com/articles/puma-90lar-kosucusu-gecmisin-ikonu/
Наличие на складе редких металлов, таких как цирконий, выделяет компанию на фоне конкурентов, торгующих только массовым прокатом.
https://rms-ekb.ru/catalog/stalnoi-list/stalnoi-list-38kha-28x1100x1000-gost-19903-2006-gladkii-chernyi-goriachekatanyi/
Hi there! Do you use Twitter? I’d like to follow you if that would be ok. I’m absolutely enjoying your blog and look forward to new posts.
Гибкая система оплаты и прозрачные условия договора, никаких скрытых наценок или задержек.
https://xn--80aeedb0bfzeok.xn--p1ai/catalog/latunnaia-vtulka/latunnaia-vtulka-137-mm-lts40mts3zh/
Возможность заказа висмута — достаточно редкое предложение на рынке
https://redmetsplav.ru/store/vismut/zarubezhnye-splavy-3/vismut-cac221c—jis-h-5121-2016/provoloka-vismutovaya-cac221c—jis-h-5121-2016/
Bu arada, eger sade salon dekorasyon konusuyla ilgileniyorsan?z, buray? inceleyin. Kendiniz gorun: https://evhobisi.com/articles/sade-salon-dekorasyonu-minimalizm/
ООО «РМС» обеспечивает поставки специализированных сварочных материалов для сложных условий эксплуатации.
https://rms-ekb.ru/catalog/stalnoi-list/list-stalnoi-4kh600-mm-acroni-44xx-en-iso-18286/
Быстрая навигация через «Карту сайта» для поиска глубоких страниц
https://redmetsplav.ru/store/vismut/zarubezhnye-splavy-3/vismut-c89540—uns/folga-vismutovaya-c89540—uns/
Продукция находит применение в производстве электротехники благодаря наличию специализированной электротехнической стали.
https://rms-ekb.ru/catalog/krug-iz-instrumentalnoi-stali/krug-r18-4-5-gost-7417-75/
Этот обзор содержит информацию о передовых достижениях в области медицины. Мы разберем инновационные технологии, которые меняют подход к лечению и диагностике, а также их влияние на эффективность оказания медицинской помощи.
Изучить рекомендации специалистов – прокапаться от алкоголя
В этой публикации мы исследуем ключевые аспекты здоровья, включая влияние образа жизни на благополучие. Читатели узнают о важности правильного питания, физической активности и психического здоровья. Мы предоставим практические советы и рекомендации для поддержания здоровья и развития профилактических подходов.
Изучить эмпирические данные – вывести из запоя капельница
4espym
Логичное деление на вольфрамовый, молибденовый и титановый прокат
https://redmetsplav.ru/store/vismut/zarubezhnye-splavy-3/vismut-bi14a—eiaipc-j-std-006/truba-vismutovaya-bi14a—eiaipc-j-std-006/
Эта медицинская заметка содержит сжатую информацию о новых находках и методах в области здравоохранения. Мы предлагаем читателям свежие данные о заболеваниях, профилактике и лечении. Наша цель — быстро и доступно донести важную информацию, которая поможет в повседневной жизни и понимании здоровья.
Не упусти шанс – выведение из запоя на дому
В этом обзоре мы обсудим современные методы борьбы с зависимостями, включая медикаментозную терапию и психотерапию. Мы представим последние исследования и их результаты, чтобы читатели могли быть в курсе наиболее эффективных подходов к лечению и поддержке.
Дополнительно читайте здесь – клиника плюс тверь
Incredible points. Solid arguments. Keep up the good spirit.
Компания выступает важным звеном в цепочке снабжения предприятий машиностроения и оборонно-промышленного комплекса.
https://rms-ekb.ru/catalog/stalnoi-list/stalnoi-list-09kh16n4b-1-5x1400x1000-gost-19903-2006-gladkii-chernyi-goriachekatanyi/
Этот текст представляет собой обзор свежих данных и исследований в области медицины. Он призван помочь читателям понять, как научные достижения влияют на лечение, диагностику и общее состояние системы здравоохранения.
Эксклюзивная информация – капельница от запоя недорого
Очень широкий каталог, нашли всё необходимое в одном месте, включая редкие позиции.
https://xn--80aeedb0bfzeok.xn--p1ai/catalog/mednyi-perekhodnoi-troinik-press/mednyi-perekhodnoi-press-troinik-27-4kh15-mm-m1r-gost-r-52948-2008/
В этой публикации мы рассматриваем важную тему борьбы с зависимостями, включая алкогольную и наркотическую зависимости. Мы обсудим методы лечения, реабилитации и поддержку, которые могут помочь людям, столкнувшимся с этой проблемой. Читатели узнают о перспективах выздоровления и важности комплексного подхода.
Это ещё не всё… – наркологическая клиника в твери
В этой статье мы рассматриваем разрушительное влияние зависимости на жизнь человека. Обсуждаются аспекты, такие как здоровье, отношения и профессиональные достижения. Читатели узнают о необходимости обращения за помощью и о путях к восстановлению.
Жми сюда — получишь ответ – вывод из запоя стоимость
Публикация посвящена жизненным историям людей, успешно справившихся с зависимостью. Мы покажем, что выход есть, и он начинается с первого шага — принятия проблемы и желания измениться.
Читать полностью – вывести из запоя цена
I’m impressed, I musst say. Rrely doo I coome acroes a bloog that’s both edducative and interesting, and withoit
a doubt, yyou have hhit tthe naqil onn thhe head. Thhe probblem iss smething
whgich too feww peopole are speaking inelligently about. I aam very haappy
thhat I foud tthis inn myy hunt foor something rearding this.
Here iss myy wedbpage :: xmxxtube bokep
Наличие прецизионных сплавов в ассортименте подтверждает работу компании с высокоточными и наукоемкими материалами.
https://rms-ekb.ru/catalog/krug-iz-instrumentalnoi-stali/krug-ep788-17-8-gost-7417-75/
Отличное соотношение цены и качества на весь цветной металлопрокат, будем заказывать еще.
https://xn--80aeedb0bfzeok.xn--p1ai/catalog/latunnoe-litoe-koltso/latunnoe-litoe-koltso-40kh800-mm-lmtszh/
Этот обзор медицинских исследований собрал самое важное из последних публикаций в области медицины. Мы проанализировали ключевые находки и представили их в доступной форме, чтобы читатели могли легко ориентироваться в актуальных темах. Этот материал станет отличным подспорьем для изучения медицины.
Связаться за уточнением – вывод из запоя дешево
Мы рассмотрим современные вызовы здравоохранения и пути их решения с помощью технологий и научных исследований. В статье собраны данные о новых лекарствах, методах диагностики и системном подходе к улучшению здоровья населения.
Доступ к полной версии – вывод из запоя анонимно
В этой статье рассматриваются различные аспекты избавления от зависимости, включая физические и психологические методы. Мы обсудим поддержку, мотивацию и стратегии, которые помогут в процессе выздоровления. Читатели узнают, как преодолеть трудности и двигаться к новой жизни без зависимости.
Узнать больше > – вывести из запоя в стационаре
ООО «РМС» специализируется на поставках редких и тугоплавких металлов, таких как ниобий и вольфрам.
https://rms-ekb.ru/catalog/ugolok-stalnoi/ugolok-iz-konstruktsionnoi-stali-100kh65kh8-mm-10khgn1-din-1029/
Статья посвящена анализу текущих трендов в медицине и их влиянию на жизнь людей. Мы рассмотрим новые технологии, методы лечения и значение профилактики в обеспечении долголетия и здоровья.
Прочесть заключение эксперта – капельница на дому екатеринбург цены
Широкий выбор тугоплавких металлов, таких как вольфрам и молибден
https://redmetsplav.ru/store/vanadiy-i-ego-splavy/vanadiy-fev60—gost-27130-94/prutok-vanadievyy-fev60—gost-27130-94/
I’ve been surfing online more than 3 hours today, yet I never found any interesting article like yours. It is pretty worth enough for me. Personally, if all site owners and bloggers made good content as you did, the web will be much more useful than ever before.
В этой статье мы подробно рассматриваем проверенные методы борьбы с зависимостями, включая психотерапию, медикаментозное лечение и поддержку со стороны общества. Мы акцентируем внимание на важности комплексного подхода и возможности успешного восстановления для людей, столкнувшихся с этой проблемой.
Смотрите также – кодирование алкоголизма уколом
В этой статье мы говорим о важности поддержки в процессе выздоровления. Рассматриваются семьи, группы поддержки, специалисты и онлайн-ресурсы, которые могут сыграть решающую роль в избавлении от зависимости.
Более того — здесь – капельница на дому в екатеринбурге
Компания работает с изделиями из драгоценных и благородных металлов, что требует высокого уровня квалификации и ответственности.
https://rms-ekb.ru/catalog/list/list-u8a-55x1200x3000-gost-19903-74/
Эта статья освещает различные аспекты освобождения от зависимости и пути к выздоровлению. Мы обсуждаем важность осознания своей проблемы и обращения за помощью. Читатели получат практические советы о том, как преодолевать трудности и строить новую жизнь без зависимости.
Ознакомьтесь с аналитикой – закодированию от алкоголя
Четкая структура меню позволяет быстро найти нужный металл
https://redmetsplav.ru/store/titan/rossiyskie-splavy-4/titan-vt25u—ost-1-90013-81/lenta-titanovaya-vt25u—ost-1-90013-81/
Редметсплав — пример того, как должен работать современный поставщик металлургического сырья.
https://xn--80aeedb0bfzeok.xn--p1ai/catalog/latunnoe-litoe-koltso/latunnoe-litoe-koltso-250kh300-mm-lk1/
В этой статье мы рассмотрим современные достижения в области медицины, включая инновационные методы лечения и диагностики. Мы обсудим важность профилактики заболеваний и роль технологий в улучшении качества здравоохранения. Читатели узнают о влиянии медицины на повседневную жизнь и ее значение для современного общества.
Неизвестные факты о… – вызвать нарколога на дом воронеж
Поставка продукции возможна не только в промышленных, но и в малых лабораторных объемах для исследовательских целей.
https://rms-ekb.ru/catalog/ugolok-stalnoi/ugolok-stalnoi-10khsnd-180x110x10-gost-19771-93/
Раздел «Производство» подтверждает статус завода, а не просто перекупщика
https://redmetsplav.ru/store/titan/rossiyskie-splavy-4/titan-t32—gost-2171-90/truba-titanovaya-t32—gost-2171-90/
Этот документ охватывает важные аспекты медицинской науки, сосредотачиваясь на ключевых вопросах, касающихся здоровья населения. Мы рассматриваем свежие исследования, клинические рекомендации и лучшие практики, которые помогут улучшить качество лечения и профилактики заболеваний. Читатели получат возможность углубиться в различные медицинские дисциплины.
Изучить вопрос глубже – наркологическая помощь на дому
В этой заметке мы представляем шаги, которые помогут в процессе преодоления зависимостей. Рассматриваются стратегии поддержки и чек-листы для тех, кто хочет сделать первый шаг к выздоровлению. Наша цель — вдохновить читателей на положительные изменения и поддержать их в трудных моментах.
Получить профессиональную консультацию – наркологическая клиника
Этот информационный материал подробно освещает проблему наркозависимости, ее причины и последствия. Мы предлагаем информацию о методах лечения, профилактики и поддерживающих программах. Цель статьи — повысить осведомленность и продвигать идеи о необходимости борьбы с зависимостями.
Узнать больше – вывод из запоя цена на дому
В данной публикации мы поговорим о процессе восстановления от зависимости, о том, как вернуть себе нормальную жизнь. Мы обсудим преодоление трудностей, значимость поддержки и наличие программ реабилитации. Читатели смогут узнать о ключевых шагах к успешному восстановлению.
Более того — здесь – вывести из запоя тверь
В этой статье рассматривается комплексный подход к избавлению от зависимости. Читатель узнает, как сочетание физического, психологического и духовного восстановления помогает достичь стойкого выздоровления.
Ссылка на источник – нарколог на дом вызов
В каталоге представлены конденсаторные ниобиевые порошки высокой чистоты, необходимые для современной электроники.
https://rms-ekb.ru/catalog/stalnoi-list/stalnoi-list-14kh17n2-3-9x1800x1000-gost-19903-2006-gladkii-otsinkovannyi-goriachekatanyi/
Hi, all is going perfectly here and ofcourse every one is sharing facts, that’s really excellent, keep up writing.
Указание конкретных марок сплавов в разделах помогает специалистам
https://redmetsplav.ru/store/titan/rossiyskie-splavy-4/titan-erti-13/polosa-titanovaya-erti-13/
Публикация охватывает основные направления развития современной медицины. Мы обсудим значимость научных исследований, инноваций в лечении и роли общественного участия в формировании системы здравоохранения.
Что ещё? Расскажи всё! – Кодирование от алкоголизма уколом
ООО «РМС» поставляет вольфрамовые порошки, соответствующие строгим техническим условиям (например, ТУ 48-4205-112-2017).
https://rms-ekb.ru/catalog/stalnoi-list/list-stalnoi-1kh1250kh2500-mm-1-4521-en-iso-9444-1/
Сайт адаптирован под нужды машиностроительных заводов
https://redmetsplav.ru/store/titan/rossiyskie-splavy-4/titan-35bt—gost-10994-74/izdeliya-iz-titana-35bt—gost-10994-74/
Качество сварочных материалов на высоте, электроды варят отлично, состав металла стабильный.
https://xn--80aeedb0bfzeok.xn--p1ai/catalog/mednye-troiniki-press/mednyi-press-troinik-18-mm-m2m-gost-r-52948-2008/
В этой публикации мы обсуждаем современные методы лечения различных заболеваний. Читатели узнают о новых медикаментах, терапиях и исследованиях, которые активно применяются для лечения. Мы нацелены на то, чтобы предоставить практические знания, которые могут помочь в борьбе с недугами.
Заходи — там интересно – clinica plus
ООО «РМС» обеспечивает поставки специализированных сварочных материалов для сложных условий эксплуатации.
https://rms-ekb.ru/catalog/stalnoi-list/list-stalnoi-3kh1250kh2500-mm-1-4512-en-iso-9444-2/
Цены на спецстали одни из самых конкурентных на рынке, при этом качество на уровне мировых стандартов.
https://xn--80aeedb0bfzeok.xn--p1ai/catalog/latunnoe-litoe-koltso/latunnoe-litoe-koltso-90kh700-mm-lts23a6zh3mts2/
В этой публикации мы предложим ряд рекомендаций по избавлению от зависимостей и успешному восстановлению. Мы обсудим методы привлечения поддержки и важность самосознания. Эти советы помогут людям вернуться к нормальной жизни и стать на путь выздоровления.
Расширить кругозор по теме – вывести из запоя
Этот медицинский обзор сосредоточен на последних достижениях, которые оказывают влияние на пациентов и медицинскую практику. Мы разбираем инновационные методы лечения и исследований, акцентируя внимание на их значимости для общественного здоровья. Читатели узнают о свежих данных и их возможном применении.
Ознакомьтесь с аналитикой – капельницы чтобы выйти из запоя
Текст посвящён распространённым мифам о зависимости и их развенчанию. Мы предоставим научно обоснованную информацию и дадим рекомендации по выбору эффективного способа борьбы с зависимым поведением.
Детали по клику – нарколог на дом круглосуточно самара цены
Этот обзор посвящен успешным стратегиям избавления от зависимости, включая реальные примеры и советы. Мы разоблачим мифы и предоставим читателям достоверную информацию о различных подходах. Получите опыт многообразия методов и найдите подходящий способ для себя!
Ознакомьтесь с аналитикой – вывод из запоя анонимно
Awesome blog! Do you have any recommendations for aspiring writers? I’m planning to start my own website soon but I’m a little lost on everything. Would you propose starting with a free platform like WordPress or go for a paid option? There are so many options out there that I’m completely overwhelmed .. Any suggestions? Bless you!
Эта публикация раскрывает психологические механизмы зависимости и их роль в развитии расстройств. Читатель узнает о том, как психология влияет на формирование зависимостей и как профессиональная помощь может изменить ситуацию.
Прочесть всё о… – капельница на дому в екатеринбурге
Металлические порошки различных фракций позволяют клиентам использовать их в порошковой металлургии и напылении.
https://rms-ekb.ru/catalog/tiagi-dlia-opor/
Этот текст представляет собой обзор свежих данных и исследований в области медицины. Он призван помочь читателям понять, как научные достижения влияют на лечение, диагностику и общее состояние системы здравоохранения.
Лучшее решение — прямо здесь – кодирование от алкоголизма на дому
Редметсплав — надежный партнер, работаем по поставкам нержавеющего проката уже второй год, сбоев не было.
https://xn--80aeedb0bfzeok.xn--p1ai/catalog/mednye-otvody-press/mednyi-otvod-press-45-gradusov-28-mm-cu-dhp-gost-r-52948-2008/
География деятельности компании охватывает всю территорию России, обеспечивая металлом предприятия в удаленных регионах.
https://rms-ekb.ru/catalog/stalnoi-list/stalnoi-list-stal-20-90x1500x1000-gost-r-52146-2003-polimernyi-neotsinkovannyi-kholodnokatanyi/
Широкий выбор тугоплавких металлов, таких как вольфрам и молибден
https://redmetsplav.ru/store/molibden-i-ego-splavy/molibden-nimo-25-3/folga-molibdenovaya-nimo-25-1/
Офис в Екатеринбурге работает четко, забирали самовывозом — складская логистика на высоте.
https://xn--80aeedb0bfzeok.xn--p1ai/catalog/latunnoe-litoe-koltso/latunnoe-litoe-koltso-600kh600-mm-ls59-1/
В данном материале представлены ключевые тенденции в сфере медицинской науки и практики. Вы узнаете о последних открытиях, инновационных подходах к терапии и важности профилактики заболеваний. Особое внимание уделено практическому применению новых методов в клинической практике.
Изучите внимательнее – нарколог вывод из запоя
Наличие кобальтовых сплавов заинтересует авиастроение
https://redmetsplav.ru/store/molibden-i-ego-splavy/molibden-m-mp-2/pokovka-molibdenovaya-m-mp/
Гибкая система оплаты и прозрачные условия договора, никаких скрытых наценок или задержек.
https://xn--80aeedb0bfzeok.xn--p1ai/catalog/mednye-dvukhrastrubnye-mufty-press/mednaia-dvukhrastrubnaia-press-mufta-27-4-mm-m3m-gost-r-52948-2008/
This blog was… how do I say it? Relevant!! Finally I have found something which helped me. Appreciate it!
Наличие прецизионных сплавов в ассортименте подтверждает работу компании с высокоточными и наукоемкими материалами.
https://rms-ekb.ru/catalog/ugolok-stalnoi/ugolok-iz-konstruktsionnoi-stali-100kh65kh8-mm-c60-en-10277/
Покупали изделия из драгметаллов для лаборатории, всё соответствует заявленным характеристикам.
https://xn--80aeedb0bfzeok.xn--p1ai/catalog/latunnaia-vtulka/latunnaia-vtulka-95-mm-l63/
Публикация посвящена жизненным историям людей, успешно справившихся с зависимостью. Мы покажем, что выход есть, и он начинается с первого шага — принятия проблемы и желания измениться.
Где можно узнать подробнее? – вывод из запоя
here’s the way I look at it.Here’s this chap come to the throne after his old mother keeping himout of it till the man was grey.フィギュア オナホ
Сайт работает стабильно и быстро загружается
https://redmetsplav.ru/store/magniy-i-ego-splavy/zarubezhnye-splavy-2/magniy-sismg4635-10—ss-144635/provoloka-magnievaya-sismg4635-10—ss-144635/
Компания предлагает не только металлы, но и химическую продукцию, используемую в смежных металлургических процессах.
https://rms-ekb.ru/catalog/plity/plita-kh12vm-22x320x125-gost-19903-74/
Порадовало наличие вольфрамовых прутков редких диаметров, менеджер оперативно помог с подбором.
https://xn--80aeedb0bfzeok.xn--p1ai/catalog/krug-monel/krug-monel-25-mm-nmzhmts28-2-5-1-5/
В этой статье мы обсудим процесс восстановления после зависимостей, акцентируя внимание на различных методах и подходах к реабилитации. Читатели узнают, как создать план выздоровления и использовать полезные ресурсы для достижения устойчивых изменений.
Не пропусти важное – нарколог домой
Компания работает с изделиями из драгоценных и благородных металлов, что требует высокого уровня квалификации и ответственности.
https://rms-ekb.ru/catalog/ugolok-stalnoi/ugolok-stalnoi-aisi-409-160x100x14-gost-19771-93/
Для тех, кто ищет информацию по теме “Последние новости и события Оренбургской области”, там просто кладезь информации.
Вот, делюсь ссылкой:
https://56media.ru
I like the valuable information you provide in your articles. I will bookmark your blog and check again here regularly. I’m quite sure I’ll learn many new stuff right here! Best of luck for the next!
Долго искали надежного поставщика циркония, в Редметсплав предложили лучшие условия и чистоту металла.
https://xn--80aeedb0bfzeok.xn--p1ai/catalog/lenta-latunnaia-1/lenta-latunnaia-0-5-mm-l63m-1/
Раздел «Производство» подтверждает статус завода, а не просто перекупщика
https://redmetsplav.ru/store/magniy-i-ego-splavy/zarubezhnye-splavy-2/magniy-mg-c43-t5/polosa-magnievaya-mg-c43-t5/
Прозрачное оформление документов и быстрое выставление счетов, приятно работать с профессионалами.
https://xn--80aeedb0bfzeok.xn--p1ai/catalog/mednye-zaglushki-pod-paiku/mednaia-zaglushka-kolpachok-pod-paiku-106kh92kh2-1-mm-47-5kh51-5-mm-tverdaia-paika-m1r-gost-32590-2013/
Важным преимуществом является возможность изготовления деталей и изделий по индивидуальным чертежам заказчика.
https://rms-ekb.ru/catalog/chugunnaia-chushka/
Спасибо команде за профессионализм и помощь в реализации нашего сложного промышленного проекта!
https://xn--80aeedb0bfzeok.xn--p1ai/catalog/latunnaia-polosa/latunnaia-polosa-1-5×500-mm-l68-gost-931-90/
Поставки жаропрочных сплавов ориентированы на потребности авиационной и энергетической отраслей.
https://rms-ekb.ru/catalog/stalnoi-list/stalnoi-list-khn75mbtiu-2-5x1600x1100-gost-24982-81-zharoprochnyi-kholodnokatanyi/
Great article. I am going through a few of these issues as well..
Профессиональный подход менеджеров в Екатеринбурге, грамотно проконсультировали по техническим характеристикам сплавов.
https://xn--80aeedb0bfzeok.xn--p1ai/catalog/mednoe-dvukhrastrubnoe-koleno-pod-paiku/mednoe-dvukhrastrubnoe-koleno-pod-paiku-180-gradusov-35kh29kh1-mm-10kh12-mm-tverdaia-paika-m2-gost-r-52922-2008/
Упоминание нефтегазовой отрасли как ключевого потребителя
https://redmetsplav.ru/store/magniy-i-ego-splavy/zarubezhnye-splavy-2/magniy-mag-3—bs-2970-1/lenta-magnievaya-mag-3—bs-2970-1/
Технические специалисты компании помогли выбрать оптимальный сплав для работы в агрессивных средах.
https://xn--80aeedb0bfzeok.xn--p1ai/catalog/latunnaia-polosa/latunnaia-polosa-1-5×350-mm-l80-gost-931-90/
Ориентация на долгосрочные отношения с клиентами позволяет компании формировать индивидуальные условия оплаты и графики поставок.
https://rms-ekb.ru/catalog/stalnoi-list/list-stalnoi-90kh1300-mm-acroni-4948-en-iso-18286/
Благодарим за оперативную поставку ниобиевых труб, выручили в очень сжатые сроки.
https://xn--80aeedb0bfzeok.xn--p1ai/catalog/mednoe-dvukhrastrubnoe-koleno-pod-paiku/mednoe-dvukhrastrubnoe-koleno-pod-paiku-180-gradusov-42kh36kh1-1-mm-27kh29-mm-tverdaia-paika-m3rt-gost-32590-2013/
Сайт поддерживает английскую версию, что важно для экспорта
https://redmetsplav.ru/store/magniy-i-ego-splavy/zarubezhnye-splavy-2/magniy-m16510—uns/list-magnievyy-m16510—uns/
This is my first time pay a visit at here and i am genuinely pleassant to read all at alone place.
Спецстали для машиностроения закупаем только здесь, надежность материала подтверждена испытаниями.
https://xn--80aeedb0bfzeok.xn--p1ai/catalog/latunnaia-polosa/latunnaia-polosa-1-5×250-mm-l90-gost-931-90/
Наличие калькулятора металлопроката упрощает расчет веса и стоимости
https://redmetsplav.ru/store/magniy-i-ego-splavy/zarubezhnye-splavy-2/magniy-m11919—uns/truba-magnievaya-m11919—uns/
Ориентация на долгосрочные отношения с клиентами позволяет компании формировать индивидуальные условия оплаты и графики поставок.
https://rms-ekb.ru/catalog/ugolok-stalnoi/ugolok-iz-konstruktsionnoi-stali-150kh100kh10-mm-10khgn1-din-59370/
В этой статье мы обсудим процесс восстановления после зависимостей, акцентируя внимание на различных методах и подходах к реабилитации. Читатели узнают, как создать план выздоровления и использовать полезные ресурсы для достижения устойчивых изменений.
Расширить кругозор по теме – кодировании sit
Заказывали партию молибденовых листов для производства, качество металла идеальное, все сертификаты в наличии.
https://xn--80aeedb0bfzeok.xn--p1ai/catalog/mednyi-perekhodnoi-troinik-press/mednyi-perekhodnoi-press-troinik-88-9kh42-mm-m3m-gost-r-52948-2008/
Наличие на складе редких металлов, таких как цирконий, выделяет компанию на фоне конкурентов, торгующих только массовым прокатом.
https://rms-ekb.ru/catalog/plity/plita-75khmf-29x125x630-gost-19903-74/
Редкие и тугоплавкие металлы всегда в наличии или под заказ в короткие сроки, рекомендую.
https://xn--80aeedb0bfzeok.xn--p1ai/catalog/latunnaia-polosa/latunnaia-polosa-3-5×100-mm-l80-gost-931-90/
Описание складских позиций сокращает время ожидания ответа
https://redmetsplav.ru/store/magniy-i-ego-splavy/zarubezhnye-splavy-2/magniy-iso-mgal4si—iso-16220-1/provoloka-magnievaya-iso-mgal4si—iso-16220-1/
I wanted to thank you for this very good read!! I absolutely enjoyed every bit of it. I’ve got you book-marked to look at new things you post…
Закупали шлак ферросилиция для строительных нужд, материал качественный, без лишних примесей.
https://xn--80aeedb0bfzeok.xn--p1ai/catalog/mednye-troiniki-press/mednyi-press-troinik-40-mm-m3-gost-r-52948-2008/
Технические характеристики сплавов помогают инженерам в подборе
https://redmetsplav.ru/store/magniy-i-ego-splavy/zarubezhnye-splavy-2/magniy-iso-mb21230—bs-iso-16220/prutok-magnievyy-iso-mb21230—bs-iso-16220/
Продукция находит применение в производстве электротехники благодаря наличию специализированной электротехнической стали.
https://rms-ekb.ru/catalog/list/list-60kh2smf-2x500x500-gost-19903-74/
В этом обзоре представлены различные методы избавления от зависимости, включая терапевтические и психологические подходы. Мы сравниваем их эффективность и предоставляем рекомендации для тех, кто хочет вернуться к трезвой жизни. Читатели смогут найти информацию о реабилитационных центрах и поддерживающих группах.
Выяснить больше – наркологическая платная клиника
Надежная защита груза при транспортировке, даже длинномерные изделия доходят без повреждений.
https://xn--80aeedb0bfzeok.xn--p1ai/catalog/dvutavr-aliuminievyi/aliuminievyi-dvutavr-d19ch-2x4x35-6-gost-13621-90/
Сайт выглядит профессионально и лаконично, без лишней рекламы
https://redmetsplav.ru/store/magniy-i-ego-splavy/zarubezhnye-splavy-2/magniy-g-z5zr/poroshok-magnievyy-g-z5zr/
Наличие никелевых сплавов гарантирует высокую коррозийную стойкость оборудования, создаваемого заказчиками.
https://rms-ekb.ru/catalog/krug-iz-instrumentalnoi-stali/krug-11khf-4-9-gost-7417-75/
Reliable shuttle College Station to Bush Airport offers dependable airport transportation for business trips, vacations, and group travel. Our College Station to Bush Airport taxi service includes affordable pricing, reliable schedules, and comfortable airport transportation services.
Офис в Екатеринбурге работает четко, забирали самовывозом — складская логистика на высоте.
https://xn--80aeedb0bfzeok.xn--p1ai/catalog/provoloka-aliumel/provoloka-aliumel-0-5-mm-nmtsak2-2-1-tu-48-21-172-72/
Указание конкретных марок сплавов в разделах помогает специалистам
https://redmetsplav.ru/store/magniy-i-ego-splavy/zarubezhnye-splavy-2/magniy-gd-mgal6—din-1729-part-2/krug-magnievyy-gd-mgal6—din-1729-part-2/
Экспертная консультация при выборе сплавов помогает клиентам оптимизировать затраты и избежать технологических ошибок.
https://rms-ekb.ru/catalog/stalnoi-list/stalnoi-list-65kh13-42x1550x1900-gost-19903-2006-gladkii-neotsinkovannyi-goriachekatanyi/
This piece of writing gives clear idea in support of the new people of blogging, that actually how to do running a blog.
Быстрая доставка в регионы через «Деловые Линии», груз пришел в целости и отлично упакованным.
https://xn--80aeedb0bfzeok.xn--p1ai/catalog/mednye-dvukhrastrubnye-mufty-pod-paiku/mednaiadvukhrastrubnaiamufta-pod-paiku21kh1-4mmm2gost-32590-2013/
Наличие редких позиций, например, изделий из гафния и ванадия
https://redmetsplav.ru/store/magniy-i-ego-splavy/zarubezhnye-splavy-2/magniy-ez33a—astm-b403/pokovka-magnievaya-ez33a—astm-b403/
ООО «РМС» поставляет вольфрамовые порошки, соответствующие строгим техническим условиям (например, ТУ 48-4205-112-2017).
https://rms-ekb.ru/catalog/ugolok-stalnoi/ugolok-iz-konstruktsionnoi-stali-70kh50kh6-mm-16nicr4-uni-6762/
Очень широкий каталог, нашли всё необходимое в одном месте, включая редкие позиции.
https://xn--80aeedb0bfzeok.xn--p1ai/catalog/melkhiorovaia-truba/melkhiorovaia-truba-38kh3kh6000-mm-mnzhmts10-1-1-gost-10092-2006/
Информация о времени работы (10:00–18:00) помогает планировать звонки
https://redmetsplav.ru/store/magniy-i-ego-splavy/zarubezhnye-splavy-2/magniy-coralloy-zirconium-702—kind–co–edelstahlwerk-kg/poroshok-magnievyy-coralloy-zirconium-702—kind–co–edelsta/
Компания предлагает не только металлы, но и химическую продукцию, используемую в смежных металлургических процессах.
https://rms-ekb.ru/catalog/stalnoi-list/list-stalnoi-5kh700-mm-acroni-4462-en-iso-18286/
Редкие и тугоплавкие металлы всегда в наличии или под заказ в короткие сроки, рекомендую.
https://xn--80aeedb0bfzeok.xn--p1ai/catalog/mednye-krestoviny-pod-paiku/mednaia-krestovina-pod-paiku-22kh18kh0-9-mm-8kh10-mm-tverdaia-paika-m1e-gost-r-52922-2008/
Указание конкретных марок сплавов в разделах помогает специалистам
https://redmetsplav.ru/store/magniy-i-ego-splavy/zarubezhnye-splavy-2/magniy-az92a—mil-r-6944b/list-magnievyy-az92a—mil-r-6944b/
География деятельности компании охватывает всю территорию России, обеспечивая металлом предприятия в удаленных регионах.
https://rms-ekb.ru/catalog/truba-konstruktsionnaia/truba-konstruktsionnaia-9kh1-51×11-gost-21729-76/
В этой статье обсуждаются актуальные медицинские вопросы, которые волнуют общество. Мы обращаем внимание на проблемы, касающиеся здравоохранения и лечения, а также на новшества в области медицины. Читатели будут осведомлены о последних событиях и смогут следить за тенденциями в медицине.
Узнать больше – наркологическая клиника в твери
This is a great tip particularly to those new to the blogosphere. Brief but very accurate information… Appreciate your sharing this one. A must read post!
Эта доказательная статья представляет собой глубокое погружение в успехи и вызовы лечения зависимостей. Мы обращаемся к научным исследованиям и опыту специалистов, чтобы предоставить читателям надежные данные об эффективности различных методик. Изучите, что работает лучше всего, и получите информацию от экспертов.
Не упусти важное! – клиника плюс тверь
В этой публикации мы рассматриваем важную тему борьбы с зависимостями, включая алкогольную и наркотическую зависимости. Мы обсудим методы лечения, реабилитации и поддержку, которые могут помочь людям, столкнувшимся с этой проблемой. Читатели узнают о перспективах выздоровления и важности комплексного подхода.
Ссылка на источник – клиника плюс
Благодарим за оперативную поставку ниобиевых труб, выручили в очень сжатые сроки.
https://xn--80aeedb0bfzeok.xn--p1ai/catalog/latunnye-naruzhnye-stopornye-koltsa-po-gost/latunoe-naruzhnoe-stopornoe-pruzhinnoe-koltso-95kh3-mm-lk-gost-13942-86/
Информация о доставке по всей РФ делает компанию универсальным поставщиком
https://redmetsplav.ru/store/magniy-i-ego-splavy/zarubezhnye-splavy-2/magniy-az61—csa-hg-5/provoloka-magnievaya-az61—csa-hg-5/
Широкий выбор нержавеющей стали различных марок позволяет использовать продукцию в строительстве и пищевой промышленности.
https://rms-ekb.ru/catalog/ugolok-stalnoi/ugolok-stalnoi-st3sp-200x200x12-gost-8509-93/
Спецстали для машиностроения закупаем только здесь, надежность материала подтверждена испытаниями.
https://xn--80aeedb0bfzeok.xn--p1ai/catalog/dvutavr-aliuminievyi/aliuminievyi-dvutavr-ak4-13x63x40-gost-13621-90/
Поковки и штабики — важные заготовки для металлургических предприятий
https://redmetsplav.ru/store/magniy-i-ego-splavy/zarubezhnye-splavy-2/magniy-as41a—sae-j465/provoloka-magnievaya-as41a—sae-j465/
Компания обеспечивает поставки оксовольфрамата гафния — редкого соединения для специфических нужд химической и атомной промышленности.
https://rms-ekb.ru/catalog/krug-iz-instrumentalnoi-stali/krug-11kh-7-gost-5950-2000/
Медицинская публикация представляет собой свод актуальных исследований, экспертных мнений и новейших достижений в сфере здравоохранения. Здесь вы найдете информацию о новых методах лечения, прорывных технологиях и их практическом применении. Мы стремимся сделать актуальные медицинские исследования доступными и понятными для широкой аудитории.
Прочесть заключение эксперта – клиника плюс тверь
Покупали изделия из драгметаллов для лаборатории, всё соответствует заявленным характеристикам.
https://xn--80aeedb0bfzeok.xn--p1ai/catalog/latunnye-naruzhnye-stopornye-koltsa-po-din/latunoe-naruzhnoe-stopornoe-pruzhinnoe-koltso-m15-13-8kh1-mm-l63-din-471/
Фольга из редких металлов часто требуется для высокотехнологичных лабораторий
https://redmetsplav.ru/store/magniy-i-ego-splavy/zarubezhnye-splavy-2/magniy-am50a—astm-b93/truba-magnievaya-am50a—astm-b93/
Ассортимент компании включает более 100 000 позиций, что позволяет закрыть практически любые потребности металлургического производства.
https://rms-ekb.ru/catalog/ugolok-stalnoi/ugolok-iz-konstruktsionnoi-stali-150kh90kh12-mm-34crnimo6-en-10056-2/
You made some really good points there. I checked on the web to learn more about the issue and found most people will go along with your views on this web site.
Заказывали партию молибденовых листов для производства, качество металла идеальное, все сертификаты в наличии.
https://xn--80aeedb0bfzeok.xn--p1ai/catalog/dvutavr-aliuminievyi/aliuminievyi-dvutavr-amg3-1-5x30x20-gost-13621-90/
Сайт адаптирован под нужды машиностроительных заводов
https://redmetsplav.ru/store/magniy-i-ego-splavy/zarubezhnye-splavy-2/magniy-9980b—astm-b275/polosa-magnievaya-9980b—astm-b275/
В этой публикации мы исследуем ключевые аспекты здоровья, включая влияние образа жизни на благополучие. Читатели узнают о важности правильного питания, физической активности и психического здоровья. Мы предоставим практические советы и рекомендации для поддержания здоровья и развития профилактических подходов.
Доступ к полной версии – клиника плюс
Компания работает с изделиями из драгоценных и благородных металлов, что требует высокого уровня квалификации и ответственности.
https://rms-ekb.ru/catalog/list/list-3kh2n2mvf-3x1000x1500-gost-19903-74/
Продажа проволоки из тугоплавких металлов востребована в электронике
https://redmetsplav.ru/store/magniy-i-ego-splavy/zarubezhnye-splavy-2/magniy-3-5101—din-1729-part-2/lenta-magnievaya-3-5101—din-1729-part-2/
Компания выступает важным звеном в цепочке снабжения предприятий машиностроения и оборонно-промышленного комплекса.
https://rms-ekb.ru/catalog/krug-iz-instrumentalnoi-stali/krug-di37-41-gost-7417-75/
Широкий выбор тугоплавких металлов, таких как вольфрам и молибден
https://redmetsplav.ru/store/magniy-i-ego-splavy/rossiyskie-splavy-1/magniy-mg98—gost-804-93/prutok-magnievyy-mg98—gost-804-93/
Ассортимент компании включает более 100 000 позиций, что позволяет закрыть практически любые потребности металлургического производства.
https://rms-ekb.ru/catalog/stalnoi-list/stalnoi-list-40khn2ma-36x1100x1600-gost-19903-2006-gladkii-otsinkovannyi-goriachekatanyi/
I have read so many articles regarding the blogger lovers however this post is truly a pleasant post, keep it up.
Высокая квалификация персонала, знают специфику редких металлов и особенности их применения.
https://xn--80aeedb0bfzeok.xn--p1ai/catalog/melkhiorovaia-truba/melkhiorovaia-truba-22kh3kh11000-mm-mnzhmts30-1-1-gost-10092-2006/
Представлен полный цикл изделий: от фольги и проволоки до крупных поковок
https://redmetsplav.ru/store/magniy-i-ego-splavy/rossiyskie-splavy-1/magniy-l3—tu-1714-002-00545484-99/lenta-magnievaya-l3—tu-1714-002-00545484-99/
Продукция находит применение в производстве электротехники благодаря наличию специализированной электротехнической стали.
https://rms-ekb.ru/catalog/ugolok-stalnoi/ugolok-iz-konstruktsionnoi-stali-80kh60kh7-mm-e335gc-en-10277/
В этой публикации мы рассматриваем важную тему борьбы с зависимостями, включая алкогольную и наркотическую зависимости. Мы обсудим методы лечения, реабилитации и поддержку, которые могут помочь людям, столкнувшимся с этой проблемой. Читатели узнают о перспективах выздоровления и важности комплексного подхода.
Смотри, что ещё есть – clinica plus
yarat?c? fikirler abajur sapkas? yap?m? hakk?ndaki makaleyi tavsiye ederim. Iste link: https://evhobisi.com/articles/koctas-abajur-sapkasi-tasarim-uygulama/
Качество сварочных материалов на высоте, электроды варят отлично, состав металла стабильный.
https://xn--80aeedb0bfzeok.xn--p1ai/catalog/dvutavr-aliuminievyi/aliuminievyi-dvutavr-amts-4x40x40-gost-13621-90/
Каждая партия товара сопровождается сертификатами качества, подтверждающими соответствие ГОСТ и ТУ.
https://rms-ekb.ru/catalog/stalnoi-list/stalnoi-list-stal-35-100x1200x1250-gost-r-52146-2003-polimernyi-otsinkovannyi-kholodnokatanyi/
Высокий уровень сервиса и контроля качества, для нашего научного проекта это было критически важно.
https://xn--80aeedb0bfzeok.xn--p1ai/catalog/melkhiorovaia-truba/melkhiorovaia-truba-17kh0-8kh4000-mm-mnzhmts30-1-1-gost-10092-2006/
Компания обеспечивает поставки оксовольфрамата гафния — редкого соединения для специфических нужд химической и атомной промышленности.
https://rms-ekb.ru/catalog/truba-konstruktsionnaia/truba-konstruktsionnaia-12kh18n10t-159×10-gost-21729-76/
В этой публикации мы рассматриваем важную тему борьбы с зависимостями, включая алкогольную и наркотическую зависимости. Мы обсудим методы лечения, реабилитации и поддержку, которые могут помочь людям, столкнувшимся с этой проблемой. Читатели узнают о перспективах выздоровления и важности комплексного подхода.
Узнайте всю правду – Кодирование от алкоголизма в Твери
Write more, thats all I have to say. Literally, it seems as though you relied on the video to make your point. You clearly know what youre talking about, why waste your intelligence on just posting videos to your site when you could be giving us something enlightening to read?
Представлены технически сложные сплавы ниобия и тантала
https://redmetsplav.ru/store/kobalt/rossiyskie-splavy-3/kobalt-yundk40t8aa/provoloka-kobaltovaya-yundk40t8aa/
Behind them the moon was risingout of the sea that grew all radiant and transfigured in her light.Every little cove along the curving road was a marvel of dancingripples.エロオナホ
Ассортимент компании включает более 100 000 позиций, что позволяет закрыть практически любые потребности металлургического производства.
https://rms-ekb.ru/catalog/ugolok-stalnoi/ugolok-stalnoi-stal-3-45x45x6-gost-8509-93/
Указание конкретных марок сплавов в разделах помогает специалистам
https://redmetsplav.ru/store/kobalt/rossiyskie-splavy-3/kobalt-hn33kvyu—gost-5632-14/lenta-kobaltovaya-hn33kvyu—gost-5632-14/
Технические специалисты компании помогли выбрать оптимальный сплав для работы в агрессивных средах.
https://xn--80aeedb0bfzeok.xn--p1ai/catalog/melkhiorovaia-truba/melkhiorovaia-truba-23kh1-5kh13000-mm-mnzhmts10-1-1-gost-10092-2006/
Оперативная логистика и поддержка на всех этапах сделки позволяют минимизировать сроки простоя производственных линий заказчиков.
https://rms-ekb.ru/catalog/krug-iz-instrumentalnoi-stali/krug-r6m5k5-130-gost-2590-2006/
em a week.?“Shucks,コスプレ エロ い
Информация о времени работы (10:00–18:00) помогает планировать звонки
https://redmetsplav.ru/store/kobalt/rossiyskie-splavy-3/kobalt-ek20-1/krug-kobaltovyy-ek20-1/
Этот текст представляет собой обзор свежих данных и исследований в области медицины. Он призван помочь читателям понять, как научные достижения влияют на лечение, диагностику и общее состояние системы здравоохранения.
Подробнее тут – наркологическая клиника в твери
Наличие прецизионных сплавов в ассортименте подтверждает работу компании с высокоточными и наукоемкими материалами.
https://rms-ekb.ru/catalog/ugolok-stalnoi/ugolok-iz-konstruktsionnoi-stali-90kh90kh9-mm-st52-3n-en-10056-2/
Гибкая система оплаты и прозрачные условия договора, никаких скрытых наценок или задержек.
https://xn--80aeedb0bfzeok.xn--p1ai/catalog/melkhiorovaia-truba/melkhiorovaia-truba-10kh1-5kh6000-mm-mnzhmts10-1-1-gost-10092-2006/
Wonderful beat ! I would like to apprentice while you amend your website, how could i subscribe for a blog website? The account helped me a acceptable deal. I had been a little bit acquainted of this your broadcast provided bright clear idea
Реализация твердых сплавов типа «Победит» ориентирована на производителей металлорежущего и бурового инструмента.
https://rms-ekb.ru/catalog/list/list-u9a-2x1000x1500-gost-19903-74/
Раздел «Производство» подтверждает статус завода, а не просто перекупщика
https://redmetsplav.ru/store/volfram/splavy-volframa-1/volfram-wl20-1/pokovka-volframovaya-wl20/
Поставки жаропрочных сплавов ориентированы на потребности авиационной и энергетической отраслей.
https://rms-ekb.ru/catalog/krug-iz-instrumentalnoi-stali/krug-4kh5mf1s-5-8-gost-7417-75/
Этот медицинский обзор сосредоточен на последних достижениях, которые оказывают влияние на пациентов и медицинскую практику. Мы разбираем инновационные методы лечения и исследований, акцентируя внимание на их значимости для общественного здоровья. Читатели узнают о свежих данных и их возможном применении.
Что ещё? Расскажи всё! – цены вывод из запоя
Никелевые сплавы — основа для жаропрочных конструкций
https://redmetsplav.ru/store/volfram/splavy-volframa-1/volfram-vnzh-3-2/provoloka-volframovaya-vnzh-3-2/
Высокая квалификация персонала, знают специфику редких металлов и особенности их применения.
https://xn--80aeedb0bfzeok.xn--p1ai/catalog/melkhiorovaia-truba/melkhiorovaia-truba-76kh2-5kh7000-mm-mnzhmts10-06-06-gost-10092-2006/
В этой публикации мы обсуждаем современные методы лечения различных заболеваний. Читатели узнают о новых медикаментах, терапиях и исследованиях, которые активно применяются для лечения. Мы нацелены на то, чтобы предоставить практические знания, которые могут помочь в борьбе с недугами.
Провести детальное исследование – стационарное выведение из запоя
Металлические порошки различных фракций позволяют клиентам использовать их в порошковой металлургии и напылении.
https://rms-ekb.ru/catalog/stalnoi-list/stalnoi-list-65kh13-42x1700x1550-gost-19903-2006-gladkii-belyi-goriachekatanyi/
Публикация посвящена жизненным историям людей, успешно справившихся с зависимостью. Мы покажем, что выход есть, и он начинается с первого шага — принятия проблемы и желания измениться.
Это ещё не всё… – клиника плюс тверь
Этот информационный материал подробно освещает проблему наркозависимости, ее причины и последствия. Мы предлагаем информацию о методах лечения, профилактики и поддерживающих программах. Цель статьи — повысить осведомленность и продвигать идеи о необходимости борьбы с зависимостями.
Смотри, что ещё есть – наркология вывод из запоя в стационаре
?“Don,コスプレ エッチt do it! ?said Crunches looking abou as if he rather expectedto see the loaf disappear under the efficacy of s petitions.
Информация об обработке IP-адреса для определения региона — современный подход
https://redmetsplav.ru/store/volfram/splavy-volframa-1/volfram-va-pk-1/prutok-volframovyy-va-pk/
Редметсплав — надежный партнер, работаем по поставкам нержавеющего проката уже второй год, сбоев не было.
https://xn--80aeedb0bfzeok.xn--p1ai/catalog/mednye-dvukhrastrubnye-mufty-pod-paiku/mednaiadvukhrastrubnaia-podvizhnaiamufta-pod-paiku35kh1-8mmm3gost-32590-2013/
Hey there this is kind of of off topic but I was wanting to know if blogs use WYSIWYG editors or if you have to manually code with HTML. I’m starting a blog soon but have no coding know-how so I wanted to get guidance from someone with experience. Any help would be enormously appreciated!
Поставка продукции возможна не только в промышленных, но и в малых лабораторных объемах для исследовательских целей.
https://rms-ekb.ru/catalog/kadmii-azotnokislyi/
Поковки и штабики — важные заготовки для металлургических предприятий
https://redmetsplav.ru/store/vismut/zarubezhnye-splavy-3/vismut-s-sn60pb38bi2—en-29453/pokovka-vismutovaya-s-sn60pb38bi2—en-29453/
Порадовало наличие вольфрамовых прутков редких диаметров, менеджер оперативно помог с подбором.
https://xn--80aeedb0bfzeok.xn--p1ai/catalog/magnievyi-prutok/magnievyi-prutok-190-mm-ma8-gost-18351-73/
Наличие никелевых сплавов гарантирует высокую коррозийную стойкость оборудования, создаваемого заказчиками.
https://rms-ekb.ru/catalog/stalnoi-list/list-stalnoi-12kh1000kh4000-mm-1-4307-en-iso-9444-1/
Удобное разделение продукции на сплавы и конкретные виды проката
https://redmetsplav.ru/store/vismut/zarubezhnye-splavy-3/vismut-l54840—uns/poroshok-vismutovyy-l54840—uns/
Гибкая система оплаты и прозрачные условия договора, никаких скрытых наценок или задержек.
https://xn--80aeedb0bfzeok.xn--p1ai/catalog/mednye-dvukhrastrubnye-mufty-pod-paiku/mednaiadvukhrastrubnaia-podvizhnaiamufta-pod-paiku53-6kh1-9mmm3rmgost-r-52922-2008/
Компания обеспечивает поставки оксовольфрамата гафния — редкого соединения для специфических нужд химической и атомной промышленности.
https://rms-ekb.ru/catalog/stalnoi-list/list-stalnoi-8kh1000-mm-acroni-4435-en-iso-18286/
В статье рассматриваются различные стратегии борьбы с зависимостями, включая проверенные методы и реальные истории успеха. Читатель узнает, какие подходы наиболее эффективны и как начать путь к выздоровлению.
Не пропусти важное – вывод из запоя на дому недорого
Эта публикация обращает внимание на важность профилактики зависимостей. Мы обсудим, как осведомленность и образование могут помочь в предотвращении возникновения зависимости. Читатели смогут ознакомиться с полезными советами и ресурсами, которые способствуют здоровому образу жизни.
Подробнее тут – нарколог на дом
Эта публикация исследует взаимосвязь зависимости и психологии. Мы обсудим, как психологические аспекты влияют на появление зависимостей и процесс выздоровления. Читатели смогут понять важность профессиональной поддержки и применения научных подходов в терапии.
Кликни, не пожалеешь – платная наркологическая помощь на дому
Алкогольный делирий проявляется в виде галлюцинаций, бреда и агрессии. При отсутствии контроля такие пациенты опасны для себя и окружающих, требуя немедленной госпитализации.
Получить дополнительную информацию – вывод из запоя клиника в челябинске
Лаконичное приветствие на главной странице сразу вводит в курс дела
https://redmetsplav.ru/store/vismut/zarubezhnye-splavy-3/vismut-cerrolow-136/lenta-vismutovaya-cerrolow-136/
Весь металл проходит строгий входной контроль, за всё время работы ни одного случая брака.
https://xn--80aeedb0bfzeok.xn--p1ai/catalog/tkanaia-latunnaia-setka/setka-tkanaia-latunnaia-0-125×0-08-l80/
Компания работает с изделиями из драгоценных и благородных металлов, что требует высокого уровня квалификации и ответственности.
https://rms-ekb.ru/catalog/ugolok-stalnoi/ugolok-stalnoi-15khsnd-220x220x14-gost-19771-93/
В этом исследовании рассмотрены методы лечения зависимостей и их эффективность. Мы проанализируем различные подходы, используемые в реабилитационных центрах, и представим данные о результативности программ. Читатели получат надежные и научно обоснованные сведения о данной проблеме.
А есть ли продолжение? – капельница от похмелья стоимость
В данной статье мы поговорим о будущем медицины, акцентируя внимание на прорывных разработках и их потенциале. Читатель узнает о новых подходах к лечению, роли искусственного интеллекта и возможностях персонализированной медицины.
Ознакомиться с деталями – круглосуточный вывод из запоя
В этой статье мы говорим о важности поддержки в процессе выздоровления. Рассматриваются семьи, группы поддержки, специалисты и онлайн-ресурсы, которые могут сыграть решающую роль в избавлении от зависимости.
Посмотреть подробности – выезд нарколога на дом цена
Hello everyone, it’s my first pay a quick visit at this web page, and piece of writing is actually fruitful for me, keep up posting these posts.
Сайт четко ориентирован на промышленный сектор и B2B сегмент
https://redmetsplav.ru/store/vismut/zarubezhnye-splavy-3/vismut-cac221c—jis-h-5121-2016/provoloka-vismutovaya-cac221c—jis-h-5121-2016/
Надежная защита груза при транспортировке, даже длинномерные изделия доходят без повреждений.
https://xn--80aeedb0bfzeok.xn--p1ai/catalog/mednye-dvukhrastrubnye-mufty-pod-paiku/mednaiadvukhrastrubnaiamufta-pod-paiku133kh4-2mmm3tgost-r-52922-2008/
Опыт работы с более чем 120 постоянными заказчиками свидетельствует о высокой стабильности и надежности поставок.
https://rms-ekb.ru/catalog/krug-iz-instrumentalnoi-stali/krug-ep761-28-55-gost-7417-75/
Эта публикация раскрывает психологические механизмы зависимости и их роль в развитии расстройств. Читатель узнает о том, как психология влияет на формирование зависимостей и как профессиональная помощь может изменить ситуацию.
Давай разберёмся досконально – вывод из похмелья капельница
Возможность изготовления деталей по чертежам заказчика — это большой плюс
https://redmetsplav.ru/store/vismut/zarubezhnye-splavy-3/vismut-c89550—cda/list-vismutovyy-c89550—cda/
Офис в Екатеринбурге работает четко, забирали самовывозом — складская логистика на высоте.
https://xn--80aeedb0bfzeok.xn--p1ai/catalog/latunnye-naruzhnye-stopornye-koltsa-po-gost/latunoe-naruzhnoe-stopornoe-pruzhinnoe-koltso-90kh3-mm-lts25s2-gost-13942-86/
Текст посвящён распространённым мифам о зависимости и их развенчанию. Мы предоставим научно обоснованную информацию и дадим рекомендации по выбору эффективного способа борьбы с зависимым поведением.
Только для своих – капельница от похмелья недорого
Поставки титана и его сплавов востребованы в медицине, авиации и химическом машиностроении.
https://rms-ekb.ru/catalog/ugolok-stalnoi/ugolok-stalnoi-15khsnd-180x180x20-gost-19771-93/
В этой статье рассматриваются различные аспекты избавления от зависимости, включая физические и психологические методы. Мы обсудим поддержку, мотивацию и стратегии, которые помогут в процессе выздоровления. Читатели узнают, как преодолеть трудности и двигаться к новой жизни без зависимости.
Посмотреть подробности – нарколог на дом вывод из запоя
Этот медицинский обзор сосредоточен на последних достижениях, которые оказывают влияние на пациентов и медицинскую практику. Мы разбираем инновационные методы лечения и исследований, акцентируя внимание на их значимости для общественного здоровья. Читатели узнают о свежих данных и их возможном применении.
Ознакомиться с теоретической базой – цены на вывод из запоя на дому
В этой статье мы обсудим процесс восстановления после зависимостей, акцентируя внимание на различных методах и подходах к реабилитации. Читатели узнают, как создать план выздоровления и использовать полезные ресурсы для достижения устойчивых изменений.
Ознакомиться с теоретической базой – нарколог на дом вывод из запоя на дому
В статье рассматриваются различные стратегии борьбы с зависимостями, включая проверенные методы и реальные истории успеха. Читатель узнает, какие подходы наиболее эффективны и как начать путь к выздоровлению.
Интересует подробная информация – нарколог вывод из запоя
Описание преимуществ компании подчеркивает надежность поставок
https://redmetsplav.ru/store/vismut/zarubezhnye-splavy-3/vismut-bi52a—en-61190-1-3/krug-vismutovyy-bi52a—en-61190-1-3/
Закупали шлак ферросилиция для строительных нужд, материал качественный, без лишних примесей.
https://xn--80aeedb0bfzeok.xn--p1ai/catalog/mednye-dvukhrastrubnye-mufty-pod-paiku/mednaiadvukhrastrubnaiamufta-pod-paiku88-9kh2-9mmm1tgost-32590-2013/
Ассортимент компании включает более 100 000 позиций, что позволяет закрыть практически любые потребности металлургического производства.
https://rms-ekb.ru/catalog/list/list-u8a-23x500x800-gost-19903-74/
Описание применения металлов в атомной энергетике подчеркивает качество
https://redmetsplav.ru/store/vismut/zarubezhnye-splavy-3/vismut-42-3982—csnstn-423982/list-vismutovyy-42-3982—csnstn-423982/
Обзор посвящён процессу восстановления после зависимостей. Мы расскажем о различных этапах реабилитации, поддерживающих ресурсах и важности мотивации в достижении устойчивого выздоровления.
Перейти к статье – цена вывода из запоя в стационаре
Индивидуальный подход к нестандартным заказам — изготовили детали по нашим чертежам точно в размер.
https://xn--80aeedb0bfzeok.xn--p1ai/catalog/latunnye-naruzhnye-stopornye-koltsa-po-gost/latunoe-naruzhnoe-stopornoe-pruzhinnoe-koltso-108kh3-mm-lts37mts2s2k-gost-13942-86/
Компания занимается реализацией ферросплавов, необходимых для качественного легирования сталей на литейных участках.
https://rms-ekb.ru/catalog/krug-iz-instrumentalnoi-stali/krug-3kh2n2mvf-85-gost-1133-71/
It’s not my first time to pay a quick visit this web site, i am visiting this web page dailly and get nice information from here daily.
Указан физический адрес в Екатеринбурге, что повышает доверие
https://redmetsplav.ru/store/vanadiy-i-ego-splavy/vanadiy-vnm99-99—tu-1761-043-2587982-2002/prutok-vanadievyy-vnm99-99—tu-1761-043-2587982-2002/
В этой статье мы обсудим процесс восстановления после зависимостей, акцентируя внимание на различных методах и подходах к реабилитации. Читатели узнают, как создать план выздоровления и использовать полезные ресурсы для достижения устойчивых изменений.
Ознакомиться с полной информацией – clinica plus
Закупали шлак ферросилиция для строительных нужд, материал качественный, без лишних примесей.
https://xn--80aeedb0bfzeok.xn--p1ai/catalog/mednye-dvukhrastrubnye-mufty-pod-paiku/mednaiadvukhrastrubnaiamufta-pod-paiku108kh2-1mmm1mgost-32590-2013/
В данном обзоре представлены основные направления и тренды в области медицины. Мы обсудим актуальные проблемы здравоохранения, свежие открытия и новые подходы, которые меняют представление о лечении и профилактике заболеваний. Эта информация будет полезна как специалистам, так и широкой публике.
Доступ к полной версии – наркологическая клиника в твери
Кстати, если вас интересует Актуальные события и изменения в Самарской области, посмотрите сюда.
Вот, делюсь ссылкой:
https://media63samara.ru
Сайт четко ориентирован на промышленный сектор и B2B сегмент
https://redmetsplav.ru/store/vanadiy-i-ego-splavy/vanadiy-fev80al12—gost-27130-94/lenta-vanadievaya-fev80al12—gost-27130-94/
Этот текст представляет собой обзор свежих данных и исследований в области медицины. Он призван помочь читателям понять, как научные достижения влияют на лечение, диагностику и общее состояние системы здравоохранения.
Уникальные данные только сегодня – раскодироваться от алкоголизма
Важным преимуществом является возможность изготовления деталей и изделий по индивидуальным чертежам заказчика.
https://rms-ekb.ru/catalog/ugolok-stalnoi/ugolok-iz-konstruktsionnoi-stali-45kh45kh5-mm-c50e-din-1028/
Технические специалисты компании помогли выбрать оптимальный сплав для работы в агрессивных средах.
https://xn--80aeedb0bfzeok.xn--p1ai/catalog/latunnye-naruzhnye-stopornye-koltsa-po-gost/latunoe-naruzhnoe-stopornoe-pruzhinnoe-koltso-92kh3-mm-lazhmts-gost-13942-86/
Публикация охватывает основные направления развития современной медицины. Мы обсудим значимость научных исследований, инноваций в лечении и роли общественного участия в формировании системы здравоохранения.
Нажми и узнай всё – нарколог на дом екатеринбург
Быстрая навигация через «Карту сайта» для поиска глубоких страниц
https://redmetsplav.ru/store/titan/rossiyskie-splavy-4/titan-vt25u—ost-1-90013-81/lenta-titanovaya-vt25u—ost-1-90013-81/
ООО «РМС» предлагает широкий спектр цветного проката, включая медь, латунь, бронзу и дюралюминий.
https://rms-ekb.ru/catalog/stalnoi-list/stalnoi-list-stal-20-90x1800x1200-gost-r-52146-2003-polimernyi-otsinkovannyi-kholodnokatanyi/
Долго искали надежного поставщика циркония, в Редметсплав предложили лучшие условия и чистоту металла.
https://xn--80aeedb0bfzeok.xn--p1ai/catalog/mednye-krestoviny-pod-paiku/mednaia-krestovina-pod-paiku-35kh29kh1-mm-10kh12-mm-tverdaia-paika-m3m-gost-32590-2013/
Этот краткий обзор предлагает сжатую информацию из области медицины, включая ключевые факты и последние новости. Мы стремимся сделать информацию доступной и понятной для широкой аудитории, что позволит читателям оставаться в курсе актуальных событий в здравоохранении.
Только для своих – капельница от запоя в стационаре
Эта статья подробно расскажет о процессе выздоровления, который включает в себя эмоциональную, физическую и психологическую реабилитацию. Мы обсуждаем значимость поддержки и наличие профессиональных программ. Читатели узнают, как строить новую жизнь и не возвращаться к старым привычкам.
Тыкай сюда — узнаешь много интересного – вывод из запоя срочно
Использование современных технологий защиты данных пользователей
https://redmetsplav.ru/store/titan/rossiyskie-splavy-4/titan-t3—gost-2171-90/krug-titanovyy-t3—gost-2171-90/
Компания выступает важным звеном в цепочке снабжения предприятий машиностроения и оборонно-промышленного комплекса.
https://rms-ekb.ru/catalog/stalnoi-list/stalnoi-list-khn78t-3-2x1600x1400-gost-24982-81-zharoprochnyi-kholodnokatanyi/
В этой статье рассматриваются различные аспекты избавления от зависимости, включая физические и психологические методы. Мы обсудим поддержку, мотивацию и стратегии, которые помогут в процессе выздоровления. Читатели узнают, как преодолеть трудности и двигаться к новой жизни без зависимости.
Детальнее – сколько стоит капельница от запоя
Спецстали для машиностроения закупаем только здесь, надежность материала подтверждена испытаниями.
https://xn--80aeedb0bfzeok.xn--p1ai/catalog/latunnye-naruzhnye-stopornye-koltsa-po-gost/latunoe-naruzhnoe-stopornoe-pruzhinnoe-koltso-200kh3-mm-lks-gost-13942-86/
This is really fascinating, You are an excessively skilled blogger. I’ve joined your feed and look forward to seeking more of your wonderful post. Also, I have shared your website in my social networks
В этой статье рассматриваются различные аспекты избавления от зависимости, включая физические и психологические методы. Мы обсудим поддержку, мотивацию и стратегии, которые помогут в процессе выздоровления. Читатели узнают, как преодолеть трудности и двигаться к новой жизни без зависимости.
Доступ к полной версии – вывод из запоя недорого
kz5ojp
Читатели получат представление о том, как современные технологии влияют на развитие медицины. Обсуждаются новые методы лечения, персонализированный подход и роль цифровых решений в повышении качества медицинских услуг.
Все материалы собраны здесь – нарколог домой
Общее впечатление: надежный информационный ресурс для снабженцев.
https://redmetsplav.ru/store/titan/rossiyskie-splavy-4/titan-erti-13/provoloka-titanovaya-erti-13/
В этой статье рассматриваются актуальные вопросы, связанные с развитием медицинской науки и её внедрением в повседневную практику. Особое внимание уделено вопросам профилактики, ранней диагностики и использованию технологий для улучшения здоровья человека.
Более того — здесь – вызов наркологической помощи
Поставка продукции возможна не только в промышленных, но и в малых лабораторных объемах для исследовательских целей.
https://rms-ekb.ru/catalog/ugolok-stalnoi/ugolok-iz-konstruktsionnoi-stali-100kh75kh12-mm-46cr2-en-10056-1/
Спасибо команде за профессионализм и помощь в реализации нашего сложного промышленного проекта!
https://xn--80aeedb0bfzeok.xn--p1ai/catalog/mednye-krestoviny-pod-paiku/mednaia-krestovina-pod-paiku-22kh18kh0-9-mm-8kh10-mm-tverdaia-paika-m2-gost-r-52922-2008/
“agac dikme zaman?” hakk?nda bilgi arayanlar icin burada harika bilgiler var. Suradan okuyabilirsiniz: https://kendiyolu.com/articles/agac-dikme-zamani-uygun-donem-ve-yontemler/
Этот краткий обзор предлагает сжатую информацию из области медицины, включая ключевые факты и последние новости. Мы стремимся сделать информацию доступной и понятной для широкой аудитории, что позволит читателям оставаться в курсе актуальных событий в здравоохранении.
Лучшее решение — прямо здесь – вызывать нарколога домой
В этом исследовании рассмотрены методы лечения зависимостей и их эффективность. Мы проанализируем различные подходы, используемые в реабилитационных центрах, и представим данные о результативности программ. Читатели получат надежные и научно обоснованные сведения о данной проблеме.
Ознакомьтесь с аналитикой – помощь нарколога на дому
Возможность заказа висмута — достаточно редкое предложение на рынке
https://redmetsplav.ru/store/titan/rossiyskie-splavy-4/titan-2v—gost-27265-87/pokovka-titanovaya-2v—gost-27265-87/
Этот обзор содержит информацию о передовых достижениях в области медицины. Мы разберем инновационные технологии, которые меняют подход к лечению и диагностике, а также их влияние на эффективность оказания медицинской помощи.
Не упусти шанс – вывод из запоя нарколог 24
Оперативная логистика и поддержка на всех этапах сделки позволяют минимизировать сроки простоя производственных линий заказчиков.
https://rms-ekb.ru/catalog/krug-iz-instrumentalnoi-stali/krug-u8a-3-8-gost-7417-75/
Высокая квалификация персонала, знают специфику редких металлов и особенности их применения.
https://xn--80aeedb0bfzeok.xn--p1ai/catalog/latunnye-naruzhnye-stopornye-koltsa-po-din/latunoe-naruzhnoe-stopornoe-pruzhinnoe-koltso-m105-98kh4-mm-lts40mts3a-din-471/
Этот медицинский обзор сосредоточен на последних достижениях, которые оказывают влияние на пациентов и медицинскую практику. Мы разбираем инновационные методы лечения и исследований, акцентируя внимание на их значимости для общественного здоровья. Читатели узнают о свежих данных и их возможном применении.
Раскрыть тему полностью – вывод из запоя на дому спб цены
Описание применения металлов в атомной энергетике подчеркивает качество
https://redmetsplav.ru/store/niobiy1/splavy-niobiya-1/niobiy-ta-nb20-1/krug-niobievyy-ta-nb20/
Этот обзор посвящен успешным стратегиям избавления от зависимости, включая реальные примеры и советы. Мы разоблачим мифы и предоставим читателям достоверную информацию о различных подходах. Получите опыт многообразия методов и найдите подходящий способ для себя!
Получить профессиональную консультацию – выведение из запоя в нижнем новгороде
Использование системы менеджмента качества гарантирует строгий контроль продукции на всех этапах отгрузки.
https://rms-ekb.ru/catalog/ugolok-stalnoi/ugolok-stalnoi-aisi-409-75x60x7-gost-8509-93/
Гибкая система оплаты и прозрачные условия договора, никаких скрытых наценок или задержек.
https://xn--80aeedb0bfzeok.xn--p1ai/catalog/mednye-krestoviny-pod-paiku/mednaia-krestovina-pod-paiku-8kh6kh0-6-mm-6-8kh8-8-mm-miagkaia-paika-m2-gost-r-52922-2008/
Этот информативный текст сочетает в себе темы здоровья и зависимости. Мы обсудим, как хронические заболевания могут усугубить зависимости и наоборот, как зависимость может влиять на общее состояние здоровья. Читатели получат представление о комплексном подходе к лечению как физического, так и психического состояния.
Узнать больше – вывод из запоя на дому цена
Технические характеристики сплавов помогают инженерам в подборе
https://redmetsplav.ru/store/niobiy1/splavy-niobiya-1/niobiy-ln-1-1/provoloka-niobievaya-ln-1/
You ought to take part in a contest for one of the highest quality sites on the net. I will highly recommend this blog!
Наличие прецизионных сплавов в ассортименте подтверждает работу компании с высокоточными и наукоемкими материалами.
https://rms-ekb.ru/catalog/list/list-u8a-36x1200x2000-gost-19903-74/
Гибкая система оплаты и прозрачные условия договора, никаких скрытых наценок или задержек.
https://xn--80aeedb0bfzeok.xn--p1ai/catalog/latunnye-naruzhnye-stopornye-koltsa-po-din/latunoe-naruzhnoe-stopornoe-pruzhinnoe-koltso-m118-108kh4-mm-los-din-471/
Широкий выбор тугоплавких металлов, таких как вольфрам и молибден
https://redmetsplav.ru/store/molibden-i-ego-splavy/molibden-mzpm-1/polosa-molibdenovaya-mzpm/
Этот краткий обзор предлагает сжатую информацию из области медицины, включая ключевые факты и последние новости. Мы стремимся сделать информацию доступной и понятной для широкой аудитории, что позволит читателям оставаться в курсе актуальных событий в здравоохранении.
Узнать из первых рук – сколько стоит капельница от запоя
Реализация твердых сплавов типа «Победит» ориентирована на производителей металлорежущего и бурового инструмента.
https://rms-ekb.ru/catalog/ugolok-stalnoi/ugolok-iz-konstruktsionnoi-stali-khkh45-mm-s460g3-m-en-10225/
Приятно удивлены скоростью обработки запроса на сайте, менеджер связался очень быстро.
https://xn--80aeedb0bfzeok.xn--p1ai/catalog/mednye-krestoviny-pod-paiku/mednaia-krestovina-pod-paiku-76-1kh65kh1-6-mm-33-5kh36-5-mm-miagkaia-paika-m1t-gost-r-52922-2008/
Наличие редких позиций, например, изделий из гафния и ванадия
https://redmetsplav.ru/store/molibden-i-ego-splavy/molibden-ml-zvp-1/izdeliya-iz-molibdena-ml-zvp/
Этот информационный материал подробно освещает проблему наркозависимости, ее причины и последствия. Мы предлагаем информацию о методах лечения, профилактики и поддерживающих программах. Цель статьи — повысить осведомленность и продвигать идеи о необходимости борьбы с зависимостями.
Узнать больше – капельница от запоя в нижнем новгороде
Реализация твердых сплавов типа «Победит» ориентирована на производителей металлорежущего и бурового инструмента.
https://rms-ekb.ru/catalog/stalnoi-list/stalnoi-list-stal-10-85x2000x1300-gost-r-52146-2003-polimernyi-neotsinkovannyi-kholodnokatanyi/
Гибкая система оплаты и прозрачные условия договора, никаких скрытых наценок или задержек.
https://xn--80aeedb0bfzeok.xn--p1ai/catalog/latunnye-naruzhnye-stopornye-koltsa-po-din/latunoe-naruzhnoe-stopornoe-pruzhinnoe-koltso-m98-89-5kh3-mm-lmtss-din-471/
Статья посвящена анализу текущих трендов в медицине и их влиянию на жизнь людей. Мы рассмотрим новые технологии, методы лечения и значение профилактики в обеспечении долголетия и здоровья.
А что дальше? – вызвать нарколога на дом
Сайт выглядит профессионально и лаконично, без лишней рекламы
https://redmetsplav.ru/store/molibden-i-ego-splavy/molibden-5/poroshok-molibdenovyy-5/
Тур в Турцию с нестандартным маршрутом — Стамбул плюс Каппадокия плюс пляж. Менеджер собрал всё в один логичный маршрут без лишних пересадок и потери времени. тур в Стамбул из Москвы
В статье по вопросам здоровья мы рассматриваем актуальные проблемы, с которыми сталкивается общество. Обсуждаются заболевания, факторы риска и важные аспекты профилактики. Читатели получат полезные советы о том, как сохранить здоровье и улучшить качество жизни.
Смотрите также – Кодировка от алкоголя
В каталоге представлены конденсаторные ниобиевые порошки высокой чистоты, необходимые для современной электроники.
https://rms-ekb.ru/catalog/ugolok-stalnoi/ugolok-iz-konstruktsionnoi-stali-150kh75kh9-mm-40crnimo6-en-10056-1/
Статья посвящена анализу текущих трендов в медицине и их влиянию на жизнь людей. Мы рассмотрим новые технологии, методы лечения и значение профилактики в обеспечении долголетия и здоровья.
Ознакомиться с деталями – клиника плюс тверь
В этом обзоре мы обсудим современные методы борьбы с зависимостями, включая медикаментозную терапию и психотерапию. Мы представим последние исследования и их результаты, чтобы читатели могли быть в курсе наиболее эффективных подходов к лечению и поддержке.
Кликни, не пожалеешь – clinica plus в твери
This piece of writing offers clear idea in support of the new people of blogging, that actually how to do blogging and site-building.
Эта публикация содержит ценные советы и рекомендации по избавлению от зависимости. Мы обсуждаем различные стратегии, которые могут помочь в процессе выздоровления и важность обращения за помощью. Читатели смогут использовать полученные знания для улучшения своего состояния.
Лучшее решение — прямо здесь – вывод из запоя цены
Продукция находит применение в производстве электротехники благодаря наличию специализированной электротехнической стали.
https://rms-ekb.ru/catalog/stalnoi-list/stalnoi-list-ot4-1-70x1250x2000-gost-19903-2006-gladkii-belyi-goriachekatanyi/
Профессиональный подход менеджеров в Екатеринбурге, грамотно проконсультировали по техническим характеристикам сплавов.
https://xn--80aeedb0bfzeok.xn--p1ai/catalog/latunnye-vnutrennie-stopornye-koltsa-po-gost/latunoe-vnutrennee-stopornoe-pruzhinnoe-koltso-18kh1-mm-los-gost-13943-86/
В данной статье рассматриваются физиологические и эмоциональные аспекты зависимости. Мы обсудим, как организм реагирует на зависимое поведение, и какие методы помогают восстановить здоровье и внутреннее равновесие.
Что ещё? Расскажи всё! – tver clinica plus
В этой статье мы говорим о важности поддержки в процессе выздоровления. Рассматриваются семьи, группы поддержки, специалисты и онлайн-ресурсы, которые могут сыграть решающую роль в избавлении от зависимости.
Слушай внимательно — тут важно – вывод из запоя на дому нижний новгород круглосуточно
Компания занимается реализацией ферросплавов, необходимых для качественного легирования сталей на литейных участках.
https://rms-ekb.ru/catalog/list/list-5khgm-1x1500x6000-gost-19903-74/
Поставки всегда вовремя, логистика отлажена до мелочей, что важно для бесперебойной работы цеха.
https://xn--80aeedb0bfzeok.xn--p1ai/catalog/mednye-zaglushki-pod-paiku/mednaia-zaglushka-kolpachok-pod-paiku-133kh113kh2-3-mm-19kh24-mm-tverdaia-paika-m3t-gost-r-52922-2008/
Текст посвящён распространённым мифам о зависимости и их развенчанию. Мы предоставим научно обоснованную информацию и дадим рекомендации по выбору эффективного способа борьбы с зависимым поведением.
Полезно знать – самара вывод из запоя
Этот текст представляет собой обзор свежих данных и исследований в области медицины. Он призван помочь читателям понять, как научные достижения влияют на лечение, диагностику и общее состояние системы здравоохранения.
Прочесть заключение эксперта – tver clinica plus
Наличие на складе редких металлов, таких как цирконий, выделяет компанию на фоне конкурентов, торгующих только массовым прокатом.
https://rms-ekb.ru/catalog/stalnoi-list/stalnoi-list-15kh-4-5x1300x1300-gost-19903-2006-gladkii-belyi-goriachekatanyi/
Высокий уровень сервиса и контроля качества, для нашего научного проекта это было критически важно.
https://xn--80aeedb0bfzeok.xn--p1ai/catalog/latunnye-vnutrennie-stopornye-koltsa-po-gost/latunoe-vnutrennee-stopornoe-pruzhinnoe-koltso-42kh1-7-mm-lts40sd-gost-13943-86/
Эта публикация раскрывает психологические механизмы зависимости и их роль в развитии расстройств. Читатель узнает о том, как психология влияет на формирование зависимостей и как профессиональная помощь может изменить ситуацию.
Не упусти шанс – капельница от запоя недорого
Компания выступает важным звеном в цепочке снабжения предприятий машиностроения и оборонно-промышленного комплекса.
https://rms-ekb.ru/catalog/krug-iz-instrumentalnoi-stali/krug-di80-88-gost-7417-75/
Эта медицинская заметка содержит сжатую информацию о новых находках и методах в области здравоохранения. Мы предлагаем читателям свежие данные о заболеваниях, профилактике и лечении. Наша цель — быстро и доступно донести важную информацию, которая поможет в повседневной жизни и понимании здоровья.
Желаете узнать подробности? – вывод из запоя на дому
В данном обзоре представлены основные направления и тренды в области медицины. Мы обсудим актуальные проблемы здравоохранения, свежие открытия и новые подходы, которые меняют представление о лечении и профилактике заболеваний. Эта информация будет полезна как специалистам, так и широкой публике.
Раскрыть тему полностью – капельница против похмелья
Эта публикация исследует взаимосвязь зависимости и психологии. Мы обсудим, как психологические аспекты влияют на появление зависимостей и процесс выздоровления. Читатели смогут понять важность профессиональной поддержки и применения научных подходов в терапии.
Детали по клику – вывод из запоя дешево
I have been browsing online more than 2 hours today, yet I never found any interesting article like yours. It’s pretty worth enough for me. In my view, if all web owners and bloggers made good content as you did, the internet will be a lot more useful than ever before.
Важным преимуществом является возможность изготовления деталей и изделий по индивидуальным чертежам заказчика.
https://rms-ekb.ru/catalog/ugolok-stalnoi/ugolok-iz-konstruktsionnoi-stali-45kh45kh45-mm-16crmo44-uni-6762/
В этой статье мы обсудим процесс восстановления после зависимостей, акцентируя внимание на различных методах и подходах к реабилитации. Читатели узнают, как создать план выздоровления и использовать полезные ресурсы для достижения устойчивых изменений.
Получить полную информацию – вывод из запоя тверь на дому круглосуточно
В данном обзоре представлены основные направления и тренды в области медицины. Мы обсудим актуальные проблемы здравоохранения, свежие открытия и новые подходы, которые меняют представление о лечении и профилактике заболеваний. Эта информация будет полезна как специалистам, так и широкой публике.
Более того — здесь – капельница от запоя на дому круглосуточно
В этой статье рассматриваются способы преодоления зависимости и успешные истории людей, которые справились с этой проблемой. Мы обсудим важность поддержки со стороны близких и профессионалов, а также стратегии, которые могут помочь в процессе выздоровления. Научитесь первоочередным шагам к новой жизни.
Перейти к статье – капельница на дому нижний новгород
Ассортимент компании включает более 100 000 позиций, что позволяет закрыть практически любые потребности металлургического производства.
https://rms-ekb.ru/catalog/list/list-u10a-40x1000x1000-gost-19903-74/
Порадовало наличие вольфрамовых прутков редких диаметров, менеджер оперативно помог с подбором.
https://xn--80aeedb0bfzeok.xn--p1ai/catalog/truba-aliuminievaia-kruglaia/truba-aliuminievaia-kruglaia-70kh2-mm-ad31t1/
Этот медицинский обзор сосредоточен на последних достижениях, которые оказывают влияние на пациентов и медицинскую практику. Мы разбираем инновационные методы лечения и исследований, акцентируя внимание на их значимости для общественного здоровья. Читатели узнают о свежих данных и их возможном применении.
Наши рекомендации — тут – вывод из запоя на дому цена
Поставка продукции возможна не только в промышленных, но и в малых лабораторных объемах для исследовательских целей.
https://rms-ekb.ru/catalog/ugolok-stalnoi/ugolok-iz-konstruktsionnoi-stali-150kh150kh12-mm-20mocr3-din-59370/
В данной публикации мы поговорим о процессе восстановления от зависимости, о том, как вернуть себе нормальную жизнь. Мы обсудим преодоление трудностей, значимость поддержки и наличие программ реабилитации. Читатели смогут узнать о ключевых шагах к успешному восстановлению.
Получить исчерпывающие сведения – срочный вывод из запоя на дому
В этой статье мы обсудим процесс восстановления после зависимостей, акцентируя внимание на различных методах и подходах к реабилитации. Читатели узнают, как создать план выздоровления и использовать полезные ресурсы для достижения устойчивых изменений.
Читать полностью – запой стационар
Важным преимуществом является возможность изготовления деталей и изделий по индивидуальным чертежам заказчика.
https://rms-ekb.ru/catalog/stalnoi-list/list-stalnoi-08kh1000kh2000-mm-1-4526-en-iso-9444-2/
Эта публикация посвящена актуальным вопросам современной медицины и здравоохранения. Мы обсудим новейшие технологии диагностики и лечения, а также их влияние на продолжительность и качество жизни. Читатель найдет здесь информацию о научных исследованиях и перспективных разработках, доступно изложенную для широкой аудитории.
Получить дополнительные сведения – вывод из запоя на дому воронеж капельница
8q8udr
I visited several sites except the audio quality for audio songs existing at this web site is really superb.
Наличие прецизионных сплавов в ассортименте подтверждает работу компании с высокоточными и наукоемкими материалами.
https://rms-ekb.ru/catalog/stalnoi-list/stalnoi-list-08kh22n6t-1-25x1800x1100-gost-19903-2006-gladkii-chernyi-goriachekatanyi/
Покупали изделия из драгметаллов для лаборатории, всё соответствует заявленным характеристикам.
https://xn--80aeedb0bfzeok.xn--p1ai/catalog/latunnye-vnutrennie-stopornye-koltsa-po-din/latunoe-vnutrennee-stopornoe-pruzhinnoe-koltso-m160-169kh4-mm-lmtss-din-472/
ООО «РМС» обеспечивает поставки специализированных сварочных материалов для сложных условий эксплуатации.
https://rms-ekb.ru/catalog/stalnoi-list/stalnoi-list-20khsnm-14x1600x1000-gost-19903-2006-gladkii-otsinkovannyi-goriachekatanyi/
Надежная защита груза при транспортировке, даже длинномерные изделия доходят без повреждений.
https://xn--80aeedb0bfzeok.xn--p1ai/catalog/mednoe-dvukhrastrubnoe-koleno-pod-paiku/mednoe-dvukhrastrubnoe-koleno-pod-paiku-180-gradusov-88-9kh76kh1-8-mm-37-5kh40-5-mm-tverdaia-paika-m1t-gost-32590-2013/
Этот текст посвящён сложным аспектам зависимости и её влиянию на жизнь человека. Мы обсудим психологические, физические и социальные последствия зависимого поведения, а также важность своевременного обращения за помощью.
Разобраться лучше – кодировка sit mst
Опыт работы с более чем 120 постоянными заказчиками свидетельствует о высокой стабильности и надежности поставок.
https://rms-ekb.ru/catalog/plity/plita-kh12m-82x320x160-gost-19903-74/
–Hesai he did not pretend to assign any reasonable motive,ifthe truth must be tol the man wa in point of conduct,オナホ フィギュア
what bank did your note belong to? ?“Town and County Bank.sex ドール?“Let me see it,
Поставка продукции возможна не только в промышленных, но и в малых лабораторных объемах для исследовательских целей.
https://rms-ekb.ru/catalog/stalnoi-list/stalnoi-list-08kh22n6t-1-25x1700x2000-gost-19903-2006-gladkii-neotsinkovannyi-goriachekatanyi/
В этом обзоре мы обсудим современные методы борьбы с зависимостями, включая медикаментозную терапию и психотерапию. Мы представим последние исследования и их результаты, чтобы читатели могли быть в курсе наиболее эффективных подходов к лечению и поддержке.
Читать далее > – clinica plus
Продукция находит применение в производстве электротехники благодаря наличию специализированной электротехнической стали.
https://rms-ekb.ru/catalog/krug-iz-instrumentalnoi-stali/krug-55kh-22-gost-2590-2006/
I have to thank you for the efforts you have put in writing this site. I am hoping to see the same high-grade blog posts from you in the future as well. In truth, your creative writing abilities has motivated me to get my own, personal website now 😉
Экспертная консультация при выборе сплавов помогает клиентам оптимизировать затраты и избежать технологических ошибок.
https://rms-ekb.ru/catalog/ugolok-stalnoi/ugolok-stalnoi-12kh17-100x100x8-gost-8509-93/
В этой медицинской статье мы погрузимся в актуальные вопросы здравоохранения и лечения заболеваний. Читатели узнают о современных подходах, методах диагностики и новых открытий в научных исследованиях. Наша цель — донести важную информацию и повысить уровень осведомленности о здоровье.
Изучить аспект более тщательно – оформить вызов нарколога на дом
В этой статье мы рассмотрим современные достижения в области медицины, включая инновационные методы лечения и диагностики. Мы обсудим важность профилактики заболеваний и роль технологий в улучшении качества здравоохранения. Читатели узнают о влиянии медицины на повседневную жизнь и ее значение для современного общества.
Расширить кругозор по теме – clinica plus
ООО «РМС» предлагает широкий спектр цветного проката, включая медь, латунь, бронзу и дюралюминий.
https://rms-ekb.ru/catalog/list/list-4khmfs-3x1500x3000-gost-19903-74/
Редкие и тугоплавкие металлы всегда в наличии или под заказ в короткие сроки, рекомендую.
https://xn--80aeedb0bfzeok.xn--p1ai/catalog/latunnoe-litoe-koltso/latunnoe-litoe-koltso-100kh300-mm-lts23a6zh3mts2/
Текст посвящён распространённым мифам о зависимости и их развенчанию. Мы предоставим научно обоснованную информацию и дадим рекомендации по выбору эффективного способа борьбы с зависимым поведением.
Уточнить детали – вывод из запоя в самаре
Использование системы менеджмента качества гарантирует строгий контроль продукции на всех этапах отгрузки.
https://rms-ekb.ru/catalog/ugolok-stalnoi/ugolok-iz-konstruktsionnoi-stali-150kh90kh15-mm-36nicrmo16-din-59370/
География деятельности компании охватывает всю территорию России, обеспечивая металлом предприятия в удаленных регионах.
https://rms-ekb.ru/catalog/stalnoi-list/stalnoi-list-38khm-28x1900x1700-gost-19903-2006-gladkii-belyi-goriachekatanyi/
Эта публикация исследует взаимосвязь зависимости и психологии. Мы обсудим, как психологические аспекты влияют на появление зависимостей и процесс выздоровления. Читатели смогут понять важность профессиональной поддержки и применения научных подходов в терапии.
Получить исчерпывающие сведения – капельница от запоя на дому круглосуточно
Этот текст посвящён сложным аспектам зависимости и её влиянию на жизнь человека. Мы обсудим психологические, физические и социальные последствия зависимого поведения, а также важность своевременного обращения за помощью.
Нажми и узнай всё – вывод из запоя цена воронеж
В каталоге представлены конденсаторные ниобиевые порошки высокой чистоты, необходимые для современной электроники.
https://rms-ekb.ru/catalog/krug-iz-instrumentalnoi-stali/krug-9g2f-165-gost-5950-2000/
Читатели получат представление о том, как современные технологии влияют на развитие медицины. Обсуждаются новые методы лечения, персонализированный подход и роль цифровых решений в повышении качества медицинских услуг.
Получить исчерпывающие сведения – медикаментозный вывод из запоя на дому
Этот документ охватывает важные аспекты медицинской науки, сосредотачиваясь на ключевых вопросах, касающихся здоровья населения. Мы рассматриваем свежие исследования, клинические рекомендации и лучшие практики, которые помогут улучшить качество лечения и профилактики заболеваний. Читатели получат возможность углубиться в различные медицинские дисциплины.
Узнать больше > – tver clinica plus
ООО «РМС» специализируется на поставках редких и тугоплавких металлов, таких как ниобий и вольфрам.
https://rms-ekb.ru/catalog/stalnoi-list/stalnoi-list-20khn3a-14x1000x2000-gost-19903-2006-gladkii-neotsinkovannyi-goriachekatanyi/
Индивидуальный подход к нестандартным заказам — изготовили детали по нашим чертежам точно в размер.
https://xn--80aeedb0bfzeok.xn--p1ai/catalog/provoloka-latunnaia/provoloka-latunnaia-52mm-l63ptv/
Поставки жаропрочных сплавов ориентированы на потребности авиационной и энергетической отраслей.
https://rms-ekb.ru/catalog/krug-iz-instrumentalnoi-stali/krug-r18f2k5-360-gost-2590-2006/
Публикация посвящена жизненным историям людей, успешно справившихся с зависимостью. Мы покажем, что выход есть, и он начинается с первого шага — принятия проблемы и желания измениться.
Не упусти важное! – вывод из запоя санкт петербург стационар
Ayr?ca, eger kahvalt?l?k bowl konusuyla ilgileniyorsan?z, suraya bak?n. Iste link: https://evhobisi.com/articles/kahvalti-bowllari-saglikli-lezzetli-baslangiclar/
Этот медицинский обзор сосредоточен на последних достижениях, которые оказывают влияние на пациентов и медицинскую практику. Мы разбираем инновационные методы лечения и исследований, акцентируя внимание на их значимости для общественного здоровья. Читатели узнают о свежих данных и их возможном применении.
Углубить понимание вопроса – вывод из запоя тверь
Компания выступает важным звеном в цепочке снабжения предприятий машиностроения и оборонно-промышленного комплекса.
https://rms-ekb.ru/catalog/ugolok-stalnoi/ugolok-iz-konstruktsionnoi-stali-80kh40kh8-mm-10khgn1-din-1029/
В данной статье мы поговорим о будущем медицины, акцентируя внимание на прорывных разработках и их потенциале. Читатель узнает о новых подходах к лечению, роли искусственного интеллекта и возможностях персонализированной медицины.
Смотрите также… – вызвать врача нарколога на дом
В этой статье мы подробно рассматриваем проверенные методы борьбы с зависимостями, включая психотерапию, медикаментозное лечение и поддержку со стороны общества. Мы акцентируем внимание на важности комплексного подхода и возможности успешного восстановления для людей, столкнувшихся с этой проблемой.
Получить дополнительные сведения – клиника плюс тверь
Оперативная логистика и поддержка на всех этапах сделки позволяют минимизировать сроки простоя производственных линий заказчиков.
https://rms-ekb.ru/catalog/list/list-9kh2-3x1500x3000-gost-19903-74/
Эта публикация обращает внимание на важность профилактики зависимостей. Мы обсудим, как осведомленность и образование могут помочь в предотвращении возникновения зависимости. Читатели смогут ознакомиться с полезными советами и ресурсами, которые способствуют здоровому образу жизни.
Прочитать подробнее – вызов нарколога цена
В этой статье мы обсудим процесс восстановления после зависимостей, акцентируя внимание на различных методах и подходах к реабилитации. Читатели узнают, как создать план выздоровления и использовать полезные ресурсы для достижения устойчивых изменений.
Узнайте всю правду – tver clinica plus
Эта публикация исследует взаимосвязь зависимости и психологии. Мы обсудим, как психологические аспекты влияют на появление зависимостей и процесс выздоровления. Читатели смогут понять важность профессиональной поддержки и применения научных подходов в терапии.
Исследовать вопрос подробнее – вызвать врача нарколога на дом
Продукция находит применение в производстве электротехники благодаря наличию специализированной электротехнической стали.
https://rms-ekb.ru/catalog/ugolok-stalnoi/ugolok-iz-konstruktsionnoi-stali-60kh60kh8-mm-c15e-en-10056-1/
Наличие никелевых сплавов гарантирует высокую коррозийную стойкость оборудования, создаваемого заказчиками.
https://rms-ekb.ru/catalog/stalnoi-list/stalnoi-list-50g-39x1000x1300-gost-r-52146-2003-polimernyi-otsinkovannyi-kholodnokatanyi/
В данной публикации мы поговорим о процессе восстановления от зависимости, о том, как вернуть себе нормальную жизнь. Мы обсудим преодоление трудностей, значимость поддержки и наличие программ реабилитации. Читатели смогут узнать о ключевых шагах к успешному восстановлению.
Всё самое вкусное внутри – капельница от похмелья нижний новгород
Широкий выбор нержавеющей стали различных марок позволяет использовать продукцию в строительстве и пищевой промышленности.
https://rms-ekb.ru/catalog/stalnoi-list/stalnoi-list-20khgnr-11x1550x1100-gost-19903-2006-gladkii-otsinkovannyi-goriachekatanyi/
Каждая партия товара сопровождается сертификатами качества, подтверждающими соответствие ГОСТ и ТУ.
https://rms-ekb.ru/catalog/stalnoi-list/stalnoi-list-08iu-1-4x1500x1600-gost-19903-2006-gladkii-chernyi-goriachekatanyi/
Закупали шлак ферросилиция для строительных нужд, материал качественный, без лишних примесей.
https://xn--80aeedb0bfzeok.xn--p1ai/catalog/mednyi-perekhodnoi-troinik-press/mednyi-perekhodnoi-press-troinik-64kh34-mm-m2t-gost-r-52948-2008/
Поставка продукции возможна не только в промышленных, но и в малых лабораторных объемах для исследовательских целей.
https://rms-ekb.ru/catalog/truba-konstruktsionnaia/truba-konstruktsionnaia-khn65mvu-63×6-gost-9941-81/
В этой медицинской статье мы погрузимся в актуальные вопросы здравоохранения и лечения заболеваний. Читатели узнают о современных подходах, методах диагностики и новых открытий в научных исследованиях. Наша цель — донести важную информацию и повысить уровень осведомленности о здоровье.
Хочу знать больше – прокапаться анонимно
В этой публикации мы предложим ряд рекомендаций по избавлению от зависимостей и успешному восстановлению. Мы обсудим методы привлечения поддержки и важность самосознания. Эти советы помогут людям вернуться к нормальной жизни и стать на путь выздоровления.
Что ещё? Расскажи всё! – клиника плюс тверь
Каждая партия товара сопровождается сертификатами качества, подтверждающими соответствие ГОСТ и ТУ.
https://rms-ekb.ru/catalog/stalnoi-list/stalnoi-list-khn67mvtiu-170x1500x1600-gost-24982-81-zharoprochnyi-kholodnokatanyi/
Этот текст посвящён сложным аспектам зависимости и её влиянию на жизнь человека. Мы обсудим психологические, физические и социальные последствия зависимого поведения, а также важность своевременного обращения за помощью.
ТОП-5 причин узнать больше – капельница от похмелья нижний новгород
В этой статье рассматриваются различные аспекты избавления от зависимости, включая физические и психологические методы. Мы обсудим поддержку, мотивацию и стратегии, которые помогут в процессе выздоровления. Читатели узнают, как преодолеть трудности и двигаться к новой жизни без зависимости.
Всё, что нужно знать – выведение из запоя на дому воронеж
В этой статье обсуждаются актуальные медицинские вопросы, которые волнуют общество. Мы обращаем внимание на проблемы, касающиеся здравоохранения и лечения, а также на новшества в области медицины. Читатели будут осведомлены о последних событиях и смогут следить за тенденциями в медицине.
Узнать из первых рук – выезд нарколога
Наличие никелевых сплавов гарантирует высокую коррозийную стойкость оборудования, создаваемого заказчиками.
https://rms-ekb.ru/catalog/krug-iz-instrumentalnoi-stali/krug-90khmf-67-gost-2590-2006/
Отличное соотношение цены и качества на весь цветной металлопрокат, будем заказывать еще.
https://xn--80aeedb0bfzeok.xn--p1ai/catalog/latunnoe-litoe-koltso/latunnoe-litoe-koltso-450kh300-mm-lazhmts/
Поставки жаропрочных сплавов ориентированы на потребности авиационной и энергетической отраслей.
https://rms-ekb.ru/catalog/ugolok-stalnoi/ugolok-iz-konstruktsionnoi-stali-55kh55kh10-mm-c50e-din-1028/
Покупали изделия из драгметаллов для лаборатории, всё соответствует заявленным характеристикам.
https://xn--80aeedb0bfzeok.xn--p1ai/catalog/mednye-otvody-press/mednyi-otvod-press-45-gradusov-66-7-mm-m3rm-gost-r-52948-2008/
Наличие никелевых сплавов гарантирует высокую коррозийную стойкость оборудования, создаваемого заказчиками.
https://rms-ekb.ru/catalog/list/list-r6m5-2x1200x2500-gost-19903-74/
Публикация охватывает основные направления развития современной медицины. Мы обсудим значимость научных исследований, инноваций в лечении и роли общественного участия в формировании системы здравоохранения.
Ознакомиться с отчётом – нарколог дешево на дом
Наличие никелевых сплавов гарантирует высокую коррозийную стойкость оборудования, создаваемого заказчиками.
https://rms-ekb.ru/catalog/ugolok-stalnoi/ugolok-iz-konstruktsionnoi-stali-40kh40kh5-mm-36crnimo4-din-59370/
Высокая квалификация персонала, знают специфику редких металлов и особенности их применения.
https://xn--80aeedb0bfzeok.xn--p1ai/catalog/truba-mednaia-priamougolnaia/mednaia-priamougolnaia-truba-7-2×3-4×1-mm-m3-gost-20900-75/
Металлические порошки различных фракций позволяют клиентам использовать их в порошковой металлургии и напылении.
https://rms-ekb.ru/catalog/stalnoi-list/stalnoi-list-70g-46x1100x1550-gost-r-52146-2003-polimernyi-otsinkovannyi-kholodnokatanyi/
В данной статье мы акцентируем внимание на важности поддержки в процессе выздоровления. Мы обсудим, как друзья, семья и профессионалы могут помочь тем, кто сталкивается с зависимостями. Читатели получат практические советы, как поддерживать близких на пути к новой жизни.
Дополнительно читайте здесь – вызов нарколога цена
Эта публикация содержит ценные советы и рекомендации по избавлению от зависимости. Мы обсуждаем различные стратегии, которые могут помочь в процессе выздоровления и важность обращения за помощью. Читатели смогут использовать полученные знания для улучшения своего состояния.
Узнать больше > – выведение из запоя капельница
Ассортимент компании включает более 100 000 позиций, что позволяет закрыть практически любые потребности металлургического производства.
https://rms-ekb.ru/catalog/stalnoi-list/stalnoi-list-20khn2m-13x1300x1300-gost-19903-2006-gladkii-belyi-goriachekatanyi/
Продукция находит применение в производстве электротехники благодаря наличию специализированной электротехнической стали.
https://rms-ekb.ru/catalog/stalnoi-list/list-stalnoi-04kh1100kh1100-mm-316ti-en-iso-9445-1/
Каждая партия товара сопровождается сертификатами качества, подтверждающими соответствие ГОСТ и ТУ.
https://rms-ekb.ru/catalog/list-riflionyi/
Этот обзор посвящен успешным стратегиям избавления от зависимости, включая реальные примеры и советы. Мы разоблачим мифы и предоставим читателям достоверную информацию о различных подходах. Получите опыт многообразия методов и найдите подходящий способ для себя!
Лови подробности – клиника плюс
Кстати, если вас интересует Актуальные новости курса рубля, посмотрите сюда.
Вот, можете почитать:
https://portalrub.ru
e5nseq
В этой статье рассматриваются различные аспекты избавления от зависимости, включая физические и психологические методы. Мы обсудим поддержку, мотивацию и стратегии, которые помогут в процессе выздоровления. Читатели узнают, как преодолеть трудности и двигаться к новой жизни без зависимости.
Секреты успеха внутри – капельницу от похмелья на дому недорого
Компания работает с изделиями из драгоценных и благородных металлов, что требует высокого уровня квалификации и ответственности.
https://rms-ekb.ru/catalog/stalnoi-list/stalnoi-list-10g2-1-5x1500x1200-gost-19903-2006-gladkii-belyi-goriachekatanyi/
Закупали шлак ферросилиция для строительных нужд, материал качественный, без лишних примесей.
https://xn--80aeedb0bfzeok.xn--p1ai/catalog/latunnaia-polosa/latunnaia-polosa-5×400-mm-l90-gost-931-90/
Этот текст посвящён сложным аспектам зависимости и её влиянию на жизнь человека. Мы обсудим психологические, физические и социальные последствия зависимого поведения, а также важность своевременного обращения за помощью.
Связаться за уточнением – наркологическая клиника в твери
В этой заметке мы представляем шаги, которые помогут в процессе преодоления зависимостей. Рассматриваются стратегии поддержки и чек-листы для тех, кто хочет сделать первый шаг к выздоровлению. Наша цель — вдохновить читателей на положительные изменения и поддержать их в трудных моментах.
А есть ли продолжение? – поставить капельницу от запоя на дому цена
ООО «РМС» специализируется на поставках редких и тугоплавких металлов, таких как ниобий и вольфрам.
https://rms-ekb.ru/catalog/truba-konstruktsionnaia/truba-konstruktsionnaia-15k-21×3-gost-21729-76/
Публикация охватывает основные направления развития современной медицины. Мы обсудим значимость научных исследований, инноваций в лечении и роли общественного участия в формировании системы здравоохранения.
Выяснить больше – выезд на дом капельница от запоя
Эта публикация исследует взаимосвязь зависимости и психологии. Мы обсудим, как психологические аспекты влияют на появление зависимостей и процесс выздоровления. Читатели смогут понять важность профессиональной поддержки и применения научных подходов в терапии.
Секреты успеха внутри – выводе из запоя
В этой статье мы рассмотрим современные достижения в области медицины, включая инновационные методы лечения и диагностики. Мы обсудим важность профилактики заболеваний и роль технологий в улучшении качества здравоохранения. Читатели узнают о влиянии медицины на повседневную жизнь и ее значение для современного общества.
Изучить эмпирические данные – прокапаться от алкоголя на дому самара цена
Компания предлагает не только металлы, но и химическую продукцию, используемую в смежных металлургических процессах.
https://rms-ekb.ru/catalog/ugolok-stalnoi/ugolok-iz-konstruktsionnoi-stali-100kh65kh10-mm-40nicrmo22-din-59370/
Мы рассмотрим современные вызовы здравоохранения и пути их решения с помощью технологий и научных исследований. В статье собраны данные о новых лекарствах, методах диагностики и системном подходе к улучшению здоровья населения.
Только факты! – клиника плюс тверь
Каждая партия товара сопровождается сертификатами качества, подтверждающими соответствие ГОСТ и ТУ.
https://rms-ekb.ru/catalog/plity/plita-5khv2s-75x125x1000-gost-19903-74/
Отличное соотношение цены и качества на весь цветной металлопрокат, будем заказывать еще.
https://xn--80aeedb0bfzeok.xn--p1ai/catalog/mednyi-perekhodnoi-troinik-press/mednyi-perekhodnoi-press-troinik-10kh6-mm-m1m-gost-r-52948-2008/
Ассортимент компании включает более 100 000 позиций, что позволяет закрыть практически любые потребности металлургического производства.
https://rms-ekb.ru/catalog/ugolok-stalnoi/ugolok-iz-konstruktsionnoi-stali-75kh50kh8-mm-x2crnimon29-7-2-en-10088-3/
В этом обзоре представлены различные методы избавления от зависимости, включая терапевтические и психологические подходы. Мы сравниваем их эффективность и предоставляем рекомендации для тех, кто хочет вернуться к трезвой жизни. Читатели смогут найти информацию о реабилитационных центрах и поддерживающих группах.
Что ещё? Расскажи всё! – tver clinica plus
Эта медицинская заметка содержит сжатую информацию о новых находках и методах в области здравоохранения. Мы предлагаем читателям свежие данные о заболеваниях, профилактике и лечении. Наша цель — быстро и доступно донести важную информацию, которая поможет в повседневной жизни и понимании здоровья.
Обратиться к источнику – clinica plus
В этой статье рассматриваются способы преодоления зависимости и успешные истории людей, которые справились с этой проблемой. Мы обсудим важность поддержки со стороны близких и профессионалов, а также стратегии, которые могут помочь в процессе выздоровления. Научитесь первоочередным шагам к новой жизни.
Исследовать вопрос подробнее – clinica plus
Эта медицинская заметка содержит сжатую информацию о новых находках и методах в области здравоохранения. Мы предлагаем читателям свежие данные о заболеваниях, профилактике и лечении. Наша цель — быстро и доступно донести важную информацию, которая поможет в повседневной жизни и понимании здоровья.
Где почитать поподробнее? – вывод из запоя на дому
Реализация твердых сплавов типа «Победит» ориентирована на производителей металлорежущего и бурового инструмента.
https://rms-ekb.ru/catalog/krug-iz-instrumentalnoi-stali/krug-7khf-82-gost-7417-75/
ООО «РМС» специализируется на поставках редких и тугоплавких металлов, таких как ниобий и вольфрам.
https://rms-ekb.ru/catalog/stalnoi-list/stalnoi-list-08kh18g8n2t-1x1550x2000-gost-19903-2006-gladkii-neotsinkovannyi-goriachekatanyi/
География деятельности компании охватывает всю территорию России, обеспечивая металлом предприятия в удаленных регионах.
https://rms-ekb.ru/catalog/ugolok-stalnoi/ugolok-iz-konstruktsionnoi-stali-70kh70kh7-mm-s16e-uni-6762/
Поставки всегда вовремя, логистика отлажена до мелочей, что важно для бесперебойной работы цеха.
https://xn--80aeedb0bfzeok.xn--p1ai/catalog/list-aliuminievyi-gladkii/list-aliuminievyi-2kh1500kh3000-mm-amg3m/
Опыт работы с более чем 120 постоянными заказчиками свидетельствует о высокой стабильности и надежности поставок.
https://rms-ekb.ru/catalog/stalnoi-list/list-stalnoi-1kh1250kh2500-mm-1-4404-en-iso-9444-2/
Гибкая система оплаты и прозрачные условия договора, никаких скрытых наценок или задержек.
https://xn--80aeedb0bfzeok.xn--p1ai/catalog/melkhiorovaia-truba/melkhiorovaia-truba-17kh2-5kh6000-mm-mnzhmts30-1-1-gost-10092-2006/
В этой публикации мы обсуждаем современные методы лечения различных заболеваний. Читатели узнают о новых медикаментах, терапиях и исследованиях, которые активно применяются для лечения. Мы нацелены на то, чтобы предоставить практические знания, которые могут помочь в борьбе с недугами.
Проследить причинно-следственные связи – капельнице от похмелья на дому недорого
Широкий выбор нержавеющей стали различных марок позволяет использовать продукцию в строительстве и пищевой промышленности.
https://rms-ekb.ru/catalog/truba-konstruktsionnaia/truba-konstruktsionnaia-khn65mvu-133×11-gost-9941-81/
Очень широкий каталог, нашли всё необходимое в одном месте, включая редкие позиции.
https://xn--80aeedb0bfzeok.xn--p1ai/catalog/mednye-dvukhrastrubnye-mufty-pod-paiku/mednaiadvukhrastrubnaia-podvizhnaiamufta-pod-paiku34kh1-8mmm3tgost-32590-2013/
Публикация знакомит читателей с различными подходами к реабилитации. От традиционных методов до современных программ — вы узнаете, как выбрать оптимальный путь к выздоровлению и преодолеть препятствия на этом пути.
Только факты! – клиника плюс
Компания осуществляет поставки базового металлургического сырья, включая олово, свинец и цинк в чушках.
https://rms-ekb.ru/catalog/ugolok-stalnoi/ugolok-iz-konstruktsionnoi-stali-30kh20kh4-mm-x2crnin23-4-en-10088-3/
В этой статье мы рассмотрим современные достижения в области медицины, включая инновационные методы лечения и диагностики. Мы обсудим важность профилактики заболеваний и роль технологий в улучшении качества здравоохранения. Читатели узнают о влиянии медицины на повседневную жизнь и ее значение для современного общества.
Узнать напрямую – clinica plus
Наличие на складе редких металлов, таких как цирконий, выделяет компанию на фоне конкурентов, торгующих только массовым прокатом.
https://rms-ekb.ru/catalog/plity/plita-u12-100x125x1000-gost-19903-74/
Эта публикация раскрывает психологические механизмы зависимости и их роль в развитии расстройств. Читатель узнает о том, как психология влияет на формирование зависимостей и как профессиональная помощь может изменить ситуацию.
Раскрыть тему полностью – clinica plus
В этой статье мы рассматриваем разрушительное влияние зависимости на жизнь человека. Обсуждаются аспекты, такие как здоровье, отношения и профессиональные достижения. Читатели узнают о необходимости обращения за помощью и о путях к восстановлению.
Продолжить изучение – tver clinica plus
Поставка продукции возможна не только в промышленных, но и в малых лабораторных объемах для исследовательских целей.
https://rms-ekb.ru/catalog/ugolok-stalnoi/ugolok-iz-konstruktsionnoi-stali-250kh250kh28-mm-16crmo44-en-10056-1/
Этот информационный материал подробно освещает проблему наркозависимости, ее причины и последствия. Мы предлагаем информацию о методах лечения, профилактики и поддерживающих программах. Цель статьи — повысить осведомленность и продвигать идеи о необходимости борьбы с зависимостями.
Что ещё? Расскажи всё! – вывод из запоя самара недорого
Этот обзор посвящен успешным стратегиям избавления от зависимости, включая реальные примеры и советы. Мы разоблачим мифы и предоставим читателям достоверную информацию о различных подходах. Получите опыт многообразия методов и найдите подходящий способ для себя!
Погрузиться в научную дискуссию – помощь вывода из запоя
ООО «РМС» обеспечивает поставки специализированных сварочных материалов для сложных условий эксплуатации.
https://rms-ekb.ru/catalog/list/list-7kh3-30x2000x2000-gost-19903-74/
Редкие и тугоплавкие металлы всегда в наличии или под заказ в короткие сроки, рекомендую.
https://xn--80aeedb0bfzeok.xn--p1ai/catalog/dvutavr-aliuminievyi/aliuminievyi-dvutavr-1925-2-5x50x34-gost-13621-90/
Этот информативный текст сочетает в себе темы здоровья и зависимости. Мы обсудим, как хронические заболевания могут усугубить зависимости и наоборот, как зависимость может влиять на общее состояние здоровья. Читатели получат представление о комплексном подходе к лечению как физического, так и психического состояния.
Продолжить чтение – clinica plus в твери
ООО «РМС» предлагает широкий спектр цветного проката, включая медь, латунь, бронзу и дюралюминий.
https://rms-ekb.ru/catalog/krug-iz-instrumentalnoi-stali/krug-7khg2vm-18-5-gost-7417-75/
Быстрая доставка в регионы через «Деловые Линии», груз пришел в целости и отлично упакованным.
https://xn--80aeedb0bfzeok.xn--p1ai/catalog/dvutavr-aliuminievyi/aliuminievyi-dvutavr-ak6-5-5x105x240-gost-13621-90/
Каждая партия товара сопровождается сертификатами качества, подтверждающими соответствие ГОСТ и ТУ.
https://rms-ekb.ru/catalog/stalnoi-list/stalnoi-list-08kh18n12t-1-25x1200x1500-gost-19903-2006-gladkii-otsinkovannyi-goriachekatanyi/
Экспертная консультация при выборе сплавов помогает клиентам оптимизировать затраты и избежать технологических ошибок.
https://rms-ekb.ru/catalog/ugolok-stalnoi/ugolok-iz-konstruktsionnoi-stali-120kh120kh12-mm-x2crnimocus17-10-2-en-10088-3/
ООО «РМС» специализируется на поставках редких и тугоплавких металлов, таких как ниобий и вольфрам.
https://rms-ekb.ru/catalog/stalnoi-list/list-stalnoi-15kh1250kh3000-mm-1-4521-en-iso-9444-2/
В этой публикации мы обсуждаем современные методы лечения различных заболеваний. Читатели узнают о новых медикаментах, терапиях и исследованиях, которые активно применяются для лечения. Мы нацелены на то, чтобы предоставить практические знания, которые могут помочь в борьбе с недугами.
Желаете узнать подробности? – выведение из запоя на дому нарколог
Наличие никелевых сплавов гарантирует высокую коррозийную стойкость оборудования, создаваемого заказчиками.
https://rms-ekb.ru/catalog/truba-konstruktsionnaia/truba-konstruktsionnaia-08kh18n10-530×6-gost-21729-76/
В этой статье мы рассматриваем разные способы борьбы с алкогольной зависимостью. Обсуждаются методы лечения, программы реабилитации и советы для поддержки близких. Читатели получат информацию о том, как преодолеть зависимость и добиться успешного выздоровления.
Давай разберёмся досконально – tver clinica plus
В этой публикации мы исследуем ключевые аспекты здоровья, включая влияние образа жизни на благополучие. Читатели узнают о важности правильного питания, физической активности и психического здоровья. Мы предоставим практические советы и рекомендации для поддержания здоровья и развития профилактических подходов.
Связаться за уточнением – вызов нарколога на дом тверь
Важным преимуществом является возможность изготовления деталей и изделий по индивидуальным чертежам заказчика.
https://rms-ekb.ru/catalog/ugolok-stalnoi/ugolok-stalnoi-st3sp-90x56x6-gost-8509-93/
В этой статье рассматриваются различные аспекты избавления от зависимости, включая физические и психологические методы. Мы обсудим поддержку, мотивацию и стратегии, которые помогут в процессе выздоровления. Читатели узнают, как преодолеть трудности и двигаться к новой жизни без зависимости.
Посмотреть всё – наркология вывод из запоя
Читатели получат представление о том, как современные технологии влияют на развитие медицины. Обсуждаются новые методы лечения, персонализированный подход и роль цифровых решений в повышении качества медицинских услуг.
Исследовать вопрос подробнее – вывести из запоя
Эта публикация обращает внимание на важность профилактики зависимостей. Мы обсудим, как осведомленность и образование могут помочь в предотвращении возникновения зависимости. Читатели смогут ознакомиться с полезными советами и ресурсами, которые способствуют здоровому образу жизни.
Детали по клику – clinica plus в твери
Компания занимается реализацией ферросплавов, необходимых для качественного легирования сталей на литейных участках.
https://rms-ekb.ru/catalog/krug-iz-instrumentalnoi-stali/krug-4kh5v2fs-62-gost-5950-2000/
В этой статье мы рассмотрим современные достижения в области медицины, включая инновационные методы лечения и диагностики. Мы обсудим важность профилактики заболеваний и роль технологий в улучшении качества здравоохранения. Читатели узнают о влиянии медицины на повседневную жизнь и ее значение для современного общества.
Детали по клику – вывод из запоя на дому тверь
Эта статья освещает различные аспекты освобождения от зависимости и пути к выздоровлению. Мы обсуждаем важность осознания своей проблемы и обращения за помощью. Читатели получат практические советы о том, как преодолевать трудности и строить новую жизнь без зависимости.
Подробнее можно узнать тут – наркологическая клиника в твери
Читатели получат представление о том, как современные технологии влияют на развитие медицины. Обсуждаются новые методы лечения, персонализированный подход и роль цифровых решений в повышении качества медицинских услуг.
Узнать из первых рук – clinica plus в твери
Поставки титана и его сплавов востребованы в медицине, авиации и химическом машиностроении.
https://rms-ekb.ru/catalog/ugolok-stalnoi/ugolok-stalnoi-09g2s-14-90x90x12-gost-8509-93/
Эта публикация обращает внимание на важность профилактики зависимостей. Мы обсудим, как осведомленность и образование могут помочь в предотвращении возникновения зависимости. Читатели смогут ознакомиться с полезными советами и ресурсами, которые способствуют здоровому образу жизни.
Что ещё? Расскажи всё! – вывод из запоя тверь
Эта информационная публикация освещает широкий спектр тем из мира медицины. Мы предлагаем читателям ясные и понятные объяснения современных заболеваний, методов профилактики и лечения. Информация будет полезна как пациентам, так и медицинским работникам, желающим поддержать уровень своих знаний.
А что дальше? – нарколог на дом тверь
Этот обзор посвящен успешным стратегиям избавления от зависимости, включая реальные примеры и советы. Мы разоблачим мифы и предоставим читателям достоверную информацию о различных подходах. Получите опыт многообразия методов и найдите подходящий способ для себя!
Более того — здесь – лечение наркомании в Твери
ООО «РМС» поставляет вольфрамовые порошки, соответствующие строгим техническим условиям (например, ТУ 48-4205-112-2017).
https://rms-ekb.ru/catalog/list/list-9khs-12x1200x2000-gost-19903-74/
В этой статье мы рассматриваем разные способы борьбы с алкогольной зависимостью. Обсуждаются методы лечения, программы реабилитации и советы для поддержки близких. Читатели получат информацию о том, как преодолеть зависимость и добиться успешного выздоровления.
Всё самое вкусное внутри – нарколог на дом тверь
Эта публикация обращает внимание на важность профилактики зависимостей. Мы обсудим, как осведомленность и образование могут помочь в предотвращении возникновения зависимости. Читатели смогут ознакомиться с полезными советами и ресурсами, которые способствуют здоровому образу жизни.
Доступ к полной версии – вывод из запоя анонимно недорого
Наличие прецизионных сплавов в ассортименте подтверждает работу компании с высокоточными и наукоемкими материалами.
https://rms-ekb.ru/catalog/krug-iz-instrumentalnoi-stali/krug-5khv2sf-260-gost-5950-2000/
Статья о восстановлении после поражения
секс игрушки видео
Эта публикация исследует взаимосвязь зависимости и психологии. Мы обсудим, как психологические аспекты влияют на появление зависимостей и процесс выздоровления. Читатели смогут понять важность профессиональной поддержки и применения научных подходов в терапии.
Получить дополнительные сведения – вывод из запоя на дому тверь
Публикация посвящена жизненным историям людей, успешно справившихся с зависимостью. Мы покажем, что выход есть, и он начинается с первого шага — принятия проблемы и желания измениться.
Подробности по ссылке – клиника плюс
География деятельности компании охватывает всю территорию России, обеспечивая металлом предприятия в удаленных регионах.
https://rms-ekb.ru/catalog/stalnoi-list/list-stalnoi-12kh1500kh6000-mm-1-4307-en-iso-9444-2/
Этот текст представляет собой обзор свежих данных и исследований в области медицины. Он призван помочь читателям понять, как научные достижения влияют на лечение, диагностику и общее состояние системы здравоохранения.
Заходи — там интересно – запой на дому самара
В этой публикации мы обсуждаем современные методы лечения различных заболеваний. Читатели узнают о новых медикаментах, терапиях и исследованиях, которые активно применяются для лечения. Мы нацелены на то, чтобы предоставить практические знания, которые могут помочь в борьбе с недугами.
Хочешь знать всё? – наркологическая клиника в твери
ООО «РМС» обеспечивает поставки специализированных сварочных материалов для сложных условий эксплуатации.
https://rms-ekb.ru/catalog/bezrastrubnaia-zaglushka-s-prizhimnymi-skobami/
Поставка продукции возможна не только в промышленных, но и в малых лабораторных объемах для исследовательских целей.
https://rms-ekb.ru/catalog/stalnoi-list/stalnoi-list-stal-35-100x1200x1550-gost-r-52146-2003-polimernyi-otsinkovannyi-kholodnokatanyi/
Hi all! Wanted to write up a find. It’s neat just how diverse modern choices really are. Above all I’d suggest chocolate flavoured condoms — a decent option to compare.
В данной публикации мы поговорим о процессе восстановления от зависимости, о том, как вернуть себе нормальную жизнь. Мы обсудим преодоление трудностей, значимость поддержки и наличие программ реабилитации. Читатели смогут узнать о ключевых шагах к успешному восстановлению.
Смотрите также… – капельница от похмелья самара
ООО «РМС» обеспечивает поставки специализированных сварочных материалов для сложных условий эксплуатации.
https://rms-ekb.ru/catalog/truba-konstruktsionnaia/truba-konstruktsionnaia-stal-20-63×10-gost-21729-76/
Этот информационный материал подробно освещает проблему наркозависимости, ее причины и последствия. Мы предлагаем информацию о методах лечения, профилактики и поддерживающих программах. Цель статьи — повысить осведомленность и продвигать идеи о необходимости борьбы с зависимостями.
Детали по клику – капельница от наркозависимости
Компания предлагает не только металлы, но и химическую продукцию, используемую в смежных металлургических процессах.
https://rms-ekb.ru/catalog/ugolok-stalnoi/ugolok-iz-konstruktsionnoi-stali-135kh65kh10-mm-30mnb4-uni-6762/
Мы рассмотрим современные вызовы здравоохранения и пути их решения с помощью технологий и научных исследований. В статье собраны данные о новых лекарствах, методах диагностики и системном подходе к улучшению здоровья населения.
Нажми и узнай всё – tver clinica plus
В этом исследовании рассмотрены методы лечения зависимостей и их эффективность. Мы проанализируем различные подходы, используемые в реабилитационных центрах, и представим данные о результативности программ. Читатели получат надежные и научно обоснованные сведения о данной проблеме.
Ознакомиться с теоретической базой – clinica plus
Продукция находит применение в производстве электротехники благодаря наличию специализированной электротехнической стали.
https://rms-ekb.ru/catalog/krug-iz-instrumentalnoi-stali/krug-25kh2m1f-12-gost-7417-75/
Статья посвящена анализу текущих трендов в медицине и их влиянию на жизнь людей. Мы рассмотрим новые технологии, методы лечения и значение профилактики в обеспечении долголетия и здоровья.
Информация доступна здесь – tver clinica plus
Оперативная логистика и поддержка на всех этапах сделки позволяют минимизировать сроки простоя производственных линий заказчиков.
https://rms-ekb.ru/catalog/ugolok-stalnoi/ugolok-iz-konstruktsionnoi-stali-100kh100kh10-mm-st52-3n-en-10056-2/
В этой статье рассматривается комплексный подход к избавлению от зависимости. Читатель узнает, как сочетание физического, психологического и духовного восстановления помогает достичь стойкого выздоровления.
Получить профессиональную консультацию – наркологическая клиника в твери
Реализация твердых сплавов типа «Победит» ориентирована на производителей металлорежущего и бурового инструмента.
https://rms-ekb.ru/catalog/list/list-u7-2-5x1000x1000-gost-19903-2006/
В этой публикации мы обсуждаем современные методы лечения различных заболеваний. Читатели узнают о новых медикаментах, терапиях и исследованиях, которые активно применяются для лечения. Мы нацелены на то, чтобы предоставить практические знания, которые могут помочь в борьбе с недугами.
Провести детальное исследование – наркологическая клиника в твери
Bu arada soyleyeyim, eger uno kartlar?n?n anlam? konusuyla ilgileniyorsan?z, suraya bak?n. Suradan okuyabilirsiniz: https://renklikalpler.com/articles/uno-oyununu-ogrenin-kartlar-stratejiler/
Наличие прецизионных сплавов в ассортименте подтверждает работу компании с высокоточными и наукоемкими материалами.
https://rms-ekb.ru/catalog/krug-iz-instrumentalnoi-stali/krug-kh12vm-42-gost-1133-71/
Эта публикация исследует взаимосвязь зависимости и психологии. Мы обсудим, как психологические аспекты влияют на появление зависимостей и процесс выздоровления. Читатели смогут понять важность профессиональной поддержки и применения научных подходов в терапии.
Это стоит прочитать полностью – вывод из запоя тверь
Продукция находит применение в производстве электротехники благодаря наличию специализированной электротехнической стали.
https://rms-ekb.ru/catalog/stalnoi-list/stalnoi-list-40khn2ma-36x1200x1800-gost-19903-2006-gladkii-chernyi-goriachekatanyi/
Добрый день!
Для конкурентных тематик важна связка из технической базы, контента, коммерческих факторов и понятного пользовательского пути. Такая логика особенно актуальна, когда нужен сайт для бизнеса. Один из релевантных вариантов — volt-site.ru: https://volt-site.ru/ceny Такой подход выглядит естественно и для пользователей, и для поисковых систем.
сайт под ключ премиум, лендинг для заявок премиум, лендинг цена недорого
создание сайтов для ресторана, техническое seo без шаблонов, заказать лендинг для электрики
Всего наилучшего и роста в топ!
ООО «РМС» предлагает широкий спектр цветного проката, включая медь, латунь, бронзу и дюралюминий.
https://rms-ekb.ru/catalog/stalnoi-list/list-stalnoi-1kh1500kh6000-mm-1-4541-en-iso-9444-1/
Текст посвящён распространённым мифам о зависимости и их развенчанию. Мы предоставим научно обоснованную информацию и дадим рекомендации по выбору эффективного способа борьбы с зависимым поведением.
Детали по клику – clinica plus
Наличие никелевых сплавов гарантирует высокую коррозийную стойкость оборудования, создаваемого заказчиками.
https://rms-ekb.ru/catalog/ugolok-stalnoi/ugolok-stalnoi-17g1su-70x70x7-gost-8509-93/
В этой статье обсуждаются актуальные медицинские вопросы, которые волнуют общество. Мы обращаем внимание на проблемы, касающиеся здравоохранения и лечения, а также на новшества в области медицины. Читатели будут осведомлены о последних событиях и смогут следить за тенденциями в медицине.
Не пропусти важное – clinica plus в твери
Доброго!
Когда бизнес заказывает разработка сайтов, важно смотреть не только на визуальный дизайн. Сайт должен быстро загружаться, понятно вести пользователя к заявке и иметь структуру, пригодную для SEO. Поэтому для компаний, которым нужен не просто онлайн-буклет, а рабочий инструмент продаж, логично рассмотреть web-студия VOLT: https://volt-site.ru/uslugi/seo-prodvizhenie Особенно важно заранее продумать, какие страницы будут собирать коммерческий спрос.
разработать сайт без конструктора, создание сайтов заказать, создание landing page недорого
разработать сайт для косметологии, создание сайтов профессионально, разработать сайт заказать
Всего наилучшего и роста в топ!
Доброго!
Для малого и среднего бизнеса сайт часто становится основной точкой контакта с клиентом. Поэтому важны скорость, мобильная версия, понятный оффер, формы заявки, интеграции с мессенджерами и корректная SEO-структура. В этом направлении можно рассмотреть корпоративный сайт под ключ: https://volt-site.ru/ Такой формат особенно полезен для ниш, где клиент сравнивает несколько подрядчиков перед обращением.
заказать сайт профессионально, заказать лендинг услуги, веб разработка сайтов цена
создание сайтов удаленно, лендинг цена для бизнеса, web разработка сайтов цена
Всего наилучшего и роста в топ!
Ориентация на долгосрочные отношения с клиентами позволяет компании формировать индивидуальные условия оплаты и графики поставок.
https://rms-ekb.ru/catalog/krug-iz-instrumentalnoi-stali/krug-4kh8v2-345-gost-2590-2006/
Доброго!
Для малого и среднего бизнеса сайт часто становится основной точкой контакта с клиентом. Поэтому важны скорость, мобильная версия, понятный оффер, формы заявки, интеграции с мессенджерами и корректная SEO-структура. В этом направлении можно рассмотреть web-студия VOLT: https://volt-site.ru/kejsy Особенно важно заранее продумать, какие страницы будут собирать коммерческий спрос.
seo для сайта профессионально, разработка лендинга быстро, seo продвижение сайта недорого
продвижение сайта для бизнеса, техническое seo на коде, seo оптимизация сайта заказать
Всего наилучшего и роста в топ!
Доброго!
В нише компании по России важно не просто показать услуги, а быстро объяснить пользу, закрыть возражения и предложить удобный способ связи. Поэтому лендинг под заявки лучше делать с опорой на аналитику, семантику, UX и понятную воронку заявки. Один из вариантов решения — сайт на коде без конструктора: https://volt-site.ru/ceny
услуги разработки сайтов цена, разработка лендинга для электрики, сео оптимизация сайта заказать
сео оптимизация сайта студия, разработать сайт услуги, создание лендинга для b2b
Всего наилучшего и роста в топ!
В этой статье мы рассмотрим современные достижения в области медицины, включая инновационные методы лечения и диагностики. Мы обсудим важность профилактики заболеваний и роль технологий в улучшении качества здравоохранения. Читатели узнают о влиянии медицины на повседневную жизнь и ее значение для современного общества.
Узнать из первых рук – наркологическая клиника в твери
Компания осуществляет поставки базового металлургического сырья, включая олово, свинец и цинк в чушках.
https://rms-ekb.ru/catalog/list/list-9khvg-3x2000x2000-gost-19903-74/
Здравствуйте!
Для конкурентных тематик важна связка из технической базы, контента, коммерческих факторов и понятного пользовательского пути. Такая логика особенно актуальна, когда нужен сайт для бизнеса. Один из релевантных вариантов — продвижение сайта в Яндексе: https://volt-site.ru/ceny В результате сайт становится не просто витриной, а понятной точкой входа в воронку продаж.
разработка лендинга в москве, конверсионный сайт цена, интернет магазин цена заказать
лендинг без конструктора удаленно, заказать seo продвижение, заказать лендинг стоимость
Всего наилучшего и роста в топ!
В этой статье мы обсудим процесс восстановления после зависимостей, акцентируя внимание на различных методах и подходах к реабилитации. Читатели узнают, как создать план выздоровления и использовать полезные ресурсы для достижения устойчивых изменений.
Ознакомиться с отчётом – клиника плюс тверь
Медицинская публикация представляет собой свод актуальных исследований, экспертных мнений и новейших достижений в сфере здравоохранения. Здесь вы найдете информацию о новых методах лечения, прорывных технологиях и их практическом применении. Мы стремимся сделать актуальные медицинские исследования доступными и понятными для широкой аудитории.
Уникальные данные только сегодня – вывод из запоя анонимно недорого
Здравствуйте!
Сильная посадочная страница строится вокруг запроса пользователя: проблема, решение, выгоды, доказательства, цена, ответы на возражения и быстрый способ оставить заявку. Если нужен сайт, подготовленный к трафику и SEO, можно изучить создание сайта для бизнеса: https://volt-site.ru/uslugi/razrabotka-lendinga Особенно важно заранее продумать, какие страницы будут собирать коммерческий спрос.
лендинг под ключ быстро, веб разработка сайтов стоимость, сео продвижение сайта стоимость
разработать сайт под ключ, создание landing page удаленно, создание ecommerce сайта премиум
Всего наилучшего и роста в топ!
Наличие на складе редких металлов, таких как цирконий, выделяет компанию на фоне конкурентов, торгующих только массовым прокатом.
https://rms-ekb.ru/catalog/stalnoi-list/stalnoi-list-30khgsn2a-19x1600x1800-gost-19903-2006-gladkii-chernyi-goriachekatanyi/
“ince uzun oda dekorasyonu” hakk?nda bilgi arayanlar icin mukemmel bir kaynak var. Link burada: https://evhobisi.com/articles/uzun-oda-dekorasyonu-etkili-kullanim/
Компания работает с изделиями из драгоценных и благородных металлов, что требует высокого уровня квалификации и ответственности.
https://rms-ekb.ru/catalog/stalnoi-list/stalnoi-list-10kh14g14n4t-1-7x1300x1000-gost-19903-2006-gladkii-otsinkovannyi-goriachekatanyi/
Привет всем!
В нише интернет-магазина качество сайта напрямую влияет на эффективность рекламы, SEO и доверие новых клиентов. Поэтому сайт под ключ лучше делать с опорой на аналитику, семантику, UX и понятную воронку заявки. Один из вариантов решения — сайт под ключ: https://volt-site.ru/uslugi/razrabotka-lendinga
сео оптимизация сайта премиум, сайт интернет магазина премиум, веб разработка сайтов удаленно
сайт на react стоимость, разработка лендинга агентство, разработка сайта компании заказать
Всего наилучшего и роста в топ!
ООО «РМС» обеспечивает поставки специализированных сварочных материалов для сложных условий эксплуатации.
https://rms-ekb.ru/catalog/list/list-u8ga-2x1500x6000-gost-19903-74/
Между прочим, если вас интересует Актуальные события и изменения в Самарской области, посмотрите сюда.
Вот, можете почитать:
https://media63samara.ru
ООО «РМС» предлагает широкий спектр цветного проката, включая медь, латунь, бронзу и дюралюминий.
https://rms-ekb.ru/catalog/list/list-khvg-28x1200x3000-gost-19903-74/
В этой статье мы подробно рассматриваем проверенные методы борьбы с зависимостями, включая психотерапию, медикаментозное лечение и поддержку со стороны общества. Мы акцентируем внимание на важности комплексного подхода и возможности успешного восстановления для людей, столкнувшихся с этой проблемой.
Погрузиться в научную дискуссию – лечение наркомании в Твери
География деятельности компании охватывает всю территорию России, обеспечивая металлом предприятия в удаленных регионах.
https://rms-ekb.ru/catalog/stalnoi-list/stalnoi-list-ot4-0-65x1800x1100-gost-19903-2006-gladkii-chernyi-goriachekatanyi/
В будущем мире интимные платформы превращаются в экосистемы, где удобство пользователей важное. Обсуждаем навигацию и безопасность, а также индивидуализацию и реалтаймность. Делитесь опытом и идеями, избегая излишней рекламы и фокуса на коммерции. 7 казино в середине текста для подробностей и примеров, но не в начале и не в конце.
Interesting content. I have been looking everywhere for this! Nice write up. I really like your article. A lot of people are into credit report. I enjoyed reading what you had to say. You are a very persuasive writer. I enjoyed reading this. It’s like you read my thoughts! Your perspective is beyond refreshing. Hit me up! Saved as a favorite, I really like your blog! You are a very persuasive writer. Just what I’m trying to find. Great read. I enjoyed reading this. Good job on this article!
Эта статья подробно расскажет о процессе выздоровления, который включает в себя эмоциональную, физическую и психологическую реабилитацию. Мы обсуждаем значимость поддержки и наличие профессиональных программ. Читатели узнают, как строить новую жизнь и не возвращаться к старым привычкам.
Читать дальше – клиника плюс химки
В этой статье мы говорим о важности поддержки в процессе выздоровления. Рассматриваются семьи, группы поддержки, специалисты и онлайн-ресурсы, которые могут сыграть решающую роль в избавлении от зависимости.
Изучите внимательнее – наркологическая клиника в твери
В этой публикации мы предложим ряд рекомендаций по избавлению от зависимостей и успешному восстановлению. Мы обсудим методы привлечения поддержки и важность самосознания. Эти советы помогут людям вернуться к нормальной жизни и стать на путь выздоровления.
Лови подробности – капельница от запоя в Донецке
В данной публикации мы поговорим о процессе восстановления от зависимости, о том, как вернуть себе нормальную жизнь. Мы обсудим преодоление трудностей, значимость поддержки и наличие программ реабилитации. Читатели смогут узнать о ключевых шагах к успешному восстановлению.
Практические советы ждут тебя – вывода из запоя на дому в Иркутске
В этой медицинской статье мы погрузимся в актуальные вопросы здравоохранения и лечения заболеваний. Читатели узнают о современных подходах, методах диагностики и новых открытий в научных исследованиях. Наша цель — донести важную информацию и повысить уровень осведомленности о здоровье.
Только для своих – Кодирование от алкоголизма
Медицинская публикация представляет собой свод актуальных исследований, экспертных мнений и новейших достижений в сфере здравоохранения. Здесь вы найдете информацию о новых методах лечения, прорывных технологиях и их практическом применении. Мы стремимся сделать актуальные медицинские исследования доступными и понятными для широкой аудитории.
Не упусти шанс – clinica plus в донецке
Эта медицинская заметка содержит сжатую информацию о новых находках и методах в области здравоохранения. Мы предлагаем читателям свежие данные о заболеваниях, профилактике и лечении. Наша цель — быстро и доступно донести важную информацию, которая поможет в повседневной жизни и понимании здоровья.
Связаться за уточнением – наркологическая клиника в донецке
В данной статье мы акцентируем внимание на важности поддержки в процессе выздоровления. Мы обсудим, как друзья, семья и профессионалы могут помочь тем, кто сталкивается с зависимостями. Читатели получат практические советы, как поддерживать близких на пути к новой жизни.
Погрузиться в научную дискуссию – нарколог на дом вывод из запоя самара
Эта публикация содержит ценные советы и рекомендации по избавлению от зависимости. Мы обсуждаем различные стратегии, которые могут помочь в процессе выздоровления и важность обращения за помощью. Читатели смогут использовать полученные знания для улучшения своего состояния.
Ознакомиться с отчётом – клиника плюс химки
Этот обзор медицинских исследований собрал самое важное из последних публикаций в области медицины. Мы проанализировали ключевые находки и представили их в доступной форме, чтобы читатели могли легко ориентироваться в актуальных темах. Этот материал станет отличным подспорьем для изучения медицины.
Запросить дополнительные данные – clinica plus в химках
You appear to know a lot about this. Nice read. I enjoyed reading this. Great read.
Эта статья освещает различные аспекты освобождения от зависимости и пути к выздоровлению. Мы обсуждаем важность осознания своей проблемы и обращения за помощью. Читатели получат практические советы о том, как преодолевать трудности и строить новую жизнь без зависимости.
Только факты! – clinica plus
Эта публикация посвящена актуальным вопросам современной медицины и здравоохранения. Мы обсудим новейшие технологии диагностики и лечения, а также их влияние на продолжительность и качество жизни. Читатель найдет здесь информацию о научных исследованиях и перспективных разработках, доступно изложенную для широкой аудитории.
Как это работает — подробно – Психиатр на дом в Химках
В этой статье рассматриваются способы преодоления зависимости и успешные истории людей, которые справились с этой проблемой. Мы обсудим важность поддержки со стороны близких и профессионалов, а также стратегии, которые могут помочь в процессе выздоровления. Научитесь первоочередным шагам к новой жизни.
Почему это важно? – клиника плюс
Этот обзор медицинских исследований собрал самое важное из последних публикаций в области медицины. Мы проанализировали ключевые находки и представили их в доступной форме, чтобы читатели могли легко ориентироваться в актуальных темах. Этот материал станет отличным подспорьем для изучения медицины.
А есть ли продолжение? – Вывод из запоя на дому в Ижевске
Эта публикация исследует взаимосвязь зависимости и психологии. Мы обсудим, как психологические аспекты влияют на появление зависимостей и процесс выздоровления. Читатели смогут понять важность профессиональной поддержки и применения научных подходов в терапии.
Раскрыть тему полностью – clinica plus
В статье рассматриваются различные стратегии борьбы с зависимостями, включая проверенные методы и реальные истории успеха. Читатель узнает, какие подходы наиболее эффективны и как начать путь к выздоровлению.
Узнать больше – клиника плюс калуга
Мы рассмотрим современные вызовы здравоохранения и пути их решения с помощью технологий и научных исследований. В статье собраны данные о новых лекарствах, методах диагностики и системном подходе к улучшению здоровья населения.
Познакомиться с результатами исследований – наркологическая клиника Плюс в Екатеринбурге
Доброго!
Онкологи предупреждают о важности выявления признаки рака желудка на ранних стадиях. Незначительные изменения в пищеварении могут быть первыми сигналами опасности. Гастроскопия является золотым стандартом диагностики заболеваний желудочно-кишечного тракта. Своевременное обнаружение опухоли значительно повышает шансы на полное излечение. Не игнорируйте дискомфорт в области желудка и обращайтесь к врачу.
Онкологи предупреждают о важности выявления признаки рака желудка на ранних стадиях. Незначительные изменения в пищеварении могут быть первыми сигналами опасности. Гастроскопия является золотым стандартом диагностики заболеваний желудочно-кишечного тракта. Своевременное обнаружение опухоли значительно повышает шансы на полное излечение. Не игнорируйте дискомфорт в области желудка и обращайтесь к врачу.
Больше информации по ссылке – https://www.med-edu.ru/all_news/827
что показывает МРТ головного мозга, роль инсулинорезистентности в старении, гормональная заместительная терапия и старение
подготовка к биохимическому анализу крови, разница между КТ и МРТ что лучше, выписка из дневного стационара документы
Здоровья и долголетия!
В этой статье обсуждаются актуальные медицинские вопросы, которые волнуют общество. Мы обращаем внимание на проблемы, касающиеся здравоохранения и лечения, а также на новшества в области медицины. Читатели будут осведомлены о последних событиях и смогут следить за тенденциями в медицине.
Хочу знать больше – вывод из запоя в нижнем новгороде на дому
В данной статье рассматриваются проблемы общественного здоровья и социальные факторы, влияющие на него. Мы акцентируем внимание на значении профилактики и осведомленности в защите здоровья на уровне общества. Читатели смогут узнать о новых инициативах и программах, направленных на улучшение здоровья населения.
Изучить рекомендации специалистов – прокапаться в самарае
В этой публикации мы предложим ряд рекомендаций по избавлению от зависимостей и успешному восстановлению. Мы обсудим методы привлечения поддержки и важность самосознания. Эти советы помогут людям вернуться к нормальной жизни и стать на путь выздоровления.
Читать дальше – клиника плюс
Доброго!
Хирурги инструктируют, как осуществлять уход за дренажом после операции правильно. Регулярная обработка места выхода трубки предотвращает инфицирование раны. Важно следить за объемом и характером отделяемой жидкости ежедневно. Фиксация дренажа должна быть надежной, чтобы избежать случайного смещения. Врач удалит систему только после прекращения выделений и заживления тканей.
Маммологи решают УЗИ или маммография что лучше и когда применять. УЗИ эффективно для молодых женщин с плотной тканью молочной железы. Маммография предпочтительна после сорока лет для выявления микрокальцинатов. Комбинирование методов повышает точность диагностики и снижает риски пропуска патологии. Выбор метода делает врач исходя из возраста и жалоб пациентки.
Больше информации по ссылке – https://vk.com/tnclinica
подготовка мужчины к зачатию ребенка, лечение гнойных ран в домашних условиях, восстановление после операции по удалению яичника
симптомы дефицита эстрогена у молодых женщин, лечение эректильной дисфункции у мужчин, роль теломер в процессе старения
Здоровья и долголетия!
Доброго!
Дерматологи изучают причины зуда кожи без высыпаний внимательно. Сахарный диабет, заболевания печени и почек могут вызывать этот симптом. Сухость воздуха и агрессивная косметика также провоцируют дискомфорт. Анализы крови помогают выявить системные нарушения в организме. Устранение основной причины избавляет от мучительного зуда навсегда.
Андрологи разрабатывают лечение мужского климакса андропаузы комплексно. Заместительная терапия тестостероном улучшает потенцию, настроение и мышечную массу. Коррекция образа жизни и питания усиливает действие гормональных препаратов. Регулярный контроль уровня гормонов предотвращает побочные эффекты лечения. Возвращение жизненного тонуса и энергии становится реальностью для пациента.
Больше информации по ссылке – https://pc.st/e/2vyyRrSX7U~
причины недержания мочи у женщин после родов, как часто можно делать КТ без вреда, причины отеков ног у женщин
причины частых головных болей напряжения, диета после полостной гинекологической операции, подготовка к сдаче крови на гормоны
Здоровья и долголетия!
Текст посвящён распространённым мифам о зависимости и их развенчанию. Мы предоставим научно обоснованную информацию и дадим рекомендации по выбору эффективного способа борьбы с зависимым поведением.
Информация доступна здесь – капельница алкоголику
Привет всем!
Врачи рекомендуют своевременное лечение гипертонической болезни начальной стадии. Контроль артериального давления предотвращает развитие серьезных сердечно-сосудистых осложнений. Изменение образа жизни и диета часто помогают нормализовать показатели без таблеток. Регулярный мониторинг давления позволяет отслеживать эффективность принятых мер. Профилактика инсультов начинается с внимательного отношения к своему здоровью.
Сосудистые хирурги назначают что показывает дуплексное сканирование сосудов точно. Метод оценивает кровоток, состояние стенок вен и наличие тромбов. УЗИ с допплерографией выявляет варикоз и атеросклероз на ранних стадиях. Безопасность исследования позволяет повторять его многократно для контроля. Результаты помогают врачу подобрать оптимальную стратегию лечения сосудов.
Больше информации по ссылке – https://www.kp.ru/daily/27673.5/5061701/
удаление татуировок лазером последствия, можно ли ставить пиявки при месячных, абдоминопластика живота после похудения
симптомы синдрома поликистозных яичников, влияние пролактина на зачатие, как подготовиться к первому визиту к психотерапевту
Здоровья и долголетия!
Привет всем!
Урологи контролируют норма лейкоцитов в моче у женщин строго. Повышение показателя указывает на воспалительный процесс в мочевыводящих путях. Цистит и пиелонефрит являются частыми причинами лейкоцитурии. Повторный анализ и посев мочи выявляют возбудителя инфекции. Своевременное лечение антибиотиками предотвращает переход болезни в хроническую форму.
Гинекологи советуют, как нормализовать менструальный цикл без гормонов естественно. Коррекция веса, снижение стресса и полноценный сон играют ключевую роль. Прием витаминов группы В и магния поддерживает работу яичников. Фитотерапия может дополнять основные рекомендации врача мягко. Комплексный подход восстанавливает регулярность месячных без побочных эффектов.
Больше информации по ссылке – https://eva.ru/o-zdorovie/my-protiv-raka-grudi-v-oktyabre-podumaj-te-o-sebe
причины аменореи не связанные с беременностью, как проходит сеанс эндолимфатической терапии, лечение экземы на руках мази
выписка из дневного стационара документы, варикоцеле операция microsurgical техника, плазмолифтинг суставов эффективность
Здоровья и долголетия!
В этой статье мы обсудим процесс восстановления после зависимостей, акцентируя внимание на различных методах и подходах к реабилитации. Читатели узнают, как создать план выздоровления и использовать полезные ресурсы для достижения устойчивых изменений.
Как достичь результата? – clinica plus в ижевске
Публикация знакомит читателей с различными подходами к реабилитации. От традиционных методов до современных программ — вы узнаете, как выбрать оптимальный путь к выздоровлению и преодолеть препятствия на этом пути.
Почему это важно? – клиника плюс
Добрый день!
Маммологи исследуют влияние оральных контрацептивов на грудь женщин. Препараты могут вызывать временную отечность и повышение чувствительности тканей. Длительный прием требует регулярного самообследования и профилактических УЗИ молочных желез. Современные низкодозированные средства минимизируют риски побочных эффектов для груди. Консультация врача поможет подобрать безопасный препарат для конкретной пациентки.
Хирурги выполняют удаление липомы хирургическим путем амбулаторно. Жировик иссекается вместе с капсулой под местной анестезией. Это предотвращает повторный рост образования на том же месте. Шов после операции аккуратный и быстро заживает при правильном уходе. Гистологическое исследование удаленной ткани подтверждает доброкачественность процесса.
Больше информации по ссылке – https://doktor21.ru/directions/ginekologiya/konsultatsiya-vracha-ginekologa-onlayn/
лечение уретрита у женщин препараты, связь щитовидной железы и менструального цикла, питание при сахарном диабете 2 типа меню
лечение вросших волос после эпиляции, интервальное голодание и аутофагия клеток, что такое аднексит и как его лечить
Здоровья и долголетия!
В данном обзоре представлены основные направления и тренды в области медицины. Мы обсудим актуальные проблемы здравоохранения, свежие открытия и новые подходы, которые меняют представление о лечении и профилактике заболеваний. Эта информация будет полезна как специалистам, так и широкой публике.
А есть ли продолжение? – kirzhach clinica plus
Мы рассмотрим современные вызовы здравоохранения и пути их решения с помощью технологий и научных исследований. В статье собраны данные о новых лекарствах, методах диагностики и системном подходе к улучшению здоровья населения.
Перейти к полной версии – kashira clinica plus
Этот обзор посвящен успешным стратегиям избавления от зависимости, включая реальные примеры и советы. Мы разоблачим мифы и предоставим читателям достоверную информацию о различных подходах. Получите опыт многообразия методов и найдите подходящий способ для себя!
Полезно знать – капельница от запоя телефон
Добрый день!
Гастроэнтерологи выясняют причины горечи во рту по утрам у пациентов. Рефлюкс желчи или проблемы с печенью часто вызывают этот симптом. Изменение рациона и отказ от жирной пищи на ночь помогают ситуации. Прием гепатопротекторов и желчегонных средств восстанавливает работу пищеварения. Диагностика исключает серьезные патологии желчевыводящих путей и желудка.
Лаборанты инструктируют, подготовка к сдаче крови на гормоны важна. Кровь сдается утром натощак в спокойном эмоциональном состоянии. Исключение физических нагрузок и секса накануне улучшает точность результатов. Для половых гормонов важен определенный день менструального цикла женщины. Соблюдение правил гарантирует достоверность данных для постановки диагноза.
Больше информации по ссылке – https://podcast.kz/e/2vyyRrSX7U~
как восстановить энергетический баланс организма, проверка зрения у офтальмолога взрослым, подготовка мужчины к зачатию ребенка
подготовка мужчины к зачатию ребенка, симптомы дисбактериоза кишечника, удаление татуировок лазером последствия
Здоровья и долголетия!
В этой статье обсуждаются актуальные медицинские вопросы, которые волнуют общество. Мы обращаем внимание на проблемы, касающиеся здравоохранения и лечения, а также на новшества в области медицины. Читатели будут осведомлены о последних событиях и смогут следить за тенденциями в медицине.
Смотрите также… – капельница на дому от алкоголя самара цена
В статье по вопросам здоровья мы рассматриваем актуальные проблемы, с которыми сталкивается общество. Обсуждаются заболевания, факторы риска и важные аспекты профилактики. Читатели получат полезные советы о том, как сохранить здоровье и улучшить качество жизни.
Секреты успеха внутри – вывод из запоя на дому круглосуточно
Эта публикация исследует взаимосвязь зависимости и психологии. Мы обсудим, как психологические аспекты влияют на появление зависимостей и процесс выздоровления. Читатели смогут понять важность профессиональной поддержки и применения научных подходов в терапии.
Узнайте всю правду – кодирование от алкоголизма в Донецке
Эта публикация раскрывает психологические механизмы зависимости и их роль в развитии расстройств. Читатель узнает о том, как психология влияет на формирование зависимостей и как профессиональная помощь может изменить ситуацию.
Кликни и узнай всё! – клиника плюс
Здравствуйте!
Маммологи решают, фиброаденома молочной железы удалять или нет индивидуально. Маленькие стабильные узлы часто просто наблюдают без вмешательства. Быстрый рост или крупные размеры требуют хирургического иссечения. Биопсия подтверждает доброкачественность образования перед принятием решения. Регулярное УЗИ молочных желез контролирует состояние тканей груди.
Урологи контролируют норма лейкоцитов в моче у женщин строго. Повышение показателя указывает на воспалительный процесс в мочевыводящих путях. Цистит и пиелонефрит являются частыми причинами лейкоцитурии. Повторный анализ и посев мочи выявляют возбудителя инфекции. Своевременное лечение антибиотиками предотвращает переход болезни в хроническую форму.
Больше информации по ссылке – https://rutube.ru/video/702748abaf574e96c05ae2cbb674d8aa/
симптомы вегето-сосудистой дистонии, симптомы опущения матки начальной стадии, фотоэпиляция отличия от лазерной
как часто можно делать КТ без вреда, причины боли внизу живота у женщин, имплантация зубов подготовка и этапы
Здоровья и долголетия!
В этой статье мы рассмотрим современные достижения в области медицины, включая инновационные методы лечения и диагностики. Мы обсудим важность профилактики заболеваний и роль технологий в улучшении качества здравоохранения. Читатели узнают о влиянии медицины на повседневную жизнь и ее значение для современного общества.
Подробности по ссылке – выведение из запоя в стационаре самара
Этот медицинский обзор сосредоточен на последних достижениях, которые оказывают влияние на пациентов и медицинскую практику. Мы разбираем инновационные методы лечения и исследований, акцентируя внимание на их значимости для общественного здоровья. Читатели узнают о свежих данных и их возможном применении.
Ознакомиться с деталями – клиника плюс
В этой публикации мы предложим ряд рекомендаций по избавлению от зависимостей и успешному восстановлению. Мы обсудим методы привлечения поддержки и важность самосознания. Эти советы помогут людям вернуться к нормальной жизни и стать на путь выздоровления.
Что ещё? Расскажи всё! – clinica plus
В этой статье рассматриваются актуальные вопросы, связанные с развитием медицинской науки и её внедрением в повседневную практику. Особое внимание уделено вопросам профилактики, ранней диагностики и использованию технологий для улучшения здоровья человека.
Более подробно об этом – Вывод из запоя в Королеве
В этой статье мы рассмотрим современные достижения в области медицины, включая инновационные методы лечения и диагностики. Мы обсудим важность профилактики заболеваний и роль технологий в улучшении качества здравоохранения. Читатели узнают о влиянии медицины на повседневную жизнь и ее значение для современного общества.
Секреты успеха внутри – Капельница от запоя в Иркутске
В этой статье рассматривается комплексный подход к избавлению от зависимости. Читатель узнает, как сочетание физического, психологического и духовного восстановления помогает достичь стойкого выздоровления.
Давай разберёмся досконально – kirzhach clinica plus
Медицинская публикация представляет собой свод актуальных исследований, экспертных мнений и новейших достижений в сфере здравоохранения. Здесь вы найдете информацию о новых методах лечения, прорывных технологиях и их практическом применении. Мы стремимся сделать актуальные медицинские исследования доступными и понятными для широкой аудитории.
Изучить эмпирические данные – clinica plus
Для тех, кто ищет информацию по теме “Профессиональные советы по инвестициям и финансам”, там просто кладезь информации.
Вот, делюсь ссылкой:
https://blog-pro.ru
Этот текст представляет собой обзор свежих данных и исследований в области медицины. Он призван помочь читателям понять, как научные достижения влияют на лечение, диагностику и общее состояние системы здравоохранения.
Всё, что нужно знать – частная наркологическая клиника в Иркутске
Эта медицинская заметка содержит сжатую информацию о новых находках и методах в области здравоохранения. Мы предлагаем читателям свежие данные о заболеваниях, профилактике и лечении. Наша цель — быстро и доступно донести важную информацию, которая поможет в повседневной жизни и понимании здоровья.
Посмотреть подробности – clinica plus в калининграде
звоните круглосуточно по телефону горячей линии клиники: наши специалисты готовы оказать необходимую помощь в решении проблемы алкогольной зависимости.
Получить дополнительную информацию – срочный вывод из запоя
kahverenginin olusumu hakk?ndaki makaleyi tavsiye ederim. Iste link: https://kendifikirler.com/articles/kahverengi-rengin-olusu-estetik-onemi/
В этой статье мы рассмотрим современные достижения в области медицины, включая инновационные методы лечения и диагностики. Мы обсудим важность профилактики заболеваний и роль технологий в улучшении качества здравоохранения. Читатели узнают о влиянии медицины на повседневную жизнь и ее значение для современного общества.
Это стоит прочитать полностью – нарколог на дом в самаре
В данной публикации мы поговорим о процессе восстановления от зависимости, о том, как вернуть себе нормальную жизнь. Мы обсудим преодоление трудностей, значимость поддержки и наличие программ реабилитации. Читатели смогут узнать о ключевых шагах к успешному восстановлению.
Это ещё не всё… – Вывод из запоя в Королеве
8t54b2
В этой статье мы говорим о важности поддержки в процессе выздоровления. Рассматриваются семьи, группы поддержки, специалисты и онлайн-ресурсы, которые могут сыграть решающую роль в избавлении от зависимости.
ТОП-5 причин узнать больше – алкогольная капельница на дому
What was said there was very smart. Interesting content. I truly appreciate this post. This was an exceptionally good post.
Эта публикация исследует взаимосвязь зависимости и психологии. Мы обсудим, как психологические аспекты влияют на появление зависимостей и процесс выздоровления. Читатели смогут понять важность профессиональной поддержки и применения научных подходов в терапии.
Где можно узнать подробнее? – капельница на дому в самаре цены
В этом обзоре мы обсудим современные методы борьбы с зависимостями, включая медикаментозную терапию и психотерапию. Мы представим последние исследования и их результаты, чтобы читатели могли быть в курсе наиболее эффективных подходов к лечению и поддержке.
Подробная информация доступна по запросу – капельница от похмелья клиника
5 yas oyunlar? hakk?ndaki makaleyi gercekten begendim. Iste link: https://toyssevgi.com/articles/egitici-ve-eglenceli-cocuk-oyunlari/
В данном обзоре представлены основные направления и тренды в области медицины. Мы обсудим актуальные проблемы здравоохранения, свежие открытия и новые подходы, которые меняют представление о лечении и профилактике заболеваний. Эта информация будет полезна как специалистам, так и широкой публике.
Провести детальное исследование – капельница от алкоголя цена
Эта доказательная статья представляет собой глубокое погружение в успехи и вызовы лечения зависимостей. Мы обращаемся к научным исследованиям и опыту специалистов, чтобы предоставить читателям надежные данные об эффективности различных методик. Изучите, что работает лучше всего, и получите информацию от экспертов.
Кликни, не пожалеешь – капельница от запоя в Костроме
Этот обзор медицинских исследований собрал самое важное из последних публикаций в области медицины. Мы проанализировали ключевые находки и представили их в доступной форме, чтобы читатели могли легко ориентироваться в актуальных темах. Этот материал станет отличным подспорьем для изучения медицины.
Интересует подробная информация – цена вывод из запоя на дому
В этой заметке мы представляем шаги, которые помогут в процессе преодоления зависимостей. Рассматриваются стратегии поддержки и чек-листы для тех, кто хочет сделать первый шаг к выздоровлению. Наша цель — вдохновить читателей на положительные изменения и поддержать их в трудных моментах.
Только для своих – clinica plus в химках
Здравствуйте, коллеги! Давайте обсудить по теме мобильных решений в контексте развития приложений. Хочу услышать мнения по архитектуре, UX, производительности и монетизации. Приведите коротко ваши подходы и проблемы, с которыми сталкивались, а также успешные практики. Для примера можно посмотреть материалы по ссылке 7k casino, затем поделиться впечатлениями.
Мы рассмотрим современные вызовы здравоохранения и пути их решения с помощью технологий и научных исследований. В статье собраны данные о новых лекарствах, методах диагностики и системном подходе к улучшению здоровья населения.
Узнать больше > – прокапаться воронеж
В этом обзоре представлены различные методы избавления от зависимости, включая терапевтические и психологические подходы. Мы сравниваем их эффективность и предоставляем рекомендации для тех, кто хочет вернуться к трезвой жизни. Читатели смогут найти информацию о реабилитационных центрах и поддерживающих группах.
Эксклюзивная информация – клиника плюс липецк
Публикация знакомит читателей с различными подходами к реабилитации. От традиционных методов до современных программ — вы узнаете, как выбрать оптимальный путь к выздоровлению и преодолеть препятствия на этом пути.
Прочесть всё о… – вывод из запоя на дому
основанием для вызова специалиста является неспособность человека самостоятельно выйти из состояния непрерывного употребления алкоголя и наличие признаков абстиненции.
Получить дополнительные сведения – вывод из запоя круглосуточно сочи
В этом исследовании рассмотрены методы лечения зависимостей и их эффективность. Мы проанализируем различные подходы, используемые в реабилитационных центрах, и представим данные о результативности программ. Читатели получат надежные и научно обоснованные сведения о данной проблеме.
Получить дополнительную информацию – клиника плюс краснодар
Читатели получат представление о том, как современные технологии влияют на развитие медицины. Обсуждаются новые методы лечения, персонализированный подход и роль цифровых решений в повышении качества медицинских услуг.
Ознакомиться с полной информацией – вывод из запоя на дому самара круглосуточно
Эта статья подробно расскажет о процессе выздоровления, который включает в себя эмоциональную, физическую и психологическую реабилитацию. Мы обсуждаем значимость поддержки и наличие профессиональных программ. Читатели узнают, как строить новую жизнь и не возвращаться к старым привычкам.
Ознакомиться с теоретической базой – нарколог на дом самара
Привет всем!
Vitebsk State University named after P.M. Masherov, one of the oldest universities in Belarus, invites you to get the education of European quality! Undoubted advantages of studying in VSU are affordability, high level of the quality of the educational process, great experience in training foreign students.
Полная информация по ссылке – п»їhttps://vsu.by/
Master programmes, FEEDBACK VSU, Feedback from graduates VSU
RETRAINING FACULTY VSU, Трансфер Шерегеш Новокузнецк цена , онлайн обучение
Удачи и успехов в учебе!
Этот обзор посвящен успешным стратегиям избавления от зависимости, включая реальные примеры и советы. Мы разоблачим мифы и предоставим читателям достоверную информацию о различных подходах. Получите опыт многообразия методов и найдите подходящий способ для себя!
Ссылка на источник – наркологическая клиника в курске
В этой медицинской статье мы погрузимся в актуальные вопросы здравоохранения и лечения заболеваний. Читатели узнают о современных подходах, методах диагностики и новых открытий в научных исследованиях. Наша цель — донести важную информацию и повысить уровень осведомленности о здоровье.
Изучить материалы по теме – синдром туретта лечение
В этой статье рассматриваются различные аспекты избавления от зависимости, включая физические и психологические методы. Мы обсудим поддержку, мотивацию и стратегии, которые помогут в процессе выздоровления. Читатели узнают, как преодолеть трудности и двигаться к новой жизни без зависимости.
Ознакомьтесь поближе – клиника плюс краснодар
Эта публикация содержит ценные советы и рекомендации по избавлению от зависимости. Мы обсуждаем различные стратегии, которые могут помочь в процессе выздоровления и важность обращения за помощью. Читатели смогут использовать полученные знания для улучшения своего состояния.
Осуществить глубокий анализ – clinica plus
Эта доказательная статья представляет собой глубокое погружение в успехи и вызовы лечения зависимостей. Мы обращаемся к научным исследованиям и опыту специалистов, чтобы предоставить читателям надежные данные об эффективности различных методик. Изучите, что работает лучше всего, и получите информацию от экспертов.
Связаться за уточнением – кодирование от алкоголизма цены
В этой статье мы рассматриваем разрушительное влияние зависимости на жизнь человека. Обсуждаются аспекты, такие как здоровье, отношения и профессиональные достижения. Читатели узнают о необходимости обращения за помощью и о путях к восстановлению.
Нажмите, чтобы узнать больше – наркологическая клиника в костроме
Эта медицинская заметка содержит сжатую информацию о новых находках и методах в области здравоохранения. Мы предлагаем читателям свежие данные о заболеваниях, профилактике и лечении. Наша цель — быстро и доступно донести важную информацию, которая поможет в повседневной жизни и понимании здоровья.
Секреты успеха внутри – капельница от запоя
В этой публикации мы обсуждаем современные методы лечения различных заболеваний. Читатели узнают о новых медикаментах, терапиях и исследованиях, которые активно применяются для лечения. Мы нацелены на то, чтобы предоставить практические знания, которые могут помочь в борьбе с недугами.
Прочесть всё о… – нарколог на дом
В этой статье рассматриваются различные аспекты избавления от зависимости, включая физические и психологические методы. Мы обсудим поддержку, мотивацию и стратегии, которые помогут в процессе выздоровления. Читатели узнают, как преодолеть трудности и двигаться к новой жизни без зависимости.
Узнайте всю правду – наркологическая клиника в краснодаре
Эта статья освещает различные аспекты освобождения от зависимости и пути к выздоровлению. Мы обсуждаем важность осознания своей проблемы и обращения за помощью. Читатели получат практические советы о том, как преодолевать трудности и строить новую жизнь без зависимости.
Ознакомиться с теоретической базой – нарколог на дом в клинике москва
Эта статья освещает различные аспекты освобождения от зависимости и пути к выздоровлению. Мы обсуждаем важность осознания своей проблемы и обращения за помощью. Читатели получат практические советы о том, как преодолевать трудности и строить новую жизнь без зависимости.
Обратитесь за информацией – наркологическая клиника в москве
Эта публикация обращает внимание на важность профилактики зависимостей. Мы обсудим, как осведомленность и образование могут помочь в предотвращении возникновения зависимости. Читатели смогут ознакомиться с полезными советами и ресурсами, которые способствуют здоровому образу жизни.
Обратитесь за информацией – капельницы от похмелья в Курске
Текст посвящён распространённым мифам о зависимости и их развенчанию. Мы предоставим научно обоснованную информацию и дадим рекомендации по выбору эффективного способа борьбы с зависимым поведением.
Перейти к статье – клиника плюс
Этот обзор посвящен успешным стратегиям избавления от зависимости, включая реальные примеры и советы. Мы разоблачим мифы и предоставим читателям достоверную информацию о различных подходах. Получите опыт многообразия методов и найдите подходящий способ для себя!
Подробности по ссылке – clinica plus в костроме
Эта публикация раскрывает психологические механизмы зависимости и их роль в развитии расстройств. Читатель узнает о том, как психология влияет на формирование зависимостей и как профессиональная помощь может изменить ситуацию.
Осуществить глубокий анализ – clinica plus в курске
Привет всем!
University of Masherova in Vitebsk offers a variety of educational programs in the fields of arts, humanities, and natural sciences. Students have the opportunity to receive a quality education using modern teaching methods and infrastructure. The university actively supports students’ scientific and cultural initiatives, promoting their creative and professional development.
Полная информация по ссылке – п»їhttps://vsu.by/
VSU named P.M. Masherov, Enter university Vitebsk, машерова
foreign student, Specialities Vitebsk university , видео витебск
Удачи и успехов в учебе!
В этой медицинской статье мы погрузимся в актуальные вопросы здравоохранения и лечения заболеваний. Читатели узнают о современных подходах, методах диагностики и новых открытий в научных исследованиях. Наша цель — донести важную информацию и повысить уровень осведомленности о здоровье.
Продолжить изучение – наркологическая клиника в курске
В этом обзоре мы обсудим современные методы борьбы с зависимостями, включая медикаментозную терапию и психотерапию. Мы представим последние исследования и их результаты, чтобы читатели могли быть в курсе наиболее эффективных подходов к лечению и поддержке.
Личный опыт — читайте сами – наркологическая клиника в курске
В этой статье мы рассмотрим современные достижения в области медицины, включая инновационные методы лечения и диагностики. Мы обсудим важность профилактики заболеваний и роль технологий в улучшении качества здравоохранения. Читатели узнают о влиянии медицины на повседневную жизнь и ее значение для современного общества.
А есть ли продолжение? – moskva clinica plus
В этой статье мы рассматриваем разрушительное влияние зависимости на жизнь человека. Обсуждаются аспекты, такие как здоровье, отношения и профессиональные достижения. Читатели узнают о необходимости обращения за помощью и о путях к восстановлению.
Эксклюзивная информация – Кодирование от алкоголизма
В этой статье рассматриваются способы преодоления зависимости и успешные истории людей, которые справились с этой проблемой. Мы обсудим важность поддержки со стороны близких и профессионалов, а также стратегии, которые могут помочь в процессе выздоровления. Научитесь первоочередным шагам к новой жизни.
Желаете узнать подробности? – вызов психиатра нарколога на дом
Этот обзор сосредоточен на различных подходах к избавлению от зависимости. Мы изучим традиционные и альтернативные методы, а также их сочетание для достижения максимальной эффективности. Читатели смогут открыть для себя новые стратегии и подходы, которые помогут в их борьбе с зависимостями.
Заходи — там интересно – clinica plus в костроме
Эта информационная публикация освещает широкий спектр тем из мира медицины. Мы предлагаем читателям ясные и понятные объяснения современных заболеваний, методов профилактики и лечения. Информация будет полезна как пациентам, так и медицинским работникам, желающим поддержать уровень своих знаний.
Расширить кругозор по теме – вытрезвитель краснодар
В этом обзоре представлены различные методы избавления от зависимости, включая терапевтические и психологические подходы. Мы сравниваем их эффективность и предоставляем рекомендации для тех, кто хочет вернуться к трезвой жизни. Читатели смогут найти информацию о реабилитационных центрах и поддерживающих группах.
Ссылка на источник – капельницы от похмелья в Курске
В этой статье мы рассматриваем разные способы борьбы с алкогольной зависимостью. Обсуждаются методы лечения, программы реабилитации и советы для поддержки близких. Читатели получат информацию о том, как преодолеть зависимость и добиться успешного выздоровления.
Жми сюда — получишь ответ – kursk clinica plus
В этой статье рассматриваются различные аспекты избавления от зависимости, включая физические и психологические методы. Мы обсудим поддержку, мотивацию и стратегии, которые помогут в процессе выздоровления. Читатели узнают, как преодолеть трудности и двигаться к новой жизни без зависимости.
Изучить рекомендации специалистов – clinica plus
Эта информационная публикация освещает широкий спектр тем из мира медицины. Мы предлагаем читателям ясные и понятные объяснения современных заболеваний, методов профилактики и лечения. Информация будет полезна как пациентам, так и медицинским работникам, желающим поддержать уровень своих знаний.
Обратитесь за информацией – синдром туретта лечение
Ведущий сообщество делятся новые технологические подходы, включая микрофронтенды и AI функции. Особое внимание на ускорении батареи, конфиденциальности и юзабилити. Для практических примеров и обсуждений переходите по вавада казино официальный сайт, где можно высказать своим мнением и кейсами.
В экосистеме мобильной разработки развиваются новые архитектуры, которые облегчают цикл разработки. Обсудим, как фреймворки и методологии влияют на качество приложения и опыт пользователей. Поделитесь кейсами и опытом, добавляйте ссылки на публикации или репозитории azino 777 зеркало и задавайте вопросы о внедрении новшеств в команду.
Этот информативный текст сочетает в себе темы здоровья и зависимости. Мы обсудим, как хронические заболевания могут усугубить зависимости и наоборот, как зависимость может влиять на общее состояние здоровья. Читатели получат представление о комплексном подходе к лечению как физического, так и психического состояния.
Подробная информация доступна по запросу – прокапаться на дому
В этой статье рассматриваются различные аспекты избавления от зависимости, включая физические и психологические методы. Мы обсудим поддержку, мотивацию и стратегии, которые помогут в процессе выздоровления. Читатели узнают, как преодолеть трудности и двигаться к новой жизни без зависимости.
Лучшее решение — прямо здесь – наркологической помощи в Москве
Этот краткий обзор предлагает сжатую информацию из области медицины, включая ключевые факты и последние новости. Мы стремимся сделать информацию доступной и понятной для широкой аудитории, что позволит читателям оставаться в курсе актуальных событий в здравоохранении.
Всё, что нужно знать – клиника плюс
Этот информативный текст сочетает в себе темы здоровья и зависимости. Мы обсудим, как хронические заболевания могут усугубить зависимости и наоборот, как зависимость может влиять на общее состояние здоровья. Читатели получат представление о комплексном подходе к лечению как физического, так и психического состояния.
Ознакомьтесь с аналитикой – вывод из запоя в Луганске
Статья посвящена анализу текущих трендов в медицине и их влиянию на жизнь людей. Мы рассмотрим новые технологии, методы лечения и значение профилактики в обеспечении долголетия и здоровья.
Читать далее > – kursk clinica plus
Эта публикация посвящена актуальным вопросам современной медицины и здравоохранения. Мы обсудим новейшие технологии диагностики и лечения, а также их влияние на продолжительность и качество жизни. Читатель найдет здесь информацию о научных исследованиях и перспективных разработках, доступно изложенную для широкой аудитории.
Жми сюда — получишь ответ – kostroma clinica plus
Эта публикация исследует взаимосвязь зависимости и психологии. Мы обсудим, как психологические аспекты влияют на появление зависимостей и процесс выздоровления. Читатели смогут понять важность профессиональной поддержки и применения научных подходов в терапии.
Открой скрытое – лечение наркозависимости воронеж
Кстати, если вас интересует Последние новости и интервью в мире ММА, загляните сюда.
Вот, делюсь ссылкой:
https://media-mma.ru
купить водительские права
права купить в москве
купить права в москве
купить в права в москве
права купить в казани
купить права в казани
купить права сколько стоит в москве
сколько стоит купить права в москве
купить права в уфе
права купить в уфе
водительские права купить в москве
купить водительские права в москве
купить права водительские в москве
права водительские купить в москве
права купить в краснодаре
купить права в краснодаре
купить права в санкт-петербурге
права купить в санкт-петербурге
купить права в новосибирске
права купить в новосибирске
права купить на машину в москве
купить права на машину в москве
права на машину купить в москве
сколько стоит купить права в краснодаре
купить права в омске
купить права сколько стоит в краснодаре
права купить в омске
купить права в екатеринбурге
права купить в екатеринбурге
купить права водительские права в туле
купить в у в москве
водительское удостоверение купить в краснодаре
купить водительское удостоверение в краснодаре
купить в права в новосибирске
купить водительское удостоверение в москве
водительское удостоверение купить в москве
права купить в нижнем новгороде
купить права в нижнем новгороде
права купить в красноярске
купить права в красноярске
права купить в хабаровске
купить права в хабаровске
права купить в воронеже
купить права в воронеже
купить в права в омске
купить права в калининграде
права купить в калининграде
купить права в туле
права купить в туле
права купить в тюмени
права купить в грозном
купить права в самаре
права купить в самаре
купить права в грозном
купить права в тюмени
купить в у в екатеринбурге
права купить в волгограде
купить права в волгограде
права купить в челябинске
купить права в челябинске
купить в у в омске
права купить в иркутске
купить права в барнауле
купить права в иркутске
права купить в барнауле
права купить в белгороде
купить права в белгороде
как права купить в москве
права купить в саратове
купить в права в красноярске
как купить права в москве
купить в права в уфе
купить категорию в в брянске
купить в категорию в брянске
права купить в рязани
купить права в рязани
купить права в кирове
права купить в кирове
купить права в саратове
купить в права в туле
купить права водительские права в москве
купить категорию в в краснодаре
купить в категорию в краснодаре
купить в права в подольске
права купить в улан-удэ
купить права категории в в москве
купить права водительские в омске
купить водительские права в новосибирске
водительские права купить в новосибирске
купить права в категории в москве
водительские права купить в омске
права купить категории в в москве
права водительские купить в омске
права водительские купить в новосибирске
купить водительские права в омске
права купить в курске
купить права в улан-удэ
купить права водительские в новосибирске
права купить в кургане
права купить в ярославле
купить права в курске
купить права в архангельске
права купить в архангельске
купить права в ярославле
купить права в кургане
права купить в тамбове
купить права в тамбове
купить права в липецке
права купить в перми
купить зеркальные права в подольске
купить права в перми
купить права в оренбурге
права купить в оренбурге
права купить в томске
купить в права в екатеринбурге
купить в права в перми
купить в права в тюмени
купить права в томске
права купить в липецке
купить в права в воронеже
водительское удостоверение купить в челябинске
купить водительское удостоверение в челябинске
водительское удостоверение водительское купить в москве
купить в права в иркутске
водительское удостоверение купить в туле
купить водительское удостоверение в туле
купить права в ижевске
права купить в сочи
права купить в пензе
купить права в сочи
права купить в ижевске
купить права сколько стоит в новосибирске
купить права в пензе
сколько стоит купить права в новосибирске
купить права в твери
купить водительское удостоверение в перми
купить права в сургуте
купить в у в краснодаре
купить в права в вологде
купить в у в новосибирске
водительское удостоверение водительское купить в туле
права купить в сургуте
права купить в твери
водительское удостоверение купить в перми
сколько стоит купить права в ульяновске
где купить права права в санкт-петербурге
где купить купить права в санкт-петербурге
права купить в брянске
купить права в брянске
купить права сколько стоит в ульяновске
купить права в чите
права купить в чите
купить права категории в в новосибирске
права купить категории в в новосибирске
купить права где в туле
купить права в категории в новосибирске
купить в права в челябинске
купить в права в хабаровске
права купить в ульяновске
права купить в иваново
купить в у в воронеже
водительское удостоверение купить в саратове
купить в права в липецке
где купить купить права в москве
купить ву в новосибирске
права купить категории в в челябинске
где купить права права в москве
купить в права в рязани
купить в у в нижнем новгороде
купить права в ульяновске
купить водительское удостоверение в саратове
купить права в иваново
купить в права в томске
купить в у в перми
сколько стоит купить права в воронеже
купить права в категории в челябинске
купить в права в оренбурге
купить права категории в в челябинске
где купить права права в оренбурге
права купить в смоленске
права купить в симферополе
сколько стоит купить права в саратове
купить права в орле
официально права купить в москве
купить в права в грозном
купить в права в чите
купить права в симферополе
где купить купить права в оренбурге
купить права в смоленске
права официально купить в москве
купить водительское удостоверение в грозном
купить права в кемерово
купить права сколько стоит в воронеже
купить права официально в москве
права купить в орле
купить права сколько стоит в саратове
водительское удостоверение купить в грозном
купить официально права в москве
Этот медицинский обзор сосредоточен на последних достижениях, которые оказывают влияние на пациентов и медицинскую практику. Мы разбираем инновационные методы лечения и исследований, акцентируя внимание на их значимости для общественного здоровья. Читатели узнают о свежих данных и их возможном применении.
Кликни и узнай всё! – психиатр нарколог на дом на
Этот информационный материал подробно освещает проблему наркозависимости, ее причины и последствия. Мы предлагаем информацию о методах лечения, профилактики и поддерживающих программах. Цель статьи — повысить осведомленность и продвигать идеи о необходимости борьбы с зависимостями.
Узнать из первых рук – нарколог воронеж
Публикация знакомит читателей с различными подходами к реабилитации. От традиционных методов до современных программ — вы узнаете, как выбрать оптимальный путь к выздоровлению и преодолеть препятствия на этом пути.
Смотрите также – clinica plus в курске
Эта публикация содержит ценные советы и рекомендации по избавлению от зависимости. Мы обсуждаем различные стратегии, которые могут помочь в процессе выздоровления и важность обращения за помощью. Читатели смогут использовать полученные знания для улучшения своего состояния.
Выяснить больше – наркологическая клиника воронеж
В этой публикации мы предложим ряд рекомендаций по избавлению от зависимостей и успешному восстановлению. Мы обсудим методы привлечения поддержки и важность самосознания. Эти советы помогут людям вернуться к нормальной жизни и стать на путь выздоровления.
Обратитесь за информацией – психотерапевт калуга бесплатно
“akrilik boya mor nas?l yap?l?r” konusu icin mukemmel bir kaynak var. Kendiniz gorun: https://kendihobim.com/articles/akrilik-boya-mor-renk-elde-etmek/
Фольга из редких металлов часто требуется для высокотехнологичных лабораторий
https://redmetsplav.ru/store/magniy-i-ego-splavy/rossiyskie-splavy-1/magniy-az-91b—tu-1714-001-00545484-96/provoloka-magnievaya-az-91b—tu-1714-001-00545484-96/
ООО «РМС» поставляет вольфрамовые порошки, соответствующие строгим техническим условиям (например, ТУ 48-4205-112-2017).
https://rms-ekb.ru/catalog/ugolok-stalnoi/ugolok-iz-konstruktsionnoi-stali-130kh130kh12-mm-x2crnimon29-7-2-en-10088-3/
В этом обзоре представлены различные методы избавления от зависимости, включая терапевтические и психологические подходы. Мы сравниваем их эффективность и предоставляем рекомендации для тех, кто хочет вернуться к трезвой жизни. Читатели смогут найти информацию о реабилитационных центрах и поддерживающих группах.
Как достичь результата? – наркология
Поковки и штабики — важные заготовки для металлургических предприятий
https://redmetsplav.ru/store/kobalt/stellite/kobalt-stellite-95/prutok-kobaltovyy-stellite-95/
Текст посвящён распространённым мифам о зависимости и их развенчанию. Мы предоставим научно обоснованную информацию и дадим рекомендации по выбору эффективного способа борьбы с зависимым поведением.
ТОП-5 причин узнать больше – анонимное лечение от алкоголизма
Оперативная логистика и поддержка на всех этапах сделки позволяют минимизировать сроки простоя производственных линий заказчиков.
https://rms-ekb.ru/catalog/stalnoi-list/stalnoi-list-35khg2-25x1300x1700-gost-19903-2006-gladkii-belyi-goriachekatanyi/
Наличие калькулятора металлопроката упрощает расчет веса и стоимости
https://redmetsplav.ru/store/kobalt/stellite/kobalt-stellite-25/list-kobaltovyy-stellite-25/
ООО «РМС» обеспечивает поставки специализированных сварочных материалов для сложных условий эксплуатации.
https://rms-ekb.ru/catalog/truba-konstruktsionnaia/truba-konstruktsionnaia-45g-89×7-gost-21729-76/
Удобное разделение продукции на сплавы и конкретные виды проката
https://redmetsplav.ru/store/kobalt/rossiyskie-splavy-3/kobalt-yundk35t5/pokovka-kobaltovaya-yundk35t5/
Логичное деление на вольфрамовый, молибденовый и титановый прокат
https://redmetsplav.ru/store/kobalt/rossiyskie-splavy-3/kobalt-ep635/folga-kobaltovaya-ep635/
Оперативная логистика и поддержка на всех этапах сделки позволяют минимизировать сроки простоя производственных линий заказчиков.
https://rms-ekb.ru/catalog/ugolok-stalnoi/ugolok-stalnoi-17g1su-150x150x12-gost-19771-93/
В статье рассматриваются различные стратегии борьбы с зависимостями, включая проверенные методы и реальные истории успеха. Читатель узнает, какие подходы наиболее эффективны и как начать путь к выздоровлению.
Что скрывают от вас? – clinica plus
Никелевые сплавы — основа для жаропрочных конструкций
https://redmetsplav.ru/store/kobalt/rossiyskie-splavy-3/kobalt-ek120-1/pokovka-kobaltovaya-ek120-1/
В этой статье мы рассмотрим современные достижения в области медицины, включая инновационные методы лечения и диагностики. Мы обсудим важность профилактики заболеваний и роль технологий в улучшении качества здравоохранения. Читатели узнают о влиянии медицины на повседневную жизнь и ее значение для современного общества.
Как это работает — подробно – наркологический центр воронеж
В этой статье мы рассматриваем разрушительное влияние зависимости на жизнь человека. Обсуждаются аспекты, такие как здоровье, отношения и профессиональные достижения. Читатели узнают о необходимости обращения за помощью и о путях к восстановлению.
Выяснить больше – врач нарколог на дом
Поставка продукции возможна не только в промышленных, но и в малых лабораторных объемах для исследовательских целей.
https://rms-ekb.ru/catalog/plity/plita-6khvg-27x250x125-gost-19903-74/
Поковки и штабики — важные заготовки для металлургических предприятий
https://redmetsplav.ru/store/vismut/zarubezhnye-splavy-3/vismut-c89320—cda/prutok-vismutovyy-c89320—cda/
В этой статье мы рассматриваем разрушительное влияние зависимости на жизнь человека. Обсуждаются аспекты, такие как здоровье, отношения и профессиональные достижения. Читатели узнают о необходимости обращения за помощью и о путях к восстановлению.
Как это работает — подробно – частный нарколог на дом быстро
В этом обзоре представлены различные методы избавления от зависимости, включая терапевтические и психологические подходы. Мы сравниваем их эффективность и предоставляем рекомендации для тех, кто хочет вернуться к трезвой жизни. Читатели смогут найти информацию о реабилитационных центрах и поддерживающих группах.
Ознакомьтесь поближе – лечение алкоголиков в нижнем новгороде
В данной статье рассматриваются физиологические и эмоциональные аспекты зависимости. Мы обсудим, как организм реагирует на зависимое поведение, и какие методы помогают восстановить здоровье и внутреннее равновесие.
Смотрите также – врач нарколог выезд на дом
Эта публикация обращает внимание на важность профилактики зависимостей. Мы обсудим, как осведомленность и образование могут помочь в предотвращении возникновения зависимости. Читатели смогут ознакомиться с полезными советами и ресурсами, которые способствуют здоровому образу жизни.
Погрузиться в детали – наркологическая клиника клиника помощь
Важным преимуществом является возможность изготовления деталей и изделий по индивидуальным чертежам заказчика.
https://rms-ekb.ru/catalog/ugolok-stalnoi/ugolok-iz-konstruktsionnoi-stali-180kh180kh18-mm-x2crnimocus17-10-2-en-10088-3/
Сайт выглядит профессионально и лаконично, без лишней рекламы
https://redmetsplav.ru/store/volfram/splavy-volframa-1/volfram-w-cu20-1/folga-volframovaya-w-cu20/
В этой статье мы обсудим процесс восстановления после зависимостей, акцентируя внимание на различных методах и подходах к реабилитации. Читатели узнают, как создать план выздоровления и использовать полезные ресурсы для достижения устойчивых изменений.
Запросить дополнительные данные – нарколог на дом телефон
Сайт работает стабильно и быстро загружается
https://redmetsplav.ru/store/volfram/splavy-volframa-1/volfram-vnm-3-2-2/pokovka-volframovaya-vnm-3-2/
Поставка продукции возможна не только в промышленных, но и в малых лабораторных объемах для исследовательских целей.
https://rms-ekb.ru/catalog/list/list-90khmf-2x500x500-gost-19903-74/
Редметсплав — пример того, как должен работать современный поставщик металлургического сырья.
https://xn--80aeedb0bfzeok.xn--p1ai/catalog/mednye-dvukhrastrubnye-mufty-pod-paiku/mednaiadvukhrastrubnaia-podvizhnaiamufta-pod-paiku54kh1-2mmcu-dhpgost-r-52922-2008/
hylz01
Использование файлов cookie и политика конфиденциальности соответствуют закону
https://redmetsplav.ru/store/volfram/splavy-volframa-1/volfram-va-2/krug-volframovyy-va/
В данной статье мы акцентируем внимание на важности поддержки в процессе выздоровления. Мы обсудим, как друзья, семья и профессионалы могут помочь тем, кто сталкивается с зависимостями. Читатели получат практические советы, как поддерживать близких на пути к новой жизни.
Читать дальше – старс медикал нижний новгород
Компания выступает важным звеном в цепочке снабжения предприятий машиностроения и оборонно-промышленного комплекса.
https://rms-ekb.ru/catalog/krug-iz-instrumentalnoi-stali/krug-90khmf-9-5-gost-7417-75/
Возможность заказа висмута — достаточно редкое предложение на рынке
https://redmetsplav.ru/store/vismut/zarubezhnye-splavy-3/vismut-sn89zn8bi3—iec-61190-1-3/truba-vismutovaya-sn89zn8bi3—iec-61190-1-3/
В данной публикации мы поговорим о процессе восстановления от зависимости, о том, как вернуть себе нормальную жизнь. Мы обсудим преодоление трудностей, значимость поддержки и наличие программ реабилитации. Читатели смогут узнать о ключевых шагах к успешному восстановлению.
Лови подробности – прокапывание от алкоголя на дому цена
В этой медицинской статье мы погрузимся в актуальные вопросы здравоохранения и лечения заболеваний. Читатели узнают о современных подходах, методах диагностики и новых открытий в научных исследованиях. Наша цель — донести важную информацию и повысить уровень осведомленности о здоровье.
Посмотреть подробности – капельницы от похмелья в Курске
Компания предлагает не только металлы, но и химическую продукцию, используемую в смежных металлургических процессах.
https://rms-ekb.ru/catalog/stalnoi-list/list-stalnoi-3kh1500kh2300-mm-aisi-430-en-iso-9445-1/
Эта публикация раскрывает психологические механизмы зависимости и их роль в развитии расстройств. Читатель узнает о том, как психология влияет на формирование зависимостей и как профессиональная помощь может изменить ситуацию.
Читать полностью – платная наркологическая клиника
Упоминание нефтегазовой отрасли как ключевого потребителя
https://redmetsplav.ru/store/vismut/zarubezhnye-splavy-3/vismut-l54810—uns/provoloka-vismutovaya-l54810—uns/
Эта публикация исследует взаимосвязь зависимости и психологии. Мы обсудим, как психологические аспекты влияют на появление зависимостей и процесс выздоровления. Читатели смогут понять важность профессиональной поддержки и применения научных подходов в терапии.
Переходите по ссылке ниже – врач нарколог вызов на дом
Раздел «Цены на металлы» полезен для мониторинга рынка
https://redmetsplav.ru/store/vismut/zarubezhnye-splavy-3/vismut-cacin902—jis-h-2202-2016/poroshok-vismutovyy-cacin902—jis-h-2202-2016/
Ассортимент компании включает более 100 000 позиций, что позволяет закрыть практически любые потребности металлургического производства.
https://rms-ekb.ru/catalog/ugolok-stalnoi/ugolok-stalnoi-aisi-409-63x63x4-gost-8509-93/
Надежная защита груза при транспортировке, даже длинномерные изделия доходят без повреждений.
https://xn--80aeedb0bfzeok.xn--p1ai/catalog/dvutavr-aliuminievyi/aliuminievyi-dvutavr-k48-2pch-15x45x37-gost-13621-90/
Наличие обратной связи позволяет быстро отправить запрос
https://redmetsplav.ru/store/vismut/zarubezhnye-splavy-3/vismut-c99720—uns/poroshok-vismutovyy-c99720—uns/
Использование системы менеджмента качества гарантирует строгий контроль продукции на всех этапах отгрузки.
https://rms-ekb.ru/catalog/stalnoi-list/list-stalnoi-1kh1250kh3000-mm-1-4526-en-iso-9444-1/
Удобное разделение продукции на сплавы и конкретные виды проката
https://redmetsplav.ru/store/vismut/zarubezhnye-splavy-3/vismut-c89530—uns/izdeliya-iz-vismuta-c89530—uns/
Компания обеспечивает поставки оксовольфрамата гафния — редкого соединения для специфических нужд химической и атомной промышленности.
https://rms-ekb.ru/catalog/truba-konstruktsionnaia/truba-konstruktsionnaia-vt1-0-18×2-gost-21729-76/
Информация о доставке по всей РФ делает компанию универсальным поставщиком
https://redmetsplav.ru/store/vismut/zarubezhnye-splavy-3/vismut-bi08a—en-61190-1-3/truba-vismutovaya-bi08a—en-61190-1-3/
College Station to Houston Airport business travel services offer reliable transportation for meetings, conferences, and airport rides. Our College Station to Houston Airport transfer includes comfortable vehicles, flexible booking, and dependable airport transportation schedules.
Реализация твердых сплавов типа «Победит» ориентирована на производителей металлорежущего и бурового инструмента.
https://rms-ekb.ru/catalog/ugolok-stalnoi/ugolok-iz-konstruktsionnoi-stali-40kh25kh4-mm-15nicr13-din-59370/
Медицинская публикация представляет собой свод актуальных исследований, экспертных мнений и новейших достижений в сфере здравоохранения. Здесь вы найдете информацию о новых методах лечения, прорывных технологиях и их практическом применении. Мы стремимся сделать актуальные медицинские исследования доступными и понятными для широкой аудитории.
Подробнее – вызов нарколога на дом
Никелевые сплавы — основа для жаропрочных конструкций
https://redmetsplav.ru/store/vismut/zarubezhnye-splavy-3/vismut-42-3741—csnstn-423741/krug-vismutovyy-42-3741—csnstn-423741/
Наличие никелевых сплавов гарантирует высокую коррозийную стойкость оборудования, создаваемого заказчиками.
https://rms-ekb.ru/catalog/krug-iz-instrumentalnoi-stali/krug-r9k5-23-gost-2590-2006/
Общее впечатление: надежный информационный ресурс для снабженцев.
https://redmetsplav.ru/store/vanadiy-i-ego-splavy/vanadiy-vnm99-5—tu-1761-037-2587982-2002/lenta-vanadievaya-vnm99-5—tu-1761-037-2587982-2002/
В данной статье рассматриваются физиологические и эмоциональные аспекты зависимости. Мы обсудим, как организм реагирует на зависимое поведение, и какие методы помогают восстановить здоровье и внутреннее равновесие.
Открой скрытое – капельница против похмелья
Экспертная консультация при выборе сплавов помогает клиентам оптимизировать затраты и избежать технологических ошибок.
https://rms-ekb.ru/catalog/ugolok-stalnoi/ugolok-stalnoi-3sp5-40x30x4-gost-19771-93/
Bu arada, eger zeka kupu faydalar? konusuyla ilgileniyorsan?z, buray? inceleyin. Suradan okuyabilirsiniz: https://toycenneti.com/articles/orjinal-zeka-kupu-cocuk-gelisiminde-onem/
Компания предлагает не только металлы, но и химическую продукцию, используемую в смежных металлургических процессах.
https://rms-ekb.ru/catalog/krug-iz-instrumentalnoi-stali/krug-r18f2k5-85-gost-2590-2006/
Указание конкретных марок сплавов в разделах помогает специалистам
https://redmetsplav.ru/store/titan/rossiyskie-splavy-4/titan-t25—gost-2171-90/krug-titanovyy-t25—gost-2171-90/
Широкий выбор нержавеющей стали различных марок позволяет использовать продукцию в строительстве и пищевой промышленности.
https://rms-ekb.ru/catalog/stalnoi-list/stalnoi-list-08kp-0-7x1700x1400-gost-19903-2006-gladkii-neotsinkovannyi-goriachekatanyi/
Четкая структура меню позволяет быстро найти нужный металл
https://redmetsplav.ru/store/titan/rossiyskie-splavy-4/titan-erti-12/polosa-titanovaya-erti-12/
Компания выступает важным звеном в цепочке снабжения предприятий машиностроения и оборонно-промышленного комплекса.
https://rms-ekb.ru/catalog/svarnye-skolziashchie-opory/
Наличие кобальтовых сплавов заинтересует авиастроение
https://redmetsplav.ru/store/titan/rossiyskie-splavy-4/titan-30btc-vd/truba-titanovaya-30btc-vd/
Зацепил раздел про Актуальные новости и история ЦСКА для фанатов.
Ссылка ниже:
https://bestcska.ru
Рабочее леонбетс зеркало помогло войти в аккаунт без VPN, все средства на балансе на месте.
https://lcrealestate-mz.com/author/kianfedler832/
p2p lending
Нашел леонбетс зеркало рабочее и актуальное, всё работает четко и быстро.
https://git.ascension.wtf/cheriebalcombe
Танталовый прокат незаменим для химически агрессивных сред
https://redmetsplav.ru/store/niobiy1/splavy-niobiya-1/niobiy-sb-1-1/lenta-niobievaya-sb-1/
Через леон рабочее зеркало вход в личный кабинет занял всего пару секунд.
https://7yue.net/dinaschiffman
Se preparar bem conta muito, mas de nada vale se voce nao as encontra. Em nossa plataforma voce cria seu perfil sem complicacao e, logo de cara, voce acompanha as vagas em SГЈo Paulo, direto no seu painel, de Sao Paulo ao Rio, o que deixa a sua busca muito mais rapida e certeira.
Продукция находит применение в производстве электротехники благодаря наличию специализированной электротехнической стали.
https://rms-ekb.ru/catalog/truba-konstruktsionnaia/truba-konstruktsionnaia-12kh18n10t-73×0-8-gost-21729-76/
В каталоге представлены конденсаторные ниобиевые порошки высокой чистоты, необходимые для современной электроники.
https://rms-ekb.ru/catalog/ugolok-stalnoi/ugolok-stalnoi-st3sp5-40x80x4-gost-8509-93/
Быстрая навигация через «Карту сайта» для поиска глубоких страниц
https://redmetsplav.ru/store/molibden-i-ego-splavy/molibden-mzpm-1/polosa-molibdenovaya-mzpm/
Описание преимуществ компании подчеркивает надежность поставок
https://redmetsplav.ru/store/molibden-i-ego-splavy/molibden-ml-zvp-1/prutok-molibdenovyy-ml-zvp/
Компания осуществляет поставки базового металлургического сырья, включая олово, свинец и цинк в чушках.
https://rms-ekb.ru/catalog/krug-iz-instrumentalnoi-stali/krug-40khsmf-9-gost-5950-2000/
Вызвать нарколога на дом следует при ухудшении самочувствия после алкоголя, при длительном запое, выраженном похмелье, отравлении спиртным, признаках абстиненции, тревоге, страхе, бессоннице, сильной слабости, нарушениях поведения и невозможности самостоятельно прекратить употребление. Чем дольше человек находится в запое, тем выше риск осложнений для здоровья, поэтому откладывать вызов врача опасно.
Выяснить больше – http://narkolog-na-dom-balashiha13-4.ru/
Представлены технически сложные сплавы ниобия и тантала
https://redmetsplav.ru/store/magniy-i-ego-splavy/zarubezhnye-splavy-2/magniy-zm21—csa-hg-5/poroshok-magnievyy-zm21—csa-hg-5/
muz kabugu suyu hangi ciceklere verilir hakk?ndaki bolumu cok sevdim. Link burada: https://hobiprojesi.com/articles/ciceklere-muz-kabugu-suyu-uygulamasi/
Компания занимается реализацией ферросплавов, необходимых для качественного легирования сталей на литейных участках.
https://rms-ekb.ru/catalog/list/list-11kh4v2mf3s2-3x1200x3000-gost-19903-74/
Упоминание нефтегазовой отрасли как ключевого потребителя
https://redmetsplav.ru/store/magniy-i-ego-splavy/zarubezhnye-splavy-2/magniy-sismg4635-10—ss-144635/poroshok-magnievyy-sismg4635-10—ss-144635/
Указание конкретных марок сплавов в разделах помогает специалистам
https://redmetsplav.ru/store/magniy-i-ego-splavy/zarubezhnye-splavy-2/magniy-mp1—jis-h-4201/provoloka-magnievaya-mp1—jis-h-4201/
покраска оград на кладбище
Профессиональный подход к описанию каждого вида металла
https://redmetsplav.ru/store/magniy-i-ego-splavy/zarubezhnye-splavy-2/magniy-mg-al9zn—iso-121/prutok-magnievyy-mg-al9zn—iso-121/
Продукция находит применение в производстве электротехники благодаря наличию специализированной электротехнической стали.
https://rms-ekb.ru/catalog/stalnoi-list/list-stalnoi-07kh1250kh3000-mm-1-4541-en-iso-9444-1/
Whether you’re looking for a fresh start, city has a place for you. On our portal you can check out see the listings here, in just a few clicks, and apply in no time — that’s why so many professionals have already landed their ideal job using our tools.
إباحية مصر
If you wish for to increase your experience just keep
visiting this site and be updated with the newest news
update posted here.
Возможность заказа висмута — достаточно редкое предложение на рынке
https://redmetsplav.ru/store/magniy-i-ego-splavy/zarubezhnye-splavy-2/magniy-mgal3zn1-alloy-21—iso-3116/prutok-magnievyy-mgal3zn1-alloy-21—iso-3116/
hack apk
Описание складских позиций сокращает время ожидания ответа
https://redmetsplav.ru/store/magniy-i-ego-splavy/zarubezhnye-splavy-2/magniy-mc6—jis-h-5203/polosa-magnievaya-mc6—jis-h-5203/
drugs
Информация о доставке по всей РФ делает компанию универсальным поставщиком
https://redmetsplav.ru/store/magniy-i-ego-splavy/zarubezhnye-splavy-2/magniy-mag-3—bs-2970/truba-magnievaya-mag-3—bs-2970/
Компания занимается реализацией ферросплавов, необходимых для качественного легирования сталей на литейных участках.
https://rms-ekb.ru/catalog/stalnoi-list/list-stalnoi-60kh700-mm-acroni-4833-en-iso-18286/
Редметсплав — пример того, как должен работать современный поставщик металлургического сырья.
https://xn--80aeedb0bfzeok.xn--p1ai/catalog/mednye-dvukhrastrubnye-mufty-pod-paiku/mednaiadvukhrastrubnaiamufta-pod-paiku53-6kh1-9mmm1tgost-32590-2013/
تطبيق مهكر
Раздел «Цены на металлы» полезен для мониторинга рынка
https://redmetsplav.ru/store/magniy-i-ego-splavy/zarubezhnye-splavy-2/magniy-mag-101—bs-3370/list-magnievyy-mag-101—bs-3370/
porno egypt
sex girl
تطبيق مهكر
Широкий выбор нержавеющей стали различных марок позволяет использовать продукцию в строительстве и пищевой промышленности.
https://rms-ekb.ru/catalog/krug-iz-instrumentalnoi-stali/krug-kh12mf-100-gost-7417-75/
porno goobet
Сайт четко ориентирован на промышленный сектор и B2B сегмент
https://redmetsplav.ru/store/magniy-i-ego-splavy/zarubezhnye-splavy-2/magniy-m11917—uns/poroshok-magnievyy-m11917—uns/
Реализация твердых сплавов типа «Победит» ориентирована на производителей металлорежущего и бурового инструмента.
https://rms-ekb.ru/catalog/ugolok-stalnoi/ugolok-iz-konstruktsionnoi-stali-100kh50kh6-mm-c15e-en-10056-1/
Благодарим за оперативную поставку ниобиевых труб, выручили в очень сжатые сроки.
https://xn--80aeedb0bfzeok.xn--p1ai/catalog/latunnye-naruzhnye-stopornye-koltsa-po-gost/latunoe-naruzhnoe-stopornoe-pruzhinnoe-koltso-19kh1-2-mm-lk2-gost-13942-86/
إباحية مصر
Сайт адаптирован под нужды машиностроительных заводов
https://redmetsplav.ru/store/magniy-i-ego-splavy/zarubezhnye-splavy-2/magniy-m10600—uns/truba-magnievaya-m10600—uns/
География деятельности компании охватывает всю территорию России, обеспечивая металлом предприятия в удаленных регионах.
https://rms-ekb.ru/catalog/list/list-kh12mf-4-5x1000x1000-gost-19903-2006/
Прозрачное оформление документов и быстрое выставление счетов, приятно работать с профессионалами.
https://xn--80aeedb0bfzeok.xn--p1ai/catalog/mednye-krestoviny-pod-paiku/mednaia-krestovina-pod-paiku-159kh135kh2-6-mm-63-5kh59-5-mm-miagkaia-paika-m3m-gost-32590-2013/
gooobet drugs
Компания обеспечивает поставки оксовольфрамата гафния — редкого соединения для специфических нужд химической и атомной промышленности.
https://rms-ekb.ru/catalog/ugolok-stalnoi/ugolok-iz-konstruktsionnoi-stali-150kh100kh10-mm-40crnimo6-en-10056-2/
Раздел «Производство» подтверждает статус завода, а не просто перекупщика
https://redmetsplav.ru/store/molibden-i-ego-splavy/molibden-cm-1-1/truba-molibdenovaya-cm-1/
إباحية مصر
В этой публикации мы предложим ряд рекомендаций по избавлению от зависимостей и успешному восстановлению. Мы обсудим методы привлечения поддержки и важность самосознания. Эти советы помогут людям вернуться к нормальной жизни и стать на путь выздоровления.
Детальнее – принудительное лечение от алкоголизма цена
Эта публикация исследует взаимосвязь зависимости и психологии. Мы обсудим, как психологические аспекты влияют на появление зависимостей и процесс выздоровления. Читатели смогут понять важность профессиональной поддержки и применения научных подходов в терапии.
Это стоит прочитать полностью – принудительная кодировка от алкоголизма санкт петербург
Этот текст представляет собой обзор свежих данных и исследований в области медицины. Он призван помочь читателям понять, как научные достижения влияют на лечение, диагностику и общее состояние системы здравоохранения.
Узнайте всю правду – вызов на дом нарколога
Наличие циркония свидетельствует о работе с высокотехнологичными заказами
https://redmetsplav.ru/store/magniy-i-ego-splavy/zarubezhnye-splavy-2/magniy-iso-mb21220—bs-iso-16220/provoloka-magnievaya-iso-mb21220—bs-iso-16220/
В данном обзоре представлены основные направления и тренды в области медицины. Мы обсудим актуальные проблемы здравоохранения, свежие открытия и новые подходы, которые меняют представление о лечении и профилактике заболеваний. Эта информация будет полезна как специалистам, так и широкой публике.
Обратиться к источнику – нарколог на дом вывод
porno egypt
В этой статье мы обсудим процесс восстановления после зависимостей, акцентируя внимание на различных методах и подходах к реабилитации. Читатели узнают, как создать план выздоровления и использовать полезные ресурсы для достижения устойчивых изменений.
Кликни и узнай всё! – вывод из запоя вызов на дом
Этот обзор медицинских исследований собрал самое важное из последних публикаций в области медицины. Мы проанализировали ключевые находки и представили их в доступной форме, чтобы читатели могли легко ориентироваться в актуальных темах. Этот материал станет отличным подспорьем для изучения медицины.
Обратиться к источнику – анонимная наркологическая помощь на дому
Читатели получат представление о том, как современные технологии влияют на развитие медицины. Обсуждаются новые методы лечения, персонализированный подход и роль цифровых решений в повышении качества медицинских услуг.
Личный опыт — читайте сами – нарколог с выездом на дом
sex girl
Этот обзор посвящен успешным стратегиям избавления от зависимости, включая реальные примеры и советы. Мы разоблачим мифы и предоставим читателям достоверную информацию о различных подходах. Получите опыт многообразия методов и найдите подходящий способ для себя!
Изучить рекомендации специалистов – нарколог на дом вывод из запоя москва
Отраслевой охват впечатляет: от медицины до космической промышленности
https://redmetsplav.ru/store/magniy-i-ego-splavy/zarubezhnye-splavy-2/magniy-g-z55zr—afnor-nf-a65-717/izdeliya-iz-magniya-g-z55zr—afnor-nf-a65-717/
В этой статье рассматриваются актуальные вопросы, связанные с развитием медицинской науки и её внедрением в повседневную практику. Особое внимание уделено вопросам профилактики, ранней диагностики и использованию технологий для улучшения здоровья человека.
Полная информация здесь – нарколог на дом вывод из запоя
إباحية مصر
Реализация твердых сплавов типа «Победит» ориентирована на производителей металлорежущего и бурового инструмента.
https://rms-ekb.ru/catalog/stalnoi-list/stalnoi-list-r18k5f2-75x1800x1300-gost-19903-2006-gladkii-neotsinkovannyi-goriachekatanyi/
Возможность изготовления деталей по чертежам заказчика — это большой плюс
https://redmetsplav.ru/store/magniy-i-ego-splavy/zarubezhnye-splavy-2/magniy-gd-mgal6—din-1729-part-2/polosa-magnievaya-gd-mgal6—din-1729-part-2/
Публикация знакомит читателей с различными подходами к реабилитации. От традиционных методов до современных программ — вы узнаете, как выбрать оптимальный путь к выздоровлению и преодолеть препятствия на этом пути.
Продолжить изучение – принудительное лечение алкоголиков
تطبيق مهكر
Информация о проверке качества продукции повышает лояльность клиентов
https://redmetsplav.ru/store/magniy-i-ego-splavy/zarubezhnye-splavy-2/magniy-ez33a—astm-b275/prutok-magnievyy-ez33a—astm-b275/
ООО «РМС» поставляет вольфрамовые порошки, соответствующие строгим техническим условиям (например, ТУ 48-4205-112-2017).
https://rms-ekb.ru/catalog/list/list-60khn-3x1000x1500-gost-19903-74/
drugs
Закупали шлак ферросилиция для строительных нужд, материал качественный, без лишних примесей.
https://xn--80aeedb0bfzeok.xn--p1ai/catalog/latunnye-naruzhnye-stopornye-koltsa-po-din/latunoe-naruzhnoe-stopornoe-pruzhinnoe-koltso-m157-146kh4-mm-lmtss-din-471/
مخدرات غوبيت
География деятельности компании охватывает всю территорию России, обеспечивая металлом предприятия в удаленных регионах.
https://rms-ekb.ru/catalog/ugolok-stalnoi/ugolok-stalnoi-vst3ps-70x70x7-gost-19771-93/
hack apk
Этот обзор сосредоточен на различных подходах к избавлению от зависимости. Мы изучим традиционные и альтернативные методы, а также их сочетание для достижения максимальной эффективности. Читатели смогут открыть для себя новые стратегии и подходы, которые помогут в их борьбе с зависимостями.
Изучить вопрос глубже – врач нарколог на дом частный
Эта доказательная статья представляет собой глубокое погружение в успехи и вызовы лечения зависимостей. Мы обращаемся к научным исследованиям и опыту специалистов, чтобы предоставить читателям надежные данные об эффективности различных методик. Изучите, что работает лучше всего, и получите информацию от экспертов.
Это стоит прочитать полностью – нарколог на дом москва
Поставка продукции возможна не только в промышленных, но и в малых лабораторных объемах для исследовательских целей.
https://rms-ekb.ru/catalog/krug-iz-instrumentalnoi-stali/krug-5khnv-18-5-gost-7417-75/
Магниевый прокат представлен в достаточном ассортименте
https://redmetsplav.ru/store/magniy-i-ego-splavy/zarubezhnye-splavy-2/magniy-az92a—astm-b403/prutok-magnievyy-az92a—astm-b403/
В современном цифровом поле необходимо думать о том, как сделать платформу более интерактивной для аудитории. Рекомендуется тестировать форматы контента, подходы к монетизации и механики вовлечения, а также учитывать аналитику и обратную связь. Для обсуждения деталей и обмена подходами можно посмотреть материалы по 7k casino и обсудить возможные пути развития с коллегами.
Этот краткий обзор предлагает сжатую информацию из области медицины, включая ключевые факты и последние новости. Мы стремимся сделать информацию доступной и понятной для широкой аудитории, что позволит читателям оставаться в курсе актуальных событий в здравоохранении.
Всё, что нужно знать – выведение из запоя в наркологическом стационаре
Публикация знакомит читателей с различными подходами к реабилитации. От традиционных методов до современных программ — вы узнаете, как выбрать оптимальный путь к выздоровлению и преодолеть препятствия на этом пути.
Получить дополнительную информацию – вывод из запоя стационар цены
Возвращение на рынок труда встречается чаще, чем вы думаете. Именно для этого наша платформа приходит на помощь: вы находите портал вакансий России, без скрытых платежей и мелкого шрифта, и откликайтесь на столько вакансий, сколько хотите, в любое удобное время.
купить водительские права
права купить в москве
купить права в москве
купить в права в москве
права купить в казани
купить права в казани
купить права сколько стоит в москве
сколько стоит купить права в москве
купить права в уфе
права купить в уфе
водительские права купить в москве
купить водительские права в москве
купить права водительские в москве
права водительские купить в москве
права купить в краснодаре
купить права в краснодаре
купить права в санкт-петербурге
права купить в санкт-петербурге
купить права в новосибирске
права купить в новосибирске
права купить на машину в москве
купить права на машину в москве
права на машину купить в москве
сколько стоит купить права в краснодаре
купить права в омске
купить права сколько стоит в краснодаре
права купить в омске
купить права в екатеринбурге
права купить в екатеринбурге
купить права водительские права в туле
купить в у в москве
водительское удостоверение купить в краснодаре
купить водительское удостоверение в краснодаре
купить в права в новосибирске
купить водительское удостоверение в москве
водительское удостоверение купить в москве
права купить в нижнем новгороде
купить права в нижнем новгороде
права купить в красноярске
купить права в красноярске
права купить в хабаровске
купить права в хабаровске
права купить в воронеже
купить права в воронеже
купить в права в омске
купить права в калининграде
права купить в калининграде
купить права в туле
права купить в туле
права купить в тюмени
права купить в грозном
купить права в самаре
права купить в самаре
купить права в грозном
купить права в тюмени
купить в у в екатеринбурге
права купить в волгограде
купить права в волгограде
права купить в челябинске
купить права в челябинске
купить в у в омске
права купить в иркутске
купить права в барнауле
купить права в иркутске
права купить в барнауле
права купить в белгороде
купить права в белгороде
как права купить в москве
права купить в саратове
купить в права в красноярске
как купить права в москве
купить в права в уфе
купить категорию в в брянске
купить в категорию в брянске
права купить в рязани
купить права в рязани
купить права в кирове
права купить в кирове
купить права в саратове
купить в права в туле
купить права водительские права в москве
купить категорию в в краснодаре
купить в категорию в краснодаре
купить в права в подольске
права купить в улан-удэ
купить права категории в в москве
купить права водительские в омске
купить водительские права в новосибирске
водительские права купить в новосибирске
купить права в категории в москве
водительские права купить в омске
права купить категории в в москве
права водительские купить в омске
права водительские купить в новосибирске
купить водительские права в омске
права купить в курске
купить права в улан-удэ
купить права водительские в новосибирске
права купить в кургане
права купить в ярославле
купить права в курске
купить права в архангельске
права купить в архангельске
купить права в ярославле
купить права в кургане
права купить в тамбове
купить права в тамбове
купить права в липецке
права купить в перми
купить зеркальные права в подольске
купить права в перми
купить права в оренбурге
права купить в оренбурге
права купить в томске
купить в права в екатеринбурге
купить в права в перми
купить в права в тюмени
купить права в томске
права купить в липецке
купить в права в воронеже
водительское удостоверение купить в челябинске
купить водительское удостоверение в челябинске
водительское удостоверение водительское купить в москве
купить в права в иркутске
водительское удостоверение купить в туле
купить водительское удостоверение в туле
купить права в ижевске
права купить в сочи
права купить в пензе
купить права в сочи
права купить в ижевске
купить права сколько стоит в новосибирске
купить права в пензе
сколько стоит купить права в новосибирске
купить права в твери
купить водительское удостоверение в перми
купить права в сургуте
купить в у в краснодаре
купить в права в вологде
купить в у в новосибирске
водительское удостоверение водительское купить в туле
права купить в сургуте
права купить в твери
водительское удостоверение купить в перми
сколько стоит купить права в ульяновске
где купить права права в санкт-петербурге
где купить купить права в санкт-петербурге
права купить в брянске
купить права в брянске
купить права сколько стоит в ульяновске
купить права в чите
права купить в чите
купить права категории в в новосибирске
права купить категории в в новосибирске
купить права где в туле
купить права в категории в новосибирске
купить в права в челябинске
купить в права в хабаровске
права купить в ульяновске
права купить в иваново
купить в у в воронеже
водительское удостоверение купить в саратове
купить в права в липецке
где купить купить права в москве
купить ву в новосибирске
права купить категории в в челябинске
где купить права права в москве
купить в права в рязани
купить в у в нижнем новгороде
купить права в ульяновске
купить водительское удостоверение в саратове
купить права в иваново
купить в права в томске
купить в у в перми
сколько стоит купить права в воронеже
купить права в категории в челябинске
купить в права в оренбурге
купить права категории в в челябинске
где купить права права в оренбурге
права купить в смоленске
права купить в симферополе
сколько стоит купить права в саратове
купить права в орле
официально права купить в москве
купить в права в грозном
купить в права в чите
купить права в симферополе
где купить купить права в оренбурге
купить права в смоленске
права официально купить в москве
купить водительское удостоверение в грозном
купить права в кемерово
купить права сколько стоит в воронеже
купить права официально в москве
права купить в орле
купить права сколько стоит в саратове
водительское удостоверение купить в грозном
купить официально права в москве
Сайт поддерживает английскую версию, что важно для экспорта
https://redmetsplav.ru/store/magniy-i-ego-splavy/zarubezhnye-splavy-2/magniy-az61—csa-hg-5/poroshok-magnievyy-az61—csa-hg-5/
Хочу выделить раздел про Глубокий анализ футбола и спортивные тренды.
Смотрите сами:
https://footballcska.ru
Четкое позиционирование как эксперта в области редких металлов
https://redmetsplav.ru/store/magniy-i-ego-splavy/zarubezhnye-splavy-2/magniy-as41a—astm-b94/poroshok-magnievyy-as41a—astm-b94/
География деятельности компании охватывает всю территорию России, обеспечивая металлом предприятия в удаленных регионах.
https://rms-ekb.ru/catalog/list/list-kh12mf-40x1000x1000-gost-19903-2006/
В данной статье рассматриваются проблемы общественного здоровья и социальные факторы, влияющие на него. Мы акцентируем внимание на значении профилактики и осведомленности в защите здоровья на уровне общества. Читатели смогут узнать о новых инициативах и программах, направленных на улучшение здоровья населения.
Уточнить детали – частный нарколог на дом быстро
Удобное разделение продукции на сплавы и конкретные виды проката
https://redmetsplav.ru/store/magniy-i-ego-splavy/zarubezhnye-splavy-2/magniy-am-50/poroshok-magnievyy-am-50/
Эта публикация посвящена актуальным вопросам современной медицины и здравоохранения. Мы обсудим новейшие технологии диагностики и лечения, а также их влияние на продолжительность и качество жизни. Читатель найдет здесь информацию о научных исследованиях и перспективных разработках, доступно изложенную для широкой аудитории.
Познакомиться с результатами исследований – выведение из запоя цена
Долго искал сиалис дженерик, тут оказался самый лучший выбор.
https://telegra.ph/Dzheneriki-v-Moskve-Indiya-06-23
Понравилось, что можно дженерики купить в москве анонимно.
https://telegra.ph/Vilitra-20-06-23-2
Лучшее место, чтобы дженерики сиалиса приобрести конфиденциально.
https://telegra.ph/Dzheneriki-v-Moskve-bez-sintetiki-06-23
Ориентация на долгосрочные отношения с клиентами позволяет компании формировать индивидуальные условия оплаты и графики поставок.
https://rms-ekb.ru/catalog/stalnoi-list/stalnoi-list-45kh-38x1900x1300-gost-19903-2006-gladkii-otsinkovannyi-goriachekatanyi/
В данной статье мы поговорим о будущем медицины, акцентируя внимание на прорывных разработках и их потенциале. Читатель узнает о новых подходах к лечению, роли искусственного интеллекта и возможностях персонализированной медицины.
Расширить кругозор по теме – срочный вызов нарколога на дом
В этой статье рассматриваются различные аспекты избавления от зависимости, включая физические и психологические методы. Мы обсудим поддержку, мотивацию и стратегии, которые помогут в процессе выздоровления. Читатели узнают, как преодолеть трудности и двигаться к новой жизни без зависимости.
Детали по клику – вывод из запоя врач на дом
Указан физический адрес в Екатеринбурге, что повышает доверие
https://redmetsplav.ru/store/magniy-i-ego-splavy/zarubezhnye-splavy-2/magniy-3-5101—din-1729-part-2/list-magnievyy-3-5101—din-1729-part-2/
Ассортимент компании включает более 100 000 позиций, что позволяет закрыть практически любые потребности металлургического производства.
https://rms-ekb.ru/catalog/ugolok-stalnoi/ugolok-iz-konstruktsionnoi-stali-120kh120kh10-mm-28mn6-en-10056-1/
Этот медицинский обзор сосредоточен на последних достижениях, которые оказывают влияние на пациентов и медицинскую практику. Мы разбираем инновационные методы лечения и исследований, акцентируя внимание на их значимости для общественного здоровья. Читатели узнают о свежих данных и их возможном применении.
Связаться за уточнением – вызов наркологической помощи на дом
В этой публикации мы обсуждаем современные методы лечения различных заболеваний. Читатели узнают о новых медикаментах, терапиях и исследованиях, которые активно применяются для лечения. Мы нацелены на то, чтобы предоставить практические знания, которые могут помочь в борьбе с недугами.
Узнайте всю правду – круглосуточный вывод из запоя
Сайт работает стабильно и быстро загружается
https://redmetsplav.ru/store/magniy-i-ego-splavy/rossiyskie-splavy-1/magniy-mg95s—tu-1714-016-00545484-97/krug-magnievyy-mg95s—tu-1714-016-00545484-97/
Использование системы менеджмента качества гарантирует строгий контроль продукции на всех этапах отгрузки.
https://rms-ekb.ru/catalog/stalnoi-list/stalnoi-list-20khgnr-11x1550x1300-gost-19903-2006-gladkii-chernyi-goriachekatanyi/
В статье рассматриваются различные стратегии борьбы с зависимостями, включая проверенные методы и реальные истории успеха. Читатель узнает, какие подходы наиболее эффективны и как начать путь к выздоровлению.
Продолжить чтение – вывести из запоя в наркологическом стационаре
Публикация посвящена жизненным историям людей, успешно справившихся с зависимостью. Мы покажем, что выход есть, и он начинается с первого шага — принятия проблемы и желания измениться.
Узнайте всю правду – анонимный вызов нарколога
Представлены технически сложные сплавы ниобия и тантала
https://redmetsplav.ru/store/magniy-i-ego-splavy/rossiyskie-splavy-1/magniy-l3—tu-1714-002-00545484-99/krug-magnievyy-l3—tu-1714-002-00545484-99/
Важным преимуществом является возможность изготовления деталей и изделий по индивидуальным чертежам заказчика.
https://rms-ekb.ru/catalog/list/list-9khs-20x500x1000-gost-19903-74/
Офис в Екатеринбурге работает четко, забирали самовывозом — складская логистика на высоте.
https://xn--80aeedb0bfzeok.xn--p1ai/catalog/mednoe-dvukhrastrubnoe-koleno-pod-paiku/mednoe-dvukhrastrubnoe-koleno-pod-paiku-180-gradusov-66-7kh57kh1-4-mm-33-5kh36-5-mm-miagkaia-paika-m3rt-gost-r-52922-2008/
Возможность изготовления деталей по чертежам заказчика — это большой плюс
https://redmetsplav.ru/store/kobalt/wallex/kobalt-wallex-1/polosa-kobaltovaya-wallex-1/
Широкий выбор нержавеющей стали различных марок позволяет использовать продукцию в строительстве и пищевой промышленности.
https://rms-ekb.ru/catalog/stalnoi-list/stalnoi-list-15kh-4-5x1300x1900-gost-19903-2006-gladkii-neotsinkovannyi-goriachekatanyi/
“bornozlar hangi programda y?kan?r” konusu icin burada harika bilgiler var. Link burada: https://hobiprojesi.com/articles/bornozlari-nasil-yikanir/
Общее впечатление: надежный информационный ресурс для снабженцев.
https://redmetsplav.ru/store/kobalt/stellite/kobalt-stellite-314-2/izdeliya-iz-kobalta-stellite-314-2/
ООО «РМС» поставляет вольфрамовые порошки, соответствующие строгим техническим условиям (например, ТУ 48-4205-112-2017).
https://rms-ekb.ru/catalog/krug-iz-instrumentalnoi-stali/krug-90khmf-4-35-gost-7417-75/
Большой опыт работы, судя по копирайту с 2013 года
https://redmetsplav.ru/store/kobalt/rossiyskie-splavy-3/kobalt-yundkt5ba—gost-17809-72/pokovka-kobaltovaya-yundkt5ba—gost-17809-72/
Использование системы менеджмента качества гарантирует строгий контроль продукции на всех этапах отгрузки.
https://rms-ekb.ru/catalog/ugolok-stalnoi/ugolok-iz-konstruktsionnoi-stali-65kh50kh5-mm-42crmo4-en-10056-2/
В любом уголке страны, работодатели постоянно ищут сотрудников. Если вы ищете работу в своём регионе, или даже если думаете о переезде в другой регион, вы можете найти работа рядом с домом, с зарплатами для любого уровня опыта, ведь чем больше вариантов, тем выше шансы найти работу мечты рядом с домом.
Раздел «Контакты» содержит все необходимые реквизиты и карту
https://redmetsplav.ru/store/kobalt/rossiyskie-splavy-3/kobalt-hn33kvyu—gost-5632-14/lenta-kobaltovaya-hn33kvyu—gost-5632-14/
Опыт работы с более чем 120 постоянными заказчиками свидетельствует о высокой стабильности и надежности поставок.
https://rms-ekb.ru/catalog/list/list-6khv2s-15x1000x1000-gost-19903-2006/
“voleybolda pozisyonlar” konusu icin burada harika bilgiler var. Link burada: https://sporvibes.com/articles/voleybol-saha-pozisyonlari-detayli-inceleme/
Четкая структура меню позволяет быстро найти нужный металл
https://redmetsplav.ru/store/kobalt/rossiyskie-splavy-3/kobalt-ek4/izdeliya-iz-kobalta-ek4/
Компания осуществляет поставки базового металлургического сырья, включая олово, свинец и цинк в чушках.
https://rms-ekb.ru/catalog/ugolok-stalnoi/ugolok-iz-konstruktsionnoi-stali-100kh50kh6-mm-c25e-en-10056-1/
В этой медицинской статье мы погрузимся в актуальные вопросы здравоохранения и лечения заболеваний. Читатели узнают о современных подходах, методах диагностики и новых открытий в научных исследованиях. Наша цель — донести важную информацию и повысить уровень осведомленности о здоровье.
Где почитать поподробнее? – вызвать врача нарколога на дом срочно
Эта информационная публикация освещает широкий спектр тем из мира медицины. Мы предлагаем читателям ясные и понятные объяснения современных заболеваний, методов профилактики и лечения. Информация будет полезна как пациентам, так и медицинским работникам, желающим поддержать уровень своих знаний.
Расширить кругозор по теме – вывожу из запоя екатеринбург
В статье рассматриваются различные стратегии борьбы с зависимостями, включая проверенные методы и реальные истории успеха. Читатель узнает, какие подходы наиболее эффективны и как начать путь к выздоровлению.
Подробнее тут – психиатр нарколог на дом
Информация о времени работы (10:00–18:00) помогает планировать звонки
https://redmetsplav.ru/store/cirkoniy-i-ego-splavy/cirkoniy-cirkoloy-46/folga-cirkonievaya-cirkoloy-46/
В этой публикации мы предложим ряд рекомендаций по избавлению от зависимостей и успешному восстановлению. Мы обсудим методы привлечения поддержки и важность самосознания. Эти советы помогут людям вернуться к нормальной жизни и стать на путь выздоровления.
Получить исчерпывающие сведения – наркологическая клиника в москве
Компания осуществляет поставки базового металлургического сырья, включая олово, свинец и цинк в чушках.
https://rms-ekb.ru/catalog/stalnoi-list/stalnoi-list-20khgr-12x1250x1200-gost-19903-2006-gladkii-otsinkovannyi-goriachekatanyi/
Эта публикация посвящена актуальным вопросам современной медицины и здравоохранения. Мы обсудим новейшие технологии диагностики и лечения, а также их влияние на продолжительность и качество жизни. Читатель найдет здесь информацию о научных исследованиях и перспективных разработках, доступно изложенную для широкой аудитории.
Только для своих – clinica plus в москве
Публикация посвящена жизненным историям людей, успешно справившихся с зависимостью. Мы покажем, что выход есть, и он начинается с первого шага — принятия проблемы и желания измениться.
Кликни, не пожалеешь – вывод из запоя срочно в Москве
В этой статье мы рассматриваем разрушительное влияние зависимости на жизнь человека. Обсуждаются аспекты, такие как здоровье, отношения и профессиональные достижения. Читатели узнают о необходимости обращения за помощью и о путях к восстановлению.
Хочу знать больше – наркологической помощи в Москве
Мы рассмотрим современные вызовы здравоохранения и пути их решения с помощью технологий и научных исследований. В статье собраны данные о новых лекарствах, методах диагностики и системном подходе к улучшению здоровья населения.
Личный опыт — читайте сами – Кодирование от алкоголизма
Четкая структура меню позволяет быстро найти нужный металл
https://redmetsplav.ru/store/volfram/splavy-volframa-1/volfram-w-la15-1/prutok-volframovyy-w-la15/
Экспертная консультация при выборе сплавов помогает клиентам оптимизировать затраты и избежать технологических ошибок.
https://rms-ekb.ru/catalog/stalnoi-list/list-stalnoi-12kh1000kh4000-mm-1-4016-en-iso-9444-1/
В данной статье рассматриваются проблемы общественного здоровья и социальные факторы, влияющие на него. Мы акцентируем внимание на значении профилактики и осведомленности в защите здоровья на уровне общества. Читатели смогут узнать о новых инициативах и программах, направленных на улучшение здоровья населения.
Где можно узнать подробнее? – вызвать нарколога
Сайт четко ориентирован на промышленный сектор и B2B сегмент
https://redmetsplav.ru/store/volfram/splavy-volframa-1/volfram-vnzh-5-3/krug-volframovyy-vnzh-5-3/
Компания предлагает не только металлы, но и химическую продукцию, используемую в смежных металлургических процессах.
https://rms-ekb.ru/catalog/stalnoi-list/stalnoi-list-stal-40-100x1500x1100-gost-r-52146-2003-polimernyi-otsinkovannyi-kholodnokatanyi/
В статье по вопросам здоровья мы рассматриваем актуальные проблемы, с которыми сталкивается общество. Обсуждаются заболевания, факторы риска и важные аспекты профилактики. Читатели получат полезные советы о том, как сохранить здоровье и улучшить качество жизни.
Кликни, не пожалеешь – вывести из запоя екатеринбург
В этой публикации мы обсуждаем современные методы лечения различных заболеваний. Читатели узнают о новых медикаментах, терапиях и исследованиях, которые активно применяются для лечения. Мы нацелены на то, чтобы предоставить практические знания, которые могут помочь в борьбе с недугами.
Нажми и узнай всё – вызов нарколога на дом екатеринбург цена
Сайт адаптирован под нужды машиностроительных заводов
https://redmetsplav.ru/store/volfram/splavy-volframa-1/volfram-vchg-1/lenta-volframovaya-vchg/
Металлические порошки различных фракций позволяют клиентам использовать их в порошковой металлургии и напылении.
https://rms-ekb.ru/catalog/krug-iz-instrumentalnoi-stali/krug-4kh2v5mf-175-gost-5950-2000/
Наличие кобальтовых сплавов заинтересует авиастроение
https://redmetsplav.ru/store/vismut/zarubezhnye-splavy-3/vismut-s-sn60pb38bi2—en-29453/poroshok-vismutovyy-s-sn60pb38bi2—en-29453/
ООО «РМС» предлагает широкий спектр цветного проката, включая медь, латунь, бронзу и дюралюминий.
https://rms-ekb.ru/catalog/stalnoi-list/list-stalnoi-45kh1900-mm-acroni-4307-en-iso-18286/
Этот медицинский обзор сосредоточен на последних достижениях, которые оказывают влияние на пациентов и медицинскую практику. Мы разбираем инновационные методы лечения и исследований, акцентируя внимание на их значимости для общественного здоровья. Читатели узнают о свежих данных и их возможном применении.
Что скрывают от вас? – clinica plus в москве
В статье рассматриваются различные стратегии борьбы с зависимостями, включая проверенные методы и реальные истории успеха. Читатель узнает, какие подходы наиболее эффективны и как начать путь к выздоровлению.
Всё, что нужно знать – вывод из запоя срочно в Москве
Указан физический адрес в Екатеринбурге, что повышает доверие
https://redmetsplav.ru/store/vismut/zarubezhnye-splavy-3/vismut-l54840—uns/prutok-vismutovyy-l54840—uns/
Наличие на складе редких металлов, таких как цирконий, выделяет компанию на фоне конкурентов, торгующих только массовым прокатом.
https://rms-ekb.ru/catalog/krug-iz-instrumentalnoi-stali/krug-8kh6nft-75-gost-7417-75/
Независимо от того, ищете ли вы первую работу, подходящее место обязательно есть. На нашем портале вы можете посмотреть новые вакансии сегодня, с учётом вашего опыта и пожеланий, и откликнуться на понравившиеся — именно так тысячи людей уже нашли свою работу.
Эта публикация содержит ценные советы и рекомендации по избавлению от зависимости. Мы обсуждаем различные стратегии, которые могут помочь в процессе выздоровления и важность обращения за помощью. Читатели смогут использовать полученные знания для улучшения своего состояния.
Узнать больше > – clinica plus в москве
Наличие калькулятора металлопроката упрощает расчет веса и стоимости
https://redmetsplav.ru/store/vismut/zarubezhnye-splavy-3/vismut-cerrolow-136/prutok-vismutovyy-cerrolow-136/
Этот обзор медицинских исследований собрал самое важное из последних публикаций в области медицины. Мы проанализировали ключевые находки и представили их в доступной форме, чтобы читатели могли легко ориентироваться в актуальных темах. Этот материал станет отличным подспорьем для изучения медицины.
Нажмите, чтобы узнать больше – нарколог на дом 24 часа
Ориентация на долгосрочные отношения с клиентами позволяет компании формировать индивидуальные условия оплаты и графики поставок.
https://rms-ekb.ru/catalog/ugolok-stalnoi/ugolok-iz-konstruktsionnoi-stali-100kh65kh7-mm-42cr4-uni-6762/
Эта публикация исследует взаимосвязь зависимости и психологии. Мы обсудим, как психологические аспекты влияют на появление зависимостей и процесс выздоровления. Читатели смогут понять важность профессиональной поддержки и применения научных подходов в терапии.
Полезно знать – msk clinica plus
Информация о проверке качества продукции повышает лояльность клиентов
https://redmetsplav.ru/store/vismut/zarubezhnye-splavy-3/vismut-cac221—jis-h-5120-2016/poroshok-vismutovyy-cac221—jis-h-5120-2016/
Использование системы менеджмента качества гарантирует строгий контроль продукции на всех этапах отгрузки.
https://rms-ekb.ru/catalog/list/list-u8a-10x1000x2000-gost-19903-74/
You got a very excellent website, Gladiola I discovered it through yahoo.
Удобное разделение продукции на сплавы и конкретные виды проката
https://redmetsplav.ru/store/vismut/zarubezhnye-splavy-3/vismut-c89550—cda/truba-vismutovaya-c89550—cda/
Каждый день московские работодатели публикуют свежие предложения — от стартапов до крупных московских предприятий. Если вы ищете работу в Москве, вы можете найти вакансии бухгалтер Москва, во всех отраслях и по всем профессиям, ведь чем раньше начнёте, тем быстрее найдёте в Москве.
ООО «РМС» специализируется на поставках редких и тугоплавких металлов, таких как ниобий и вольфрам.
https://rms-ekb.ru/catalog/ugolok-stalnoi/ugolok-iz-konstruktsionnoi-stali-200kh200kh18-mm-st52-3n-uni-6762/
Добрый день!
В нише среднего бизнеса сайт должен учитывать поисковый спрос, коммерческие факторы и сценарии принятия решения. Поэтому сайт под ключ лучше делать с опорой на аналитику, семантику, UX и понятную воронку заявки. Один из вариантов решения — сайт на коде без конструктора: https://volt-site.ru/uslugi/seo-prodvizhenie
заказать сайт для детейлинга, seo продвижение сайта услуги, разработка b2b сайта стоимость
студия разработки сайтов агентство, создание сайта цена онлайн, заказать разработку сайта онлайн
Всего наилучшего и роста в топ!
Этот обзор посвящен успешным стратегиям избавления от зависимости, включая реальные примеры и советы. Мы разоблачим мифы и предоставим читателям достоверную информацию о различных подходах. Получите опыт многообразия методов и найдите подходящий способ для себя!
Продолжить чтение – moskva clinica plus
Раздел «Цены на металлы» полезен для мониторинга рынка
https://redmetsplav.ru/store/vismut/zarubezhnye-splavy-3/vismut-bi46a—eiaipc-j-std-006/prutok-vismutovyy-bi46a—eiaipc-j-std-006/
Эта публикация исследует взаимосвязь зависимости и психологии. Мы обсудим, как психологические аспекты влияют на появление зависимостей и процесс выздоровления. Читатели смогут понять важность профессиональной поддержки и применения научных подходов в терапии.
Узнать больше > – клиника плюс мурманск
Экспертная консультация при выборе сплавов помогает клиентам оптимизировать затраты и избежать технологических ошибок.
https://rms-ekb.ru/catalog/stalnoi-list/stalnoi-list-70g-46x1000x1400-gost-r-52146-2003-polimernyi-neotsinkovannyi-kholodnokatanyi/
Здравствуйте!
Когда бизнес заказывает разработка лендингов, важно смотреть не только на визуальный дизайн. Сайт должен быстро загружаться, понятно вести пользователя к заявке и иметь структуру, пригодную для SEO. Поэтому для компаний, которым нужен не просто онлайн-буклет, а рабочий инструмент продаж, логично рассмотреть корпоративный сайт под ключ: https://volt-site.ru/uslugi/nashi-tekhnologii Это снижает риск переделок после запуска и помогает быстрее перейти к продвижению.
сайт без шаблонов, создание лендинга для кафе, заказать интернет магазин цена
разработка b2b сайта стоимость, лендинг для заявок студия, лендинг без тильды премиум
Всего наилучшего и роста в топ!
Добрый день!
Для продвижения сайта важны не только ссылки и тексты, но и качество самой площадки: логика страниц, релевантность запросам, удобство интерфейса, скорость и понятные коммерческие сигналы. Поэтому разработку лучше совмещать с SEO-планированием. Подробнее: создание сайта для бизнеса — https://volt-site.ru/ Для безопасного ссылочного профиля лучше чередовать брендовые, безанкорные и разбавленные анкоры.
лендинг на коде, сайт интернет магазина услуги, создание лендинга удаленно
разработка b2b сайта онлайн, уникальный дизайн сайта стоимость, разработка сайтов премиум
Всего наилучшего и роста в топ!
Наличие кобальтовых сплавов заинтересует авиастроение
https://redmetsplav.ru/store/vismut/zarubezhnye-splavy-3/vismut-42-3984—csnstn-423984/prutok-vismutovyy-42-3984—csnstn-423984/
В этой статье мы рассмотрим современные достижения в области медицины, включая инновационные методы лечения и диагностики. Мы обсудим важность профилактики заболеваний и роль технологий в улучшении качества здравоохранения. Читатели узнают о влиянии медицины на повседневную жизнь и ее значение для современного общества.
Узнать больше – msk clinica plus
Добрый день!
Для услуг с высокой конкуренцией обычного шаблонного сайта часто недостаточно. Нужны понятное позиционирование, сильный первый экран, доказательства экспертности, кейсы, формы связи и техническая база без лишнего кода. Посмотреть подход можно здесь — разработка сайтов под ключ: https://volt-site.ru/uslugi/razrabotka-lendinga Такой подход выглядит естественно и для пользователей, и для поисковых систем.
создание landing page премиум, заказать сайт в спб, разработка сайтов для производства
разработка сайта компании заказать, заказать лендинг на коде, создание лендинга для кафе
Всего наилучшего и роста в топ!
Добрый день!
Для конкурентных тематик важна связка из технической базы, контента, коммерческих факторов и понятного пользовательского пути. Такая логика особенно актуальна, когда нужен сайт для бизнеса. Один из релевантных вариантов — заказать сайт под ключ: https://volt-site.ru/uslugi/razrabotka-sajtov Это снижает риск переделок после запуска и помогает быстрее перейти к продвижению.
разработка b2b сайта заказать, лендинг для привлечения заявок, создание сайта компании
заказать лендинг удаленно, создание современного сайта студия, заказать разработку сайта онлайн
Всего наилучшего и роста в топ!
В каталоге представлены конденсаторные ниобиевые порошки высокой чистоты, необходимые для современной электроники.
https://rms-ekb.ru/catalog/stalnoi-list/stalnoi-list-08iu-1-4x1250x1200-gost-19903-2006-gladkii-belyi-goriachekatanyi/
Поиск работы в Краснодаре не обязательно должен занимать много времени. На нашем портале вы можете загрузить резюме за пару минут и сразу найти работа – сварщик Краснодар по вашей профессии в Краснодаре, не теряя времени на лишние поиски.
Доброго!
Лендинг, корпоративный сайт или интернет-магазин должны решать конкретную бизнес-задачу: получать заявки, продавать услуги, формировать доверие или масштабировать продажи. Для проектов, где важны SEO и конверсия, подойдет разработка сайтов под ключ: https://volt-site.ru/o-studii Это помогает не размывать релевантность и вести пользователя к целевому действию.
продающий лендинг для ресторана, создание сайтов заказать, разработать сайт для недвижимости
разработать сайт для b2b, seo для сайта удаленно, разработка лендинга для бизнеса
Всего наилучшего и роста в топ!
Для тех, кто ищет информацию по теме “Последние новости и обзоры кино на Лорд Фильмов”, там просто кладезь информации.
Вот, можете почитать:
https://web-freelance.ru
Удобное разделение продукции на сплавы и конкретные виды проката
https://redmetsplav.ru/store/vanadiy-i-ego-splavy/vanadiy-vnm99-9—tu-1761-037-2587982-2002/truba-vanadievaya-vnm99-9—tu-1761-037-2587982-2002/
Эта публикация исследует взаимосвязь зависимости и психологии. Мы обсудим, как психологические аспекты влияют на появление зависимостей и процесс выздоровления. Читатели смогут понять важность профессиональной поддержки и применения научных подходов в терапии.
Продолжить изучение – клиника плюс москва
Доброго!
Лендинг, корпоративный сайт или интернет-магазин должны решать конкретную бизнес-задачу: получать заявки, продавать услуги, формировать доверие или масштабировать продажи. Для проектов, где важны SEO и конверсия, подойдет volt-site.ru: https://volt-site.ru/kejsy Особенно важно заранее продумать, какие страницы будут собирать коммерческий спрос.
seo для сайта профессионально, заказать интернет магазин студия, заказать seo продвижение
лендинг для заявок услуги, создание сайта цена удаленно, продающий лендинг быстро
Всего наилучшего и роста в топ!
ООО «РМС» предлагает широкий спектр цветного проката, включая медь, латунь, бронзу и дюралюминий.
https://rms-ekb.ru/catalog/stalnoi-list/stalnoi-list-12gn2mfaiu-2-2x1550x1100-gost-19903-2006-gladkii-chernyi-goriachekatanyi/
Профессиональный подход к описанию каждого вида металла
https://redmetsplav.ru/store/vanadiy-i-ego-splavy/vanadiy-fev60—iso-5451/truba-vanadievaya-fev60—iso-5451/
Каждая партия товара сопровождается сертификатами качества, подтверждающими соответствие ГОСТ и ТУ.
https://rms-ekb.ru/catalog/krug-iz-instrumentalnoi-stali/krug-khv4-45-89-gost-7417-75/
Доброго!
Многие сайты выглядят современно, но не дают заявок из-за слабой структуры, отсутствия аналитики и неочевидного оффера. Перед запуском рекламы или SEO стоит проверить посадочные страницы, скорость, формы, тексты и коммерческие блоки. Для такой задачи подходит SEO-продвижение сайта, где разработка строится вокруг конверсии и поискового спроса: https://volt-site.ru/o-studii Это помогает не размывать релевантность и вести пользователя к целевому действию.
разработка сайта цена недорого, разработка лендинга для эксперта, продвижение сайта под google
увеличить заявки с сайта, seo оптимизация сайта студия, создание landing page стоимость
Всего наилучшего и роста в топ!
Сайт адаптирован под нужды машиностроительных заводов
https://redmetsplav.ru/store/titan/rossiyskie-splavy-4/titan-vt25u—ost-1-90013-81/krug-titanovyy-vt25u—ost-1-90013-81/
Компания выступает важным звеном в цепочке снабжения предприятий машиностроения и оборонно-промышленного комплекса.
https://rms-ekb.ru/catalog/stalnoi-list/stalnoi-list-20kh17n2-11x1100x1000-gost-19903-2006-gladkii-belyi-goriachekatanyi/
Сайт четко ориентирован на промышленный сектор и B2B сегмент
https://redmetsplav.ru/store/titan/rossiyskie-splavy-4/titan-t51—gost-2171-90/krug-titanovyy-t51—gost-2171-90/
В этой статье мы обсудим процесс восстановления после зависимостей, акцентируя внимание на различных методах и подходах к реабилитации. Читатели узнают, как создать план выздоровления и использовать полезные ресурсы для достижения устойчивых изменений.
Читать полностью – нарколога на дому в Мурманске
Купить лучший кайт Cabrinha в Беларуси бесплатно с доставкой
Опыт работы с более чем 120 постоянными заказчиками свидетельствует о высокой стабильности и надежности поставок.
https://rms-ekb.ru/catalog/krug-iz-instrumentalnoi-stali/krug-r12f3-17-2-gost-7417-75/
Наличие циркония свидетельствует о работе с высокотехнологичными заказами
https://redmetsplav.ru/store/titan/rossiyskie-splavy-4/titan-et2—tu-1-9-77-85/lenta-titanovaya-et2—tu-1-9-77-85/
Купить лучший кайт Cabrinha в Беларуси бесплатно с доставкой
Приятно удивлены скоростью обработки запроса на сайте, менеджер связался очень быстро.
https://xn--80aeedb0bfzeok.xn--p1ai/catalog/mednyi-perekhodnoi-troinik-press/mednyi-perekhodnoi-press-troinik-53-6kh12-mm-m1e-gost-r-52948-2008/
Использование системы менеджмента качества гарантирует строгий контроль продукции на всех этапах отгрузки.
https://rms-ekb.ru/catalog/ugolok-stalnoi/ugolok-stalnoi-stal-3-45x28x3-gost-8509-93/
Лучшие предложения в СПб разбирают раньше, чем вы думаете. С учётом этого важно мониторить вакансии каждый день. На нашем сайте вы можете посмотреть срочные вакансии СПб, от производства до финансов, по всем районам города, и опередите других соискателей.
Широкий выбор тугоплавких металлов, таких как вольфрам и молибден
https://redmetsplav.ru/store/titan/rossiyskie-splavy-4/titan-35bt—gost-10994-74/prutok-titanovyy-35bt—gost-10994-74/
Ориентация на долгосрочные отношения с клиентами позволяет компании формировать индивидуальные условия оплаты и графики поставок.
https://rms-ekb.ru/catalog/list/list-u11-2x500x1000-gost-19903-74/
Howdy! I simply would like to offer you a
big thumbs up for your great info you have right here on this
post. I am returning to your blog for more soon.
yxd795
Большой опыт работы, судя по копирайту с 2013 года
https://redmetsplav.ru/store/magniy-i-ego-splavy/rossiyskie-splavy-1/magniy-l-2-1—tu-28-10-33-75/list-magnievyy-l-2-1—tu-28-10-33-75/
Приятно удивлены скоростью обработки запроса на сайте, менеджер связался очень быстро.
https://xn--80aeedb0bfzeok.xn--p1ai/catalog/latunnaia-polosa/latunnaia-polosa-1-8×300-mm-l90-gost-931-90/
Наличие на складе редких металлов, таких как цирконий, выделяет компанию на фоне конкурентов, торгующих только массовым прокатом.
https://rms-ekb.ru/catalog/ugolok-stalnoi/ugolok-iz-konstruktsionnoi-stali-90kh90kh9-mm-41cralmo7-din-1029/
Этот краткий обзор предлагает сжатую информацию из области медицины, включая ключевые факты и последние новости. Мы стремимся сделать информацию доступной и понятной для широкой аудитории, что позволит читателям оставаться в курсе актуальных событий в здравоохранении.
Ознакомиться с теоретической базой – частная наркологическая клиника
В данной статье рассматриваются физиологические и эмоциональные аспекты зависимости. Мы обсудим, как организм реагирует на зависимое поведение, и какие методы помогают восстановить здоровье и внутреннее равновесие.
Получить полную информацию – клиника плюс
В этой статье мы обсудим процесс восстановления после зависимостей, акцентируя внимание на различных методах и подходах к реабилитации. Читатели узнают, как создать план выздоровления и использовать полезные ресурсы для достижения устойчивых изменений.
Посмотреть всё – clinica plus
В этой статье рассматриваются различные аспекты избавления от зависимости, включая физические и психологические методы. Мы обсудим поддержку, мотивацию и стратегии, которые помогут в процессе выздоровления. Читатели узнают, как преодолеть трудности и двигаться к новой жизни без зависимости.
Погрузиться в научную дискуссию – вывода из запоя на дому в Муроме
Der Arbeitsmarkt in Deutschland bietet mehr Moglichkeiten als viele denken. Das bedeutet, dass fur jeden Erfahrungslevel ein Angebot bereitsteht. Schauen Sie sich an Jobs – Krankenpfleger Deutschland direkt hier, speichern Sie Favoriten und starten Sie noch heute in Ihren neuen Job.
Этот обзор медицинских исследований собрал самое важное из последних публикаций в области медицины. Мы проанализировали ключевые находки и представили их в доступной форме, чтобы читатели могли легко ориентироваться в актуальных темах. Этот материал станет отличным подспорьем для изучения медицины.
Что ещё нужно знать? – кодирования от алкоголизма в Муроме
Поток вакансий в Новосибирске не иссякает ни в будни, ни в выходные. Транспортные и логистические компании расширяют штат — и вы можете откликнуться прямо сейчас. Зайдите вакансии для начинающих Новосибирск на нашем портале и убедитесь сами — мы обновляем базу каждый день, чтобы вы не упустили ничего важного.
Корзина на сайте промышленного предприятия — удобный инструмент для формирования заявки
https://redmetsplav.ru/store/kobalt/stellite/kobalt-stellite-sf12/truba-kobaltovaya-stellite-sf12/
Реализация твердых сплавов типа «Победит» ориентирована на производителей металлорежущего и бурового инструмента.
https://rms-ekb.ru/catalog/stalnoi-list/stalnoi-list-45g-36x2000x1200-gost-19903-2006-gladkii-neotsinkovannyi-goriachekatanyi/
Bu arada, eger gumus kararmas? nas?l gecer konusuyla ilgileniyorsan?z, suraya bir goz at?n. Iste link: https://kendihobim.com/articles/gumus-kararmasi-nasil-temizlenir/
В этой публикации мы рассматриваем важную тему борьбы с зависимостями, включая алкогольную и наркотическую зависимости. Мы обсудим методы лечения, реабилитации и поддержку, которые могут помочь людям, столкнувшимся с этой проблемой. Читатели узнают о перспективах выздоровления и важности комплексного подхода.
Полная информация здесь – вывод из запоя дешево самара
Этот обзор медицинских исследований собрал самое важное из последних публикаций в области медицины. Мы проанализировали ключевые находки и представили их в доступной форме, чтобы читатели могли легко ориентироваться в актуальных темах. Этот материал станет отличным подспорьем для изучения медицины.
Детальнее – нарколог
Описание преимуществ компании подчеркивает надежность поставок
https://redmetsplav.ru/store/kobalt/stellite/kobalt-stellite-251/krug-kobaltovyy-stellite-251/
Компания выступает важным звеном в цепочке снабжения предприятий машиностроения и оборонно-промышленного комплекса.
https://rms-ekb.ru/catalog/truba-konstruktsionnaia/truba-konstruktsionnaia-stal-35-146×17-gost-21729-76/
Ответственная компания, которая ценит долгосрочное сотрудничество, всегда идут навстречу клиенту.
https://xn--80aeedb0bfzeok.xn--p1ai/catalog/latunnaia-polosa/latunnaia-polosa-4-5×350-mm-l68-gost-931-90/
Этот краткий обзор предлагает сжатую информацию из области медицины, включая ключевые факты и последние новости. Мы стремимся сделать информацию доступной и понятной для широкой аудитории, что позволит читателям оставаться в курсе актуальных событий в здравоохранении.
Откройте для себя больше – вывод из запоя с выездом
OimynaxAi
Информация о времени работы (10:00–18:00) помогает планировать звонки
https://redmetsplav.ru/store/kobalt/rossiyskie-splavy-3/kobalt-yundk38t7/prutok-kobaltovyy-yundk38t7/
Технические специалисты компании помогли выбрать оптимальный сплав для работы в агрессивных средах.
https://xn--80aeedb0bfzeok.xn--p1ai/catalog/mednyi-perekhodnoi-troinik-press/mednyi-perekhodnoi-press-troinik-108kh53-6-mm-m2rm-gost-r-52948-2008/
Медицинская публикация представляет собой свод актуальных исследований, экспертных мнений и новейших достижений в сфере здравоохранения. Здесь вы найдете информацию о новых методах лечения, прорывных технологиях и их практическом применении. Мы стремимся сделать актуальные медицинские исследования доступными и понятными для широкой аудитории.
Где почитать поподробнее? – экстренная помощь при запое на дому
В этой статье рассматриваются различные аспекты избавления от зависимости, включая физические и психологические методы. Мы обсудим поддержку, мотивацию и стратегии, которые помогут в процессе выздоровления. Читатели узнают, как преодолеть трудности и двигаться к новой жизни без зависимости.
Раскрыть тему полностью – эффективный вывод из запоя
Funding Fred
Stop putting it off — jobs in Britain are there for those who look. On our platform you’ll find jobs – chef UK, for every age, background and level of experience, and you can apply to the best ones in just a few clicks.
Раздел «Цены на металлы» полезен для мониторинга рынка
https://redmetsplav.ru/store/kobalt/rossiyskie-splavy-3/kobalt-ep949/poroshok-kobaltovyy-ep949/
Ориентация на долгосрочные отношения с клиентами позволяет компании формировать индивидуальные условия оплаты и графики поставок.
https://rms-ekb.ru/catalog/plity/plita-u10a-30x500x360-gost-19903-74/
Гибкая система оплаты и прозрачные условия договора, никаких скрытых наценок или задержек.
https://xn--80aeedb0bfzeok.xn--p1ai/catalog/dvutavr-aliuminievyi/aliuminievyi-dvutavr-ad35-4x60x200-gost-13621-90/
Хотите сменить работу, но не понимаете где искать? Нужный вариант уже ждёт вас. Зайдите на наш сайт вы можете посмотреть работа – инженер СПб отсортированные по свежести и релевантности — и уже через несколько минут у вас будет список мест, куда стоит отправить резюме.
Вывод запоя на дому позволяет сохранить приватность: соседи, коллеги и знакомые не узнают о визите врача. Наркологическая служба работает анонимно, поэтому постановки на учет не происходит, а информация о пациенте не передается третьим лицам. Гарантия конфиденциальности особенно важна для тех, кто постоянно работает с людьми, занимает ответственное место или переживает за репутацию близкого человека.
Разобраться лучше – помощь вывод из запоя
Glen Investwick
Сайт четко ориентирован на промышленный сектор и B2B сегмент
https://redmetsplav.ru/store/kobalt/rossiyskie-splavy-3/kobalt-ek120/lenta-kobaltovaya-ek120/
Компания работает с изделиями из драгоценных и благородных металлов, что требует высокого уровня квалификации и ответственности.
https://rms-ekb.ru/catalog/ugolok-stalnoi/ugolok-stalnoi-09g2s-100x100x7-gost-8509-93/
Эта статья подробно расскажет о процессе выздоровления, который включает в себя эмоциональную, физическую и психологическую реабилитацию. Мы обсуждаем значимость поддержки и наличие профессиональных программ. Читатели узнают, как строить новую жизнь и не возвращаться к старым привычкам.
Смотрите также… – капельница от похмелья в Мытищах
Очень широкий каталог, нашли всё необходимое в одном месте, включая редкие позиции.
https://xn--80aeedb0bfzeok.xn--p1ai/catalog/mednye-dvukhrastrubnye-mufty-press/mednaia-dvukhrastrubnaia-press-mufta-25-mm-m3r-gost-r-52948-2008/
Продажа проволоки из тугоплавких металлов востребована в электронике
https://redmetsplav.ru/store/cirkoniy-i-ego-splavy/cirkoniy-125-1/prutok-cirkonievyy-125/
Varnexium365
Компания занимается реализацией ферросплавов, необходимых для качественного легирования сталей на литейных участках.
https://rms-ekb.ru/catalog/list/list-u10a-35x1200x2500-gost-19903-74/
Надежная защита груза при транспортировке, даже длинномерные изделия доходят без повреждений.
https://xn--80aeedb0bfzeok.xn--p1ai/catalog/mednye-dvukhrastrubnye-mufty-pod-paiku/mednaiadvukhrastrubnaiamufta-pod-paiku16kh1-2mmm3tgost-32590-2013/
В этой публикации мы предложим ряд рекомендаций по избавлению от зависимостей и успешному восстановлению. Мы обсудим методы привлечения поддержки и важность самосознания. Эти советы помогут людям вернуться к нормальной жизни и стать на путь выздоровления.
Получить дополнительную информацию – процедура снятия интоксикации на дому
Поток вакансий в Казани не иссякает ни в будни, ни в выходные. Промышленные предприятия набирают рабочих и инженеров — и всё это можно найти в одном месте. Зайдите срочные вакансии Казань прямо здесь и выберите подходящее — мы обновляем базу каждый день, чтобы вы не упустили ничего важного.
В этой публикации мы рассматриваем важную тему борьбы с зависимостями, включая алкогольную и наркотическую зависимости. Мы обсудим методы лечения, реабилитации и поддержку, которые могут помочь людям, столкнувшимся с этой проблемой. Читатели узнают о перспективах выздоровления и важности комплексного подхода.
Читать дальше – вывода из запоя на дому в Мурманске
Представлен полный цикл изделий: от фольги и проволоки до крупных поковок
https://redmetsplav.ru/store/volfram/splavy-volframa-1/volfram-w-cu40-1/pokovka-volframovaya-w-cu40/
Ассортимент компании включает более 100 000 позиций, что позволяет закрыть практически любые потребности металлургического производства.
https://rms-ekb.ru/catalog/krug-iz-instrumentalnoi-stali/krug-u10-8-8-gost-7417-75/
Kyndorax Velsarim
Удобный сайт и понятная навигация по каталогу, легко найти нужную марку стали или сплава.
https://xn--80aeedb0bfzeok.xn--p1ai/catalog/melkhiorovaia-truba/melkhiorovaia-truba-24kh1-5kh2000-mm-mnzhmts30-1-1-gost-10092-2006/
Описание применения металлов в атомной энергетике подчеркивает качество
https://redmetsplav.ru/store/volfram/splavy-volframa-1/volfram-vnzh-2-1/lenta-volframovaya-vnzh-2-1/
В этой статье мы подробно рассматриваем проверенные методы борьбы с зависимостями, включая психотерапию, медикаментозное лечение и поддержку со стороны общества. Мы акцентируем внимание на важности комплексного подхода и возможности успешного восстановления для людей, столкнувшихся с этой проблемой.
Углубить понимание вопроса – вывод из запоя круглосуточно
Поставки титана и его сплавов востребованы в медицине, авиации и химическом машиностроении.
https://rms-ekb.ru/catalog/stalnoi-list/list-stalnoi-3kh1500kh2300-mm-aisi-430-en-iso-9445-1/
Bistra Fondina
Долго искали надежного поставщика циркония, в Редметсплав предложили лучшие условия и чистоту металла.
https://xn--80aeedb0bfzeok.xn--p1ai/catalog/mednye-dvukhrastrubnye-mufty-pod-paiku/mednaiadvukhrastrubnaia-podvizhnaiamufta-pod-paiku21kh0-9mmm3tgost-r-52922-2008/
Мы рассмотрим современные вызовы здравоохранения и пути их решения с помощью технологий и научных исследований. В статье собраны данные о новых лекарствах, методах диагностики и системном подходе к улучшению здоровья населения.
Прочитать подробнее – наркологам на дом в Муроме
New opportunities appear in every province every single day. Trucking and logistics firms are hiring drivers and warehouse staff across the country — and you can find all of it in one place. Browse through jobs – security Canada on our platform and pick the roles that suit you — we update every day so you never miss a good opening.
Информация о проверке качества продукции повышает лояльность клиентов
https://redmetsplav.ru/store/volfram/splavy-volframa-1/volfram-vch-1-1/prutok-volframovyy-vch-1/
Реализация твердых сплавов типа «Победит» ориентирована на производителей металлорежущего и бурового инструмента.
https://rms-ekb.ru/catalog/ugolok-stalnoi/ugolok-iz-konstruktsionnoi-stali-khkh40-mm-s355g13-qt-en-10225/
Qorvanel Dymarix
Спецстали для машиностроения закупаем только здесь, надежность материала подтверждена испытаниями.
https://xn--80aeedb0bfzeok.xn--p1ai/catalog/latunnaia-kapilliarnaia-trubka/latunnaia-kapilliarnaia-trubka-2-5kh0-85kh100000-mm-l96-gost-2624-2016/
Хватит откладывать — работа в Нижнем найдётся быстрее, чем вы думаете. Здесь вы найдёте работа Нижний Новгород рядом, для любого возраста, опыта и специальности, и сможете откликнуться на лучшие из них в несколько кликов.
Сайт четко ориентирован на промышленный сектор и B2B сегмент
https://redmetsplav.ru/store/vismut/zarubezhnye-splavy-3/vismut-sn96ag2-5bi1cu-5—iec-61190-1-3/lenta-vismutovaya-sn96ag2-5bi1cu-5—iec-61190-1-3/
Ассортимент компании включает более 100 000 позиций, что позволяет закрыть практически любые потребности металлургического производства.
https://rms-ekb.ru/catalog/stalnoi-list/stalnoi-list-10khsnd-2-2x1200x1100-gost-19903-2006-gladkii-belyi-goriachekatanyi/
В этой статье обсуждаются актуальные медицинские вопросы, которые волнуют общество. Мы обращаем внимание на проблемы, касающиеся здравоохранения и лечения, а также на новшества в области медицины. Читатели будут осведомлены о последних событиях и смогут следить за тенденциями в медицине.
Изучить материалы по теме – вывод из запоя круглосуточно по Самаре
Trustbalance
Покупали изделия из драгметаллов для лаборатории, всё соответствует заявленным характеристикам.
https://xn--80aeedb0bfzeok.xn--p1ai/catalog/mednye-krestoviny-pod-paiku/mednaia-krestovina-pod-paiku-18kh14kh0-8-mm-12-6kh14-6-mm-miagkaia-paika-m3t-gost-r-52922-2008/
Этот информационный материал подробно освещает проблему наркозависимости, ее причины и последствия. Мы предлагаем информацию о методах лечения, профилактики и поддерживающих программах. Цель статьи — повысить осведомленность и продвигать идеи о необходимости борьбы с зависимостями.
Есть чему поучиться – клиника плюс
Раздел «Контакты» содержит все необходимые реквизиты и карту
https://redmetsplav.ru/store/vismut/zarubezhnye-splavy-3/vismut-l54830—uns/provoloka-vismutovaya-l54830—uns/
Поставки жаропрочных сплавов ориентированы на потребности авиационной и энергетической отраслей.
https://rms-ekb.ru/catalog/truba-konstruktsionnaia/truba-konstruktsionnaia-vt1-0-18×2-gost-21729-76/
Stone Ganvale
Очень широкий каталог, нашли всё необходимое в одном месте, включая редкие позиции.
https://xn--80aeedb0bfzeok.xn--p1ai/catalog/latunnye-naruzhnye-stopornye-koltsa-po-gost/latunoe-naruzhnoe-stopornoe-pruzhinnoe-koltso-120kh3-mm-lsd-gost-13942-86/
Сайт выглядит профессионально и лаконично, без лишней рекламы
https://redmetsplav.ru/store/vismut/zarubezhnye-splavy-3/vismut-cacin906—jis-h-2202-2016/polosa-vismutovaya-cacin906—jis-h-2202-2016/
Make your next career move now — the Australian job market is full of opportunity right across the country. Here you’ll find apprenticeship jobs Australia, for every background, experience level and industry, and you can apply to the best ones in just a few clicks.
Компания предлагает не только металлы, но и химическую продукцию, используемую в смежных металлургических процессах.
https://rms-ekb.ru/catalog/ugolok-stalnoi/ugolok-iz-konstruktsionnoi-stali-75kh50kh6-mm-16crmo44-uni-6762/
Благодарим за оперативную поставку ниобиевых труб, выручили в очень сжатые сроки.
https://xn--80aeedb0bfzeok.xn--p1ai/catalog/dvutavr-aliuminievyi/aliuminievyi-dvutavr-1915-1-2x38x23-gost-13621-90/
В этой статье рассматриваются способы преодоления зависимости и успешные истории людей, которые справились с этой проблемой. Мы обсудим важность поддержки со стороны близких и профессионалов, а также стратегии, которые могут помочь в процессе выздоровления. Научитесь первоочередным шагам к новой жизни.
Хочу знать больше – murom clinica plus
Челябинск — промышленный центр Южного Урала с вакансиями во всех сферах. Это значит, что работа здесь есть всегда. Посмотрите вакансии продавцом Челябинск сегодня на нашем портале, откликнитесь на лучшее и двигайтесь к новому месту работы уже сегодня.
Описание преимуществ компании подчеркивает надежность поставок
https://redmetsplav.ru/store/vismut/zarubezhnye-splavy-3/vismut-c89940—uns/pokovka-vismutovaya-c89940—uns/
Компания обеспечивает поставки оксовольфрамата гафния — редкого соединения для специфических нужд химической и атомной промышленности.
https://rms-ekb.ru/catalog/krug-iz-instrumentalnoi-stali/krug-r9k5-23-gost-2590-2006/
Порадовало наличие вольфрамовых прутков редких диаметров, менеджер оперативно помог с подбором.
https://xn--80aeedb0bfzeok.xn--p1ai/catalog/latunnye-naruzhnye-stopornye-koltsa-po-din/latunoe-naruzhnoe-stopornoe-pruzhinnoe-koltso-m108-98kh4-mm-lmtsska-din-471/
Логичное деление на вольфрамовый, молибденовый и титановый прокат
https://redmetsplav.ru/store/vismut/zarubezhnye-splavy-3/vismut-c89530—uns/polosa-vismutovaya-c89530—uns/
Van verpleegkundigen met jaren ervaring tot mensen die voor het eerst werk zoeken — de Nederlandse arbeidsmarkt heeft voor iedereen iets te bieden. Bekijk schoonmaak vacatures Nederland hier, pas de zoekopdracht aan op jouw profiel en solliciteer — helemaal gratis en zonder gedoe.
Краснодар — город возможностей. Здесь найдут себе место и молодые специалисты без опыта, и матёрые профессионалы с портфолио. Просмотрите вакансии посменно Краснодар на нашем сайте, отфильтруйте по нужным параметрам и отправляйте отклики — всё это бесплатно и без лишних шагов.
” said Ignatius Gallaher.フィギュア オナホ“I drink mine neat.
La France emploie des personnes dans la sante, le batiment, la tech, l’education, la restauration et bien d’autres domaines. Ce qui veut dire que il y a toujours une offre qui correspond a votre profil. Parcourez agent nettoyage emploi France sur notre plateforme, postulez en un clic et mettez-vous en route vers votre prochain poste des aujourd’hui.
Ayr?ca, eger konsantrik kas?lma nedir konusuyla ilgileniyorsan?z, buray? inceleyin. Suradan okuyabilirsiniz: https://sportmodu.com/articles/konsantrik-kasilma-tanim-onemi/
Кстати, если вас интересует Актуальные события и изменения в Саратовской области, загляните сюда.
Ссылка ниже:
https://64media.ru
В самых разных форматах, вакансии существуют почти в каждой сфере. На нашем сайте вы можете найти вакансии кассиром – сегодня, с умными фильтрами, в любом городе, и совсем скоро вы будете намного ближе к подписанию оффера с компанией своей мечты.
Gemstone WoW is a free World of Warcraft: Wrath of the Lich King 3.3.5a private
server built for players who want to experience Northrend the way they remember it.
Enjoy Blizzlike raids, dungeons, quests, battlegrounds,
arenas, and world content without subscriptions, hidden costs, or pay-to-win advantages.
Explore fully scripted content such as Icecrown Citadel,
Ulduar, Trial of the Crusader, Naxxramas, Eye of Eternity,
Obsidian Sanctum, and every normal and heroic five-player dungeon. Our balanced rates provide faster progression while preserving the classic
WotLK experience.
Gemstone WoW offers a pre-configured HD client, stable worldwide connections,
low latency, regular bug fixes, frequent server
updates, active PvE and PvP, and a growing international community.
https://mail.ru/
Il mercato del lavoro in Italia si muove velocemente e le buone offerte finiscono in fretta. Per questo non dovresti rimandare la tua ricerca. Sul nostro sito puoi consultare offerte — imbianchino Italia, dalla sanita all’ingegneria, in tutta Italia, e stai sempre un passo avanti.
Только начинаете карьеру? Отличный момент для старта. В нашей базе вы найдёте работа – сварщик без строгих требований к стажу, и получите реальный шанс построить карьеру с нуля.
Wager safely at a fully licensed online casino offering premium software interfaces and robust digital encryption. Experience the true thrill of live blackjack, real-time roulette, and modern crash mechanics from any mobile device. Enjoy guaranteed fast track withdrawals and daily loyalty rewards tailored for continuous action.
https://www.auracollection.co.za/post/copy-of-scent-and-our-emotions?commentId=484cf724-f434-4009-93a5-1fd3b07e4f6b
Wager safely at a fully licensed online casino offering premium software interfaces and robust digital encryption. Experience the true thrill of live blackjack, real-time roulette, and modern crash mechanics from any mobile device. Enjoy guaranteed fast track withdrawals and daily loyalty rewards tailored for continuous action.
https://www.chocolatesbytomes.co.za/post/valentines?commentId=6e4dba54-6cf6-4d37-9496-1a08522b348f
Chcesz pracowac blisko domu, aby nie tracic godzin na dojazdy? Takie role zgromadzilismy na naszej platformie. Sprawdz praca nauczyciel dzisiaj Polska, z prostymi filtrami wedlug miasta i kategorii zawodowej, i aplikuj na to, co naprawde pasuje do Twojej sytuacji.
Great beat ! I would like to apprentice even as you amend your website, how could i subscribe for a weblog site?
The account aided me a appropriate deal. I were tiny bit familiar
of this your broadcast offered bright transparent concept
Думаете о смене работы но не хватает времени на долгий поиск? Ведущие компании рынка публикуют вакансии каждый день — откройте вакансии – свободный график обновляемые ежедневно, чтобы уже сегодня сделать первый шаг к лучшей работе.
Bu arada, eger sukulent nedir konusuyla ilgileniyorsan?z, suraya bir goz at?n. Link burada: https://kendihobim.com/articles/sukulent-cicekli-turler-beslenme-bakim/
?Nuevo en Espana y buscas tu primer empleo aqui? Nuestra plataforma te da una vision completa de lo que esta contratando en todo el pais ahora mismo. Explora trabajo estacional Espana, desde pequenas empresas locales hasta grandes empleadores espanoles, y da tu primer paso hacia un nuevo trabajo hoy.
Your next step up starts with the right opportunity. Open job postings filtered by seniority level — because the right job at the right moment changes everything.
Hi, I do think this is an excellent site. I stumbledupon it 😉 I’m going to come back yet again since i
have saved as a favorite it. Money and freedom is the best way to change,
may you be rich and continue to help other people.
Этот текст представляет собой обзор свежих данных и исследований в области медицины. Он призван помочь читателям понять, как научные достижения влияют на лечение, диагностику и общее состояние системы здравоохранения.
Читать полностью – наркологическая клиника в нижнем новгороде
Эта медицинская заметка содержит сжатую информацию о новых находках и методах в области здравоохранения. Мы предлагаем читателям свежие данные о заболеваниях, профилактике и лечении. Наша цель — быстро и доступно донести важную информацию, которая поможет в повседневной жизни и понимании здоровья.
Где почитать поподробнее? – novokuzneck clinica plus
В этой статье мы рассмотрим современные достижения в области медицины, включая инновационные методы лечения и диагностики. Мы обсудим важность профилактики заболеваний и роль технологий в улучшении качества здравоохранения. Читатели узнают о влиянии медицины на повседневную жизнь и ее значение для современного общества.
Что ещё нужно знать? – наркологическая клиника Плюс в Находке
Эта публикация исследует взаимосвязь зависимости и психологии. Мы обсудим, как психологические аспекты влияют на появление зависимостей и процесс выздоровления. Читатели смогут понять важность профессиональной поддержки и применения научных подходов в терапии.
Где почитать поподробнее? – капельница от похмелья воронеж
В данном обзоре представлены основные направления и тренды в области медицины. Мы обсудим актуальные проблемы здравоохранения, свежие открытия и новые подходы, которые меняют представление о лечении и профилактике заболеваний. Эта информация будет полезна как специалистам, так и широкой публике.
Ознакомиться с полной информацией – капельница от похмелья в воронеже
В этой статье рассматриваются актуальные вопросы, связанные с развитием медицинской науки и её внедрением в повседневную практику. Особое внимание уделено вопросам профилактики, ранней диагностики и использованию технологий для улучшения здоровья человека.
ТОП-5 причин узнать больше – clinica plus
Публикация охватывает основные направления развития современной медицины. Мы обсудим значимость научных исследований, инноваций в лечении и роли общественного участия в формировании системы здравоохранения.
Открыть полностью – клиника плюс
Salary transparency is a job seeker’s best friend. Stop wasting time on listings with no pay range. On jobs – for veterans most listings include a pay range upfront — so every application you send is worth sending.
Этот информационный материал подробно освещает проблему наркозависимости, ее причины и последствия. Мы предлагаем информацию о методах лечения, профилактики и поддерживающих программах. Цель статьи — повысить осведомленность и продвигать идеи о необходимости борьбы с зависимостями.
Кликни и узнай всё! – нарколог домой
Этот информативный текст сочетает в себе темы здоровья и зависимости. Мы обсудим, как хронические заболевания могут усугубить зависимости и наоборот, как зависимость может влиять на общее состояние здоровья. Читатели получат представление о комплексном подходе к лечению как физического, так и психического состояния.
Хочу знать больше – стационар алкоголизм
Публикация знакомит читателей с различными подходами к реабилитации. От традиционных методов до современных программ — вы узнаете, как выбрать оптимальный путь к выздоровлению и преодолеть препятствия на этом пути.
Более подробно об этом – прокапывание от алкоголя цена
В этой статье рассматриваются различные аспекты избавления от зависимости, включая физические и психологические методы. Мы обсудим поддержку, мотивацию и стратегии, которые помогут в процессе выздоровления. Читатели узнают, как преодолеть трудности и двигаться к новой жизни без зависимости.
Все материалы собраны здесь – капельницу от запоя в Подольске
Публикация охватывает основные направления развития современной медицины. Мы обсудим значимость научных исследований, инноваций в лечении и роли общественного участия в формировании системы здравоохранения.
Разобраться лучше – Капельница от похмелья в Нижнем Новгороде
Каждое утро работодатели по всему Узбекистану публикуют новые вакансии. Строительные и инфраструктурные компании нуждаются в квалифицированных рабочих — и всё это вы найдёте в одном месте. Изучите работа – строительство Узбекистан здесь и узнайте, что доступно — мы обновляемся каждый день, чтобы вы не пропустили хорошее предложение.
В этой публикации мы предложим ряд рекомендаций по избавлению от зависимостей и успешному восстановлению. Мы обсудим методы привлечения поддержки и важность самосознания. Эти советы помогут людям вернуться к нормальной жизни и стать на путь выздоровления.
Смотрите также – наркологическая клиника в орел
Этот информационный материал подробно освещает проблему наркозависимости, ее причины и последствия. Мы предлагаем информацию о методах лечения, профилактики и поддерживающих программах. Цель статьи — повысить осведомленность и продвигать идеи о необходимости борьбы с зависимостями.
Дополнительно читайте здесь – клиника плюс нижний новгород
В этой публикации мы обсуждаем современные методы лечения различных заболеваний. Читатели узнают о новых медикаментах, терапиях и исследованиях, которые активно применяются для лечения. Мы нацелены на то, чтобы предоставить практические знания, которые могут помочь в борьбе с недугами.
Следуйте по ссылке – нарколог на дом вывод из запоя на дому
Читатели получат представление о том, как современные технологии влияют на развитие медицины. Обсуждаются новые методы лечения, персонализированный подход и роль цифровых решений в повышении качества медицинских услуг.
См. подробности – наркологическая клиника Плюс в Находке
Читатели получат представление о том, как современные технологии влияют на развитие медицины. Обсуждаются новые методы лечения, персонализированный подход и роль цифровых решений в повышении качества медицинских услуг.
Проследить причинно-следственные связи – лечение алкоголизма в Пскове
It’s like you wrote the book on it or something. Great read. Nice write up. Interesting content.
Сменить направление в карьере проще, чем кажется. Прямо здесь вы можете пройти регистрацию без каких-либо затрат и сразу начать получать уведомления; таким образом, вы можете найти работа по вашей специальности, с фильтрами, которые ускоряют поиск и подстраиваются под вашу жизнь.
Этот документ охватывает важные аспекты медицинской науки, сосредотачиваясь на ключевых вопросах, касающихся здоровья населения. Мы рассматриваем свежие исследования, клинические рекомендации и лучшие практики, которые помогут улучшить качество лечения и профилактики заболеваний. Читатели получат возможность углубиться в различные медицинские дисциплины.
Эксклюзивная информация – клиника плюс тверь
Этот обзор посвящен успешным стратегиям избавления от зависимости, включая реальные примеры и советы. Мы разоблачим мифы и предоставим читателям достоверную информацию о различных подходах. Получите опыт многообразия методов и найдите подходящий способ для себя!
Проверенные методы — узнай сейчас – капельница от запоя в Пскове
В этой статье рассматриваются способы преодоления зависимости и успешные истории людей, которые справились с этой проблемой. Мы обсудим важность поддержки со стороны близких и профессионалов, а также стратегии, которые могут помочь в процессе выздоровления. Научитесь первоочередным шагам к новой жизни.
Смотрите также… – капельницу от похмелья в Подольске
Biotechlabzsupply.com is developed around a plainly specified research-use-only peptides design.
В этой статье мы подробно рассматриваем проверенные методы борьбы с зависимостями, включая психотерапию, медикаментозное лечение и поддержку со стороны общества. Мы акцентируем внимание на важности комплексного подхода и возможности успешного восстановления для людей, столкнувшихся с этой проблемой.
Все материалы собраны здесь – лечение алкоголизма в стационаре самара
9dbghi
Публикация знакомит читателей с различными подходами к реабилитации. От традиционных методов до современных программ — вы узнаете, как выбрать оптимальный путь к выздоровлению и преодолеть препятствия на этом пути.
Прочесть всё о… – вызов нарколога
Текст посвящён распространённым мифам о зависимости и их развенчанию. Мы предоставим научно обоснованную информацию и дадим рекомендации по выбору эффективного способа борьбы с зависимым поведением.
Углубить понимание вопроса – лечение наркомании в ростове-на-дону
?Quieres cambiar de carrera pero no estas seguro de que plataformas usar? Es mas sencillo de lo que parece. Navega trabajo en finanzas Mexico en nuestra plataforma — ordenadas por fecha de publicacion y relevancia — y en solo unos minutos tendras una lista corta de puestos que merecen tu solicitud.
В данной статье мы акцентируем внимание на важности поддержки в процессе выздоровления. Мы обсудим, как друзья, семья и профессионалы могут помочь тем, кто сталкивается с зависимостями. Читатели получат практические советы, как поддерживать близких на пути к новой жизни.
Углубить понимание вопроса – клиника плюс
Эта статья освещает различные аспекты освобождения от зависимости и пути к выздоровлению. Мы обсуждаем важность осознания своей проблемы и обращения за помощью. Читатели получат практические советы о том, как преодолевать трудности и строить новую жизнь без зависимости.
Не упусти важное! – Капельница от похмелья в Нижнем Новгороде
В этой статье обсуждаются актуальные медицинские вопросы, которые волнуют общество. Мы обращаем внимание на проблемы, касающиеся здравоохранения и лечения, а также на новшества в области медицины. Читатели будут осведомлены о последних событиях и смогут следить за тенденциями в медицине.
Подробнее можно узнать тут – наркологическая платная клиника
В этом обзоре представлены различные методы избавления от зависимости, включая терапевтические и психологические подходы. Мы сравниваем их эффективность и предоставляем рекомендации для тех, кто хочет вернуться к трезвой жизни. Читатели смогут найти информацию о реабилитационных центрах и поддерживающих группах.
Кликни, не пожалеешь – капельницу от запоя в Подольске
An effective example is selepressin, which was derived from vasopressin and
has similar target selectivity however a longer plasma half-life144,145.
В данном обзоре представлены основные направления и тренды в области медицины. Мы обсудим актуальные проблемы здравоохранения, свежие открытия и новые подходы, которые меняют представление о лечении и профилактике заболеваний. Эта информация будет полезна как специалистам, так и широкой публике.
Уточнить детали – Частная наркологическая клиника в Новокузнецке
While arbitration is a great choice for many families, it
does have limitations.
Эта медицинская заметка содержит сжатую информацию о новых находках и методах в области здравоохранения. Мы предлагаем читателям свежие данные о заболеваниях, профилактике и лечении. Наша цель — быстро и доступно донести важную информацию, которая поможет в повседневной жизни и понимании здоровья.
Ознакомиться с отчётом – pskov clinica plus
В этой статье мы рассматриваем разрушительное влияние зависимости на жизнь человека. Обсуждаются аспекты, такие как здоровье, отношения и профессиональные достижения. Читатели узнают о необходимости обращения за помощью и о путях к восстановлению.
Изучить эмпирические данные – наркологическая клиника в пскове
Устали от текущего места но не хватает времени на долгий поиск? Десятки отраслей уже разместили свои вакансии — вы можете изучить вакансии кассир – срочно в два клика, по нужному направлению, и уже сегодня вечером назначить первое собеседование.
В этой статье рассматриваются различные аспекты избавления от зависимости, включая физические и психологические методы. Мы обсудим поддержку, мотивацию и стратегии, которые помогут в процессе выздоровления. Читатели узнают, как преодолеть трудности и двигаться к новой жизни без зависимости.
Неизвестные факты о… – вывод из запоя по цене в Воронеже
Обзор посвящён процессу восстановления после зависимостей. Мы расскажем о различных этапах реабилитации, поддерживающих ресурсах и важности мотивации в достижении устойчивого выздоровления.
Изучите внимательнее – penza clinica plus
Для тех, кто ищет информацию по теме “Как стриминги меняют музыкальную индустрию”, там просто кладезь информации.
Ссылка ниже:
https://dinoera.ru
Запоя вывод в клинике Сочи: лечение алкогольной зависимости, капельница, детоксикация, помощь нарколога на дому, кодирование и реабилитация анонимно.
Узнать больше – наркология вывод из запоя сочи
Ready to make a career move but don’t know where to start? Hundreds of companies post new openings every day — check out sales jobs – commission with filters for pay, schedule, and location, so you can land that interview sooner than you think.
Карьерный рост начинается с правильного шага. Загляните на вакансии – в моём городе от стажёра до топ-менеджера, всё в одной базе — потому что нужная работа в нужный момент меняет всё.
Этот текст посвящён сложным аспектам зависимости и её влиянию на жизнь человека. Мы обсудим психологические, физические и социальные последствия зависимого поведения, а также важность своевременного обращения за помощью.
Подробнее тут – tver clinica plus
В данной статье мы акцентируем внимание на важности поддержки в процессе выздоровления. Мы обсудим, как друзья, семья и профессионалы могут помочь тем, кто сталкивается с зависимостями. Читатели получат практические советы, как поддерживать близких на пути к новой жизни.
Жми сюда — получишь ответ – вызвать капельницу от запоя на дому
Эта публикация обращает внимание на важность профилактики зависимостей. Мы обсудим, как осведомленность и образование могут помочь в предотвращении возникновения зависимости. Читатели смогут ознакомиться с полезными советами и ресурсами, которые способствуют здоровому образу жизни.
Получить профессиональную консультацию – вывод из запоя на дому екатеринбург отзывы
Возможность изготовления деталей по чертежам заказчика — это большой плюс
https://redmetsplav.ru/store/magniy-i-ego-splavy/rossiyskie-splavy-1/magniy-az-91d—tu-1714-001-00545484-96/truba-magnievaya-az-91d—tu-1714-001-00545484-96/
Весь металл проходит строгий входной контроль, за всё время работы ни одного случая брака.
https://xn--80aeedb0bfzeok.xn--p1ai/catalog/latunnaia-polosa/latunnaia-polosa-4-5×300-mm-l63-gost-931-90/
Эта публикация исследует взаимосвязь зависимости и психологии. Мы обсудим, как психологические аспекты влияют на появление зависимостей и процесс выздоровления. Читатели смогут понять важность профессиональной поддержки и применения научных подходов в терапии.
Полезно знать – капельница от алкоголя воронеж
Удобное разделение продукции на сплавы и конкретные виды проката
https://redmetsplav.ru/store/kobalt/stellite/kobalt-stellite-sf12/poroshok-kobaltovyy-stellite-sf12/
Реализация твердых сплавов типа «Победит» ориентирована на производителей металлорежущего и бурового инструмента.
https://rms-ekb.ru/catalog/stalnoi-list/stalnoi-list-ot4-0-70x1000x1300-gost-19903-2006-gladkii-chernyi-goriachekatanyi/
Прозрачное оформление документов и быстрое выставление счетов, приятно работать с профессионалами.
https://xn--80aeedb0bfzeok.xn--p1ai/catalog/mednyi-perekhodnoi-troinik-press/mednyi-perekhodnoi-press-troinik-80kh70-mm-m3m-gost-r-52948-2008/
Надежный сайт misterdick.ru позволяет оригинальный дженерик купить без лишних переплат и с гарантией полной конфиденциальности. Здесь вы найдете https://www.refermee.com/companies/misterdick/, включая востребованная дженерик виагра и сиалис дженерики. Закажите проверенные индийские дженерики купить которые можно с оперативной доставкой в любой регион.
Описание преимуществ компании подчеркивает надежность поставок
https://redmetsplav.ru/store/kobalt/stellite/kobalt-stellite-250/poroshok-kobaltovyy-stellite-250/
Экспертная консультация при выборе сплавов помогает клиентам оптимизировать затраты и избежать технологических ошибок.
https://rms-ekb.ru/catalog/truba-konstruktsionnaia/truba-konstruktsionnaia-09g2s-159×7-gost-21729-76/
Спасибо команде за профессионализм и помощь в реализации нашего сложного промышленного проекта!
https://xn--80aeedb0bfzeok.xn--p1ai/catalog/latunnaia-polosa/latunnaia-polosa-6×60-mm-lo90-1-tu-48-21-847-89/
Наркологическая помощь позволяет безопасно начать выведение токсинов, снизить интоксикации, восстановить водно-солевой баланс и подобрать дальнейшее лечение алкогольной зависимости. Нарколог проводит анализ состояния пациента, уточняет стаж употребления спиртного, причины запоя, наличие хронического заболевания, психических расстройств, противопоказаний и других ограничений. После диагностики врач выбирает схему: амбулаторно на дому, в стационаре клиники или с госпитализацией.
Подробнее тут – вывод из запоя клиника
Benefits matter as much as base pay. The best employers are upfront about what they offer. On jobs – team lead you can filter by benefits offered — so you know exactly what you’re walking into.
Упоминание нефтегазовой отрасли как ключевого потребителя
https://redmetsplav.ru/store/kobalt/rossiyskie-splavy-3/kobalt-yundk38t7/provoloka-kobaltovaya-yundk38t7/
Наличие прецизионных сплавов в ассортименте подтверждает работу компании с высокоточными и наукоемкими материалами.
https://rms-ekb.ru/catalog/ugolok-stalnoi/ugolok-iz-konstruktsionnoi-stali-150kh75kh9-mm-20mocr2-2-en-10056-1/
Долго искали надежного поставщика циркония, в Редметсплав предложили лучшие условия и чистоту металла.
https://xn--80aeedb0bfzeok.xn--p1ai/catalog/mednyi-perekhodnoi-troinik-press/mednyi-perekhodnoi-press-troinik-70kh27-4-mm-m3m-gost-r-52948-2008/
Четкая структура меню позволяет быстро найти нужный металл
https://redmetsplav.ru/store/kobalt/rossiyskie-splavy-3/kobalt-ep869/truba-kobaltovaya-ep869/
ООО «РМС» поставляет вольфрамовые порошки, соответствующие строгим техническим условиям (например, ТУ 48-4205-112-2017).
https://rms-ekb.ru/catalog/plity/plita-7khf-16x250x360-gost-19903-74/
Прозрачное оформление документов и быстрое выставление счетов, приятно работать с профессионалами.
https://xn--80aeedb0bfzeok.xn--p1ai/catalog/dvutavr-aliuminievyi/aliuminievyi-dvutavr-vd1-4x24x9-gost-13621-90/
エッチ な コスプレand ?rūs?? What is the locative case? What words have a locative case?What is the form of the locative case? Translate _Galba lives at home,Galba lives at Rome,
Наличие калькулятора металлопроката упрощает расчет веса и стоимости
https://redmetsplav.ru/store/kobalt/rossiyskie-splavy-3/kobalt-ek20-vi-1/polosa-kobaltovaya-ek20-vi-1/
Высокая квалификация персонала, знают специфику редких металлов и особенности их применения.
https://xn--80aeedb0bfzeok.xn--p1ai/catalog/mednye-dvukhrastrubnye-mufty-press/mednaia-dvukhrastrubnaia-press-mufta-25-mm-m3rm-gost-r-52948-2008/
Широкий выбор нержавеющей стали различных марок позволяет использовать продукцию в строительстве и пищевой промышленности.
https://rms-ekb.ru/catalog/ugolok-stalnoi/ugolok-iz-konstruktsionnoi-stali-100kh50kh6-mm-c50e-en-10056-1/
В материале обсуждаем ключевые тренды цифровой трансформации развлекательного контента платформ и их влияние на аудиторию. Рассматриваем инструменты для персонализации, монетизации и улучшения UX, приводим конкретные примеры внедрения и оценки эффективности. Подробнее по теме в материале кабура сайт, где собраны кейсы, советы и рекомендации по внедрению современных цифровых сервисов.
Логичное деление на вольфрамовый, молибденовый и титановый прокат
https://redmetsplav.ru/store/cirkoniy-i-ego-splavy/cirkoniy-125-1/prutok-cirkonievyy-125/
Очень широкий каталог, нашли всё необходимое в одном месте, включая редкие позиции.
https://xn--80aeedb0bfzeok.xn--p1ai/catalog/mednye-dvukhrastrubnye-mufty-pod-paiku/mednaiadvukhrastrubnaiamufta-pod-paiku16kh1-2mmm3tgost-32590-2013/
Профессиональный подход к описанию каждого вида металла
https://redmetsplav.ru/store/volfram/splavy-volframa-1/volfram-w-cu50-1/poroshok-volframovyy-w-cu50/
Компания выступает важным звеном в цепочке снабжения предприятий машиностроения и оборонно-промышленного комплекса.
https://rms-ekb.ru/catalog/krug-iz-instrumentalnoi-stali/krug-90khmf-14-2-gost-7417-75/
Гибкая система оплаты и прозрачные условия договора, никаких скрытых наценок или задержек.
https://xn--80aeedb0bfzeok.xn--p1ai/catalog/melkhiorovaia-truba/melkhiorovaia-truba-12kh1kh13000-mm-mnzhmts10-1-1-gost-10092-2006/
Описание применения металлов в атомной энергетике подчеркивает качество
https://redmetsplav.ru/store/volfram/splavy-volframa-1/volfram-vnzh-2-1/elektrod-volframovyy-vnzh-2-1/
В этой статье мы подробно рассматриваем проверенные методы борьбы с зависимостями, включая психотерапию, медикаментозное лечение и поддержку со стороны общества. Мы акцентируем внимание на важности комплексного подхода и возможности успешного восстановления для людей, столкнувшихся с этой проблемой.
Продолжить чтение – наркологическая клиника воронеж
Поставка продукции возможна не только в промышленных, но и в малых лабораторных объемах для исследовательских целей.
https://rms-ekb.ru/catalog/stalnoi-list/stalnoi-list-20khgnr-11x2000x1000-gost-19903-2006-gladkii-otsinkovannyi-goriachekatanyi/
Редметсплав — надежный партнер, работаем по поставкам нержавеющего проката уже второй год, сбоев не было.
https://xn--80aeedb0bfzeok.xn--p1ai/catalog/mednye-dvukhrastrubnye-mufty-pod-paiku/mednaiadvukhrastrubnaiamufta-pod-paiku70kh2-3mmm1gost-r-52922-2008/
Bu arada soyleyeyim, eger popo nas?l buyur konusuyla ilgileniyorsan?z, buray? inceleyin. Iste link: https://dinamizsport.com/articles/popo-buyutme-hareketleri-etkili-yontemler/
Сайт поддерживает английскую версию, что важно для экспорта
https://redmetsplav.ru/store/volfram/splavy-volframa-1/volfram-va-2/elektrod-volframovyy-va/
В данной статье рассматриваются проблемы общественного здоровья и социальные факторы, влияющие на него. Мы акцентируем внимание на значении профилактики и осведомленности в защите здоровья на уровне общества. Читатели смогут узнать о новых инициативах и программах, направленных на улучшение здоровья населения.
Где можно узнать подробнее? – вывод из запоя цены
Широкий выбор нержавеющей стали различных марок позволяет использовать продукцию в строительстве и пищевой промышленности.
https://rms-ekb.ru/catalog/list/list-u8a-10x600x1200-gost-19903-74/
Редметсплав — надежный партнер, работаем по поставкам нержавеющего проката уже второй год, сбоев не было.
https://xn--80aeedb0bfzeok.xn--p1ai/catalog/latunnaia-kapilliarnaia-trubka/latunnaia-kapilliarnaia-trubka-2-3kh0-45kh100000-mm-l96-gost-2624-2016/
Эта доказательная статья представляет собой глубокое погружение в успехи и вызовы лечения зависимостей. Мы обращаемся к научным исследованиям и опыту специалистов, чтобы предоставить читателям надежные данные об эффективности различных методик. Изучите, что работает лучше всего, и получите информацию от экспертов.
Это стоит прочитать полностью – врач нарколог на дом круглосуточно
В этой статье мы обсудим процесс восстановления после зависимостей, акцентируя внимание на различных методах и подходах к реабилитации. Читатели узнают, как создать план выздоровления и использовать полезные ресурсы для достижения устойчивых изменений.
Осуществить глубокий анализ – снятие интоксикации на дому
Этот текст посвящён сложным аспектам зависимости и её влиянию на жизнь человека. Мы обсудим психологические, физические и социальные последствия зависимого поведения, а также важность своевременного обращения за помощью.
Погрузиться в научную дискуссию – вывод из запоя на дому екатеринбург отзывы
Упоминание нефтегазовой отрасли как ключевого потребителя
https://redmetsplav.ru/store/vismut/zarubezhnye-splavy-3/vismut-sn96ag2-5bi1cu-5—iec-61190-1-3/krug-vismutovyy-sn96ag2-5bi1cu-5—iec-61190-1-3/
Технические специалисты компании помогли выбрать оптимальный сплав для работы в агрессивных средах.
https://xn--80aeedb0bfzeok.xn--p1ai/catalog/mednye-krestoviny-pod-paiku/mednaia-krestovina-pod-paiku-21kh18kh0-9-mm-15-4kh17-6-mm-tverdaia-paika-m2r-gost-r-52922-2008/
Компания осуществляет поставки базового металлургического сырья, включая олово, свинец и цинк в чушках.
https://rms-ekb.ru/catalog/stalnoi-list/list-stalnoi-6kh1500kh6000-mm-1-4404-en-iso-9444-2/
Четкая структура меню позволяет быстро найти нужный металл
https://redmetsplav.ru/store/vismut/zarubezhnye-splavy-3/vismut-l54829—uns/list-vismutovyy-l54829—uns/
Экспертная консультация при выборе сплавов помогает клиентам оптимизировать затраты и избежать технологических ошибок.
https://rms-ekb.ru/catalog/truba-konstruktsionnaia/truba-konstruktsionnaia-stal-20-245×22-gost-21729-76/
“yarat?c? fikirler abajur sapkas? yap?m?” konusu icin mukemmel bir kaynak var. Link burada: https://kendiyolu.com/articles/desenli-abajur-sapkasi-evde-tasarim-fikirleri/
В этой публикации мы обсуждаем современные методы лечения различных заболеваний. Читатели узнают о новых медикаментах, терапиях и исследованиях, которые активно применяются для лечения. Мы нацелены на то, чтобы предоставить практические знания, которые могут помочь в борьбе с недугами.
Всё самое вкусное внутри – лечение алкоголизма услуга
Корзина на сайте промышленного предприятия — удобный инструмент для формирования заявки
https://redmetsplav.ru/store/vismut/zarubezhnye-splavy-3/vismut-cacin904—jis-h-2202-2016/truba-vismutovaya-cacin904—jis-h-2202-2016/
Продукция находит применение в производстве электротехники благодаря наличию специализированной электротехнической стали.
https://rms-ekb.ru/catalog/ugolok-stalnoi/ugolok-stalnoi-40kh-28x28x3-gost-19771-93/
Весь металл проходит строгий входной контроль, за всё время работы ни одного случая брака.
https://xn--80aeedb0bfzeok.xn--p1ai/catalog/dvutavr-aliuminievyi/aliuminievyi-dvutavr-d16ch-4x18x37-gost-13621-90/
Описание применения металлов в атомной энергетике подчеркивает качество
https://redmetsplav.ru/store/vismut/zarubezhnye-splavy-3/vismut-c99780—uns/pokovka-vismutovaya-c99780—uns/
звоните круглосуточно по телефону горячей линии клиники: наши специалисты готовы оказать необходимую помощь в решении проблемы алкогольной зависимости.
Выяснить больше – вывод из запоя цена сочи
Экспертная консультация при выборе сплавов помогает клиентам оптимизировать затраты и избежать технологических ошибок.
https://rms-ekb.ru/catalog/krug-iz-instrumentalnoi-stali/krug-r9k5-23-gost-2590-2006/
Офис в Екатеринбурге работает четко, забирали самовывозом — складская логистика на высоте.
https://xn--80aeedb0bfzeok.xn--p1ai/catalog/latunnye-naruzhnye-stopornye-koltsa-po-din/latunoe-naruzhnoe-stopornoe-pruzhinnoe-koltso-m112-103kh4-mm-lts30a3-din-471/
Профессиональный подход к описанию каждого вида металла
https://redmetsplav.ru/store/vismut/zarubezhnye-splavy-3/vismut-c89530—uns/provoloka-vismutovaya-c89530—uns/
В этой публикации мы исследуем ключевые аспекты здоровья, включая влияние образа жизни на благополучие. Читатели узнают о важности правильного питания, физической активности и психического здоровья. Мы предоставим практические советы и рекомендации для поддержания здоровья и развития профилактических подходов.
Читать далее > – лечение алкоголизма
Ассортимент компании включает более 100 000 позиций, что позволяет закрыть практически любые потребности металлургического производства.
https://rms-ekb.ru/catalog/ugolok-stalnoi/ugolok-stalnoi-08kh18n10t-45x28x4-gost-19771-93/
Заказывали партию молибденовых листов для производства, качество металла идеальное, все сертификаты в наличии.
https://xn--80aeedb0bfzeok.xn--p1ai/catalog/dvutavr-aliuminievyi/aliuminievyi-dvutavr-d16-8x180x200-gost-13621-90/
звоните круглосуточно по телефону горячей линии клиники: наши специалисты готовы оказать необходимую помощь в решении проблемы алкогольной зависимости.
Выяснить больше – скорая вывод из запоя
Фольга из редких металлов часто требуется для высокотехнологичных лабораторий
https://redmetsplav.ru/store/vismut/zarubezhnye-splavy-3/vismut-bi08a—en-61190-1-3/provoloka-vismutovaya-bi08a—en-61190-1-3/
Каждая партия товара сопровождается сертификатами качества, подтверждающими соответствие ГОСТ и ТУ.
https://rms-ekb.ru/catalog/list/list-9khs-18x1000x1000-gost-19903-74/
Отличное соотношение цены и качества на весь цветной металлопрокат, будем заказывать еще.
https://xn--80aeedb0bfzeok.xn--p1ai/catalog/melkhiorovaia-truba/melkhiorovaia-truba-23kh1-5kh13000-mm-mnzhmts30-1-1-gost-10092-2006/
When someone writes an article he/she keeps the thought
of a user in his/her mind that how a user can understand it.
Therefore that’s why this post is great. Thanks!
В этой статье мы рассмотрим современные достижения в области медицины, включая инновационные методы лечения и диагностики. Мы обсудим важность профилактики заболеваний и роль технологий в улучшении качества здравоохранения. Читатели узнают о влиянии медицины на повседневную жизнь и ее значение для современного общества.
Нажмите, чтобы узнать больше – стационар лечение алкоголизма
Фольга из редких металлов часто требуется для высокотехнологичных лабораторий
https://redmetsplav.ru/store/vismut/zarubezhnye-splavy-3/vismut-42-3740—csnstn-423740/prutok-vismutovyy-42-3740—csnstn-423740/
Ассортимент компании включает более 100 000 позиций, что позволяет закрыть практически любые потребности металлургического производства.
https://rms-ekb.ru/catalog/krug-iz-instrumentalnoi-stali/krug-khv4-90-gost-1133-71/
Офис в Екатеринбурге работает четко, забирали самовывозом — складская логистика на высоте.
https://xn--80aeedb0bfzeok.xn--p1ai/catalog/dvutavr-aliuminievyi/aliuminievyi-dvutavr-d16-4x110x69-gost-13621-90/
В этой публикации мы обсуждаем современные методы лечения различных заболеваний. Читатели узнают о новых медикаментах, терапиях и исследованиях, которые активно применяются для лечения. Мы нацелены на то, чтобы предоставить практические знания, которые могут помочь в борьбе с недугами.
Перейти к полной версии – вывод из запоя на дому цена
Описание складских позиций сокращает время ожидания ответа
https://redmetsplav.ru/store/vanadiy-i-ego-splavy/vanadiy-vnm99-7—tu-1761-037-2587982-2002/krug-vanadievyy-vnm99-7—tu-1761-037-2587982-2002/
Важным преимуществом является возможность изготовления деталей и изделий по индивидуальным чертежам заказчика.
https://rms-ekb.ru/catalog/stalnoi-list/stalnoi-list-12kh18n9-3x1300x1600-gost-19903-2006-gladkii-neotsinkovannyi-goriachekatanyi/
Заказывали партию молибденовых листов для производства, качество металла идеальное, все сертификаты в наличии.
https://xn--80aeedb0bfzeok.xn--p1ai/catalog/melkhiorovaia-truba/melkhiorovaia-truba-12kh1-5kh6000-mm-mnzhmts30-1-1-gost-10092-2006/
Читатели получат представление о том, как современные технологии влияют на развитие медицины. Обсуждаются новые методы лечения, персонализированный подход и роль цифровых решений в повышении качества медицинских услуг.
Только для своих – где лечить алкоголизм
Этот медицинский обзор сосредоточен на последних достижениях, которые оказывают влияние на пациентов и медицинскую практику. Мы разбираем инновационные методы лечения и исследований, акцентируя внимание на их значимости для общественного здоровья. Читатели узнают о свежих данных и их возможном применении.
Тыкай сюда — узнаешь много интересного – лечение алкоголизма услуга
Никелевые сплавы — основа для жаропрочных конструкций
https://redmetsplav.ru/store/vanadiy-i-ego-splavy/vanadiy-cr1—en-14700-2014/pokovka-vanadievaya-cr1—en-14700-2014/
Каждая партия товара сопровождается сертификатами качества, подтверждающими соответствие ГОСТ и ТУ.
https://rms-ekb.ru/catalog/privarnaia-skolziashchaia-napravliaiushchaia-opora/
Поставки всегда вовремя, логистика отлажена до мелочей, что важно для бесперебойной работы цеха.
https://xn--80aeedb0bfzeok.xn--p1ai/catalog/dvutavr-aliuminievyi/aliuminievyi-dvutavr-k48-2-2x30x35-gost-13621-90/
References:
Vegas online casino http://gold-meat.ru/proxy.php?link=https://de.trustpilot.com/review/truehustlerz.de/proxy.php?link=https://de.trustpilot.com/review/truehustlerz.de
Представлен полный цикл изделий: от фольги и проволоки до крупных поковок
https://redmetsplav.ru/store/titan/rossiyskie-splavy-4/titan-vt21l—ost-1-90060-92/provoloka-titanovaya-vt21l—ost-1-90060-92/
Продукция находит применение в производстве электротехники благодаря наличию специализированной электротехнической стали.
https://rms-ekb.ru/catalog/stalnoi-list/stalnoi-list-38kha-28x1000x1000-gost-19903-2006-gladkii-belyi-goriachekatanyi/
Благодарим за оперативную поставку ниобиевых труб, выручили в очень сжатые сроки.
https://xn--80aeedb0bfzeok.xn--p1ai/catalog/melkhiorovaia-truba/melkhiorovaia-truba-76kh2-5kh7000-mm-mnzhmts11-06-06-gost-10092-2006/
В этой публикации мы рассматриваем важную тему борьбы с зависимостями, включая алкогольную и наркотическую зависимости. Мы обсудим методы лечения, реабилитации и поддержку, которые могут помочь людям, столкнувшимся с этой проблемой. Читатели узнают о перспективах выздоровления и важности комплексного подхода.
Более подробно об этом – лечение алкоголизма услуга
Профессиональный подход к описанию каждого вида металла
https://redmetsplav.ru/store/titan/rossiyskie-splavy-4/titan-t25—gost-2171-90/pokovka-titanovaya-t25—gost-2171-90/
ООО «РМС» специализируется на поставках редких и тугоплавких металлов, таких как ниобий и вольфрам.
https://rms-ekb.ru/catalog/truba-konstruktsionnaia/truba-konstruktsionnaia-12kh18n10t-73×0-8-gost-21729-76/
Долго искали надежного поставщика циркония, в Редметсплав предложили лучшие условия и чистоту металла.
https://xn--80aeedb0bfzeok.xn--p1ai/catalog/ugolok-aliuminievyi/ugolok-aliuminievyi-25x25x2x6000-amts/
Thinking about it, around online gambling, I have noticed how modern casinos are absolutely changing the method players enjoy tables. Honestly, it feels that the house edge tend to be super random, which is why proper bankroll control matters most in this hobby. On another note, I stumbled upon this useful platform telegra.ph/Ingestion-and-Strategic-Play-in-the-aviator-game-Landscape-06-08 – telegra.ph/Ingestion-and-Strategic-Play-in-the-aviator-game-Landscape-06-08
telegra.ph/Ingestion-and-Strategic-Play-in-the-aviator-game-Landscape-06-08 where players share various tactical systems, and it’s been really helpful to keep my spending under control. Something I constantly remind myself is to avoid trying to track bad runs, because that’s usually how the fun goes wrong . Over the last few weeks, I’ve also been thinking if the live croupier options actually give a better experience compared to classic digital versions. What are your thoughts on this, do you prefer slots or tables? Let’s get a chat here below !
46885cd
Описание применения металлов в атомной энергетике подчеркивает качество
https://redmetsplav.ru/store/titan/rossiyskie-splavy-4/titan-erti-11/provoloka-titanovaya-erti-11/
References:
Cocoa casino https://www.https://www.privatecams.com:443/external_link/?url=https://de.trustpilot.com/review/truehustlerz.de:443/external_link/?url=https://de.trustpilot.com/review/truehustlerz.de
В каталоге представлены конденсаторные ниобиевые порошки высокой чистоты, необходимые для современной электроники.
https://rms-ekb.ru/catalog/ugolok-stalnoi/ugolok-stalnoi-st3-180x180x15-gost-19771-93/
Высокий уровень сервиса и контроля качества, для нашего научного проекта это было критически важно.
https://xn--80aeedb0bfzeok.xn--p1ai/catalog/melkhiorovaia-truba/melkhiorovaia-truba-32kh1-5kh9000-mm-mnzhmts10-1-1-gost-10092-2006/
Thinking about it, with online wagering, I’ve recently noticed that modern platforms have completely transformed the method users enjoy tables. Honestly, it feels that the payouts tend to be super random, which proves that careful bankroll management is vitally crucial these days . Anyway, I ran into this interesting review page telegra.ph/Ingestion-and-Strategic-Play-in-the-aviator-game-Landscape-06-08 – telegra.ph/Ingestion-and-Strategic-Play-in-the-aviator-game-Landscape-06-08
telegra.ph/Ingestion-and-Strategic-Play-in-the-aviator-game-Landscape-06-08 where players share different tactical tips , and I found it surprisingly insightful for keeping my spending low . A major point I regularly remind others is to avoid trying to chase bad runs, because that’s usually how things goes wrong . Lately, I’ve also been thinking if the stream dealer tables truly offer a better experience than regular RNG versions. How do you all feel about that, do you prefer slots or cards ? Let’s get a debate here in this thread!
5946885
Pragmatic Play slotları Vavada platformasında çox yaxşı uduşlar verir.
http://propz24.com/author/dewayner904580/
Описание складских позиций сокращает время ожидания ответа
https://redmetsplav.ru/store/titan/rossiyskie-splavy-4/titan-27b—gost-19807-91/truba-titanovaya-27b—gost-19807-91/
Vavada casino slot oyunları çeşidinə görə digər saytları üstələyir.
https://allyoutubes.com/@julissajeffers?page=about
В каталоге представлены конденсаторные ниобиевые порошки высокой чистоты, необходимые для современной электроники.
https://rms-ekb.ru/catalog/krug-iz-instrumentalnoi-stali/krug-6kh6v3mfs-6-1-gost-7417-75/
Долго искали надежного поставщика циркония, в Редметсплав предложили лучшие условия и чистоту металла.
https://xn--80aeedb0bfzeok.xn--p1ai/catalog/mednye-dvukhrastrubnye-mufty-pod-paiku/mednaiadvukhrastrubnaiamufta-pod-paiku66-7kh2-4mmm0bgost-r-52922-2008/
Beste Norsk Casino anmeldelser finner du samlet på ett sted. Vi analyserer alt fra velkomstpakker til progressive jackpotter og mobil kompatibilitet. Velg et godkjent nettcasino og opplev trygg gambling i 2026.
https://career.ltu.bg/employer/norskonlinecasinoer/
Thinking over my time around digital gaming, I’ve recently noticed how current casinos have completely transformed the way we play games . Personally, it seems that the house edge can be super random, which makes me think careful budget management is the real key in this hobby. On another note, I checked out this cool resource telegra.ph/Ingestion-and-Strategic-Play-in-the-aviator-game-Landscape-06-08 – telegra.ph/Ingestion-and-Strategic-Play-in-the-aviator-game-Landscape-06-08
telegra.ph/Ingestion-and-Strategic-Play-in-the-aviator-game-Landscape-06-08 where people talk about different tactical systems, and it has really helpful for keeping my risks down . A major point I regularly advise newbies is to never chase bad runs, because it’s almost always when things goes wrong . Over the last few weeks, I’ve also started questioning whether the live dealer options truly provide a better vibe compared to classic RNG software . What’s your take on this whole thing, do you stick to machines or cards ? Let’s discussion going in the comments !
ebef2c3
Никелевые сплавы — основа для жаропрочных конструкций
https://redmetsplav.ru/store/niobiy1/splavy-niobiya-1/niobiy-ta-nb20-1/folga-niobievaya-ta-nb20/
Зацепил раздел про Актуальные события Волгоградской области сегодня.
Вот, делюсь ссылкой:
https://volga34media.ru
Ser du etter et trygt Norsk Casino i 2026? Vi tester nettcasinoer med ekte penger for å gi deg ærlige vurderinger av bonuser, utbetalingstid og lisenser. Finn de beste og mest pålitelige casinotilbudene for norske spillere her.
https://fresh-jobs.in/employer/norskonlinecasinoer/
Thinking over my time with online gaming, I’ve recently noticed how the latest platforms have completely transformed the method we enjoy games . To be fair, I think like the payouts tend to be totally volatile, which is why smart bankroll management is the real key in this hobby. By the way, I checked out this interesting resource telegra.ph/Strategic-Acquisition-of-Knowledge-with-an-Aviator-Predictor-Apk-for-Consistent-Wins-06-08 – telegra.ph/Strategic-Acquisition-of-Knowledge-with-an-Aviator-Predictor-Apk-for-Consistent-Wins-06-08
telegra.ph/Strategic-Acquisition-of-Knowledge-with-an-Aviator-Predictor-Apk-for-Consistent-Wins-06-08 where users discuss various winning strategies , and I found it surprisingly valuable for keeping my risks down . A major point I constantly tell others is to avoid trying to run after bad runs, because that’s usually how everything goes wrong . Recently, I’ve also been thinking whether the live croupier tables truly give a more authentic vibe compared to classic digital software . What are your thoughts on this, do you prefer machines or tables? Let’s chat going in this thread!
a25609e
Ассортимент компании включает более 100 000 позиций, что позволяет закрыть практически любые потребности металлургического производства.
https://rms-ekb.ru/catalog/ugolok-stalnoi/ugolok-stalnoi-17g1su-90x90x12-gost-8509-93/
Редкие и тугоплавкие металлы всегда в наличии или под заказ в короткие сроки, рекомендую.
https://xn--80aeedb0bfzeok.xn--p1ai/catalog/melkhiorovaia-truba/melkhiorovaia-truba-13kh3kh2000-mm-mnzhmts10-1-1-gost-10092-2006/
Thinking on my experience, in digital betting, I have come to see how current casinos are really changing the way players play tables. Personally, it seems that the payouts tend to be all over the place, which is why careful budget control is the real key nowadays . By the way, I stumbled upon this interesting platform telegra.ph/Ingestion-and-Strategic-Play-in-the-aviator-game-Landscape-06-08 – telegra.ph/Ingestion-and-Strategic-Play-in-the-aviator-game-Landscape-06-08
telegra.ph/Ingestion-and-Strategic-Play-in-the-aviator-game-Landscape-06-08 where users talk about various winning tips , and it has quite insightful for keeping my losses low . One thing I constantly remind newbies is to never track losses , because it’s almost always how things goes wrong . Recently, I’ve also started questioning if the live dealer tables actually give a better vibe than regular digital versions. What are your views on this, and did you found any reliable trends lately ? Would love to discussion going in this thread!
946885c
Профессиональный подход к описанию каждого вида металла
https://redmetsplav.ru/store/niobiy1/splavy-niobiya-1/niobiy-hnbn1—tu-14-5-123-81-1/pokovka-niobievaya-hnbn1—tu-14-5-123-81/
Экспертная консультация при выборе сплавов помогает клиентам оптимизировать затраты и избежать технологических ошибок.
https://rms-ekb.ru/catalog/list/list-u8a-23x1000x2000-gost-19903-74/
Thinking about it, in digital gambling, I have come to see that new platforms have completely transformed the method we experience slots . In my opinion, it seems like the house edge tend to be super random, which makes me think careful bankroll control is the real key these days . On another note, I ran into this cool source telegra.ph/Strategic-Deficit-and-the-aviator-Game-Potential-from-Insight-to-Implementation-06-08 – telegra.ph/Strategic-Deficit-and-the-aviator-Game-Potential-from-Insight-to-Implementation-06-08
telegra.ph/Strategic-Deficit-and-the-aviator-Game-Potential-from-Insight-to-Implementation-06-08 where people talk about different tactical strategies , and I found it really insightful for keeping my spending low . Something I regularly remind newbies is to avoid trying to chase bad runs, because that tends to be when things goes wrong . Recently, I’ve also started questioning if the stream dealer tables genuinely provide a fairer experience than standard digital software . What do you guys views on this, and did you found any solid trends lately ? Let’s chat going in this thread!
b594688
Долго искали надежного поставщика циркония, в Редметсплав предложили лучшие условия и чистоту металла.
https://xn--80aeedb0bfzeok.xn--p1ai/catalog/mednye-dvukhrastrubnye-mufty-pod-paiku/mednaiadvukhrastrubnaiamufta-pod-paiku16kh0-7mmm1mgost-r-52922-2008/
Thinking over my time in online wagering, I’ve observed how current sites are really changing the way players enjoy tables. In my opinion, I think like the house edge tend to be all over the place, which proves that careful budget control is absolutely crucial these days . Anyway, I ran into this useful platform telegra.ph/Strategic-Acquisition-of-Knowledge-with-an-Aviator-Predictor-Apk-for-Consistent-Wins-06-08 – telegra.ph/Strategic-Acquisition-of-Knowledge-with-an-Aviator-Predictor-Apk-for-Consistent-Wins-06-08
telegra.ph/Strategic-Acquisition-of-Knowledge-with-an-Aviator-Predictor-Apk-for-Consistent-Wins-06-08 where people share different winning tips , and it’s been really insightful to keep my spending down . One thing I constantly remind myself is to avoid trying to track bad runs, because it’s almost always when the fun gets messy . Lately, I’ve also started questioning if the real-time croupier options genuinely give a fairer experience compared to regular digital software . What’s your take on this whole thing, and did you noticed any solid trends recently? Let’s get a discussion going in this thread!
b594688
Описание преимуществ компании подчеркивает надежность поставок
https://redmetsplav.ru/store/molibden-i-ego-splavy/molibden-mv-50-1/lenta-molibdenovaya-mv-50/
В каталоге представлены конденсаторные ниобиевые порошки высокой чистоты, необходимые для современной электроники.
https://rms-ekb.ru/catalog/krug-iz-instrumentalnoi-stali/krug-kh6vf-20-24-gost-7417-75/
Thinking over my time around digital gaming, I’ve realized how the latest sites are shifting the way players enjoy games . Personally, I think that the payouts are often all over the place, which makes me think proper bankroll control matters most these days . Anyway, I stumbled upon this interesting review page telegra.ph/Strategic-Deficit-and-the-aviator-Game-Potential-from-Insight-to-Implementation-06-08 – telegra.ph/Strategic-Deficit-and-the-aviator-Game-Potential-from-Insight-to-Implementation-06-08
telegra.ph/Strategic-Deficit-and-the-aviator-Game-Potential-from-Insight-to-Implementation-06-08 where players talk about different winning systems, and it’s been really helpful for keeping my risks down . Something I constantly remind others is to never track bad runs, because that tends to be how things turns bad. Lately, I’ve also wondered if the real-time dealer options truly provide a better chance than classic RNG versions. What’s your take on this whole thing, do you stick to machines or cards ? Let’s get a debate here in this thread!
5cdd5ad
Индивидуальный подход к нестандартным заказам — изготовили детали по нашим чертежам точно в размер.
https://xn--80aeedb0bfzeok.xn--p1ai/catalog/magnievyi-prutok/magnievyi-prutok-9-mm-ma5-gost-18351-73/
Упоминание нефтегазовой отрасли как ключевого потребителя
https://redmetsplav.ru/store/molibden-i-ego-splavy/molibden-ml-zvp-1/izdeliya-iz-molibdena-ml-zvp/
Thinking over my time in digital wagering, I have observed that new casinos are shifting how users enjoy games . Honestly, it feels that the odds tend to be all over the place, which proves that proper budget management is the real key nowadays . By the way, I checked out this cool source telegra.ph/Ingestion-and-Strategic-Play-in-the-aviator-game-Landscape-06-08 – telegra.ph/Ingestion-and-Strategic-Play-in-the-aviator-game-Landscape-06-08
telegra.ph/Ingestion-and-Strategic-Play-in-the-aviator-game-Landscape-06-08 where players discuss different winning strategies , and it has quite insightful to keep my spending down . Something I constantly remind newbies is to never run after bad runs, because that tends to be when everything turns bad. Lately, I’ve also started questioning whether the stream dealer tables actually give a more authentic vibe than regular RNG versions. How do you all feel about that, do you prefer machines or tables? Let’s get a discussion here in this thread!
3a25609
Соблюдаем конфиденциальность, бережно общаемся с пациентом и его близкими на каждом этапе.
Изучить вопрос глубже – нарколог на дом цена новороссийск
Экспертная консультация при выборе сплавов помогает клиентам оптимизировать затраты и избежать технологических ошибок.
https://rms-ekb.ru/catalog/stalnoi-list/stalnoi-list-10kh2nv2f-2x1400x1100-gost-19903-2006-gladkii-otsinkovannyi-goriachekatanyi/
Thinking on my experience, around virtual betting, I’ve recently come to see that the latest sites are totally changing the way players experience tables. To be fair, I think that the house edge tend to be all over the place, which is why proper bankroll control is the real key nowadays . On another note, I stumbled upon this awesome source telegra.ph/Resonant-Strategies-for-an-aviator-bet-Leveraging-Predictive-Analytics-06-08 – telegra.ph/Resonant-Strategies-for-an-aviator-bet-Leveraging-Predictive-Analytics-06-08
telegra.ph/Resonant-Strategies-for-an-aviator-bet-Leveraging-Predictive-Analytics-06-08 where people talk about various betting systems, and it has quite helpful for keeping my risks down . Something I constantly tell myself is to avoid trying to track bad runs, because that tends to be how things gets messy . Recently, I’ve also wondered whether the real-time dealer tables truly offer a fairer chance compared to standard digital software . What’s your take on this whole thing, and did you noticed any solid patterns lately ? Let’s start a here in the comments !
85cdd5a
Редметсплав — пример того, как должен работать современный поставщик металлургического сырья.
https://xn--80aeedb0bfzeok.xn--p1ai/catalog/mednye-dvukhrastrubnye-mufty-pod-paiku/mednaiadvukhrastrubnaiamufta-pod-paiku28kh1-5mmm2rmgost-32590-2013/
Информация о доставке по всей РФ делает компанию универсальным поставщиком
https://redmetsplav.ru/store/magniy-i-ego-splavy/zarubezhnye-splavy-2/magniy-zm21—csa-hg-5/pokovka-magnievaya-zm21—csa-hg-5/
Наличие прецизионных сплавов в ассортименте подтверждает работу компании с высокоточными и наукоемкими материалами.
https://rms-ekb.ru/catalog/ugolok-stalnoi/ugolok-stalnoi-stal-3-180x110x10-gost-19771-93/
Thinking about it, in digital betting, I’ve recently realized how the latest sites are totally changing the method players experience games . In my opinion, it feels like the payouts can be quite unpredictable, which proves that proper bankroll control is the real key nowadays . That said, I stumbled upon this useful resource telegra.ph/Strategic-Deficit-and-the-aviator-Game-Potential-from-Insight-to-Implementation-06-08
telegra.ph/Strategic-Deficit-and-the-aviator-Game-Potential-from-Insight-to-Implementation-06-08 where players share various betting strategies , and it has really helpful for keeping my spending down . Something I always tell others is to avoid trying to track losses , because it’s almost always when everything goes wrong . Lately, I’ve also been thinking whether the live dealer options truly offer a fairer chance than regular RNG versions. What are your opinions on this, and did you noticed any solid patterns recently? Let’s chat going in this thread!
Долго искали надежного поставщика циркония, в Редметсплав предложили лучшие условия и чистоту металла.
https://xn--80aeedb0bfzeok.xn--p1ai/catalog/magnievyi-krug/krug-magnievyi-40-mm-ma2-gost-18351-73/
Четкая структура меню позволяет быстро найти нужный металл
https://redmetsplav.ru/store/magniy-i-ego-splavy/zarubezhnye-splavy-2/magniy-sismg4635-10—ss-144635/truba-magnievaya-sismg4635-10—ss-144635/
Поставка продукции возможна не только в промышленных, но и в малых лабораторных объемах для исследовательских целей.
https://rms-ekb.ru/catalog/stalnoi-list/stalnoi-list-12khn3a-3-5x1800x1800-gost-19903-2006-gladkii-neotsinkovannyi-goriachekatanyi/
Поставки всегда вовремя, логистика отлажена до мелочей, что важно для бесперебойной работы цеха.
https://xn--80aeedb0bfzeok.xn--p1ai/catalog/mednye-dvukhrastrubnye-mufty-pod-paiku/mednaiadvukhrastrubnaiamufta-pod-paiku64kh2-4mmm1gost-32590-2013/
Поковки и штабики — важные заготовки для металлургических предприятий
https://redmetsplav.ru/store/magniy-i-ego-splavy/zarubezhnye-splavy-2/magniy-ms1—jis-h-4204/izdeliya-iz-magniya-ms1—jis-h-4204/
Компания предлагает не только металлы, но и химическую продукцию, используемую в смежных металлургических процессах.
https://rms-ekb.ru/catalog/stalnoi-list/stalnoi-list-khn35vt-140x1100x1900-gost-24982-81-zharoprochnyi-belyi-goriachekatanyi/
Приятно удивлены скоростью обработки запроса на сайте, менеджер связался очень быстро.
https://xn--80aeedb0bfzeok.xn--p1ai/catalog/latunnaia-kapilliarnaia-trubka/latunnaia-kapilliarnaia-trubka-1-7kh0-65kh100000-mm-l68-gost-2624-2016/
Article writing is also a excitement, if you be familiar with afterward you can write otherwise
it is complicated to write.
Информация об обработке IP-адреса для определения региона — современный подход
https://redmetsplav.ru/store/magniy-i-ego-splavy/zarubezhnye-splavy-2/magniy-mg-al9zn—iso-121/prutok-magnievyy-mg-al9zn—iso-121/
Реализация твердых сплавов типа «Победит» ориентирована на производителей металлорежущего и бурового инструмента.
https://rms-ekb.ru/catalog/ugolok-stalnoi/ugolok-iz-konstruktsionnoi-stali-70kh70kh7-mm-46cr2-din-1028/
Офис в Екатеринбурге работает четко, забирали самовывозом — складская логистика на высоте.
https://xn--80aeedb0bfzeok.xn--p1ai/catalog/mednye-dvukhrastrubnye-mufty-pod-paiku/mednaiadvukhrastrubnaia-podvizhnaiamufta-pod-paiku15kh1-2mmm2tgost-32590-2013/
Наличие циркония свидетельствует о работе с высокотехнологичными заказами
https://redmetsplav.ru/store/magniy-i-ego-splavy/zarubezhnye-splavy-2/magniy-mgal3zn1-alloy-21—iso-3116/truba-magnievaya-mgal3zn1-alloy-21—iso-3116/
Поставки жаропрочных сплавов ориентированы на потребности авиационной и энергетической отраслей.
https://rms-ekb.ru/catalog/krug-iz-instrumentalnoi-stali/krug-ep863-75-gost-1133-71/
Индивидуальный подход к нестандартным заказам — изготовили детали по нашим чертежам точно в размер.
https://xn--80aeedb0bfzeok.xn--p1ai/catalog/latunnye-naruzhnye-stopornye-koltsa-po-gost/latunoe-naruzhnoe-stopornoe-pruzhinnoe-koltso-17kh1-2-mm-lks-gost-13942-86/
Упоминание нефтегазовой отрасли как ключевого потребителя
https://redmetsplav.ru/store/magniy-i-ego-splavy/zarubezhnye-splavy-2/magniy-mc6—jis-h-5203/folga-magnievaya-mc6—jis-h-5203/
В каталоге представлены конденсаторные ниобиевые порошки высокой чистоты, необходимые для современной электроники.
https://rms-ekb.ru/catalog/ugolok-stalnoi/ugolok-stalnoi-14g2-200x125x16-gost-19771-93/
Редметсплав — пример того, как должен работать современный поставщик металлургического сырья.
https://xn--80aeedb0bfzeok.xn--p1ai/catalog/mednye-dvukhrastrubnye-mufty-pod-paiku/mednaiadvukhrastrubnaiamufta-pod-paiku54kh1-9mmm2rgost-32590-2013/
Hi everyone, I had to mention that after ages of putting up with drafty windows and doors, I finally got serious about Kozijne Vervangen and truly it was one of the best decisions for my house because working with a proper kozijnen renovatie (https://thaprobaniannostalgia.com/index.php/User:JensOliver2612) vervangen specialist really changed everything, and should you be looking at kunststof kozijnen vervangen then I seriously recommend requesting a proper kozijnen vervangen offerte first so you know exactly what you’re paying for, based on my experience about kozijne vervangen the improvement speaks for itself so don’t hesitate if you’ve been on the fence.
Наличие кобальтовых сплавов заинтересует авиастроение
https://redmetsplav.ru/store/magniy-i-ego-splavy/zarubezhnye-splavy-2/magniy-mag-3—bs-2970-1/provoloka-magnievaya-mag-3—bs-2970-1/
ООО «РМС» обеспечивает поставки специализированных сварочных материалов для сложных условий эксплуатации.
https://rms-ekb.ru/catalog/list/list-u8a-28x1000x1000-gost-19903-2006/
I have read so many articles or reviews concerning the blogger lovers but this post is truly a fastidious post, keep it up.
Высокая квалификация персонала, знают специфику редких металлов и особенности их применения.
https://xn--80aeedb0bfzeok.xn--p1ai/catalog/latunnye-naruzhnye-stopornye-koltsa-po-gost/latunoe-naruzhnoe-stopornoe-pruzhinnoe-koltso-56kh2-mm-lts40sd-gost-13942-86/
Информация о проверке качества продукции повышает лояльность клиентов
https://redmetsplav.ru/store/magniy-i-ego-splavy/zarubezhnye-splavy-2/magniy-mag-101—bs-3370/poroshok-magnievyy-mag-101—bs-3370/
เนื้อหานี้ น่าสนใจดี ค่ะ
ดิฉัน ไปอ่านเพิ่มเติมเกี่ยวกับ เรื่องที่เกี่ยวข้อง
ดูต่อได้ที่ สล็อตเว็บตรง
เผื่อใครสนใจ
มีตัวอย่างประกอบชัดเจน
ขอบคุณที่แชร์ ข้อมูลที่มีประโยชน์ นี้
และหวังว่าจะมีข้อมูลใหม่ๆ มาแบ่งปันอีก
Поставки жаропрочных сплавов ориентированы на потребности авиационной и энергетической отраслей.
https://rms-ekb.ru/catalog/ugolok-stalnoi/ugolok-iz-konstruktsionnoi-stali-80kh80kh10-mm-c10e-en-10056-2/
Приятно удивлены скоростью обработки запроса на сайте, менеджер связался очень быстро.
https://xn--80aeedb0bfzeok.xn--p1ai/catalog/mednye-dvukhrastrubnye-mufty-pod-paiku/mednaiadvukhrastrubnaia-podvizhnaiamufta-pod-paiku40kh2mmm3rtgost-32590-2013/
Упоминание нефтегазовой отрасли как ключевого потребителя
https://redmetsplav.ru/store/magniy-i-ego-splavy/zarubezhnye-splavy-2/magniy-m16510—uns/list-magnievyy-m16510—uns/
Поставки жаропрочных сплавов ориентированы на потребности авиационной и энергетической отраслей.
https://rms-ekb.ru/catalog/stalnoi-list/stalnoi-list-04kh17t-0-45x1800x1700-gost-19903-2006-gladkii-chernyi-goriachekatanyi/
Широкий выбор тугоплавких металлов, таких как вольфрам и молибден
https://redmetsplav.ru/store/magniy-i-ego-splavy/zarubezhnye-splavy-2/magniy-m11917—uns/pokovka-magnievaya-m11917—uns/
Индивидуальный подход к нестандартным заказам — изготовили детали по нашим чертежам точно в размер.
https://xn--80aeedb0bfzeok.xn--p1ai/catalog/latunnye-naruzhnye-stopornye-koltsa-po-gost/latunoe-naruzhnoe-stopornoe-pruzhinnoe-koltso-19kh1-2-mm-lk2-gost-13942-86/
Do you have a spam problem on this website; I also am a
blogger, and I was wondering your situation; we have developed
some nice procedures and we are looking to swap solutions with other folks,
why not shoot me an email if interested.
Thank you for any other magnificent post. Where else may just anyone get
that type of information in such an ideal manner of writing?
I have a presentation subsequent week, and I am at the
search for such information.
“duvar boyas? k?yafetten nas?l c?kar” konusu icin burada harika bilgiler var. Link burada: https://fikirdronu.com/articles/kiyafetten-duvar-boyasi-cikarma-yontemleri/
Продукция находит применение в производстве электротехники благодаря наличию специализированной электротехнической стали.
https://rms-ekb.ru/catalog/ugolok-stalnoi/ugolok-iz-konstruktsionnoi-stali-80kh40kh6-mm-30mnb4-uni-6762/
Указание конкретных марок сплавов в разделах помогает специалистам
https://redmetsplav.ru/store/magniy-i-ego-splavy/zarubezhnye-splavy-2/magniy-m10601—uns/lenta-magnievaya-m10601—uns/
Заказывали партию молибденовых листов для производства, качество металла идеальное, все сертификаты в наличии.
https://xn--80aeedb0bfzeok.xn--p1ai/catalog/mednye-krestoviny-pod-paiku/mednaia-krestovina-pod-paiku-21kh18kh0-9-mm-15-4kh17-6-mm-miagkaia-paika-m3rt-gost-r-52922-2008/
Ищите откровенные видео, исследуя надежные платформы в Интернете.
Изучите надежные порнохабы для приватного
просмотра.
Feel free to visit my webpage: Male Penis Enlarger Pills
Возможность заказа висмута — достаточно редкое предложение на рынке
https://redmetsplav.ru/store/magniy-i-ego-splavy/zarubezhnye-splavy-2/magniy-iso-mgal4si—iso-16220/list-magnievyy-iso-mgal4si—iso-16220/
Офис в Екатеринбурге работает четко, забирали самовывозом — складская логистика на высоте.
https://xn--80aeedb0bfzeok.xn--p1ai/catalog/latunnye-naruzhnye-stopornye-koltsa-po-din/latunoe-naruzhnoe-stopornoe-pruzhinnoe-koltso-m162-151kh4-mm-lmtska-din-471/
Почему пользователи выбирают площадку KRAKEN?
Маркетплейс KRAKEN заслужил доверие многочисленной аудитории благодаря сочетанию ключевых факторов.
Во-первых, это широкий и разнообразный ассортимент, представленный сотнями продавцов.
Во-вторых, интуитивно понятный интерфейс KRAKEN, который упрощает навигацию, поиск товаров и
управление заказами даже для новых пользователей.
В-третьих, продуманная система безопасных
транзакций, включающая механизмы разрешения
споров (диспутов) и возможность использования условного депонирования, что
минимизирует риски для обеих сторон сделки.
На KRAKEN функциональность сочетается с внимательным отношением к
безопасности клиентов, что делает процесс покупок более предсказуемым, защищенным и,
как следствие, популярным среди пользователей, ценящих анонимность и
надежность.
в таких случаях вызов нарколога на дом предоставляет возможность оценить состояние пациента и предложить амбулаторное лечение.
Подробнее можно узнать тут – врач нарколог на дом казань
Patrice & Associates
Scottsdale, AZ, United Ѕtates
16265237726
restaurant temp jobs (https://atavi.com/)
Продажа проволоки из тугоплавких металлов востребована в электронике
https://redmetsplav.ru/store/magniy-i-ego-splavy/zarubezhnye-splavy-2/magniy-iso-mb21220—bs-iso-16220/lenta-magnievaya-iso-mb21220—bs-iso-16220/
Индивидуальный подход к нестандартным заказам — изготовили детали по нашим чертежам точно в размер.
https://xn--80aeedb0bfzeok.xn--p1ai/catalog/mednye-krestoviny-pod-paiku/mednaia-krestovina-pod-paiku-9kh7kh0-6-mm-7-8kh9-8-mm-miagkaia-paika-m1m-gost-32590-2013/
Pretty! This has been a really wonderful post.
Thank you for supplying this information.
I truly love your blog.. Great colors & theme. Did you create this amazing site
yourself? Please reply back as I’m wanting to create my very own site and want to find out where you got this from
or exactly what the theme is named. Many
thanks!
Танталовый прокат незаменим для химически агрессивных сред
https://redmetsplav.ru/store/magniy-i-ego-splavy/zarubezhnye-splavy-2/magniy-g-z5zr/krug-magnievyy-g-z5zr/
Hey very nice blog!
Профессиональный подход менеджеров в Екатеринбурге, грамотно проконсультировали по техническим характеристикам сплавов.
https://xn--80aeedb0bfzeok.xn--p1ai/catalog/latunnye-naruzhnye-stopornye-koltsa-po-din/latunoe-naruzhnoe-stopornoe-pruzhinnoe-koltso-m120-113kh4-mm-lsdch-din-471/
For latest information you have to pay a visit web and on internet I found this website as a best
web site for most up-to-date updates.
Сайт поддерживает английскую версию, что важно для экспорта
https://redmetsplav.ru/store/magniy-i-ego-splavy/zarubezhnye-splavy-2/magniy-gd-mgal4si1—din-1729-part-2/provoloka-magnievaya-gd-mgal4si1—din-1729-part-2/
My spouse and I stumbled over here different website and thought I
should check things out. I like what I see so now i’m following you.
Look forward to looking at your web page repeatedly.
Покупали изделия из драгметаллов для лаборатории, всё соответствует заявленным характеристикам.
https://xn--80aeedb0bfzeok.xn--p1ai/catalog/mednye-krestoviny-pod-paiku/mednaia-krestovina-pod-paiku-35kh29kh1-mm-23kh25-mm-miagkaia-paika-m1t-gost-32590-2013/
Mention socialism in our country and the majority of people will have a bad opinion.
It seems the very idea of redistributing resources has a
negative value.
References:
Suncoast casino durban http://www.sinp.msu.ru/ru/ext_link?url=http%3A%2F%2Fwww.garagebiz.ru/%3FURL%3Dhttps%3A//de.trustpilot.com/review/owowear.de%26lt%3B/a/ru/ext_link?url=http%3A%2F%2Fwww.garagebiz.ru/%3FURL%3Dhttps%3A//de.trustpilot.com/review/owowear.de%26lt%3B/a
I have read so many articles or reviews on the topic of the blogger
lovers except this post is really a good piece of writing, keep it up.
References:
Blackjack game download https://https://videoregforum.ru/proxy.php?link=https://m.en.acmedelavie.com/member/login.html?returnUrl=https://de.trustpilot.com/review/owowear.de/proxy.php?link=https://m.en.acmedelavie.com/member/login.html?returnUrl=https://de.trustpilot.com/review/owowear.de
I’m now not sure the place you’re getting your information, however good topic.
I needs to spend a while studying more or understanding
more. Thank you for excellent info I used to be on the lookout for this info for my mission.
Hello there! Would you mind if I share your blog with my twitter group?
There’s a lot of folks that I think would really enjoy your content.
Please let me know. Cheers
Наличие калькулятора металлопроката упрощает расчет веса и стоимости
https://redmetsplav.ru/store/magniy-i-ego-splavy/zarubezhnye-splavy-2/magniy-ez33a—astm-b403/folga-magnievaya-ez33a—astm-b403/
I read this article fully regarding the comparison of newest and preceding technologies, it’s awesome article.
Быстрая доставка в регионы через «Деловые Линии», груз пришел в целости и отлично упакованным.
https://xn--80aeedb0bfzeok.xn--p1ai/catalog/latunnye-naruzhnye-stopornye-koltsa-po-din/latunoe-naruzhnoe-stopornoe-pruzhinnoe-koltso-m147-138kh4-mm-lts40mts3zh-din-471/
вызов нарколога на дом круглосуточно позволяет получить профессиональную помощь в любое время суток.
Исследовать вопрос подробнее – http://www.domen.ru
Информация об обработке IP-адреса для определения региона — современный подход
https://redmetsplav.ru/store/magniy-i-ego-splavy/zarubezhnye-splavy-2/magniy-class-2/krug-magnievyy-class-2/
Кстати, если вас интересует Главные новости Белгородской области: общество и экономика, посмотрите сюда.
Ссылка ниже:
https://media31bel.ru
Офис в Екатеринбурге работает четко, забирали самовывозом — складская логистика на высоте.
https://xn--80aeedb0bfzeok.xn--p1ai/catalog/mednye-krestoviny-pod-paiku/mednaia-krestovina-pod-paiku-27-4kh23kh0-9-mm-9kh11-mm-tverdaia-paika-m2m-gost-r-52922-2008/
Представлен полный цикл изделий: от фольги и проволоки до крупных поковок
https://redmetsplav.ru/store/magniy-i-ego-splavy/zarubezhnye-splavy-2/magniy-az92a—astm-b93/provoloka-magnievaya-az92a—astm-b93/
Высокая квалификация персонала, знают специфику редких металлов и особенности их применения.
https://xn--80aeedb0bfzeok.xn--p1ai/catalog/latunnye-vnutrennie-stopornye-koltsa-po-gost/latunoe-vnutrennee-stopornoe-pruzhinnoe-koltso-54kh1-7-mm-lts30a3-gost-13943-86/
Wow, awesome weblog structure! How lengthy
have you been running a blog for? you made blogging look easy.
The full glance of your site is wonderful, as neatly as the content
material!
Раздел «Производство» подтверждает статус завода, а не просто перекупщика
https://redmetsplav.ru/store/magniy-i-ego-splavy/zarubezhnye-splavy-2/magniy-az63a—astm-b275/lenta-magnievaya-az63a—astm-b275/
Your mode of describing the whole thing in this piece of writing
is truly pleasant, every one be capable of without difficulty
know it, Thanks a lot.
Высокая квалификация персонала, знают специфику редких металлов и особенности их применения.
https://xn--80aeedb0bfzeok.xn--p1ai/catalog/mednye-zaglushki-pod-paiku/mednaia-zaglushka-kolpachok-pod-paiku-27-4kh23kh0-9-mm-18-4kh20-4-mm-tverdaia-paika-m3m-gost-32590-2013/
Ребята кто с недвижкой То вообще непонятно где смотреть Категория земли Короче, нашел отличный инструмент — публичная кадастровая карта с поиском по номеру Увидел границы и соседей В общем, там и карта и данные — карта земельных участков https://publichnaya-kadastrovaya-karta-abc.ru Пользуйтесь нормальной картой Перешлите тому кто ищет участок
Сервисный договор — за год обращались раз пятнадцать. Каждый раз быстро и по делу. Ни одного случая когда вопрос остался нерешённым или завис в ожидании ответа специалиста. доставка спецтехники по Казахстану
I love what you guys tend to be up too. This sort of clever work and coverage!
Keep up the great works guys I’ve added you guys
to our blogroll.
This website was… how do I say it? Relevant!! Finally I have found something which helped me.
Thanks!
Hi, I do think your site may be having browser compatibility issues.
When I take a look at your web site in Safari,
it looks fine however, if opening in Internet Explorer, it’s
got some overlapping issues. I simply wanted to give you a quick
heads up! Besides that, wonderful website!
It’s awesome to pay a visit this web page and reading the views of all friends about this article, while I am also zealous of getting experience.
Hey I know this is off topic but I was wondering if you knew of any widgets I could add to my
blog that automatically tweet my newest twitter updates.
I’ve been looking for a plug-in like this for quite some time and was hoping maybe you would have
some experience with something like this. Please let me know
if you run into anything. I truly enjoy reading your blog and I look forward to your new updates.
Раздел «Контакты» содержит все необходимые реквизиты и карту
https://redmetsplav.ru/store/magniy-i-ego-splavy/zarubezhnye-splavy-2/magniy-as41a—sae-j465/poroshok-magnievyy-as41a—sae-j465/
Поставки всегда вовремя, логистика отлажена до мелочей, что важно для бесперебойной работы цеха.
https://xn--80aeedb0bfzeok.xn--p1ai/catalog/latunnye-vnutrennie-stopornye-koltsa-po-gost/latunoe-vnutrennee-stopornoe-pruzhinnoe-koltso-260kh3-mm-lts40mts3a-gost-13943-86/
Важное преимущество услуги — анонимность. Информация о пациента, обращении, адрес, диагноз, лечение, консультация, стоимость, препараты и другие данные не передаются третьим лицам. Нажимая кнопку «отправить заявку», вы соглашаетесь с пользовательским соглашением, политикой обработки персональных данных и политикой конфиденциальности сайта.
Выяснить больше – вызвать нарколога на дом казань
Раздел «Цены на металлы» полезен для мониторинга рынка
https://redmetsplav.ru/store/magniy-i-ego-splavy/zarubezhnye-splavy-2/magniy-am50a—astm-b275/provoloka-magnievaya-am50a—astm-b275/
Редметсплав — надежный партнер, работаем по поставкам нержавеющего проката уже второй год, сбоев не было.
https://xn--80aeedb0bfzeok.xn--p1ai/catalog/mednye-zaglushki-pod-paiku/mednaia-zaglushka-kolpachok-pod-paiku-53-6kh47kh1-2-mm-32kh34-mm-miagkaia-paika-m1-gost-32590-2013/
Купили тур в Стамбул с экскурсионной программой. Всё организовано — перелёт, отель в центре, трансфер, гид. Три дня насыщенного отдыха без лишних забот и самостоятельного планирования. путёвки в Турцию из Москвы
Большой опыт работы, судя по копирайту с 2013 года
https://redmetsplav.ru/store/magniy-i-ego-splavy/zarubezhnye-splavy-2/magniy-9980b—astm-b275/polosa-magnievaya-9980b—astm-b275/
Закупали шлак ферросилиция для строительных нужд, материал качественный, без лишних примесей.
https://xn--80aeedb0bfzeok.xn--p1ai/catalog/latunnye-vnutrennie-stopornye-koltsa-po-gost/latunoe-vnutrennee-stopornoe-pruzhinnoe-koltso-90kh2-mm-lts23a6zh3mts2-gost-13943-86/
It’s an amazing article in favor of all the online viewers; they will take advantage
from it I am sure.
Запоя вывод в клинике Сочи: лечение алкогольной зависимости, капельница, детоксикация, помощь нарколога на дому, кодирование и реабилитация анонимно
Выяснить больше – вывод из запоя вызов на дом сочи
Представлены технически сложные сплавы ниобия и тантала
https://redmetsplav.ru/store/magniy-i-ego-splavy/zarubezhnye-splavy-2/magniy-3-5101—din-1729-part-2/prutok-magnievyy-3-5101—din-1729-part-2/
звоните круглосуточно по телефону горячей линии клиники: наши специалисты готовы оказать необходимую помощь в решении проблемы алкогольной зависимости.
Выяснить больше – помощь вывод из запоя в сочи
This is a very informative post about online casinos and betting platforms.
I especially liked how it explains the importance of choosing a licensed site before signing up.
Many players often ask where they can find reliable gaming platforms with fair odds and smooth payouts.
From what I’ve seen, checking platforms like vn22vip
helps users compare features, bonuses, and overall experience.
Thanks for sharing these insights — they’re helpful for
both beginners and experienced bettors.
Bu arada, eger under armour ne demek konusuyla ilgileniyorsan?z, buray? inceleyin. Suradan okuyabilirsiniz: https://limitligiyin.com/articles/under-armour-spor-giyimde-yenilikci-bir-marka/
Everything published made a bunch of sense. However,
what about this? suppose you added a little content?
I am not suggesting your content isn’t solid., however suppose you added a post
title to possibly grab people’s attention? I mean Upload data automatically to Amazon S3
from Outlook – Robert Garcia Ventura is a little vanilla.
You ought to peek at Yahoo’s home page and note how they create post titles to
get viewers to open the links. You might add a related video or a related picture or two to get readers excited about
what you’ve written. Just my opinion, it would bring your
posts a little livelier.
Индивидуальный подход к нестандартным заказам — изготовили детали по нашим чертежам точно в размер.
https://xn--80aeedb0bfzeok.xn--p1ai/catalog/mednye-zaglushki-pod-paiku/mednaia-zaglushka-kolpachok-pod-paiku-40kh35kh1-1-mm-10kh12-mm-tverdaia-paika-m3r-gost-32590-2013/
Возможность заказа висмута — достаточно редкое предложение на рынке
https://redmetsplav.ru/store/magniy-i-ego-splavy/rossiyskie-splavy-1/magniy-mg98—gost-804-93/krug-magnievyy-mg98—gost-804-93/
Высокий уровень сервиса и контроля качества, для нашего научного проекта это было критически важно.
https://xn--80aeedb0bfzeok.xn--p1ai/catalog/latunnye-vnutrennie-stopornye-koltsa-po-din/latunoe-vnutrennee-stopornoe-pruzhinnoe-koltso-m35-37-8kh1-5-mm-lts40mts3zh-din-472/
Запоя вывод в клинике Сочи: лечение алкогольной зависимости, капельница, детоксикация, помощь нарколога на дому, кодирование и реабилитация анонимно
Узнать больше – вывод из запоя недорого
Сайт работает стабильно и быстро загружается
https://redmetsplav.ru/store/magniy-i-ego-splavy/rossiyskie-splavy-1/magniy-l-2—tu-28-10-33-75/truba-magnievaya-l-2—tu-28-10-33-75/
What’s up, I read your blog daily. Your story-telling style is awesome, keep doing what you’re
doing!
Hello, i think that i saw you visited my website
thus i came to “return the favor”.I’m attempting to find things
to improve my site!I suppose its ok to use a
few of your ideas!!
Редкие и тугоплавкие металлы всегда в наличии или под заказ в короткие сроки, рекомендую.
https://xn--80aeedb0bfzeok.xn--p1ai/catalog/mednoe-dvukhrastrubnoe-koleno-pod-paiku/mednoe-dvukhrastrubnoe-koleno-pod-paiku-180-gradusov-25kh21kh0-9-mm-16-4kh18-4-mm-tverdaia-paika-m3m-gost-32590-2013/
http://farmaciabesurica.com/# comprare medicinali online senza ricetta
Информация об обработке IP-адреса для определения региона — современный подход
https://redmetsplav.ru/store/kobalt/wallex/kobalt-wallex-1/poroshok-kobaltovyy-wallex-1/
Modern Purair
416 Meridian Ꭱd SE #14Ꭺ, Calgary
AB T2A 1X2, Canada
(403) 800-7254
cooling cleaning
Благодарим за оперативную поставку ниобиевых труб, выручили в очень сжатые сроки.
https://xn--80aeedb0bfzeok.xn--p1ai/catalog/latunnye-vnutrennie-stopornye-koltsa-po-din/latunoe-vnutrennee-stopornoe-pruzhinnoe-koltso-m118-122kh4-mm-lk-din-472/
Добрый день!
Сайт компании должен работать как часть продаж: привлекать трафик, объяснять ценность предложения, закрывать возражения и передавать заявки в удобные каналы. Если нужен проект с упором на результат, стоит изучить сайт на коде без конструктора: https://volt-site.ru/uslugi/internet-magazin В результате сайт становится не просто витриной, а понятной точкой входа в воронку продаж.
техническое seo под яндекс, лендинг на коде удаленно, техническое seo услуги
техническое seo для мебели, разработка сайта компании быстро, лендинг без тильды быстро
Всего наилучшего и роста в топ!
Магниевый прокат представлен в достаточном ассортименте
https://redmetsplav.ru/store/kobalt/stellite/kobalt-stellite-33/folga-kobaltovaya-stellite-33/
Great items from you, man. I’ve take note your stuff prior to and you are simply too fantastic.
I actually like what you’ve obtained right here, certainly
like what you are stating and the way by which you assert it.
You are making it entertaining and you continue to take care of to stay it sensible.
I can not wait to read much more from you. This is actually a terrific web site.
В кибернетическом мире цифровые развлечения становятся в пространства, где комфорт пользователей важное. Обсуждаем дизайн и защиту, а также адаптацию и реалтаймность. Делитесь опытом и идеями, избегая излишней рекламы и фокуса на коммерции. 7 казино в середине текста для подробностей и примеров, но не в начале и не в конце.
Scegli Farmacia: top farmacia online – farmacie senza ricetta online
после вашего обращения наш врач приезжает по указанному адресу с медработниками в гражданской форме и на машине без опознавательных символов, проводит осмотр, собирает историю болезни (анамнез).
Ознакомиться с деталями – вывод из запоя цена сочи
Высокая квалификация персонала, знают специфику редких металлов и особенности их применения.
https://xn--80aeedb0bfzeok.xn--p1ai/catalog/mednoe-dvukhrastrubnoe-koleno-pod-paiku/mednoe-dvukhrastrubnoe-koleno-pod-paiku-180-gradusov-70kh60kh1-4-mm-12kh15-mm-tverdaia-paika-m1t-gost-32590-2013/
Раздел «Производство» подтверждает статус завода, а не просто перекупщика
https://redmetsplav.ru/store/kobalt/rossiyskie-splavy-3/kobalt-yundkt5—gost-17809-72/lenta-kobaltovaya-yundkt5—gost-17809-72/
Does your blog have a contact page? I’m having a tough time locating it but,
I’d like to shoot you an email. I’ve got some suggestions for your blog you might be
interested in hearing. Either way, great website and
I look forward to seeing it develop over time.
Удобный сайт и понятная навигация по каталогу, легко найти нужную марку стали или сплава.
https://xn--80aeedb0bfzeok.xn--p1ai/catalog/latunnye-vnutrennie-stopornye-koltsa-po-din/latunoe-vnutrennee-stopornoe-pruzhinnoe-koltso-m13-14-1kh1-mm-los-din-472/
Реабилитация наркоманов по методу 12 шагов может сочетаться с психотерапией, групповой терапией, консультацией нарколога, работой психолога, наблюдением врача, медикаментозной терапией, стационаром, детоксикацией и помощью родственникам. Если человек находится в острой интоксикации, переживает ломку, запой, похмельный синдром, тревогу, бессонницу, психоз или выраженное физическое истощение, сначала может потребоваться наркологическая помощь, срочный вызов, стационар, снятие ломки, капельница, вывод из запоя или детоксикация. После стабилизации начинается реабилитация как отдельная программа, направленная на долгосрочные изменения.
Подробнее тут – 12-shagov-reabilitacii
Программа 12 шагов применяется много лет и используется при наркомании, алкоголизме, сочетанных зависимостях, зависимости от аптечных препаратов, марихуаны, гашиша, спайсов, солей, опиатов, стимуляторов и других наркотиков. Человек не просто отказывается употреблять наркотик, а меняет мышление, учится видеть болезнь без оправданий, проходит шаг за шагом личную работу и получает инструменты для трезвого поведения после центра. Такая программа помогает не заменить одну зависимость другой, а осознать природу аддикции, выявить корни употребления и начать действовать иначе.
Получить дополнительные сведения – 12 шаговая программа для зависимых
В будущем мире онлайн-развлечения становятся в комплексы, где эргономика пользователей важное. Обсуждаем навигацию и безопасность, а также персонализацию и иммерсивность. Делитесь опытом и идеями, избегая излишней рекламы и фокуса на коммерции. 7k casino в середине текста для подробностей и примеров, но не в начале и не в конце.
Возможность заказа продукции в розницу и оптом (судя по описанию)
https://redmetsplav.ru/store/kobalt/rossiyskie-splavy-3/kobalt-hn33kvyu—gost-5632-14/provoloka-kobaltovaya-hn33kvyu—gost-5632-14/
Pretty section of content. I just stumbled upon your
blog and in accession capital to assert that I acquire actually
enjoyed account your blog posts. Anyway I will be subscribing to your augment and even I achievement you access consistently fast.
Candy Gas Strain candy gas strain (Gregory)
Технические специалисты компании помогли выбрать оптимальный сплав для работы в агрессивных средах.
https://xn--80aeedb0bfzeok.xn--p1ai/catalog/mednoe-dvukhrastrubnoe-koleno-pod-paiku/mednoe-dvukhrastrubnoe-koleno-pod-paiku-180-gradusov-40kh35kh1-1-mm-27kh29-mm-tverdaia-paika-m1t-gost-r-52922-2008/
What’s up, this weekend is pleasant in favor of me, because this occasion i am reading this
wonderful informative article here at my home.
Отраслевой охват впечатляет: от медицины до космической промышленности
https://redmetsplav.ru/store/kobalt/rossiyskie-splavy-3/kobalt-ek20-vi-1/pokovka-kobaltovaya-ek20-vi-1/
Hello There. I found your weblog the use of msn. That is a really well written article.
I’ll make sure to bookmark it and return to learn more of your useful info.
Thank you for the post. I will certainly comeback.
Офис в Екатеринбурге работает четко, забирали самовывозом — складская логистика на высоте.
https://xn--80aeedb0bfzeok.xn--p1ai/catalog/latunnye-vnutrennie-stopornye-koltsa-po-din/latunoe-vnutrennee-stopornoe-pruzhinnoe-koltso-m51-55-2kh2-mm-lmtsska-din-472/
Наличие редких позиций, например, изделий из гафния и ванадия
https://redmetsplav.ru/store/cirkoniy-i-ego-splavy/cirkoniy-cirkoloy-46/folga-cirkonievaya-cirkoloy-46/
Thanks, this answered my question https://clients1.google.com.gh/url?q=https://lnkm.ee/35ba3c34
Наркологическая помощь позволяет безопасно начать выведение токсинов, снизить интоксикации, восстановить водно-солевой баланс и подобрать дальнейшее лечение алкогольной зависимости. Нарколог проводит анализ состояния пациента, уточняет стаж употребления спиртного, причины запоя, наличие хронического заболевания, психических расстройств, противопоказаний и других ограничений. После диагностики врач выбирает схему: амбулаторно на дому, в стационаре клиники или с госпитализацией.
Изучить вопрос глубже – вывод из запоя с выездом сочи
“spor kombin” hakk?nda bilgi arayanlar icin mukemmel bir kaynak var. Link burada: https://fittutkusu.com/sport-outfits/
Профессиональный подход менеджеров в Екатеринбурге, грамотно проконсультировали по техническим характеристикам сплавов.
https://xn--80aeedb0bfzeok.xn--p1ai/catalog/mednoe-dvukhrastrubnoe-koleno-pod-paiku/mednoe-dvukhrastrubnoe-koleno-pod-paiku-180-gradusov-66-7kh57kh1-4-mm-33-5kh36-5-mm-tverdaia-paika-cu-dhp-gost-32590-2013/
Сайт адаптирован под нужды машиностроительных заводов
https://redmetsplav.ru/store/volfram/splavy-volframa-1/volfram-w-la20-1/elektrod-volframovyy-w-la20/
My brother suggested I might like this website. He was totally right.
This post truly made my day. You cann’t imagine
simply how much time I had spent for this info!
Thanks!
It’s an awesome post in favor of all the online visitors; they will get
benefit from it I am sure.
I am regular reader, how are you everybody? This paragraph posted at
this web page is truly good.
Покупали изделия из драгметаллов для лаборатории, всё соответствует заявленным характеристикам.
https://xn--80aeedb0bfzeok.xn--p1ai/catalog/latunnoe-litoe-koltso/latunnoe-litoe-koltso-350kh800-mm-lts14k3s3/
Сайт выглядит профессионально и лаконично, без лишней рекламы
https://redmetsplav.ru/store/volfram/splavy-volframa-1/volfram-vnzh-5-5/krug-volframovyy-vnzh-5-5/
Вывод из запоя в клинике и на дому в Сочи: лечение алкоголизма, капельница, детоксикация, помощь нарколога круглосуточно, анонимно и безопасно.
Изучить вопрос глубже – помощь вывод из запоя
Наркологическая помощь клиники направлена не только на снятие острого состояния, но и на дальнейшее лечение алкогольной зависимости. Вывод из запоя на дому подходит пациенту, если нет признаков тяжелого отравления, психоза, судорог и опасных осложнений. Если состояние больного тяжелое, врач может рекомендовать лечение в стационаре клиники, где пациент находится под наблюдением медицинской команды, а терапия проходит безопаснее.
Узнать больше – вывод из запоя вызов на дом сочи
Закупали шлак ферросилиция для строительных нужд, материал качественный, без лишних примесей.
https://xn--80aeedb0bfzeok.xn--p1ai/catalog/mednyi-perekhodnoi-troinik-press/mednyi-perekhodnoi-press-troinik-66-7kh14-7-mm-m3-gost-r-52948-2008/
Представлены технически сложные сплавы ниобия и тантала
https://redmetsplav.ru/store/volfram/splavy-volframa-1/volfram-vchdk-1/krug-volframovyy-vchdk/
Hello to every one, the contents present at this web page are actually amazing for people knowledge, well, keep up the good work fellows.
На странице услуги можно использовать и такую формулировку: нарколог на дом в — экстренная помощь при алкогольной и наркотической зависимости. В Балашихе выездной формат востребован, когда нужна быстрая помощь без поездки в клинику, без ожидания приема и без лишнего внимания соседей.
Подробнее тут – http://narkolog-na-dom-balashiha13-2.ru
Особенно понравился материал про Новости и тренды в мире ММА.
Вот, делюсь ссылкой:
https://gunmma.ru
Цены на спецстали одни из самых конкурентных на рынке, при этом качество на уровне мировых стандартов.
https://xn--80aeedb0bfzeok.xn--p1ai/catalog/magnievyi-krug/krug-magnievyi-27-mm-ma15-gost-18351-73/
Наличие циркония свидетельствует о работе с высокотехнологичными заказами
https://redmetsplav.ru/store/vismut/zarubezhnye-splavy-3/vismut-tbc-12—pn-h-87203/list-vismutovyy-tbc-12—pn-h-87203/
Премиум-платформы для взрослых предоставляют премиум-контент для зрелой аудитории.
Исследуйте проверенные сайты для взрослых
для качества и конфиденциальности.
Feel free to surf to my blog :: Buy Fentanyl without Prescription
Hi there i am kavin, its my first time to commenting anywhere, when i
read this piece of writing i thought i could also create comment due to
this sensible article.
Весь металл проходит строгий входной контроль, за всё время работы ни одного случая брака.
https://xn--80aeedb0bfzeok.xn--p1ai/catalog/mednyi-perekhodnoi-troinik-press/mednyi-perekhodnoi-press-troinik-40kh17-mm-m2t-gost-r-52948-2008/
Fine way of explaining, and pleasant post to take data regarding my
presentation topic, which i am going to present in institution of higher education.
I am really enjoying the theme/design of your website.
Do you ever run into any web browser compatibility problems?
A number of my blog visitors have complained about
my blog not working correctly in Explorer but looks great in Firefox.
Do you have any tips to help fix this problem?
I really like what you guys are up too. This type of
clever work and exposure! Keep up the awesome works guys I’ve included you guys to blogroll.
Наличие циркония свидетельствует о работе с высокотехнологичными заказами
https://redmetsplav.ru/store/vismut/zarubezhnye-splavy-3/vismut-l54860—uns/izdeliya-iz-vismuta-l54860—uns/
Terrific post however , I was wondering if you could write a litte more on this
subject? I’d be very thankful if you could elaborate a little bit more.
Bless you!
Вывод из запоя на дому — это комплексная процедура, которая начинается с первичного осмотра и диагностики состояния пациента. Врач-нарколог оценивает уровень интоксикации, измеряет артериальное давление, проверяет пульс, собирает анамнез. Только после этого принимается решение о схеме лечения. Основной метод — инфузионная терапия (капельница). Капельница содержит солевые растворы, витамины (группы B и C), гепатопротекторы, ноотропы, успокоительные средства, а при необходимости — кардиопротекторы и препараты для нормализации давления. Очищение организма после установки капельницы позволит в короткое время привести пациента в осознанное состояние и существенно облегчит последствия абстинентного синдрома. Медикаментозное лечение алкоголизма включает ускоренный вывод продуктов распада этанола из крови, восстановление самочувствия и устранение симптомов похмелья.
Узнать больше – нарколог капельница на дом
It’s the best time to make some plans for the future and it is time to be happy.
I’ve read this post and if I could I desire to suggest you few interesting things or suggestions.
Perhaps you could write next articles referring to this article.
I wish to read more things about it!
Гибкая система оплаты и прозрачные условия договора, никаких скрытых наценок или задержек.
https://xn--80aeedb0bfzeok.xn--p1ai/catalog/latunnoe-litoe-koltso/latunnoe-litoe-koltso-500kh600-mm-lts38mts2s2/
Раздел «Производство» подтверждает статус завода, а не просто перекупщика
https://redmetsplav.ru/store/vismut/zarubezhnye-splavy-3/vismut-darcet-alloy/lenta-vismutovaya-darcet-alloy/
Индивидуальный подход к нестандартным заказам — изготовили детали по нашим чертежам точно в размер.
https://xn--80aeedb0bfzeok.xn--p1ai/catalog/mednyi-perekhodnoi-troinik-press/mednyi-perekhodnoi-press-troinik-12kh10-mm-m1t-gost-r-52948-2008/
Широкий выбор тугоплавких металлов, таких как вольфрам и молибден
https://redmetsplav.ru/store/vismut/zarubezhnye-splavy-3/vismut-cac221—jis-h-5120-2016/pokovka-vismutovaya-cac221—jis-h-5120-2016/
Hey there! I’ve been reading your web site for some time now and finally got
the bravery to go ahead and give you a shout out from Dallas Tx!
Just wanted to say keep up the great work!
There’s definately a great deal to find out about this topic.
I really like all the points you have made.
Опытные специалисты знают, что запой может развиваться по-разному. У одного человека симптомы появляются уже на второй день, у другого тяжелый абстинентный синдром формируется после недели употребления. Поэтому наркологи не используют один и тот же метод для всех. Наркологу важно увидеть пациента, задать вопросы, оценить общее здоровье и понять, можно ли вывести человека из запоя дома или лучше сразу направить его в клинику.
Разобраться лучше – https://vyvod-iz-zapoya-moskva13-1.ru/vyvod-iz-zapoya-moskva-srochno/
Вывод из запоя на дому в Сочи проводится анонимно: соседям, коллегам и третьим лицам не передается информация о состоянии пациента, диагнозе, курсе лечения, факте вызова врача или необходимости дальнейшего наблюдения. Документы оформляются только в пределах медицинской работы, а постановки на учет при обращении в частную клинику не происходит.
Разобраться лучше – нарколог на дом вывод из запоя сочи
Возможность заказать листы и полосы нестандартных размеров
https://redmetsplav.ru/store/vismut/zarubezhnye-splavy-3/vismut-c89550—cda/list-vismutovyy-c89550—cda/
Закупали шлак ферросилиция для строительных нужд, материал качественный, без лишних примесей.
https://xn--80aeedb0bfzeok.xn--p1ai/catalog/latunnaia-vtulka/latunnaia-vtulka-460-mm-lts38mts2s2/
References:
Little river casino https://https://audiosex.pro/proxy.php?link=https://forum.truck.ru/away.php?site=https://de.trustpilot.com/review/owowear.de/proxy.php?link=https://forum.truck.ru/away.php?site=https://de.trustpilot.com/review/owowear.de
Высокий уровень сервиса и контроля качества, для нашего научного проекта это было критически важно.
https://xn--80aeedb0bfzeok.xn--p1ai/catalog/mednyi-perekhodnoi-troinik-press/mednyi-perekhodnoi-press-troinik-53-6kh8-mm-m1t-gost-r-52948-2008/
What’s up mates, good piece of writing and pleasant arguments commented at this place, I am in fact enjoying by
these.
Boston Medical Ꮐroup
3152 Red Hill Ave. Ste. #280,
Costa Mesa, ϹA 92626, United Stateѕ
800 337 7555
erectile dysfunction gif (https://atavi.com/)
Наличие кобальтовых сплавов заинтересует авиастроение
https://redmetsplav.ru/store/vismut/zarubezhnye-splavy-3/vismut-721—en-iso-9453/izdeliya-iz-vismuta-721—en-iso-9453/
Индивидуальный подход к нестандартным заказам — изготовили детали по нашим чертежам точно в размер.
https://xn--80aeedb0bfzeok.xn--p1ai/catalog/latunnoe-litoe-koltso/latunnoe-litoe-koltso-30kh400-mm-ls59-1/
Обновление 1С после налоговой реформы 2026 года — сделали быстро, всё заработало корректно. Не пришлось разбираться самому в изменениях конфигурации. Сдали отчёт в срок. официальный партнёр 1С
в таких случаях вызов нарколога на дом предоставляет возможность оценить состояние пациента и предложить амбулаторное лечение.
Подробнее – http://narkolog-na-dom-kazan23.ru
Раздел «Производство» подтверждает статус завода, а не просто перекупщика
https://redmetsplav.ru/store/vismut/rossiyskie-splavy-2/vismut-albi5—gost-r-53777-10/izdeliya-iz-vismuta-albi5—gost-r-53777-10/
Высокая квалификация персонала, знают специфику редких металлов и особенности их применения.
https://xn--80aeedb0bfzeok.xn--p1ai/catalog/mednyi-perekhodnoi-troinik-press/mednyi-perekhodnoi-press-troinik-66-7kh12-mm-m3rt-gost-r-52948-2008/
Реабилитация 12 шагов в Москве — это программа лечения зависимости, которая помогает человеку после наркотической, алкогольной или смешанной аддикции перейти от хаотичных попыток бросить к последовательной работе над собой. Программа 12 шагов применяется при наркомании, алкоголизме, лудомании, игромании, созависимости и других формах химической зависимости. Ее цель — помочь человеку признать болезнь, прекратить употреблять психоактивные вещества, получить опору, научиться жить трезво и постепенно вернуть способность управлять своими решениями.
Углубиться в тему – https://reabilitaciya-12-shagov-moskva13-1.ru
выездная наркологическая служба оперативно приедет по указанному адресу, имея при себе все необходимое оборудование и медикаменты, в том числе для оказания неотложной помощи.
Получить дополнительные сведения – вывод из запоя с выездом сочи
Представлен полный цикл изделий: от фольги и проволоки до крупных поковок
https://redmetsplav.ru/store/vanadiy-i-ego-splavy/vanadiy-fev80al12—iso-5451/list-vanadievyy-fev80al12—iso-5451/
Закупали шлак ферросилиция для строительных нужд, материал качественный, без лишних примесей.
https://xn--80aeedb0bfzeok.xn--p1ai/catalog/latunnoe-litoe-koltso/latunnoe-litoe-koltso-250kh400-mm-lts25s2/
Hello There. I found your blog using msn. This is a really
well written article. I’ll make sure to bookmark it and come back to
read more of your useful info. Thanks for the post. I’ll definitely comeback.
Общее впечатление: надежный информационный ресурс для снабженцев.
https://redmetsplav.ru/store/titan/rossiyskie-splavy-4/titan-vt3/poroshok-titanovyy-vt3/
Покупали изделия из драгметаллов для лаборатории, всё соответствует заявленным характеристикам.
https://xn--80aeedb0bfzeok.xn--p1ai/catalog/mednyi-perekhodnoi-troinik-press/mednyi-perekhodnoi-press-troinik-108kh80-mm-m3t-gost-r-52948-2008/
Наркологическая помощь клиники направлена не только на снятие острого состояния, но и на дальнейшее лечение алкогольной зависимости. Вывод из запоя на дому подходит пациенту, если нет признаков тяжелого отравления, психоза, судорог и опасных осложнений. Если состояние больного тяжелое, врач может рекомендовать лечение в стационаре клиники, где пациент находится под наблюдением медицинской команды, а терапия проходит безопаснее.
Изучить вопрос глубже – вывод из запоя с выездом сочи
Указание конкретных марок сплавов в разделах помогает специалистам
https://redmetsplav.ru/store/titan/rossiyskie-splavy-4/titan-t51—gost-2171-90/truba-titanovaya-t51—gost-2171-90/
Надежная защита груза при транспортировке, даже длинномерные изделия доходят без повреждений.
https://xn--80aeedb0bfzeok.xn--p1ai/catalog/latunnoe-litoe-koltso/latunnoe-litoe-koltso-200kh300-mm-lts14k3s3/
Информация о доставке по всей РФ делает компанию универсальным поставщиком
https://redmetsplav.ru/store/titan/rossiyskie-splavy-4/titan-et2—tu-1-9-77-85/poroshok-titanovyy-et2—tu-1-9-77-85/
Очень широкий каталог, нашли всё необходимое в одном месте, включая редкие позиции.
https://xn--80aeedb0bfzeok.xn--p1ai/catalog/mednyi-perekhodnoi-troinik-press/mednyi-perekhodnoi-press-troinik-88-9kh80-mm-m1e-gost-r-52948-2008/
после вашего обращения наш врач приезжает по указанному адресу с медработниками в гражданской форме и на машине без опознавательных символов, проводит осмотр, собирает историю болезни (анамнез).
Углубиться в тему – вывод из запоя вызов
ダッチワイフPor la singularidad de su forma alegórica,por el prestigio del nombrede su autor,
I think this is among the most significant info for me.
And i am glad reading your article. But want to remark on few general things, The website style is wonderful, the articles is
really excellent : D. Good job, cheers
Использование современных технологий защиты данных пользователей
https://redmetsplav.ru/store/titan/rossiyskie-splavy-4/titan-37b—gost-19807-91/polosa-titanovaya-37b—gost-19807-91/
Поставки всегда вовремя, логистика отлажена до мелочей, что важно для бесперебойной работы цеха.
https://xn--80aeedb0bfzeok.xn--p1ai/catalog/latunnoe-litoe-koltso/latunnoe-litoe-koltso-900kh600-mm-lts40sd/
I think that everything posted made a ton of sense. But,
what about this? what if you composed a catchier title?
I am not saying your content isn’t solid, however what if you
added a title that grabbed people’s attention?
I mean Upload data automatically to Amazon S3 from Outlook – Robert Garcia Ventura is kinda plain. You could glance at Yahoo’s front page and
note how they create post titles to grab viewers to open the links.
You might add a video or a picture or two to grab people interested about what you’ve written. In my opinion,
it could make your posts a little bit more interesting.
Отраслевой охват впечатляет: от медицины до космической промышленности
https://redmetsplav.ru/store/niobiy1/splavy-niobiya-1/niobiy-ta-nb40-5v2mc-1/pokovka-niobievaya-ta-nb40-5v2mc-1/
Редметсплав — пример того, как должен работать современный поставщик металлургического сырья.
https://xn--80aeedb0bfzeok.xn--p1ai/catalog/mednye-troiniki-press/mednyi-press-troinik-64-mm-m3rm-gost-r-52948-2008/
Thanks very nice blog!
Описание складских позиций сокращает время ожидания ответа
https://redmetsplav.ru/store/niobiy1/splavy-niobiya-1/niobiy-nb2-1/pokovka-niobievaya-nb2/
Awesome things here. I am very glad to peer your article.
Thank you a lot and I am having a look ahead to touch you.
Will you please drop me a e-mail?
Индивидуальный подход к нестандартным заказам — изготовили детали по нашим чертежам точно в размер.
https://xn--80aeedb0bfzeok.xn--p1ai/catalog/latunnoe-litoe-koltso/latunnoe-litoe-koltso-1000kh200-mm-lmtszh/
Большой опыт работы, судя по копирайту с 2013 года
https://redmetsplav.ru/store/molibden-i-ego-splavy/molibden-ochm-2/pokovka-molibdenovaya-ochm/
Благодарим за оперативную поставку ниобиевых труб, выручили в очень сжатые сроки.
https://xn--80aeedb0bfzeok.xn--p1ai/catalog/mednye-otvody-press/mednyi-otvod-press-45-gradusov-40-mm-cu-dhp-gost-r-52948-2008/
Раздел «Контакты» содержит все необходимые реквизиты и карту
https://redmetsplav.ru/store/molibden-i-ego-splavy/molibden-mo-cu10-1/poroshok-molibdenovyy-mo-cu10/
Редметсплав — пример того, как должен работать современный поставщик металлургического сырья.
https://xn--80aeedb0bfzeok.xn--p1ai/catalog/latunnoe-litoe-koltso/latunnoe-litoe-koltso-60kh300-mm-ls59/
Технические характеристики сплавов помогают инженерам в подборе
https://redmetsplav.ru/store/molibden-i-ego-splavy/molibden-58/pokovka-molibdenovaya-58/
Hello there! I know this is kinda off topic nevertheless I’d figured I’d ask.
Would you be interested in trading links
or maybe guest writing a blog article or vice-versa? My blog goes over
a lot of the same topics as yours and I think we could
greatly benefit from each other. If you might be interested feel free to send
me an email. I look forward to hearing from you! Terrific blog by the way!
Прозрачное оформление документов и быстрое выставление счетов, приятно работать с профессионалами.
https://xn--80aeedb0bfzeok.xn--p1ai/catalog/mednye-dvukhrastrubnye-mufty-press/mednaia-dvukhrastrubnaia-press-mufta-14-mm-m1r-gost-r-52948-2008/
Зацепил материал про Глубокий анализ футбола и спортивные тренды.
Смотрите сами:
https://footballcska.ru
Наличие циркония свидетельствует о работе с высокотехнологичными заказами
https://redmetsplav.ru/store/magniy-i-ego-splavy/zarubezhnye-splavy-2/magniy-sismg4637-03—ss-144637/lenta-magnievaya-sismg4637-03—ss-144637/
Редкие и тугоплавкие металлы всегда в наличии или под заказ в короткие сроки, рекомендую.
https://xn--80aeedb0bfzeok.xn--p1ai/catalog/latunnaia-vtulka/latunnaia-vtulka-95-mm-lk80/
Hi there to every one, the contents existing at this website are in fact awesome for
people experience, well, keep up the nice work fellows.
Фольга из редких металлов часто требуется для высокотехнологичных лабораторий
https://redmetsplav.ru/store/magniy-i-ego-splavy/zarubezhnye-splavy-2/magniy-ms3—jis-h-4204/truba-magnievaya-ms3—jis-h-4204/
Вывод из запоя нужен не только после длительного употребления алкоголя. Обратиться за помощью стоит, если человек не может прекратить пить, плохо спит, испытывает сильную тревогу, жалуется на дрожь рук, слабость, головную боль, боль в груди, рвоту, сердцебиение или скачки давления. Чем дольше продолжается запой, тем выше риск осложнений со стороны сердца, печени, сосудов, нервной системы и психики. Особенно опасна ситуация, когда пациент пытается резко прекратить употребление спирта после нескольких дней запоя и сталкивается с выраженной абстиненцией.
Получить дополнительную информацию – vyvod-iz-zapoya-moskva-srochno
Благодарим за оперативную поставку ниобиевых труб, выручили в очень сжатые сроки.
https://xn--80aeedb0bfzeok.xn--p1ai/catalog/prutok-aliumel/prutok-aliumel-10-mm-nmtsak2-2-1-tu-48-21-128-72/
Вывод из запоя в Балашихе с медицинским наблюдением, индивидуальным подбором терапии и помощью специалистов в наркологической клинике «Частный Медик 24».
Разобраться лучше – вывод из запоя дешево
Большой опыт работы, судя по копирайту с 2013 года
https://redmetsplav.ru/store/magniy-i-ego-splavy/zarubezhnye-splavy-2/magniy-mg-c81-t5—en-2733/lenta-magnievaya-mg-c81-t5—en-2733/
Hі tto all, how is everything, I thiink every onne іs getting more
from this weЬ ρage, and your views are nice designed for new visitors.
Also viѕіt my page بازی انفجار
Поставки всегда вовремя, логистика отлажена до мелочей, что важно для бесперебойной работы цеха.
https://xn--80aeedb0bfzeok.xn--p1ai/catalog/plita-latunnaia/plita-latunnaia-30x600x1500-mm-l63/
Центр в Сочи работает круглосуточно, анонимно и без постановки на учет. Помощь можно получить в любое время: достаточно заказать обратный звонок, написать через форму сайта или вызвать выезд врача по телефону. Консультация предоставляется бесплатно, а стоимость зависит от состояния пациента, длительности запоя, количества медикаментов, необходимости выезда, наблюдения, стационара или реабилитации.
Узнать больше – помощь вывод из запоя сочи
I read this paragraph completely about the comparison of latest and
earlier technologies, it’s amazing article.
Сегодня легко вызвать нарколога на дом в Балашиху круглосуточно, просто позвонив по единому телефону нашего специализированного центра в любое время суток, любой день (даже в выходные и праздники). Наркологическая помощь может понадобиться в любое время дня и ночи, поэтому клиника доктора Исаева оказывает широкий спектр услуг, в том числе в домашних условиях, 24/7. Алкогольная зависимость и наркомания — серьёзные заболевания, требующие немедленного квалифицированного вмешательства. Вывод из запоя и лечение алкоголизма на дому или в стационаре начинается с полного осмотра врача-нарколога, диагностики состояния и назначения индивидуальной схемы терапии. Мы гарантируем полную анонимность и конфиденциальность — данные пациента обрабатываются строго в соответствии с политикой обработки персональных данных. Наши специалисты имеют многолетний опыт работы с зависимыми людьми, используют современные и безопасные препараты, позволяющие быстро восстановить организм после отравления алкоголем или наркотиками. Лечение алкоголизма — это процесс, который требует времени и комплексного подхода, но первый шаг к выздоровлению можно сделать уже сегодня. Очень важно не откладывать обращение, ведь каждый день запоя усугубляет состояние здоровья и повышает риск тяжелых осложнений. Вывод из запоя и детоксикация — первый этап на пути к трезвости, и от качества лечения зависит дальнейшая ремиссия.
Выяснить больше – narkolog-na-dom-vyvod
Раздел «Производство» подтверждает статус завода, а не просто перекупщика
https://redmetsplav.ru/store/magniy-i-ego-splavy/zarubezhnye-splavy-2/magniy-mg-al8zn—iso-121/pokovka-magnievaya-mg-al8zn—iso-121/
Очень широкий каталог, нашли всё необходимое в одном месте, включая редкие позиции.
https://xn--80aeedb0bfzeok.xn--p1ai/catalog/mednye-zaglushki-pod-paiku/mednaia-zaglushka-kolpachok-pod-paiku-8kh6kh0-6-mm-6-8kh8-8-mm-miagkaia-paika-cu-dhp-gost-r-52922-2008/
Описание складских позиций сокращает время ожидания ответа
https://redmetsplav.ru/store/magniy-i-ego-splavy/zarubezhnye-splavy-2/magniy-mc8—jis-h-5203/krug-magnievyy-mc8—jis-h-5203/
Благодарим за оперативную поставку ниобиевых труб, выручили в очень сжатые сроки.
https://xn--80aeedb0bfzeok.xn--p1ai/catalog/latunnaia-polosa/latunnaia-polosa-1-3×50-mm-l80-gost-931-90/
Сайт четко ориентирован на промышленный сектор и B2B сегмент
https://redmetsplav.ru/store/magniy-i-ego-splavy/zarubezhnye-splavy-2/magniy-mag-5—bs-2970/lenta-magnievaya-mag-5—bs-2970/
Fantastic goods from you, man. I have understand your stuff previous to and
you are just too great. I really like what you’ve acquired here,
really like what you are saying and the way in which you say it.
You make it entertaining and you still take care of to
keep it wise. I can’t wait to read far more from you. This
is really a terrific website.
Спецстали для машиностроения закупаем только здесь, надежность материала подтверждена испытаниями.
https://xn--80aeedb0bfzeok.xn--p1ai/catalog/mednoe-dvukhrastrubnoe-koleno-pod-paiku/mednoe-dvukhrastrubnoe-koleno-pod-paiku-180-gradusov-35kh29kh1-mm-23kh25-mm-tverdaia-paika-m1r-gost-32590-2013/
В Москве помощь при запое может проводиться на дому, в клинике, в наркологическом центре или в стационаре. Домашний формат подходит, если пациент находится в сознании, контактирует с врачом и нет признаков тяжелого психоза, судорог, опасного поведения или выраженного нарушения дыхания. Если состояние тяжелое, нарколог может рекомендовать стационарное лечение, потому что в клинике доступно круглосуточно организованное наблюдение, диагностика, ЭКГ, анализ крови, коррекция терапии и контроль осложнений.
Изучить вопрос глубже – https://vyvod-iz-zapoya-moskva13-1.ru/vyvod-iz-zapoya-moskva-stacionar
Опытные специалисты знают, что запой может развиваться по-разному. У одного человека симптомы появляются уже на второй день, у другого тяжелый абстинентный синдром формируется после недели употребления. Поэтому наркологи не используют один и тот же метод для всех. Наркологу важно увидеть пациента, задать вопросы, оценить общее здоровье и понять, можно ли вывести человека из запоя дома или лучше сразу направить его в клинику.
Детальнее – http://vyvod-iz-zapoya-moskva13-1.ru/vyvod-iz-zapoya-moskva-na-domu/
Широкий выбор тугоплавких металлов, таких как вольфрам и молибден
https://redmetsplav.ru/store/magniy-i-ego-splavy/zarubezhnye-splavy-2/magniy-mag-111—bs-3370/folga-magnievaya-mag-111—bs-3370/
Гибкая система оплаты и прозрачные условия договора, никаких скрытых наценок или задержек.
https://xn--80aeedb0bfzeok.xn--p1ai/catalog/latunnaia-polosa/latunnaia-polosa-4×40-mm-l63-gost-931-90/
Наличие редких позиций, например, изделий из гафния и ванадия
https://redmetsplav.ru/store/magniy-i-ego-splavy/zarubezhnye-splavy-2/magniy-m16601—uns/pokovka-magnievaya-m16601—uns/
Вывод из запоя на дому — это комплексная процедура, которая начинается с первичного осмотра и диагностики состояния пациента. Врач-нарколог оценивает уровень интоксикации, измеряет артериальное давление, проверяет пульс, собирает анамнез. Только после этого принимается решение о схеме лечения. Основной метод — инфузионная терапия (капельница). Капельница содержит солевые растворы, витамины (группы B и C), гепатопротекторы, ноотропы, успокоительные средства, а при необходимости — кардиопротекторы и препараты для нормализации давления. Очищение организма после установки капельницы позволит в короткое время привести пациента в осознанное состояние и существенно облегчит последствия абстинентного синдрома. Медикаментозное лечение алкоголизма включает ускоренный вывод продуктов распада этанола из крови, восстановление самочувствие и устранение симптомов похмелья.
Получить дополнительную информацию – http://narkolog-na-dom-balashiha13-3.ru
Отличное соотношение цены и качества на весь цветной металлопрокат, будем заказывать еще.
https://xn--80aeedb0bfzeok.xn--p1ai/catalog/mednoe-dvukhrastrubnoe-koleno-pod-paiku/mednoe-dvukhrastrubnoe-koleno-pod-paiku-180-gradusov-80kh68kh1-8-mm-35-5kh38-5-mm-miagkaia-paika-m2m-gost-r-52922-2008/
Наличие кобальтовых сплавов заинтересует авиастроение
https://redmetsplav.ru/store/magniy-i-ego-splavy/zarubezhnye-splavy-2/magniy-m13320—uns/truba-magnievaya-m13320—uns/
Качество сварочных материалов на высоте, электроды варят отлично, состав металла стабильный.
https://xn--80aeedb0bfzeok.xn--p1ai/catalog/latunnaia-polosa/latunnaia-polosa-3-5×300-mm-l63-gost-931-90/
В Москве помощь при запое может проводиться на дому, в клинике, в наркологическом центре или в стационаре. Домашний формат подходит, если пациент находится в сознании, контактирует с врачом и нет признаков тяжелого психоза, судорог, опасного поведения или выраженного нарушения дыхания. Если состояние тяжелое, нарколог может рекомендовать стационарное лечение, потому что в клинике доступно круглосуточно организованное наблюдение, диагностика, ЭКГ, анализ крови, коррекция терапии и контроль осложнений.
Разобраться лучше – vyvod-iz-zapoya-kapelnica
Наличие редких позиций, например, изделий из гафния и ванадия
https://redmetsplav.ru/store/magniy-i-ego-splavy/zarubezhnye-splavy-2/magniy-m10603—uns/poroshok-magnievyy-m10603—uns/
звоните круглосуточно по телефону горячей линии клиники: наши специалисты готовы оказать необходимую помощь в решении проблемы алкогольной зависимости.
Детальнее – вывод из запоя в стационаре
Вызов нарколога на дом актуален в ситуации, когда пациент не может самостоятельно прийти на прием в клинике, агрессивно реагирует на уговоры, находится в тяжелой похмельной интоксикации или боится постановки на учет. Врач помогает на месте: проводит первичная диагностика, осмотр, назначает медикаментозные процедуры, дает рекомендации по дальнейшему лечению и объясняет родственникам, как действовать после приезда бригады.
Получить больше информации – https://narkolog-na-dom-kazan22.ru
Привет всем!
Аукцион доменных имен RU — отличное место для поиска подходящего имени. Проверенная история регистрации гарантирует отсутствие проблем в будущем. Каждая карточка домена содержит данные о бэклинках и возрасте. Начните с бесплатной проверки домена на историю и штрафы. Это надёжная основа для бренда, который планирует расти долго.
Актуальные домены в продаже на сайте https://www.domenshop.net/
Всего наилучшего и хорошего развития!
Редметсплав — надежный партнер, работаем по поставкам нержавеющего проката уже второй год, сбоев не было.
https://xn--80aeedb0bfzeok.xn--p1ai/catalog/mednyi-perekhodnoi-troinik-press/mednyi-perekhodnoi-press-troinik-42kh40-mm-m2rm-gost-r-52948-2008/
Логичное деление на вольфрамовый, молибденовый и титановый прокат
https://redmetsplav.ru/store/magniy-i-ego-splavy/zarubezhnye-splavy-2/magniy-iso-mgal5mn—iso-16220-1/polosa-magnievaya-iso-mgal5mn—iso-16220-1/
Прозрачное оформление документов и быстрое выставление счетов, приятно работать с профессионалами.
https://xn--80aeedb0bfzeok.xn--p1ai/catalog/latunnaia-polosa/latunnaia-polosa-5×100-mm-lo90-1-tu-48-21-847-89/
Вывод из запоя в Москве требуется, когда человек несколько дней употребляет алкоголь, не может самостоятельно остановиться и постепенно теряет физические силы. Запойное состояние сопровождается интоксикацией, обезвоживанием, нарушением сна, тревогой, тремором, скачками артериального давления, тошнотой, рвотой и выраженной слабостью. В такой ситуации домашние способы часто оказываются недостаточными, а бесконтрольный прием лекарственных средств может ухудшить состояние. Врачебный контроль помогает оценить риски, подобрать безопасное лечение, провести выведение продуктов распада этилового спирта и начать восстановление организма без лишней нагрузки.
Получить дополнительные сведения – вывод из запоя москва на дому
Вывод из запоя в клинике Сочи: лечение алкоголизма, капельница, детоксикация, помощь нарколога на дому и в стационаре анонимно, круглосуточно.
Узнать больше – вывод из запоя
Отраслевой охват впечатляет: от медицины до космической промышленности
https://redmetsplav.ru/store/magniy-i-ego-splavy/zarubezhnye-splavy-2/magniy-iso-mb21310—bs-iso-16220/poroshok-magnievyy-iso-mb21310—bs-iso-16220/
Вывод из запоя в Сочи требуется, когда человек не может самостоятельно выйти из длительного употребления алкоголя, испытывает тяжелое похмелье, тревогу, бессонницу, тошноту, скачки давления, признаки интоксикации или резкое ухудшение состояния. В такой ситуации важно не ждать недели и не подбирать средства самостоятельно: лечение запоя должен проводить врач, потому что при отравлении алкоголем, хронических заболеваниях и приеме большого количества таблеток возможны опасные осложнения.
Детальнее – срочный вывод из запоя
Вывод из запоя в клинике Сочи: лечение алкоголизма, капельница, детоксикация, помощь нарколога на дому и в стационаре анонимно, круглосуточно.
Узнать больше – http://www.domen.ru
В Москве помощь при запое может проводиться на дому, в клинике, в наркологическом центре или в стационаре. Домашний формат подходит, если пациент находится в сознании, контактирует с врачом и нет признаков тяжелого психоза, судорог, опасного поведения или выраженного нарушения дыхания. Если состояние тяжелое, нарколог может рекомендовать стационарное лечение, потому что в клинике доступно круглосуточно организованное наблюдение, диагностика, ЭКГ, анализ крови, коррекция терапии и контроль осложнений.
Ознакомиться с деталями – vyvod-iz-zapoya-v-stacionare-moskva
Закупали шлак ферросилиция для строительных нужд, материал качественный, без лишних примесей.
https://xn--80aeedb0bfzeok.xn--p1ai/catalog/mednye-troiniki-press/mednyi-press-troinik-42-mm-cu-dhp-gost-r-52948-2008/
Информация о проверке качества продукции повышает лояльность клиентов
https://redmetsplav.ru/store/magniy-i-ego-splavy/zarubezhnye-splavy-2/magniy-gz6/krug-magnievyy-gz6/
Вывод из запоя в Сочи требуется, когда человек не может самостоятельно прекратить употребление алкоголя, испытывает похмелья, признаки ломки, тревогу, бессонницу, рвоту, сильную слабость или резкое ухудшение самочувствие. Даже если запой длится несколько дней, риск осложнений остается высокий: страдают системы организма, печень, сердце, сосуды, нервная система, психика и общее состояние здоровья.
Углубиться в тему – вывод из запоя вызов на дом
Вывод из запоя на дому удобен, когда пациенту тяжело посещать клинику, когда близкого человека нельзя оставить одного или когда необходимо быстро получить помощь без поездки в больницы. Нарколог приезжает на место, проводит обследование, фиксирует жалобы, проверяет давление, пульс, насыщение кислородом, оценивает риски и затем назначает лечение запоя.
Получить дополнительные сведения – вывод из запоя на дому в сочи
Ответственная компания, которая ценит долгосрочное сотрудничество, всегда идут навстречу клиенту.
https://xn--80aeedb0bfzeok.xn--p1ai/catalog/dvutavr-aliuminievyi/aliuminievyi-dvutavr-avd1-1-2x34x30-gost-13621-90/
Наличие циркония свидетельствует о работе с высокотехнологичными заказами
https://redmetsplav.ru/store/magniy-i-ego-splavy/zarubezhnye-splavy-2/magniy-gd-mgal6zn1—din-1729-part-2/prutok-magnievyy-gd-mgal6zn1—din-1729-part-2/
Абстинентный синдром, или «ломка», — это мучительное состояние, которое возникает при отказе от приёма наркотических веществ. Человек испытывает сильные физические и психические страдания: боль в мышцах и суставах, тошноту, рвоту, бессонницу, потливость, дрожь в теле, панические атаки, агрессию или глубокую депрессию. В такие моменты больной не способен контролировать свои действия и нуждается в экстренной медицинской помощи. Детоксикация наркомана в условиях стационара позволяет купировать абстинентный синдром, предотвратить опасные для жизни осложнения, такие как острая сердечная или дыхательная недостаточность. Стоит отметить, что попытки самостоятельной борьбы с ломкой часто заканчиваются срывом или передозировкой, поэтому так важно своевременно обратиться к профессионалам.
Получить дополнительную информацию – https://detoksikaciya-narkomanov-moskva13-1.ru/detoksikaciya-narkozavisimyh-ceny/
Наш центр в Казани оказывает помощь круглосуточно: врач приезжает по адресу, проводит диагностику, оценивает состояние пациента, подбирает препараты и ставит капельницу. Вывод из запоя на дому помогает снять интоксикацию, уменьшить симптомы абстиненции, восстановить водно-солевой баланс, снизить тревожность и вернуть человека к более стабильной форме. В каждом случае врач учитывает возраст пациента, стаж алкоголизма, длительность запоя, наличие хронических заболеваний и реакцию на лекарства.
Подробнее – вывод из запоя капельница в казани
Офис в Екатеринбурге работает четко, забирали самовывозом — складская логистика на высоте.
https://xn--80aeedb0bfzeok.xn--p1ai/catalog/list-monel/list-monel-10x600x1500-mm-monel-400/
основанием для вызова специалиста является неспособность человека самостоятельно выйти из состояния непрерывного употребления алкоголя и наличие признаков абстиненции.
Подробнее – анонимный вывод из запоя
Удобное разделение продукции на сплавы и конкретные виды проката
https://redmetsplav.ru/store/magniy-i-ego-splavy/zarubezhnye-splavy-2/magniy-ga10/folga-magnievaya-ga10/
Наш центр в Казани оказывает помощь круглосуточно: врач приезжает по адресу, проводит диагностику, оценивает состояние пациента, подбирает препараты и ставит капельницу. Вывод из запоя на дому помогает снять интоксикацию, уменьшить симптомы абстиненции, восстановить водно-солевой баланс, снизить тревожность и вернуть человека к более стабильной форме. В каждом случае врач учитывает возраст пациента, стаж алкоголизма, длительность запоя, наличие хронических заболеваний и реакцию на лекарства.
Получить больше информации – вывод из запоя с выездом
Гибкая система оплаты и прозрачные условия договора, никаких скрытых наценок или задержек.
https://xn--80aeedb0bfzeok.xn--p1ai/catalog/mednye-dvukhrastrubnye-mufty-pod-paiku/mednaiadvukhrastrubnaia-podvizhnaiamufta-pod-paiku76-1kh1-6mmm1tgost-r-52922-2008/
Раздел «Цены на металлы» полезен для мониторинга рынка
https://redmetsplav.ru/store/magniy-i-ego-splavy/zarubezhnye-splavy-2/magniy-coralloy-zirconium-704—kind–co–edelstahlwerk-kg/polosa-magnievaya-coralloy-zirconium-704—kind–co–edelstah/
Хорошую вакансию в Краснодаре легко упустить, если откладывать поиск на потом. Именно поэтому стоит регулярно изучать вакансии краснодар без посредников, собранные сразу с нескольких проверенных площадок, чтобы не пропустить подходящее предложение именно сегодня.
Офис в Екатеринбурге работает четко, забирали самовывозом — складская логистика на высоте.
https://xn--80aeedb0bfzeok.xn--p1ai/catalog/melkhiorovaia-truba/melkhiorovaia-truba-17kh1-5kh6000-mm-mnzhmts10-1-1-gost-10092-2006/
Описание складских позиций сокращает время ожидания ответа
https://redmetsplav.ru/store/magniy-i-ego-splavy/zarubezhnye-splavy-2/magniy-az92—csa-hg-3/pokovka-magnievaya-az92—csa-hg-3/
Вывод из запоя в Сочи требуется, когда человек не может самостоятельно прекратить употребление алкоголя, испытывает похмелья, признаки ломки, тревогу, бессонницу, рвоту, сильную слабость или резкое ухудшение самочувствие. Даже если запой длится несколько дней, риск осложнений остается высокий: страдают системы организма, печень, сердце, сосуды, нервная система, психика и общее состояние здоровья.
Детальнее – наркология вывод из запоя
Вывод из запоя в Сочи требуется, когда человек не может самостоятельно прекратить употребление алкоголя, испытывает похмелья, признаки ломки, тревогу, бессонницу, рвоту, сильную слабость или резкое ухудшение самочувствие. Даже если запой длится несколько дней, риск осложнений остается высокий: страдают системы организма, печень, сердце, сосуды, нервная система, психика и общее состояние здоровья.
Выяснить больше – вывод из запоя капельница в сочи
Высокий уровень сервиса и контроля качества, для нашего научного проекта это было критически важно.
https://xn--80aeedb0bfzeok.xn--p1ai/catalog/mednye-dvukhrastrubnye-mufty-pod-paiku/mednaiadvukhrastrubnaia-podvizhnaiamufta-pod-paiku159kh5-5mmm2mgost-r-52922-2008/
Сайт четко ориентирован на промышленный сектор и B2B сегмент
https://redmetsplav.ru/store/magniy-i-ego-splavy/zarubezhnye-splavy-2/magniy-az63hp/krug-magnievyy-az63hp/
Он оценит состояние зависимого и примет решение о том, можно ли быстро выводить его из запоя на дому в Москве или требуется постепенный выход из запоя в условиях стационара. В сложных случаях, когда есть галлюцинации или серьезные хронические патологии, мы рекомендуем не рисковать и начинать терапию под круглосуточным наблюдением. Такое решение в клинике принимается строго в интересах пациента, потому что алкоголизм — это болезнь, разрушающая системы организма. Только в стационаре можно провести полный объем лабораторной диагностики, включая ЭКГ и оценку функций печени. Реабилитация в стационарных условиях дает больше шансов на успех.
Детальнее – http://vyvod-iz-zapoya-moskva1-13.ru
выездная наркологическая служба оперативно приедет по указанному адресу, имея при себе все необходимое оборудование и медикаменты, в том числе для оказания неотложной помощи.
Изучить вопрос глубже – помощь вывод из запоя сочи
Сайт адаптирован под нужды машиностроительных заводов
https://redmetsplav.ru/store/magniy-i-ego-splavy/zarubezhnye-splavy-2/magniy-as41b—astm-b275/poroshok-magnievyy-as41b—astm-b275/
Наш центр в Казани оказывает помощь круглосуточно: врач приезжает по адресу, проводит диагностику, оценивает состояние пациента, подбирает препараты и ставит капельницу. Вывод из запоя на дому помогает снять интоксикацию, уменьшить симптомы абстиненции, восстановить водно-солевой баланс, снизить тревожность и вернуть человека к более стабильной форме. В каждом случае врач учитывает возраст пациента, стаж алкоголизма, длительность запоя, наличие хронических заболеваний и реакцию на лекарства.
Подробнее можно узнать тут – вывод из запоя с выездом в казани
Наркологическая помощь клиники направлена не только на снятие острого состояния, но и на дальнейшее лечение алкогольной зависимости. Вывод из запоя на дому подходит пациенту, если нет признаков тяжелого отравления, психоза, судорог и опасных осложнений. Если состояние больного тяжелое, врач может рекомендовать лечение в стационаре клиники, где пациент находится под наблюдением медицинской команды, а терапия проходит безопаснее.
Получить больше информации – помощь вывод из запоя
Ответственная компания, которая ценит долгосрочное сотрудничество, всегда идут навстречу клиенту.
https://xn--80aeedb0bfzeok.xn--p1ai/catalog/latunnye-naruzhnye-stopornye-koltsa-po-gost/latunoe-naruzhnoe-stopornoe-pruzhinnoe-koltso-38kh1-7-mm-lk1-gost-13942-86/
Наличие циркония свидетельствует о работе с высокотехнологичными заказами
https://redmetsplav.ru/store/magniy-i-ego-splavy/zarubezhnye-splavy-2/magniy-am50a—astm-b94/list-magnievyy-am50a—astm-b94/
Редкие и тугоплавкие металлы всегда в наличии или под заказ в короткие сроки, рекомендую.
https://xn--80aeedb0bfzeok.xn--p1ai/catalog/dvutavr-aliuminievyi/aliuminievyi-dvutavr-1980-2-5x60x40-gost-13621-90/
Хочу выделить раздел про Свежие новости Томской области и мира.
Вот, можете почитать:
https://03media.ru
Возможность заказать листы и полосы нестандартных размеров
https://redmetsplav.ru/store/magniy-i-ego-splavy/zarubezhnye-splavy-2/magniy-9990a—astm-b275/polosa-magnievaya-9990a—astm-b275/
Редметсплав — надежный партнер, работаем по поставкам нержавеющего проката уже второй год, сбоев не было.
https://xn--80aeedb0bfzeok.xn--p1ai/catalog/latunnye-naruzhnye-stopornye-koltsa-po-din/latunoe-naruzhnoe-stopornoe-pruzhinnoe-koltso-m50-45-8kh2-mm-lmtska-din-471/
Первое официальное место в краевом центре — решение серьёзное, и мы рядом, чтобы помочь. Именно поэтому работает данный ресурс: вы изучаете кладовщик вакансии сегодня, распределённые по отраслям, заработной плате и типу занятости, и отправляете заявки на понравившиеся позиции.
Четкое позиционирование как эксперта в области редких металлов
https://redmetsplav.ru/store/magniy-i-ego-splavy/zarubezhnye-splavy-2/magniy-3-5105—din-1729-part-2/list-magnievyy-3-5105—din-1729-part-2/
Ответственная компания, которая ценит долгосрочное сотрудничество, всегда идут навстречу клиенту.
https://xn--80aeedb0bfzeok.xn--p1ai/catalog/dvutavr-aliuminievyi/aliuminievyi-dvutavr-amg6-2x36x25-gost-13621-90/
Официальное получение водительского удостоверения в России
Купить права в России — важный этап для каждого водителя, который хочет уверенно и законно управлять транспортным средством. Мы предлагаем информационную поддержку по всем этапам оформления: выбор автошколы, подготовка к теоретическому экзамену, практические занятия, сбор необходимых документов и подача заявления в ГИБДД.
Получение водительского удостоверения категории B официально и без лишних сложностей.** Поможем пройти все этапы законно: подготовка к теории, обучение практическому вождению, запись на экзамены, консультации по документам и сопровождение до получения прав. Услуга подойдет тем, кто хочет сэкономить время, избежать ошибок при оформлении и уверенно пройти процедуру получения прав. Поддержка на каждом этапе, понятные инструкции и помощь в подготовке к сдаче экзамена в ГИБДД. Категория B позволяет управлять легковыми автомобилями и является наиболее востребованной для личного и семейного использования.
звоните круглосуточно по телефону горячей линии клиники: наши специалисты готовы оказать необходимую помощь в решении проблемы алкогольной зависимости.
Углубиться в тему – нарколог вывод из запоя
Четкая структура меню позволяет быстро найти нужный металл
https://redmetsplav.ru/store/magniy-i-ego-splavy/rossiyskie-splavy-1/magniy-ml12—gost-2856-79/polosa-magnievaya-ml12—gost-2856-79/
Долго искали надежного поставщика циркония, в Редметсплав предложили лучшие условия и чистоту металла.
https://xn--80aeedb0bfzeok.xn--p1ai/catalog/latunnye-vnutrennie-stopornye-koltsa-po-gost/latunoe-vnutrennee-stopornoe-pruzhinnoe-koltso-72kh1-7-mm-lts40sd-gost-13943-86/
Вывод из запоя на дому подходит пациентам, которым необходимо получить помощь в привычной обстановке. Вызов врача можно заказать в любое время суток: выездная бригада приезжает по указанному адресу, проводит осмотр, оценивает давление, пульс, степень интоксикации, риск психозов, галлюцинаций, судорожных реакций, инфаркта, инсульта и других осложнений.
Узнать больше – скорая вывод из запоя сочи
Не имеет значения, нужен ли вам полный день, столичный рынок предлагает широкий выбор. Посмотрите каталог, где представлены работа бухгалтером сегодня москва для быстрого выбора и отклика. Вы экономите время и силы.
Представлены технически сложные сплавы ниобия и тантала
https://redmetsplav.ru/store/magniy-i-ego-splavy/rossiyskie-splavy-1/magniy-l4—tu-1714-002-00545484-99-1/list-magnievyy-l4—tu-1714-002-00545484-99-1/
Поставки всегда вовремя, логистика отлажена до мелочей, что важно для бесперебойной работы цеха.
https://xn--80aeedb0bfzeok.xn--p1ai/catalog/dvutavr-aliuminievyi/aliuminievyi-dvutavr-avd1-1-9x60x86-gost-13621-90/
Отраслевой охват впечатляет: от медицины до космической промышленности
https://redmetsplav.ru/store/kobalt/wallex/kobalt-wallex-20-2/krug-kobaltovyy-wallex-20-2/
Наркологическая помощь клиники направлена не только на снятие острого состояния, но и на дальнейшее лечение алкогольной зависимости. Вывод из запоя на дому подходит пациенту, если нет признаков тяжелого отравления, психоза, судорог и опасных осложнений. Если состояние больного тяжелое, врач может рекомендовать лечение в стационаре клиники, где пациент находится под наблюдением медицинской команды, а терапия проходит безопаснее.
Ознакомиться с деталями – срочный вывод из запоя в сочи
звоните круглосуточно по телефону горячей линии клиники: наши специалисты готовы оказать необходимую помощь в решении проблемы алкогольной зависимости.
Углубиться в тему – вывод из запоя на дому
Your method of explaining everything in this article is really good, every one can easily know it, Thanks a lot.
Наркологическая помощь клиники направлена не только на снятие острого состояния, но и на дальнейшее лечение алкогольной зависимости. Вывод из запоя на дому подходит пациенту, если нет признаков тяжелого отравления, психоза, судорог и опасных осложнений. Если состояние больного тяжелое, врач может рекомендовать лечение в стационаре клиники, где пациент находится под наблюдением медицинской команды, а терапия проходит безопаснее.
Подробнее тут – вывод из запоя на дому
Редметсплав — пример того, как должен работать современный поставщик металлургического сырья.
https://xn--80aeedb0bfzeok.xn--p1ai/catalog/melkhiorovaia-truba/melkhiorovaia-truba-18kh1-5kh11000-mm-mnzhmts30-1-1-gost-10092-2006/
Вывод из запоя — это только первый шаг в лечении алкогольной зависимости. Без последующей терапии риск рецидива очень высок. Наш наркологический центр предлагает полный курс лечения алкоголизма, включая кодирование и психотерапию. Кодирование на дому проводится различными методами: уколом (Торпедо, Эспераль, Налтрексон, Аквилонг), медикаментозным вшиванием (дисульфирам, Вивитрол), гипнозом по Довженко, а также двойным блоком. Каждый метод подбирается врачом индивидуально, с согласия пациента и при отсутствии противопоказаний. Опытный нарколог объяснит, какая кодировка подойдёт именно вам, учитывая стаж и форму зависимости.
Получить дополнительную информацию – vrach-narkolog-na-dom
Hiya! I know this is kinda off topic however , I’d figured I’d ask.
Would you be interested in exchanging links or maybe guest writing a
blog article or vice-versa? My website addresses a lot of
the same topics as yours and I feel we could greatly benefit
from each other. If you happen to be interested feel free to shoot me an email.
I look forward to hearing from you! Superb blog
by the way!
Nicely done, looking forward to more https://online-krasota.ru/bitrix/rk.php?goto=http%3a%2f%2fpropertibali.id%2Fhalkomentar-142-mengenal-keunggulan-web-tomy-store-sebagai-platform-top-up-game-terdepan-di-109754.html
Наличие калькулятора металлопроката упрощает расчет веса и стоимости
https://redmetsplav.ru/store/kobalt/stellite/kobalt-stellite-35/polosa-kobaltovaya-stellite-35/
Быстрая доставка в регионы через «Деловые Линии», груз пришел в целости и отлично упакованным.
https://xn--80aeedb0bfzeok.xn--p1ai/catalog/dvutavr-aliuminievyi/aliuminievyi-dvutavr-ak6-2x50x40-gost-13621-90/
выездная наркологическая служба оперативно приедет по указанному адресу, имея при себе все необходимое оборудование и медикаменты, в том числе для оказания неотложной помощи.
Разобраться лучше – вывод из запоя вызов на дом
Наличие редких позиций, например, изделий из гафния и ванадия
https://redmetsplav.ru/store/kobalt/stellite/kobalt-stellite-100/izdeliya-iz-kobalta-stellite-100/
Высокий уровень сервиса и контроля качества, для нашего научного проекта это было критически важно.
https://xn--80aeedb0bfzeok.xn--p1ai/catalog/melkhiorovaia-truba/melkhiorovaia-truba-36kh1-5kh5000-mm-mnzhmts30-1-1-gost-10092-2006/
Наркологическая помощь клиники направлена не только на снятие острого состояния, но и на дальнейшее лечение алкогольной зависимости. Вывод из запоя на дому подходит пациенту, если нет признаков тяжелого отравления, психоза, судорог и опасных осложнений. Если состояние больного тяжелое, врач может рекомендовать лечение в стационаре клиники, где пациент находится под наблюдением медицинской команды, а терапия проходит безопаснее.
Подробнее тут – скорая вывод из запоя
выездная наркологическая служба оперативно приедет по указанному адресу, имея при себе все необходимое оборудование и медикаменты, в том числе для оказания неотложной помощи.
Углубиться в тему – вывод из запоя недорого
Указание конкретных марок сплавов в разделах помогает специалистам
https://redmetsplav.ru/store/kobalt/rossiyskie-splavy-3/kobalt-k0/truba-kobaltovaya-k0/
звоните круглосуточно по телефону горячей линии клиники: наши специалисты готовы оказать необходимую помощь в решении проблемы алкогольной зависимости.
Детальнее – вывод из запоя на дому
Профессиональный подход менеджеров в Екатеринбурге, грамотно проконсультировали по техническим характеристикам сплавов.
https://xn--80aeedb0bfzeok.xn--p1ai/catalog/tavr-aliuminievyi/aliuminievyi-tavr-ad31t1-30kh30kh2-gost-13622-91/
Программа лечения алкоголизма в нашем центре состоит из нескольких последовательных шагов, каждый из которых крайне важен для достижения устойчивой ремиссии. Сначала проводится экстренная детоксикация и вывод из запоя, затем подключается медикаментозная поддержка и кодирование, и завершает курс реабилитация с психологической поддержкой. Все этапы тесно связаны между собой, и только комплексное лечение позволяет рассчитывать на полный отказ от алкоголя. Рассмотрим каждый этап подробнее. Лечение алкоголизма — это путь, который начинается с признания проблемы, и мы помогаем пройти его до конца. Далее следует длительная работа, но первые положительные сдвиги заметны уже через несколько дней.
Детальнее – anonimnyj-vyvod-iz-zapoya
Вывод из запоя на дому в Казани позволяет получить медицинскую помощь без очередей, учета и лишнего стресса. Врач приезжает по месту проживания, сохраняет конфиденциальность, спокойно говорит с пациентом и близкими, проводит первичную диагностику и начинает лечение только при наличии согласия. Если человек отказывается лечиться, доктор может провести мотивационную беседу, но принудительное лечение без законных оснований не проводится.
Получить дополнительные сведения – вывод из запоя на дому недорого
Наркологическая помощь позволяет безопасно начать выведение токсинов, снизить интоксикации, восстановить водно-солевой баланс и подобрать дальнейшее лечение алкогольной зависимости. Нарколог проводит анализ состояния пациента, уточняет стаж употребления спиртного, причины запоя, наличие хронического заболевания, психических расстройств, противопоказаний и других ограничений. После диагностики врач выбирает схему: амбулаторно на дому, в стационаре клиники или с госпитализацией.
Узнать больше – вывод из запоя капельница на дому
Описание складских позиций сокращает время ожидания ответа
https://redmetsplav.ru/store/kobalt/rossiyskie-splavy-3/kobalt-ep122-1/polosa-kobaltovaya-ep122-1/
Обращаем внимание, что таблица носит ознакомительный характер. Точную программу лечения и финальную цену определяет врач после осмотра и необходимых анализов. Врач нарколог бесплатно ответит на все ваши вопросы по услуге вывода из запоя на дому и оформит вызов врача.
Разобраться лучше – вывод из запоя клиника
Весь металл проходит строгий входной контроль, за всё время работы ни одного случая брака.
https://xn--80aeedb0bfzeok.xn--p1ai/catalog/melkhiorovaia-truba/melkhiorovaia-truba-19kh3kh13000-mm-mnzhmts10-1-1-gost-10092-2006/
Вывод из запоя на дому подходит пациентам, которым необходимо получить помощь в привычной обстановке. Вызов врача можно заказать в любое время суток: выездная бригада приезжает по указанному адресу, проводит осмотр, оценивает давление, пульс, степень интоксикации, риск психозов, галлюцинаций, судорожных реакций, инфаркта, инсульта и других осложнений.
Получить больше информации – помощь вывод из запоя в сочи
Наркологическая клиника в Балашихе предлагает полный спектр услуг: от экстренного выведения из запоя и снятия ломки до длительной реабилитации и психологической поддержки. Наша наркологическая служба работает без выходных, и вы всегда можете получить помощь анонимно, без постановки на учет. В лечении алкоголизма мы используем только проверенные методики, а каждый пациент получает персональную программу терапии, учитывающую стаж употребления, стадию болезни, возраст и сопутствующие хронические заболевания. Лечение в клинике или амбулаторно на дому — решение, которое принимается после осмотра врача. Если состояние больного позволяет, вывод из запоя можно провести в домашних условиях, но в тяжелых случаях необходима срочная госпитализация в стационар, где обеспечен круглосуточный контроль докторов. Лечением алкогольной зависимости занимаются опытные психиатры, психологи и наркологи, каждый из которых вносит вклад в общее дело.
Изучить вопрос глубже – narkolog-na-dom-balashiha
Круглосуточная помощь при запое в стационаре Балашихи. Мы работаем 24/7, обеспечивая доступность медицинской помощи в любое время суток.
Подробнее тут – нарколог вывод из запоя в балашихе
Возможность изготовления деталей по чертежам заказчика — это большой плюс
https://redmetsplav.ru/store/gafniy-i-ego-splavy/gafniy-b-737-grade-r1—astm-b737/folga-gafnievaya-b-737-grade-r1—astm-b737/
после вашего обращения наш врач приезжает по указанному адресу с медработниками в гражданской форме и на машине без опознавательных символов, проводит осмотр, собирает историю болезни (анамнез).
Получить больше информации – вывод из запоя на дому сочи
Порадовало наличие вольфрамовых прутков редких диаметров, менеджер оперативно помог с подбором.
https://xn--80aeedb0bfzeok.xn--p1ai/catalog/list-aliuminievyi-gladkii/list-aliuminievyi-40kh1500kh4000-mm-1561/
Лаконичное приветствие на главной странице сразу вводит в курс дела
https://redmetsplav.ru/store/volfram/splavy-volframa-1/volfram-w-re-1/lenta-volframovaya-w-re/
Профессиональный подход менеджеров в Екатеринбурге, грамотно проконсультировали по техническим характеристикам сплавов.
https://xn--80aeedb0bfzeok.xn--p1ai/catalog/melkhiorovaia-truba/melkhiorovaia-truba-24kh2-5kh7000-mm-mnzhmts10-1-1-gost-10092-2006/
Описание применения металлов в атомной энергетике подчеркивает качество
https://redmetsplav.ru/store/volfram/splavy-volframa-1/volfram-vnzh-7-3-2/poroshok-volframovyy-vnzh-7-3/
Офис в Екатеринбурге работает четко, забирали самовывозом — складская логистика на высоте.
https://xn--80aeedb0bfzeok.xn--p1ai/catalog/mednye-dvukhrastrubnye-mufty-pod-paiku/mednaiadvukhrastrubnaia-podvizhnaiamufta-pod-paiku88-9kh1-8mmm2gost-r-52922-2008/
Информация о времени работы (10:00–18:00) помогает планировать звонки
https://redmetsplav.ru/store/volfram/splavy-volframa-1/volfram-vch-s-1/lenta-volframovaya-vch-s/
Вывод запоя на дому позволяет сохранить приватность: соседи, коллеги и знакомые не узнают о визите врача. Наркологическая служба работает анонимно, поэтому постановки на учет не происходит, а информация о пациенте не передается третьим лицам. Гарантия конфиденциальности особенно важна для тех, кто постоянно работает с людьми, занимает ответственное место или переживает за репутацию близкого человека.
Подробнее можно узнать тут – срочный вывод из запоя
Покупали изделия из драгметаллов для лаборатории, всё соответствует заявленным характеристикам.
https://xn--80aeedb0bfzeok.xn--p1ai/catalog/melkhiorovaia-truba/melkhiorovaia-truba-35kh2-5kh1000-mm-mnzhmts10-1-1-gost-10092-2006/
Возможность заказа продукции в розницу и оптом (судя по описанию)
https://redmetsplav.ru/store/vismut/zarubezhnye-splavy-3/vismut-tbc-12—pn-h-87203/pokovka-vismutovaya-tbc-12—pn-h-87203/
Вывод из запоя на дому в Сочи подходит пациентам, у которых нет признаков острого психоза, тяжелого отравления, судорог, потери сознания и других состояний, требующих немедленной госпитализации. Врач нарколог приезжает по адресу, проводит обследование, уточняет, сколько дней длится запой, какие препараты человек принимал, есть ли хронические болезни, аллергии, ограничения по здоровью и документы, подтверждающие прошлое лечение.
Изучить вопрос глубже – вывод из запоя на дому круглосуточно сочи
Цены на спецстали одни из самых конкурентных на рынке, при этом качество на уровне мировых стандартов.
https://xn--80aeedb0bfzeok.xn--p1ai/catalog/mednye-dvukhrastrubnye-mufty-pod-paiku/mednaiadvukhrastrubnaia-podvizhnaiamufta-pod-paiku35kh1-8mmm2rgost-32590-2013/
Фольга из редких металлов часто требуется для высокотехнологичных лабораторий
https://redmetsplav.ru/store/vismut/zarubezhnye-splavy-3/vismut-l54910—uns/polosa-vismutovaya-l54910—uns/
выездная наркологическая служба оперативно приедет по указанному адресу, имея при себе все необходимое оборудование и медикаменты, в том числе для оказания неотложной помощи.
Ознакомиться с деталями – вывод из запоя на дому цена
Порадовало наличие вольфрамовых прутков редких диаметров, менеджер оперативно помог с подбором.
https://xn--80aeedb0bfzeok.xn--p1ai/catalog/magnievyi-prutok/magnievyi-prutok-95-mm-ma8-gost-18351-73/
Быстрая навигация через «Карту сайта» для поиска глубоких страниц
https://redmetsplav.ru/store/vismut/zarubezhnye-splavy-3/vismut-en-aw-6065—en-573-3/prutok-vismutovyy-en-aw-6065—en-573-3/
Thanks, this answered my question http://36.pexeburay.com/index/d1?diff=0&utm_source=ogdd&utm_campaign=26607&utm_content=&utm_clickid=6wwgkkcg44s8w4wo&aurl=http://cbsver.bget.ru/user/LPHPiper16066/
Редметсплав — пример того, как должен работать современный поставщик металлургического сырья.
https://xn--80aeedb0bfzeok.xn--p1ai/catalog/mednye-dvukhrastrubnye-mufty-pod-paiku/mednaiadvukhrastrubnaia-podvizhnaiamufta-pod-paiku54kh2-3mmm1tgost-r-52922-2008/
Четкая структура меню позволяет быстро найти нужный металл
https://redmetsplav.ru/store/vismut/zarubezhnye-splavy-3/vismut-cac902—jis-h-5120-2016/krug-vismutovyy-cac902—jis-h-5120-2016/
Офис в Екатеринбурге работает четко, забирали самовывозом — складская логистика на высоте.
https://xn--80aeedb0bfzeok.xn--p1ai/catalog/tkanaia-latunnaia-setka/setka-tkanaia-latunnaia-0-14×0-28-l63/
Сайт работает стабильно и быстро загружается
https://redmetsplav.ru/store/vismut/zarubezhnye-splavy-3/vismut-c89560—uns/truba-vismutovaya-c89560—uns/
I think this is one of the most significant
info for me. And i’m glad reading your article.
But wanna remark on few general things, The site style is great, the articles is really excellent :
D. Good job, cheers
Лечение запоя всегда начинается с детоксикационных процедур. Нарколог назначает капельницы с солевыми растворами, витаминными комплексами, гепатопротекторами и кардиопротекторами для очищения крови от токсинов и продуктов распада этилового спирта. Симптоматические препараты назначает нарколог на основании результатов диагностики, выявления сопутствующих болезней, тяжести состояния пациента. Уже через несколько часов после начала лечения состояние больного улучшается: проходят тошнота, головная боль, нормализуется артериальное давление и сон. Внутривенное введение лекарств даёт быстрый эффект и восстанавливает функции нервной системы. Лечение в стационаре позволяет провести полную детоксикацию организма безопасно и под контролем специалистов. Важно понимать, что качественная детоксикация — это фундамент всего последующего лечения алкоголизма, без которого невозможно двигаться дальше. В течение всего периода детокса врач-психиатр отслеживает психическое состояние, так как для запоя характерны перепады настроения и депрессия.
Углубиться в тему – нарколог вывод из запоя
Программа лечения алкоголизма в нашем центре состоит из нескольких последовательных шагов, каждый из которых крайне важен для достижения устойчивой ремиссии. Сначала проводится экстренная детоксикация и вывод из запоя, затем подключается медикаментозная поддержка и кодирование, и завершает курс реабилитация с психологической поддержкой. Все этапы тесно связаны между собой, и только комплексное лечение позволяет рассчитывать на полный отказ от алкоголя. Рассмотрим каждый этап подробнее. Лечение алкоголизма — это путь, который начинается с признания проблемы, и мы помогаем пройти его до конца. Далее следует длительная работа, но первые положительные сдвиги заметны уже через несколько дней.
Выяснить больше – вывод из запоя на дому недорого
Спецстали для машиностроения закупаем только здесь, надежность материала подтверждена испытаниями.
https://xn--80aeedb0bfzeok.xn--p1ai/catalog/mednye-dvukhrastrubnye-mufty-pod-paiku/mednaiadvukhrastrubnaiamufta-pod-paiku133kh2-3mmm2tgost-r-52922-2008/
Лечение запоя всегда начинается с детоксикационных процедур. Нарколог назначает капельницы с солевыми растворами, витаминными комплексами, гепатопротекторами и кардиопротекторами для очищения крови от токсинов и продуктов распада этилового спирта. Симптоматические препараты назначает нарколог на основании результатов диагностики, выявления сопутствующих болезней, тяжести состояния пациента. Уже через несколько часов после начала лечения состояние больного улучшается: проходят тошнота, головная боль, нормализуется артериальное давление и сон. Внутривенное введение лекарств даёт быстрый эффект и восстанавливает функции нервной системы. Лечение в стационаре позволяет провести полную детоксикацию организма безопасно и под контролем специалистов. Важно понимать, что качественная детоксикация — это фундамент всего последующего лечения алкоголизма, без которого невозможно двигаться дальше. В течение всего периода детокса врач-психиатр отслеживает психическое состояние, так как для запоя характерны перепады настроения и депрессия.
Изучить вопрос глубже – kruglosutochnyj-vyvod-iz-zapoya-balashiha
Вызвать нарколога на дом следует при ухудшении самочувствия после алкоголя, при длительном запое, выраженном похмелье, отравлении спиртным, признаках абстиненции, тревоге, страхе, бессоннице, сильной слабости, нарушениях поведения и невозможности самостоятельно прекратить употребление. Чем дольше человек находится в запое, тем выше риск осложнений для здоровья, поэтому откладывать вызов врача опасно.
Получить дополнительные сведения – нарколог на дом
Вывод из запоя в Балашихе с медицинским наблюдением, индивидуальным подбором терапии и помощью специалистов в наркологической клинике «Частный Медик 24».
Углубиться в тему – вывод из запоя на дому круглосуточно
Сайт адаптирован под нужды машиностроительных заводов
https://redmetsplav.ru/store/vismut/zarubezhnye-splavy-3/vismut-bi58sn42—iso-9453/izdeliya-iz-vismuta-bi58sn42—iso-9453/
В Балашихе выездной формат удобен для семьи, если близкого нельзя быстро доставить в клинику или состояние пациента ухудшается на фоне длительного запоя. Дом становится местом первичной стабилизации, когда врач видит, что капельница, вывод из запоя, консультация, снятие интоксикации и дальнейшие рекомендации могут быть проведены безопасно. Если состояние тяжелое, нарколог объясняет, почему нужна госпитализация, стационар, дополнительные обследования и круглосуточный медицинский контроль.
Разобраться лучше – narkolog-na-dom
Для срочного обращения подходит точная формулировка услуги: сегодня легко вызвать нарколога на дом в балашиху круглосуточно, просто позвонив по единому телефону нашего специализированного центра в любое время суток, любой день (даже в выходные и праздники).
Получить дополнительную информацию – vyzov-narkologa-na-dom
Вывод из запоя на дому в Казани удобен, когда близкий человек не готов ехать в клинику, плохо переносит дорогу или находится в состоянии сильной слабости. Врач приезжает на дому, сохраняет анонимность, спокойно объясняет процесс и начинает лечение только после осмотра и согласия пациента. Вызов врача на дому особенно важен, если муж, отец, брат, мама или другой близкий уже не может перестать пить и нуждается в срочной помощи.
Подробнее тут – нарколог вывод из запоя казань
В экстренных ситуациях, когда состояние больного стремительно ухудшается, а промедление грозит серьёзными осложнениями, наши специалисты готовы немедленно оказать следующую помощь. Лечение запоя — одна из самых востребованных услуг наркологической клиники, и мы оказываем её в любое время суток. Если ваш близкий сильно страдает, не ждите — скорая помощь приедет быстро, а консультацию можно получить бесплатно по телефону.
Получить дополнительные сведения – наркологическая москва
Вы получаете не просто разовую процедуру, а комплекс медицинской помощи. Врач нарколога может объяснить родственникам, как говорить с зависимым, что делать после капельницы, какие препараты принимать, когда необходимо лечение в клинике и почему кодирование алкоголизма или реабилитация часто становятся следующим этапом. Такой подход помогает не только вывести пациента из запоя, но и начать полноценное восстановление.
Получить больше информации – вывод из запоя с выездом
Для срочного обращения подходит простая схема: сегодня легко вызвать нарколога на дом в балашиху круглосуточно, просто позвонив по единому телефону нашего специализированного центра в любое время суток, любой день (даже в выходные и праздники).
Подробнее – vyzvat-narkologa-na-dom
Приятно удивлены скоростью обработки запроса на сайте, менеджер связался очень быстро.
https://xn--80aeedb0bfzeok.xn--p1ai/catalog/latunnye-naruzhnye-stopornye-koltsa-po-gost/latunoe-naruzhnoe-stopornoe-pruzhinnoe-koltso-58kh2-mm-lts14k3s3-gost-13942-86/
В экстренных ситуациях, когда состояние больного стремительно ухудшается, а промедление грозит серьёзными осложнениями, наши специалисты готовы немедленно оказать следующую помощь. Лечение запоя — одна из самых востребованных услуг наркологической клиники, и мы оказываем её в любое время суток. Если ваш близкий сильно страдает, не ждите — скорая помощь приедет быстро, а консультацию можно получить бесплатно по телефону.
Ознакомиться с деталями – narkolog-besplatno-moskva
Алкогольная зависимость — серьёзная болезнь, которая часто сопровождается длительными запоями. Симптомы интоксикации этанолом требуют немедленного медицинского вмешательства. Признаки, при которых нужно вызывать врача на дом: сильная рвота, скачки артериального давления, бессонница, тревожность, тремор, спутанность сознания. Если вовремя не начать лечение алкоголизма, могут развиться алкогольный психоз, делирий, серьёзные нарушения работы сердечно-сосудистой и нервной систем. Квалифицированная помощь на дому позволяет быстро снять абстинентный синдром и нормализовать самочувствие. Наш врач-нарколог приедет в течение 30–60 минут, проведёт осмотр, поставит капельницу и окажет необходимую психологическую поддержку. Не стоит заниматься самолечением — только профессиональный нарколог способен правильно оценить тяжесть состояния и подобрать эффективные препараты. Помните: каждый час промедления увеличивает риск серьёзных осложнений, поэтому действовать нужно незамедлительно. Позвоните прямо сейчас, и дежурный консультант оформит вызов, сориентирует по ценам и ответит на любые вопросы.
Получить дополнительную информацию – vyzov-narkologa-na-dom-nedorogo
Наркологическая клиника «Триумф» в Москве — специализированное медицинское учреждение, где пациенты получают квалифицированную помощь при алкогольной и наркотической зависимости. Лечение алкоголизма и наркомании в нашей клинике проводят опытные наркологи и психиатры, которые знают, как вернуть человека к нормальной жизни. Мы объединили под одной крышей специалистов разного профиля, чтобы предложить полноценный замкнутый цикл лечения: от первичной консультации и детоксикации до длительной реабилитации и социальной адаптации. Наша наркологическая клиника предлагает как стационарное лечение, так и помощь на дому — обратившись к нам, вы можете быть уверены в полной анонимности. Главные ценности нашей работы — безопасность, анонимное лечение, доказательная медицина и бережное отношение к каждому обратившемуся. В клинике созданы комфортные условия для стационарного пребывания, включая палаты различной категории, а также предусмотрена возможность амбулаторного наблюдения и выездной помощи на дому.
Получить дополнительную информацию – http://narkologicheskaya-klinika-moskva13.ru
Наличие калькулятора металлопроката упрощает расчет веса и стоимости
https://redmetsplav.ru/store/vismut/zarubezhnye-splavy-3/vismut-42-3989—csnstn-423989/lenta-vismutovaya-42-3989—csnstn-423989/
Алкогольная зависимость — серьёзная проблема, требующая незамедлительного лечения. Вывод из запоя — первый обязательный этап лечения алкоголизма, без которого невозможно дальнейшее лечение. Наша наркологическая клиника в Москве оказывает срочное лечение запоя на дому и в стационаре. Лечение начинается с очищения организма — инфузионной терапии, которую проводит опытный врач-нарколог. Эффективное лечение зависимости невозможно без анонимности, поэтому мы гарантируем полную конфиденциальность и соблюдение юридических прав пациентов. Лечение должно быть комплексным: детоксикация, терапия, кодирование, реабилитация. Наши специалисты используют современные методики выведения из запоя , применяя эффективные , которые быстро восстанавливают организм после интоксикации алкоголя . Лечение подбирается индивидуально, с учётом стажа, возраста, симптомов абстиненции, общего состояния и уровня токсического отравления. Диагностика состояния — обязательная часть первого приёма врача.
Получить больше информации – vyvod-iz-zapoya-nedorogo-balashiha
Наши специалисты используют эффективные методы детоксикации, которые помогают быстро устранить физическую тягу к наркотикам и нормализовать работу внутренних органов. Индивидуальный подход к каждому больному, грамотный подбор лекарственных средств и многолетний опыт врачей-наркологов гарантируют высокие результаты лечения. Здесь вы найдете всю необходимую информацию о том, как проходит детоксикация от наркотиков в нашем центре, какие методики применяются и почему так важно не откладывать обращение за профессиональной помощью. Мы также даем подробные рекомендации родственникам наркозависимых, помогая им правильно вести себя в кризисной ситуации и преодолеть страх осуждения. Мотивация больного на прохождение полного курса лечения — ключевой фактор, и наши психологи уделяют этому особое внимание.
Ознакомиться с деталями – детоксикация организма от наркотиков
Наркологическая помощь на дому особенно важна при алкогольной интоксикации, длительном запое, сильной слабости, тревоге, рвоте, нарушении сна, высоком давлении, треморе, спутанности поведения и риске осложнений. Врач нарколог приезжает по адресу, проводит диагностику, уточняет длительность употребления алкоголя, наличие хронического алкоголизма, опыт лечения, противопоказаний, заболеваний сердца, печени, нервной системы и других органов. После этого специалист выбирает безопасную схему терапии.
Получить дополнительную информацию – вызов нарколога на дом недорого
Нарколог на дом в Балашихе с оперативным приездом специалиста, оценкой состояния и проведением наркологической помощи в наркологической клинике «Частный Медик 24».
Изучить вопрос глубже – вызвать нарколога на дом
Спасибо команде за профессионализм и помощь в реализации нашего сложного промышленного проекта!
https://xn--80aeedb0bfzeok.xn--p1ai/catalog/mednye-dvukhrastrubnye-mufty-pod-paiku/mednaiadvukhrastrubnaiamufta-pod-paiku25kh1-6mmm2rgost-32590-2013/
Логичное деление на вольфрамовый, молибденовый и титановый прокат
https://redmetsplav.ru/store/vismut/rossiyskie-splavy-2/vismut-l58/folga-vismutovaya-l58/
Детоксикация наркоманов в Москве — это первый и самый важный шаг на пути к полному избавлению от наркотической зависимости. В наркологической клинике «Частный Медик 24» детоксикация от наркотиков проводится строго в условиях стационара, с применением современных медицинских методик и под круглосуточным контролем опытных врачей. Лечение наркомании требует комплексного подхода, и детоксикация позволяет безопасно очистить организм от токсичных продуктов распада психоактивных веществ, снять острые симптомы абстиненции и подготовить пациента к дальнейшей реабилитации. Мы работаем круглосуточно, чтобы каждый житель Москвы и области мог получить экстренную наркологическую помощь именно тогда, когда она жизненно необходима. Хочу подчеркнуть: наша главная задача — не просто снять ломку, а сделать первый шаг к полноценной жизни без наркотиков. Использование качественных медикаментов и проверенных схем детоксикации является основой успешного лечения.
Подробнее можно узнать тут – detoksikaciya-organizma-ot-narkotikov
Реабилитация 12 шагов в Москве — это программа лечения зависимости, которая помогает человеку после наркотической, алкогольной или смешанной аддикции перейти от хаотичных попыток бросить к последовательной работе над собой. Программа 12 шагов применяется при наркомании, алкоголизме, лудомании, игромании, созависимости и других формах химической зависимости. Ее цель — помочь человеку признать болезнь, прекратить употреблять психоактивные вещества, получить опору, научиться жить трезво и постепенно вернуть способность управлять своими решениями.
Подробнее – http://reabilitaciya-12-shagov-moskva13-1.ru/
Наркологическая помощь клиники направлена не только на снятие острого состояния, но и на дальнейшее лечение алкогольной зависимости. Вывод из запоя на дому подходит пациенту, если нет признаков тяжелого отравления, психоза, судорог и опасных осложнений. Если состояние больного тяжелое, врач может рекомендовать лечение в стационаре клиники, где пациент находится под наблюдением медицинской команды, а терапия проходит безопаснее.
Выяснить больше – скорая вывод из запоя в сочи
Поставки всегда вовремя, логистика отлажена до мелочей, что важно для бесперебойной работы цеха.
https://xn--80aeedb0bfzeok.xn--p1ai/catalog/latunnye-naruzhnye-stopornye-koltsa-po-gost/latunoe-naruzhnoe-stopornoe-pruzhinnoe-koltso-4kh0-4-mm-lmtss-gost-13942-86/
Наличие калькулятора металлопроката упрощает расчет веса и стоимости
https://redmetsplav.ru/store/vanadiy-i-ego-splavy/vanadiy-fev80—gost-27130-94/provoloka-vanadievaya-fev80—gost-27130-94/
Good day! This post could not be written any better!
Reading through this post reminds me of my good
old room mate! He always kept talking about this. I will forward this post to him.
Fairly certain he will have a good read. Many thanks for sharing!
Алкогольная зависимость — серьёзная проблема, требующая незамедлительного лечения. Вывод из запоя — первый обязательный этап лечения алкоголизма, без которого невозможно дальнейшее лечение. Наша наркологическая клиника в Москве оказывает срочное лечение запоя на дому и в стационаре. Лечение начинается с очищения организма — инфузионной терапии, которую проводит опытный врач-нарколог. Эффективное лечение зависимости невозможно без анонимности, поэтому мы гарантируем полную конфиденциальность и соблюдение юридических прав пациентов. Лечение должно быть комплексным: детоксикация, терапия, кодирование, реабилитация. Наши специалисты используют современные методики выведения из запоя , применяя эффективные , которые быстро восстанавливают организм после интоксикации алкоголя . Лечение подбирается индивидуально, с учётом стажа, возраста, симптомов абстиненции, общего состояния и уровня токсического отравления. Диагностика состояния — обязательная часть первого приёма врача.
Изучить вопрос глубже – вывод из запоя круглосуточно
Обращаем внимание, что таблица носит ознакомительный характер. Точную программу лечения и финальную цену определяет врач после осмотра и необходимых анализов. Врач нарколог бесплатно ответит на все ваши вопросы по услуге вывода из запоя на дому и оформит вызов врача.
Подробнее тут – http://
Стационарное лечение алкоголизма имеет неоспоримые преимущества перед лечением на дому. Вывод из запоя в стационаре позволяет полностью сосредоточиться на выздоровлении, избавиться от доступа к спиртному и получить круглосуточную поддержку врача. В стационаре можно сдать все необходимые анализы, пройти инструментальные исследования и сразу получить их результаты, что значительно повышает эффективность назначаемой терапии. Лечение в клинике проходит в комфортных палатах (включая VIP), под постоянным наблюдением опытного нарколога и медицинского персонала. Анонимность гарантируется: никакой постановки на учет, данные защищены политикой конфиденциальности. Наши специалисты проводят вывод из запоя любой длительности и сложности, включая запой у женщин и подростков, а также лечат пивной алкоголизм. Кроме того, стационар даёт возможность немедленно приступить к психотерапевтической работе и кодированию, что при домашнем лечении часто откладывается. Многие пациенты отмечают, что только в клинике они ощутили реальную поддержку и поняли, как лечиться правильно. Главный врач клиники, Александр Анатольевич, лично контролирует качество лечения, а бригада квалифицированных докторов, среди которых Татьяна Михайловна, Сергей Сергеевич, Екатерина Анатольевна, Андрей Викторович, Вячеслав Борисович и другие опытные специалисты, имеет стаж от 10 лет. Даже если человек находится в тяжелом состоянии, наша выездная бригада быстро приедет и организует транспортировку в стационар. Мы работаем круглосуточно, и вызов возможен в любое время — достаточно позвонить, и через 30-60 минут мы будем по указанному адресу для доставки пациента в клинику.
Углубиться в тему – anonimnyj-vyvod-iz-zapoya
Редкие и тугоплавкие металлы всегда в наличии или под заказ в короткие сроки, рекомендую.
https://xn--80aeedb0bfzeok.xn--p1ai/catalog/mednye-dvukhrastrubnye-mufty-pod-paiku/mednaiadvukhrastrubnaia-podvizhnaiamufta-pod-paiku106kh3-5mmm3rgost-r-52922-2008/
Быстрая навигация через «Карту сайта» для поиска глубоких страниц
https://redmetsplav.ru/store/titan/rossiyskie-splavy-4/titan-vt32/list-titanovyy-vt32/
Нарколог на дом в Балашихе с выездом врача, диагностикой состояния и проведением необходимой помощи в наркологической клинике «Частный Медик 24».
Изучить вопрос глубже – http://narkolog-na-dom-balashiha13-1.ru
Нарколог на дом в Казани нужен в ситуации, когда человеку требуется срочная медицинская помощь после запоя, отравления алкоголем, наркотиков, сильного похмелья, абстинентного синдрома или тяжелой интоксикации организма. Врач приезжает на дом, проводит осмотр пациента, оценивает симптомы, подбирает метод терапии и оказывает необходимые услуги анонимно, конфиденциально и с согласия больного.
Выяснить больше – запой нарколог на дом казань
Запоя вывод в клинике Сочи: лечение алкогольной зависимости, капельница, детоксикация, помощь нарколога на дому, кодирование и реабилитация анонимно
Детальнее – вывод из запоя на дому круглосуточно в сочи
Наличие редких позиций, например, изделий из гафния и ванадия
https://redmetsplav.ru/store/titan/rossiyskie-splavy-4/titan-t7—gost-2171-90/truba-titanovaya-t7—gost-2171-90/
Покупали изделия из драгметаллов для лаборатории, всё соответствует заявленным характеристикам.
https://xn--80aeedb0bfzeok.xn--p1ai/catalog/latunnye-naruzhnye-stopornye-koltsa-po-gost/latunoe-naruzhnoe-stopornoe-pruzhinnoe-koltso-38kh1-7-mm-ls59-gost-13942-86/
звоните круглосуточно по телефону горячей линии клиники: наши специалисты готовы оказать необходимую помощь в решении проблемы алкогольной зависимости.
Подробнее – вывод из запоя в сочи
Вывод из запоя — это только первый шаг в лечении алкогольной зависимости. Без последующей терапии риск рецидива очень высок. Наш наркологический центр предлагает полный курс лечения алкоголизма, включая кодирование и психотерапию. Кодирование на дому проводится различными методами: уколом (Торпедо, Эспераль, Налтрексон, Аквилонг), медикаментозным вшиванием (дисульфирам, Вивитрол), гипнозом по Довженко, а также двойным блоком. Каждый метод подбирается врачом индивидуально, с согласия пациента и при отсутствии противопоказаний. Опытный нарколог объяснит, какая кодировка подойдёт именно вам, учитывая стаж и форму зависимости.
Подробнее тут – вызов нарколога на дом круглосуточно недорого
hello!,I really like your writing so a lot! share we keep in touch more about your article on AOL?
I require a specialist in this house to solve my problem.
Maybe that’s you! Taking a look ahead to see you.
Обратившись к нам, вы получаете не только экстренную помощь, но и полный комплекс услуг с гарантией качества и анонимности. Вот основные преимущества нашей работы:
Получить дополнительные сведения – вызов нарколога на дом запой
Для тех, кто ищет информацию по теме “Обзор футбольных турниров и актуальных новостей”, есть отличная статья.
Ссылка ниже:
https://moskvafootball.ru
Стационарное лечение алкоголизма имеет неоспоримые преимущества перед лечением на дому. Вывод из запоя в стационаре позволяет полностью сосредоточиться на выздоровлении, избавиться от доступа к спиртному и получить круглосуточную поддержку врача. В стационаре можно сдать все необходимые анализы, пройти инструментальные исследования и сразу получить их результаты, что значительно повышает эффективность назначаемой терапии. Лечение в клинике проходит в комфортных палатах (включая VIP), под постоянным наблюдением опытного нарколога и медицинского персонала. Анонимность гарантируется: никакой постановки на учет, данные защищены политикой конфиденциальности. Наши специалисты проводят вывод из запоя любой длительности и сложности, включая запой у женщин и подростков, а также лечат пивной алкоголизм. Кроме того, стационар даёт возможность немедленно приступить к психотерапевтической работе и кодированию, что при домашнем лечении часто откладывается. Многие пациенты отмечают, что только в клинике они ощутили реальную поддержку и поняли, как лечиться правильно. Главный врач клиники, Александр Анатольевич, лично контролирует качество лечения, а бригада квалифицированных докторов, среди которых Татьяна Михайловна, Сергей Сергеевич, Екатерина Анатольевна, Андрей Викторович, Вячеслав Борисович и другие опытные специалисты, имеет стаж от 10 лет. Даже если человек находится в тяжелом состоянии, наша выездная бригада быстро приедет и организует транспортировку в стационар. Мы работаем круглосуточно, и вызов возможен в любое время — достаточно позвонить, и через 30-60 минут мы будем по указанному адресу для доставки пациента в клинику.
Детальнее – вывод из запоя на дому круглосуточно
Нарколог на дом в Балашихе нужен, когда человек после алкоголя, запоя, отравления, абстинентного синдрома или употребления наркотиков не может самостоятельно восстановиться и нуждается в медицинской помощи. Вызов врача на дом позволяет быстро оценить состояние пациента, провести осмотр, подобрать препараты, назначить лекарства, поставить капельницу и определить, возможно ли лечение в домашних условиях или требуется госпитализация в стационаре.
Подробнее можно узнать тут – http://
Описание складских позиций сокращает время ожидания ответа
https://redmetsplav.ru/store/titan/rossiyskie-splavy-4/titan-et5/krug-titanovyy-et5/
Весь металл проходит строгий входной контроль, за всё время работы ни одного случая брака.
https://xn--80aeedb0bfzeok.xn--p1ai/catalog/mednye-krestoviny-pod-paiku/mednaia-krestovina-pod-paiku-70kh60kh1-4-mm-33-5kh36-5-mm-tverdaia-paika-cu-dhp-gost-r-52922-2008/
https://1xbetcanlikazino.com/
Программа 12 шагов построена как последовательный путь: человек учится признавать болезнь, принимать помощь, разбирать причины употребления, проводить моральную инвентаризацию, исправить ошибки, компенсировать нанесенный ущерб и поддерживать трезвость через регулярные действия. В основе программы лежит не давление, а постепенная работа с отрицанием, самообманом, страхами и привычкой возвращаться к прежним решениям.
Получить дополнительную информацию – http://reabilitaciya-12-shagov-moskva13-1.ru
Технические специалисты компании помогли выбрать оптимальный сплав для работы в агрессивных средах.
https://xn--80aeedb0bfzeok.xn--p1ai/catalog/latunnye-naruzhnye-stopornye-koltsa-po-gost/latunoe-naruzhnoe-stopornoe-pruzhinnoe-koltso-140kh3-mm-lk1-gost-13942-86/
Вывод из запоя на дому — это комплексная процедура, которая начинается с первичного осмотра и диагностики состояния пациента. Врач-нарколог оценивает уровень интоксикации, измеряет артериальное давление, проверяет пульс, собирает анамнез. Только после этого принимается решение о схеме лечения. Основной метод — инфузионная терапия (капельница). Капельница содержит солевые растворы, витамины (группы B и C), гепатопротекторы, ноотропы, успокоительные средства, а при необходимости — кардиопротекторы и препараты для нормализации давления. Очищение организма после установки капельницы позволит в короткое время привести пациента в осознанное состояние и существенно облегчит последствия абстинентного синдрома. Медикаментозное лечение алкоголизма включает ускоренный вывод продуктов распада этанола из крови, восстановление самочувствия и устранение симптомов похмелья.
Получить больше информации – http://www.domen.ru
https://linkmate.mn.co/posts/104359606
https://www.bavf.org/forum/general-discussion/online-betting-platforms-with-fast-account-verification/#p52092
https://www.wayne-dalton.com/where-to-buy/lowes/how-to-measure-for-a-new-garage-door
https://jobs.lajobsportal.org/profiles/8557895-codigo-promocional-1xbet-sin-deposito-1xbro200-sin-deposito
Запой опасен для жизни и здоровья — это прямая угроза развития острой сердечной недостаточности, инсульта, припадков. Если запой затягивается, а попытки самостоятельного вывода из состояния запоя на дому не приносят результата, следует обратиться к опытному врачу. Длительное употребление алкоголя приводит к тяжёлой интоксикации, нарушению работы сердца, печени, почек, головного мозга. Абстинентный синдром сопровождается рвотой, бессонницей, скачками артериального давления, паническими атаками, тревогой и глубокой депрессией. Самостоятельный вывод из запоя часто заканчивается срывом или осложнениями, поэтому так важно профессиональное лечение. Лечение алкогольной зависимости должно быть экстренным, если у пациента наблюдаются судороги, галлюцинации, признаки алкогольного психоза. Чем раньше начато лечение, тем больше шансов на полное восстановление. Лечение запоя в стационаре обеспечивает круглосуточное наблюдение докторов. Если же здоровье пациента критическое, если ему нужно не просто перестать пить, но и наладить работу внутренних органов, ему требуется постоянно находиться под наблюдением докторов. Многие алкоголики не могут остановиться самостоятельно, и тогда стоит ли рисковать, откладывая вызов врача? Ответ очевиден: чем быстрее принять меры, тем лучше.
Углубиться в тему – вывод из длительного запоя
звоните круглосуточно по телефону горячей линии клиники: наши специалисты готовы оказать необходимую помощь в решении проблемы алкогольной зависимости.
Получить больше информации – вывод из запоя клиника
Медикаментозное лечение включает также таблетированные формы: налтрексон, дисульфирам (Эспераль), Аквилонг, Алгоминал, а также препараты для двойного блока. Эти средства помогают снизить тягу к спиртному и предотвратить рецидив. Лечение алкогольной зависимости требует длительной фармакотерапии. Наши врачи проводят полный курс лечения с учётом всех особенностей организма. Лечение должно быть непрерывным и последовательным. Важно помнить, что для успешного выздоровления нужно пройти длительный процесс, который может занять несколько месяцев или даже больше, в зависимости от степени зависимости. Лечение алкоголизма невозможно без психотерапии, которая помогает пациенту осознать причины болезни, сформировать установку на трезвость и получить поддержку на всех этапах лечения. Психотерапевт работает индивидуально и в группах, используя гипнозом, метод Довженко, когнитивно-поведенческую терапию. Психологическая поддержка — залог успешного лечения. Часто пациенты не могут справиться самостоятельно, и тогда мы рекомендуем прибегнуть к помощи профессионалов, которые убедят больного начать терапию. Если пациент соглашается на лечение добровольно, эффективность возрастает в разы.
Исследовать вопрос подробнее – kruglosutochnyj-vyvod-iz-zapoya-balashiha
Быстрая навигация через «Карту сайта» для поиска глубоких страниц
https://redmetsplav.ru/store/niobiy1/splavy-niobiya-1/niobiy-vn-3-1/polosa-niobievaya-vn-3/
Лечение запоя всегда начинается с детоксикационных процедур. Нарколог назначает капельницы с солевыми растворами, витаминными комплексами, гепатопротекторами и кардиопротекторами для очищения крови от токсинов и продуктов распада этилового спирта. Симптоматические препараты назначает нарколог на основании результатов диагностики, выявления сопутствующих болезней, тяжести состояния пациента. Уже через несколько часов после начала лечения состояние больного улучшается: проходят тошнота, головная боль, нормализуется артериальное давление и сон. Внутривенное введение лекарств даёт быстрый эффект и восстанавливает функции нервной системы. Лечение в стационаре позволяет провести полную детоксикацию организма безопасно и под контролем специалистов. Важно понимать, что качественная детоксикация — это фундамент всего последующего лечения алкоголизма, без которого невозможно двигаться дальше. В течение всего периода детокса врач-психиатр отслеживает психическое состояние, так как для запоя характерны перепады настроения и депрессия.
Получить дополнительную информацию – kruglosutochnyj-vyvod-iz-zapoya-balashiha
Использование файлов cookie и политика конфиденциальности соответствуют закону
https://redmetsplav.ru/store/niobiy1/splavy-niobiya-1/niobiy-nbc-2/polosa-niobievaya-nbc/
Редкие и тугоплавкие металлы всегда в наличии или под заказ в короткие сроки, рекомендую.
https://xn--80aeedb0bfzeok.xn--p1ai/catalog/latunnye-naruzhnye-stopornye-koltsa-po-din/latunoe-naruzhnoe-stopornoe-pruzhinnoe-koltso-m87-81-5kh3-mm-lts16k4-din-471/
Вывод из запоя в Казани на дому и в клинике: врач-нарколог, капельница, детоксикация, лечение алкоголизма, кодирование, реабилитация. Круглосуточная помощь анонимно.
Изучить вопрос глубже – вывод из запоя капельница на дому казань
Ниже перечислены основные плюсы, которые получает каждый пациент при выборе стационарного лечения алкоголизма в нашей наркологической клинике. Все процедуры проводятся с использованием современного оборудования и сертифицированных лекарств, что абсолютно исключено при попытках лечиться на дому:
Выяснить больше – vyvod-iz-zapoya
https://www.insert-bookmark.win/1xbet-promo-code-official-myanmar-2026-1xbono200-bonus-130
https://gamemania55.com/yasu_gamech/forums/users/humphrey66elliott/
https://pads.zapf.in/s/pY5oHKyNQD
http://www.bakinsky-dvorik.ru/communication/forum/messages/forum5/message113964/71954-trusted-slot-site-casino-your-gateway-to-fast-maxwin-2025?result=new#message113964
На странице услуги можно использовать и такую формулировку: нарколог на дом в — экстренная помощь при алкогольной и наркотической зависимости. В Балашихе выездной формат востребован, когда нужна быстрая помощь без поездки в клинику, без ожидания приема и без лишнего внимания соседей.
Ознакомиться с деталями – narkolog-na-dom-balashiha13-2.ru/
Информация о проверке качества продукции повышает лояльность клиентов
https://redmetsplav.ru/store/molibden-i-ego-splavy/molibden-p-mch-1/pokovka-molibdenovaya-p-mch/
Удобный сайт и понятная навигация по каталогу, легко найти нужную марку стали или сплава.
https://xn--80aeedb0bfzeok.xn--p1ai/catalog/mednye-krestoviny-pod-paiku/mednaia-krestovina-pod-paiku-27-4kh23kh0-9-mm-9kh11-mm-tverdaia-paika-m1m-gost-32590-2013/
Наркологическая помощь на дому особенно важна при алкогольной интоксикации, длительном запое, сильной слабости, тревоге, рвоте, нарушении сна, высоком давлении, треморе, спутанности поведения и риске осложнений. Врач нарколог приезжает по адресу, проводит диагностику, уточняет длительность употребления алкоголя, наличие хронического алкоголизма, опыт лечения, противопоказаний, заболеваний сердца, печени, нервной системы и других органов. После этого специалист выбирает безопасную схему терапии.
Изучить вопрос глубже – нарколог на дом московский
Наркологическая клиника в Балашихе предлагает срочный вывод из запоя в условиях стационара. Круглосуточная наркологическая помощь позволяет быстро и безопасно вывести человека из тяжелого состояния, вызванного длительным употреблением алкоголя. Лечение алкоголизма в стационаре — это первый и самый важный шаг на пути к полному избавлению от зависимости. Врачи-наркологи нашей клиники проводят комплексную детоксикацию, используют эффективные методы лечения и назначают персональный курс терапии. Каждый пациент получает необходимые медицинские услуги анонимно, с гарантией полной конфиденциальности. Лечение в стационаре обеспечивает круглосуточный контроль за состоянием больного, что особенно важно при серьезных запоях и наличии сопутствующих патологий внутренних органов, сердца и печени. Лечение алкогольной зависимости в стенах специализированной клиники — это возможность получить полноценную помощь и вернуться к трезвой жизни, не откладывая решение проблемы. Очень часто симптомы запоя настолько тяжелы, что справиться с ними собственными силами невозможно, и тогда на помощь приходят опытные доктора нашей наркологической службы.
Получить дополнительные сведения – vyvod-iz-zapoya-kruglosutochno
Запой опасен для жизни и здоровья — это прямая угроза развития острой сердечной недостаточности, инсульта, припадков. Если запой затягивается, а попытки самостоятельного вывода из состояния запоя на дому не приносят результата, следует обратиться к опытному врачу. Длительное употребление алкоголя приводит к тяжёлой интоксикации, нарушению работы сердца, печени, почек, головного мозга. Абстинентный синдром сопровождается рвотой, бессонницей, скачками артериального давления, паническими атаками, тревогой и глубокой депрессией. Самостоятельный вывод из запоя часто заканчивается срывом или осложнениями, поэтому так важно профессиональное лечение. Лечение алкогольной зависимости должно быть экстренным, если у пациента наблюдаются судороги, галлюцинации, признаки алкогольного психоза. Чем раньше начато лечение, тем больше шансов на полное восстановление. Лечение запоя в стационаре обеспечивает круглосуточное наблюдение докторов. Если же здоровье пациента критическое, если ему нужно не просто перестать пить, но и наладить работу внутренних органов, ему требуется постоянно находиться под наблюдением докторов. Многие алкоголики не могут остановиться самостоятельно, и тогда стоит ли рисковать, откладывая вызов врача? Ответ очевиден: чем быстрее принять меры, тем лучше.
Подробнее можно узнать тут – врач вывод из запоя
Корзина на сайте промышленного предприятия — удобный инструмент для формирования заявки
https://redmetsplav.ru/store/molibden-i-ego-splavy/molibden-mo-cu40-1/truba-molibdenovaya-mo-cu40/
Весь металл проходит строгий входной контроль, за всё время работы ни одного случая брака.
https://xn--80aeedb0bfzeok.xn--p1ai/catalog/latunnye-naruzhnye-stopornye-koltsa-po-din/latunoe-naruzhnoe-stopornoe-pruzhinnoe-koltso-m72-67-5kh2-5-mm-lsdch-din-471/
Сегодня легко вызвать нарколога на дом в балашиху круглосуточно, просто позвонив по единому телефону нашего специализированного центра в любое время суток, любой день (даже в выходные и праздники). Нарколог на дом в Балашихе — экстренная помощь при алкогольной и наркотической зависимости. Если ваш близкий человек страдает от запоя или отравления алкоголем, не ждите — срочный вызов врача на дом позволит быстро стабилизировать состояние и избежать тяжёлых последствий. Наша наркологическая клиника предлагает полный комплекс услуг: вывод из запоя, кодирование, детоксикацию, психотерапию и реабилитацию. Опытные специалисты выезжают по любому адресу в Балашихе и ближайшим районам Московской области. Мы работаем круглосуточно, гарантируем полную анонимность и конфиденциальность — никакие данные не передаются третьим лицам, а врач приезжает без опознавательных знаков.
Подробнее тут – narkolog-na-dom-balashiha
Стационарное лечение алкоголизма имеет неоспоримые преимущества перед лечением на дому. Вывод из запоя в стационаре позволяет полностью сосредоточиться на выздоровлении, избавиться от доступа к спиртному и получить круглосуточную поддержку врача. В стационаре можно сдать все необходимые анализы, пройти инструментальные исследования и сразу получить их результаты, что значительно повышает эффективность назначаемой терапии. Лечение в клинике проходит в комфортных палатах (включая VIP), под постоянным наблюдением опытного нарколога и медицинского персонала. Анонимность гарантируется: никакой постановки на учет, данные защищены политикой конфиденциальности. Наши специалисты проводят вывод из запоя любой длительности и сложности, включая запой у женщин и подростков, а также лечат пивной алкоголизм. Кроме того, стационар даёт возможность немедленно приступить к психотерапевтической работе и кодированию, что при домашнем лечении часто откладывается. Многие пациенты отмечают, что только в клинике они ощутили реальную поддержку и поняли, как лечиться правильно. Главный врач клиники, Александр Анатольевич, лично контролирует качество лечения, а бригада квалифицированных докторов, среди которых Татьяна Михайловна, Сергей Сергеевич, Екатерина Анатольевна, Андрей Викторович, Вячеслав Борисович и другие опытные специалисты, имеет стаж от 10 лет. Даже если человек находится в тяжелом состоянии, наша выездная бригада быстро приедет и организует транспортировку в стационар. Мы работаем круглосуточно, и вызов возможен в любое время — достаточно позвонить, и через 30-60 минут мы будем по указанному адресу для доставки пациента в клинику.
Изучить вопрос глубже – вывод из запоя недорого балашиха
Выведение из состояния запоя и последующее лечение и реабилитация от алкогольной зависимости в наркологической клинике «московский нарколог» делиться на два этапа – длительный и краткосрочный. Кроме того, вывод из запоя и детоксикационные мероприятия осуществляются каждому клиенту, решившему пройти полный курс лечения алкоголизма в клинике, как первый этап терапии. Экстренный вывод из запойного состояния и медикаментозное лечение не избавят человека от алкогольной зависимости, а лишь на время вернут к нормальной жизни. Именно поэтому мы рекомендуем пройти полный курс лечения алкоголизма, включающий не только снятие интоксикации, но и кодирование, психологическую поддержку и длительную реабилитацию. Опыт наших врачей показывает: стационарное лечение алкоголизма даёт наилучшие результаты, ведь в клинике созданы все условия для эффективной терапии и комфортного пребывания. Лечение зависимости — долгий процесс, но с профессиональным сопровождением он проходит легче и завершается стойкой ремиссией. Многие алкоголики годами страдают от запоя, но даже в самых сложных случаях можно добиться положительного результата.
Подробнее можно узнать тут – vyvod-iz-zapoya-na-domu-kruglosutochno
Описание применения металлов в атомной энергетике подчеркивает качество
https://redmetsplav.ru/store/molibden-i-ego-splavy/molibden-cm3-4/poroshok-molibdenovyy-cm3-1/
Весь металл проходит строгий входной контроль, за всё время работы ни одного случая брака.
https://xn--80aeedb0bfzeok.xn--p1ai/catalog/mednye-krestoviny-pod-paiku/mednaia-krestovina-pod-paiku-53-6kh47kh1-2-mm-32kh34-mm-tverdaia-paika-m3r-gost-32590-2013/
В Балашихе выездной формат удобен для семьи, если близкого нельзя быстро доставить в клинику или состояние пациента ухудшается на фоне длительного запоя. Дом становится местом первичной стабилизации, когда врач видит, что капельница, вывод из запоя, консультация, снятие интоксикации и дальнейшие рекомендации могут быть проведены безопасно. Если состояние тяжелое, нарколог объясняет, почему нужна госпитализация, стационар, дополнительные обследования и круглосуточный медицинский контроль.
Получить дополнительную информацию – narkolog-na-dom
Наши специалисты используют эффективные методы детоксикации, которые помогают быстро устранить физическую тягу к наркотикам и нормализовать работу внутренних органов. Индивидуальный подход к каждому больному, грамотный подбор лекарственных средств и многолетний опыт врачей-наркологов гарантируют высокие результаты лечения. Здесь вы найдете всю необходимую информацию о том, как проходит детоксикация от наркотиков в нашем центре, какие методики применяются и почему так важно не откладывать обращение за профессиональной помощью. Мы также даем подробные рекомендации родственникам наркозависимых, помогая им правильно вести себя в кризисной ситуации и преодолеть страх осуждения. Мотивация больного на прохождение полного курса лечения — ключевой фактор, и наши психологи уделяют этому особое внимание.
Получить дополнительные сведения – детоксикация организма от наркотиков москва
Вывод из запоя на дому в Сочи подходит пациентам, у которых нет признаков острого психоза, тяжелого отравления, судорог, потери сознания и других состояний, требующих немедленной госпитализации. Врач нарколог приезжает по адресу, проводит обследование, уточняет, сколько дней длится запой, какие препараты человек принимал, есть ли хронические болезни, аллергии, ограничения по здоровью и документы, подтверждающие прошлое лечение.
Разобраться лучше – вывод из запоя капельница на дому
Все необходимые услуги для сохранения здоровья пациентов нашей клиники оказывают высококвалифицированные специалисты с большим опытом работы. В штате центра — наркологи, психиатры, психотерапевты, клинические психологи, которые ежедневно помогают людям вернуться к здоровой жизни. Мы используем только сертифицированные лекарственные препараты и современное оборудование, что гарантирует безопасность и эффективность процедур. Персонал отделения — это опытные медсестры, которые обеспечивают комфортное пребывание и круглосуточный уход. Администраторы и координаторы всегда на связи, готовы ответить на любые вопросы и оформить запись на прием.
Детальнее – детоксикация наркозависимых цена москва
Программа лечения алкоголизма в нашем центре состоит из нескольких последовательных шагов, каждый из которых крайне важен для достижения устойчивой ремиссии. Сначала проводится экстренная детоксикация и вывод из запоя, затем подключается медикаментозная поддержка и кодирование, и завершает курс реабилитация с психологической поддержкой. Все этапы тесно связаны между собой, и только комплексное лечение позволяет рассчитывать на полный отказ от алкоголя. Рассмотрим каждый этап подробнее. Лечение алкоголизма — это путь, который начинается с признания проблемы, и мы помогаем пройти его до конца. Далее следует длительная работа, но первые положительные сдвиги заметны уже через несколько дней.
Подробнее можно узнать тут – круглосуточный вывод из запоя балашиха
звоните круглосуточно по телефону горячей линии клиники: наши специалисты готовы оказать необходимую помощь в решении проблемы алкогольной зависимости.
Ознакомиться с деталями – наркологический вывод из запоя сочи
Наличие циркония свидетельствует о работе с высокотехнологичными заказами
https://redmetsplav.ru/store/magniy-i-ego-splavy/zarubezhnye-splavy-2/magniy-sismg4640-00—ss-144640/polosa-magnievaya-sismg4640-00—ss-144640/
http://www.qingdaomop.com/?194276
https://socialcompare.com/en/member/validebets26-8mf6jkzc
Закупали шлак ферросилиция для строительных нужд, материал качественный, без лишних примесей.
https://xn--80aeedb0bfzeok.xn--p1ai/catalog/latunnye-naruzhnye-stopornye-koltsa-po-din/latunoe-naruzhnoe-stopornoe-pruzhinnoe-koltso-m162-151kh4-mm-lk2-din-471/
https://schoolido.lu/user/validebets26/
https://manufacturers.network/user/winrush88/
https://www.navacool.com/forum/topic/521337/precisely-why-sensible-avid-gamers-follow-price,-certainly-not-nonsense:-what-sort-of-appropriate-delightful-benefit-could-expand-your-current-bank-roll
https://chodilinh.com/members/secretbets26.329735/#about
https://baskadia.com/user/h582
Алкогольная зависимость — серьёзная проблема, требующая незамедлительного лечения. Вывод из запоя — первый обязательный этап лечения алкоголизма, без которого невозможно дальнейшее лечение. Наша наркологическая клиника в Москве оказывает срочное лечение запоя на дому и в стационаре. Лечение начинается с очищения организма — инфузионной терапии, которую проводит опытный врач-нарколог. Эффективное лечение зависимости невозможно без анонимности, поэтому мы гарантируем полную конфиденциальность и соблюдение юридических прав пациентов. Лечение должно быть комплексным: детоксикация, терапия, кодирование, реабилитация. Наши специалисты используют современные методики выведения из запоя , применяя эффективные , которые быстро восстанавливают организм после интоксикации алкоголя . Лечение подбирается индивидуально, с учётом стажа, возраста, симптомов абстиненции, общего состояния и уровня токсического отравления. Диагностика состояния — обязательная часть первого приёма врача.
Подробнее тут – vyvod-iz-zapoya-nedorogo
Наличие обратной связи позволяет быстро отправить запрос
https://redmetsplav.ru/store/magniy-i-ego-splavy/zarubezhnye-splavy-2/magniy-mt2—jis-h-4202/folga-magnievaya-mt2—jis-h-4202/
Поставки всегда вовремя, логистика отлажена до мелочей, что важно для бесперебойной работы цеха.
https://xn--80aeedb0bfzeok.xn--p1ai/catalog/mednye-zaglushki-pod-paiku/mednaia-zaglushka-kolpachok-pod-paiku-22kh18kh0-9-mm-15-4kh17-6-mm-tverdaia-paika-m1e-gost-32590-2013/
FileTypeDB is a file format reference database: https://filetypedb.com. Detailed descriptions of 1,500+ extensions, their structure and specs, plus nearly 3,000 applications that can open each file type. A useful resource for developers and everyday users alike.
Наличие калькулятора металлопроката упрощает расчет веса и стоимости
https://redmetsplav.ru/store/magniy-i-ego-splavy/zarubezhnye-splavy-2/magniy-mg-c91-t5—en-2735/krug-magnievyy-mg-c91-t5—en-2735/
после вашего обращения наш врач приезжает по указанному адресу с медработниками в гражданской форме и на машине без опознавательных символов, проводит осмотр, собирает историю болезни (анамнез).
Подробнее тут – наркология вывод из запоя в сочи
Заказывали партию молибденовых листов для производства, качество металла идеальное, все сертификаты в наличии.
https://xn--80aeedb0bfzeok.xn--p1ai/catalog/latunnye-vnutrennie-stopornye-koltsa-po-gost/latunoe-vnutrennee-stopornoe-pruzhinnoe-koltso-12kh1-mm-lts30a3-gost-13943-86/
Нарколог на дом в Балашихе нужен, когда человек после алкоголя, запоя, отравления, абстинентного синдрома или употребления наркотиков не может самостоятельно восстановиться и нуждается в медицинской помощи. Вызов врача на дом позволяет быстро оценить состояние пациента, провести осмотр, подобрать препараты, назначить лекарства, поставить капельницу и определить, возможно ли лечение в домашних условиях или требуется госпитализация в стационаре.
Получить дополнительную информацию – vyzov-narkologa-na-dom
Сейчас выездной формат выбирают семьи, которым нужно обратиться за помощью быстро, анонимно и без длительного ожидания в клинике. Балашиха относится к московской области, поэтому выезд может выполняться не только по центральным районам города, но и по ближайшим направлениям, если адрес находится в зоне работы бригады. На сайте обычно указываются контакты, карта, цены, отзывы, документы, сведения о лицензии, режим работы, информация о специалистах и форма заявки, через которую можно заказать звонок или попросить, чтобы консультант перезвоним в удобное время.
Подробнее – narkolog-na-dom-vyvod-iz-zapoya
https://disqus.com/by/maxcrotty/about/
https://dailybeacon.site/item/1xbet-active-promo-code-myanmar-2026-1xhasard-bonus-130
https://www.iglinks.io/khoyratimagirpowa7456-rbr?preview=true
https://www.speedrun.com/users/melbetofthebes
Вывод из запоя в Сочи требуется, когда человек не может самостоятельно прекратить употребление алкоголя, испытывает тяжелое похмелья, признаки ломки, тревогу, бессонницу, рвоту, слабость, нарушение поведение и резкое ухудшение самочувствие. Даже если запой длится несколько дней, для здоровья сохраняется высокий риск осложнений: страдают сердце, печень, почки, нервного системы, психика и общее состояние организма.
Изучить вопрос глубже – вывод из запоя капельница в сочи
https://luma.com/user/usr-b03WhCJDyjMNiVM
Наркологическая помощь на дому особенно важна при алкогольной интоксикации, длительном запое, сильной слабости, тревоге, рвоте, нарушении сна, высоком давлении, треморе, спутанности поведения и риске осложнений. Врач нарколог приезжает по адресу, проводит диагностику, уточняет длительность употребления алкоголя, наличие хронического алкоголизма, опыт лечения, противопоказаний, заболеваний сердца, печени, нервной системы и других органов. После этого специалист выбирает безопасную схему терапии.
Разобраться лучше – https://narkolog-na-dom-balashiha13-2.ru/
Удобное разделение продукции на сплавы и конкретные виды проката
https://redmetsplav.ru/store/magniy-i-ego-splavy/zarubezhnye-splavy-2/magniy-mg-al3zn1mn—bs-3373/lenta-magnievaya-mg-al3zn1mn—bs-3373/
Сейчас выездной формат выбирают семьи, которым нужно обратиться за помощью быстро, анонимно и без длительного ожидания в клинике. Балашиха относится к московской области, поэтому выезд может выполняться не только по центральным районам города, но и по ближайшим направлениям, если адрес находится в зоне работы бригады. На сайте обычно указываются контакты, карта, цены, отзывы, документы, сведения о лицензии, режим работы, информация о специалистах и форма заявки, через которую можно заказать звонок или попросить, чтобы консультант перезвоним в удобное время.
Получить дополнительные сведения – http://narkolog-na-dom-balashiha13-2.ru
Поставки всегда вовремя, логистика отлажена до мелочей, что важно для бесперебойной работы цеха.
https://xn--80aeedb0bfzeok.xn--p1ai/catalog/mednye-zaglushki-pod-paiku/mednaia-zaglushka-kolpachok-pod-paiku-6kh4kh0-6-mm-5-8kh7-8-mm-miagkaia-paika-cu-dhp-gost-r-52922-2008/
Наркологическая помощь на дому особенно важна при алкогольной интоксикации, длительном запое, сильной слабости, тревоге, рвоте, нарушении сна, высоком давлении, треморе, спутанности поведения и риске осложнений. Врач нарколог приезжает по адресу, проводит диагностику, уточняет длительность употребления алкоголя, наличие хронического алкоголизма, опыт лечения, противопоказаний, заболеваний сердца, печени, нервной системы и других органов. После этого специалист выбирает безопасную схему терапии.
Получить дополнительные сведения – нарколог на дом московский
Основой лечения алкогольного запоя является инфузионная терапия — капельница. Капельница позволяет быстро доставить лекарства прямо в кровь, минуя желудочно-кишечный тракт. Состав капельницы подбирает врач-нарколог индивидуально, исходя из тяжести состояния и результатов теста показателей крови. В стандартную инфузионную терапию входят солевые растворы, витамины группы B и C, ноотропы, кардиопротекторы, гепатопротекторы, препараты для нормализации артериального давления и сердечной деятельности. Дозы лекарственных средств рассчитываются строго по весу и возрасту, с учётом противопоказаний. Лечение капельницей даёт быстрый эффект: уже через несколько часов пациент чувствует значительное улучшение. Капельница снимает тошноту, жажду, головную боль, уменьшает тремор и потливость, облегчает физическое состояние. Лечение абстинентного синдрома капельницей может проводиться амбулаторно на дому или в условиях стационара. Однако даже после капельницы необходимо продолжать лечение алкоголизма — терапия должна быть комплексной. Терапия обязательно включает необходимые процедуры для полного очищения организма и восстановления функций печени и мозга. Современная наркологическая помощь использует комплекс препаратов, направленных на снятие ломки, устранение депрессии и улучшение сна. Мы используем успокоительные и ноотропы, чтобы поддержать нервную систему и улучшить самочувствие в течение нескольких дней. Водно-электролитный баланс восстанавливается за счёт специальных растворов, что особенно важно при сильном обезвоживании.
Получить дополнительную информацию – vyvod-iz-zapoya-v-stacionare
В статье подробно рассказывается, как выбрать материалы для штор с учётом освещения, ухода и бюджета: ссылка.
Фольга из редких металлов часто требуется для высокотехнологичных лабораторий
https://redmetsplav.ru/store/magniy-i-ego-splavy/zarubezhnye-splavy-2/magniy-mcin1—jis-h-2221/provoloka-magnievaya-mcin1—jis-h-2221/
Нарколог на дом в Балашихе с оперативным приездом специалиста, оценкой состояния и проведением наркологической помощи в наркологической клинике «Частный Медик 24».
Узнать больше – vyzov-narkologa-na-dom-kruglosutochno-nedorogo
Hi there would you mind stating which blog platform you’re working with?
I’m looking to start my own blog soon but I’m having a hard
time selecting between BlogEngine/Wordpress/B2evolution and Drupal.
The reason I ask is because your design seems different then most blogs and I’m looking for something completely unique.
P.S Apologies for being off-topic but I had to ask!
Редметсплав — пример того, как должен работать современный поставщик металлургического сырья.
https://xn--80aeedb0bfzeok.xn--p1ai/catalog/latunnye-vnutrennie-stopornye-koltsa-po-gost/latunoe-vnutrennee-stopornoe-pruzhinnoe-koltso-9kh0-8-mm-ls59-gost-13943-86/
Вывод из запоя в Сочи требуется, когда человек не может самостоятельно прекратить употребление алкоголя, испытывает похмелья, признаки ломки, тревогу, бессонницу, рвоту, сильную слабость или резкое ухудшение самочувствие. Даже если запой длится несколько дней, риск осложнений остается высокий: страдают системы организма, печень, сердце, сосуды, нервная система, психика и общее состояние здоровья.
Разобраться лучше – вывод из запоя на дому цена
Наши специалисты используют эффективные методы детоксикации, которые помогают быстро устранить физическую тягу к наркотикам и нормализовать работу внутренних органов. Индивидуальный подход к каждому больному, грамотный подбор лекарственных средств и многолетний опыт врачей-наркологов гарантируют высокие результаты лечения. Здесь вы найдете всю необходимую информацию о том, как проходит детоксикация от наркотиков в нашем центре, какие методики применяются и почему так важно не откладывать обращение за профессиональной помощью. Мы также даем подробные рекомендации родственникам наркозависимых, помогая им правильно вести себя в кризисной ситуации и преодолеть страх осуждения. Мотивация больного на прохождение полного курса лечения — ключевой фактор, и наши психологи уделяют этому особое внимание.
Выяснить больше – https://detoksikaciya-narkomanov-moskva13-1.ru/detoksikaciya-narkozavisimyh-ceny/
Врач контролирует состояние пациента на протяжении всей процедуры — от первого введения препаратов до стабилизации самочувствия. Обычно уже через час после постановки капельницы уходит тошнота, нормализуется сон, снижается тревожность и тяга к спиртному. По завершении инфузионной терапии нарколог оставляет необходимые медикаменты на несколько дней, дает чёткие инструкции по их приёму и рекомендует дальнейшие шаги: амбулаторное наблюдение, кодирование или реабилитацию. После вывода из запоя обязательно даются рекомендации по продолжению лечения алкоголизма, включая кодирование и реабилитацию. Во многих случаях — да: в частной клинике платная помощь включает выездную стабилизацию, чтобы анонимно и быстро провести необходимые процедуры на месте.
Детальнее – narkolog-kapelnica-na-dom
Информация о проверке качества продукции повышает лояльность клиентов
https://redmetsplav.ru/store/magniy-i-ego-splavy/zarubezhnye-splavy-2/magniy-mag-5—bs-2970-1/pokovka-magnievaya-mag-5—bs-2970-1/
salon gier gdynia Najlepsze Kasyna Online casinos poland opinie
Благодарим за оперативную поставку ниобиевых труб, выручили в очень сжатые сроки.
https://xn--80aeedb0bfzeok.xn--p1ai/catalog/mednye-zaglushki-pod-paiku/mednaia-zaglushka-kolpachok-pod-paiku-18kh14kh0-8-mm-12-6kh14-6-mm-tverdaia-paika-m3-gost-32590-2013/
Программа лечения алкоголизма в нашем центре состоит из нескольких последовательных шагов, каждый из которых крайне важен для достижения устойчивой ремиссии. Сначала проводится экстренная детоксикация и вывод из запоя, затем подключается медикаментозная поддержка и кодирование, и завершает курс реабилитация с психологической поддержкой. Все этапы тесно связаны между собой, и только комплексное лечение позволяет рассчитывать на полный отказ от алкоголя. Рассмотрим каждый этап подробнее. Лечение алкоголизма — это путь, который начинается с признания проблемы, и мы помогаем пройти его до конца. Далее следует длительная работа, но первые положительные сдвиги заметны уже через несколько дней.
Выяснить больше – vyvod-iz-zapoya-s-vyezdom-balashiha
Указан физический адрес в Екатеринбурге, что повышает доверие
https://redmetsplav.ru/store/magniy-i-ego-splavy/zarubezhnye-splavy-2/magniy-mag-121—bs-3370/folga-magnievaya-mag-121—bs-3370/
vulkan bet 50 free spins Najszybciej wypЕ‚acajД…ce kasyna w Polsce fountain casino no deposit bonus
Спасибо команде за профессионализм и помощь в реализации нашего сложного промышленного проекта!
https://xn--80aeedb0bfzeok.xn--p1ai/catalog/latunnye-vnutrennie-stopornye-koltsa-po-gost/latunoe-vnutrennee-stopornoe-pruzhinnoe-koltso-68kh1-7-mm-l63-gost-13943-86/
https://www.adirs-bookmarks.win/1xbet-no-deposit-promo-code-2026-1xwow777-130
https://www.magcloud.com/user/casinomaster2
https://www.checkli.com/1xbet26586#/a/process
https://bn.quora.com/profile/Troymadrid67
https://actualites.cava.tn/user/whyttaxiyt
Вывод из запоя в Сочи требуется, когда человек не может самостоятельно прекратить употребление алкоголя, испытывает похмелья, признаки ломки, тревогу, бессонницу, рвоту, сильную слабость или резкое ухудшение самочувствие. Даже если запой длится несколько дней, риск осложнений остается высокий: страдают системы организма, печень, сердце, сосуды, нервная система, психика и общее состояние здоровья.
Ознакомиться с деталями – помощь вывод из запоя в сочи
https://forumtransportu.pl/forum/temat/59758
Вывод запоя на дому позволяет сохранить приватность: соседи, коллеги и знакомые не узнают о визите врача. Наркологическая служба работает анонимно, поэтому постановки на учет не происходит, а информация о пациенте не передается третьим лицам. Гарантия конфиденциальности особенно важна для тех, кто постоянно работает с людьми, занимает ответственное место или переживает за репутацию близкого человека.
Получить дополнительную информацию – вывод из запоя вызов в сочи
Пребывание в стационаре даёт целый ряд неоспоримых преимуществ, которые делают этот этап незаменимым для многих пациентов, особенно на начальной стадии терапии и в случаях тяжёлой интоксикации. Большое внимание мы уделяем качеству медицинских услуг и комфорту каждого пациента. В нашей частной клинике работают кандидаты медицинских наук и врачи высшей категории, что является гарантией успешного лечения алкоголизма и наркомании. Сейчас мы готовы принять вас в любом районе Москвы и Московской области.
Углубиться в тему – платная наркологическая клиника москва
Вызвать нарколога на дом следует при ухудшении самочувствия после алкоголя, при длительном запое, выраженном похмелье, отравлении спиртным, признаках абстиненции, тревоге, страхе, бессоннице, сильной слабости, нарушениях поведения и невозможности самостоятельно прекратить употребление. Чем дольше человек находится в запое, тем выше риск осложнений для здоровья, поэтому откладывать вызов врача опасно.
Подробнее можно узнать тут – вызов нарколога на дом недорого
Наличие обратной связи позволяет быстро отправить запрос
https://redmetsplav.ru/store/magniy-i-ego-splavy/zarubezhnye-splavy-2/magniy-m16620—uns/lenta-magnievaya-m16620—uns/
This is a very informative post about online casinos and betting platforms.
I especially liked how it explains the importance of choosing
a trusted site before signing up.
Many players often ask where they can find reliable
gaming platforms with fair odds and smooth payouts.
From what I’ve seen, checking platforms like vn22vip helps users compare features,
bonuses, and overall experience.
Thanks for sharing these insights — they’re helpful for both beginners and experienced bettors.
Технические специалисты компании помогли выбрать оптимальный сплав для работы в агрессивных средах.
https://xn--80aeedb0bfzeok.xn--p1ai/catalog/truba-aliuminievaia-kruglaia/truba-aliuminievaia-kruglaia-75kh2-mm-ad31t1/
legalne prawo jazdy do kupienia Kasyno Bonus bez Depozytu za RejestracjД™ blackjack online with friends free
Вывод из запоя на дому в Сочи проводится анонимно: соседям, коллегам и третьим лицам не передается информация о состоянии пациента, диагнозе, курсе лечения, факте вызова врача или необходимости дальнейшего наблюдения. Документы оформляются только в пределах медицинской работы, а постановки на учет при обращении в частную клинику не происходит.
Исследовать вопрос подробнее – вывод из запоя вызов на дом в сочи
Раздел «Контакты» содержит все необходимые реквизиты и карту
https://redmetsplav.ru/store/magniy-i-ego-splavy/zarubezhnye-splavy-2/magniy-m12300—uns/pokovka-magnievaya-m12300—uns/
Вывод запоя на дому позволяет сохранить приватность: соседи, коллеги и знакомые не узнают о визите врача. Наркологическая служба работает анонимно, поэтому постановки на учет не происходит, а информация о пациенте не передается третьим лицам. Гарантия конфиденциальности особенно важна для тех, кто постоянно работает с людьми, занимает ответственное место или переживает за репутацию близкого человека.
Углубиться в тему – наркологический вывод из запоя
Редметсплав — надежный партнер, работаем по поставкам нержавеющего проката уже второй год, сбоев не было.
https://xn--80aeedb0bfzeok.xn--p1ai/catalog/latunnye-vnutrennie-stopornye-koltsa-po-din/latunoe-vnutrennee-stopornoe-pruzhinnoe-koltso-m108-115kh4-mm-la-din-472/
jak zresetowac komputer Najlepsze Kasyna Online gdfplay no deposit bonus
Сайт адаптирован под нужды машиностроительных заводов
https://redmetsplav.ru/store/magniy-i-ego-splavy/zarubezhnye-splavy-2/magniy-m11101—uns/krug-magnievyy-m11101—uns/
Весь металл проходит строгий входной контроль, за всё время работы ни одного случая брака.
https://xn--80aeedb0bfzeok.xn--p1ai/catalog/mednoe-dvukhrastrubnoe-koleno-pod-paiku/mednoe-dvukhrastrubnoe-koleno-pod-paiku-180-gradusov-76-1kh65kh1-6-mm-12kh15-mm-tverdaia-paika-m1r-gost-r-52922-2008/
telefon siД™ nie Е‚aduje Najlepsze kasyna internetowe kasyno darmowe spiny za rejestracje
Сайт четко ориентирован на промышленный сектор и B2B сегмент
https://redmetsplav.ru/store/magniy-i-ego-splavy/zarubezhnye-splavy-2/magniy-m10100—uns/lenta-magnievaya-m10100—uns/
Ответственная компания, которая ценит долгосрочное сотрудничество, всегда идут навстречу клиенту.
https://xn--80aeedb0bfzeok.xn--p1ai/catalog/latunnye-vnutrennie-stopornye-koltsa-po-din/latunoe-vnutrennee-stopornoe-pruzhinnoe-koltso-m67-70-2kh2-5-mm-lmtszh-din-472/
Технические характеристики сплавов помогают инженерам в подборе
https://redmetsplav.ru/store/magniy-i-ego-splavy/zarubezhnye-splavy-2/magniy-iso-mc21210—bs-iso-16220/folga-magnievaya-iso-mc21210—bs-iso-16220/
maszyny na pieniądze Najlepsze kasyna internetowe na czym zarobić duże pieniądze
Нарколог на дом в Балашихе с быстрым выездом специалиста, осмотром пациента и оказанием медицинской помощи в наркологической клинике «Частный Медик 24».
Подробнее тут – нарколог капельница на дом
Надежная защита груза при транспортировке, даже длинномерные изделия доходят без повреждений.
https://xn--80aeedb0bfzeok.xn--p1ai/catalog/mednoe-dvukhrastrubnoe-koleno-pod-paiku/mednoe-dvukhrastrubnoe-koleno-pod-paiku-180-gradusov-15kh11kh0-7-mm-10-6kh12-6-mm-miagkaia-paika-m2-gost-r-52922-2008/
Каждый случай вывода из запоя требует своего подхода. Лечение в клинике или на дому начинается с вызова нарколога. Врач приедет быстро, проведёт осмотр, назначит лечение. Лечение алкоголизма — длительный процесс, и важно помнить, что для успешного выздоровления нужно пройти длительный процесс, который может занять несколько месяцев или даже больше, в зависимости от степени зависимости. Если запой затягивается, а попытки самостоятельного вывода из состояния запоя на дому не приносят результата, следует обратиться к опытному врачу. Наши врачи помогут вывести из запоя даже в самых тяжёлых случаях, когда человек страдает от длительного употребления и огромного желания выпить. Лечение зависимости требует не только медикаментов, но и работы с психотерапевтом, изменения поведения, мотивации. У нас можно заказать услугу вывода из запоя, получить консультацию и записаться на лечение. Опыт наших специалистов — более 15 лет успешного лечения алкоголиков и наркозависимых. Мы помогаем справиться с последствиями отравления этиловым спиртом и продуктами его распада.
Подробнее тут – http://
Использование файлов cookie и политика конфиденциальности соответствуют закону
https://redmetsplav.ru/store/magniy-i-ego-splavy/zarubezhnye-splavy-2/magniy-g-zr—afnor-nf-a57-704/krug-magnievyy-g-zr—afnor-nf-a57-704/
Сегодня легко вызвать нарколога на дом в балашиху круглосуточно, просто позвонив по единому телефону нашего специализированного центра в любое время суток, любой день (даже в выходные и праздники). Нарколог на дом в Балашихе — экстренная помощь при алкогольной и наркотической зависимости. Если ваш близкий человек страдает от запоя или отравления алкоголем, не ждите — срочный вызов врача на дом позволит быстро стабилизировать состояние и избежать тяжёлых последствий. Наша наркологическая клиника предлагает полный комплекс услуг: вывод из запоя, кодирование, детоксикацию, психотерапию и реабилитацию. Опытные специалисты выезжают по любому адресу в Балашихе и ближайшим районам Московской области. Мы работаем круглосуточно, гарантируем полную анонимность и конфиденциальность — никакие данные не передаются третьим лицам, а врач приезжает без опознавательных знаков.
Разобраться лучше – chastnyj-narkolog-na-dom-telefon
Вывод из запоя на дому в Сочи подходит пациентам, у которых нет признаков острого психоза, тяжелого отравления, судорог, потери сознания и других состояний, требующих немедленной госпитализации. Врач нарколог приезжает по адресу, проводит обследование, уточняет, сколько дней длится запой, какие препараты человек принимал, есть ли хронические болезни, аллергии, ограничения по здоровью и документы, подтверждающие прошлое лечение.
Подробнее – вывод из запоя цена сочи
Стационарное лечение запоя в Балашихе — эффективное решение для длительного запоя. Мы предлагаем индивидуальный подход и комплексную терапию для каждого пациента.
Детальнее – вывод из запоя с выездом
kasyna z darmowymi spinami Kasyno Bonus bez Depozytu za RejestracjД™ automaty online na pieniadze
Основой лечения алкогольного запоя является инфузионная терапия — капельница. Капельница позволяет быстро доставить лекарства прямо в кровь, минуя желудочно-кишечный тракт. Состав капельницы подбирает врач-нарколог индивидуально, исходя из тяжести состояния и результатов теста показателей крови. В стандартную инфузионную терапию входят солевые растворы, витамины группы B и C, ноотропы, кардиопротекторы, гепатопротекторы, препараты для нормализации артериального давления и сердечной деятельности. Дозы лекарственных средств рассчитываются строго по весу и возрасту, с учётом противопоказаний. Лечение капельницей даёт быстрый эффект: уже через несколько часов пациент чувствует значительное улучшение. Капельница снимает тошноту, жажду, головную боль, уменьшает тремор и потливость, облегчает физическое состояние. Лечение абстинентного синдрома капельницей может проводиться амбулаторно на дому или в условиях стационара. Однако даже после капельницы необходимо продолжать лечение алкоголизма — терапия должна быть комплексной. Терапия обязательно включает необходимые процедуры для полного очищения организма и восстановления функций печени и мозга. Современная наркологическая помощь использует комплекс препаратов, направленных на снятие ломки, устранение депрессии и улучшение сна. Мы используем успокоительные и ноотропы, чтобы поддержать нервную систему и улучшить самочувствие в течение нескольких дней. Водно-электролитный баланс восстанавливается за счёт специальных растворов, что особенно важно при сильном обезвоживании.
Подробнее можно узнать тут – помощь вывод из запоя
Покупали изделия из драгметаллов для лаборатории, всё соответствует заявленным характеристикам.
https://xn--80aeedb0bfzeok.xn--p1ai/catalog/latunnye-vnutrennie-stopornye-koltsa-po-din/latunoe-vnutrennee-stopornoe-pruzhinnoe-koltso-m125-132kh4-mm-lts23a6zh3mts2-din-472/
Каждый случай вывода из запоя требует своего подхода. Лечение в клинике или на дому начинается с вызова нарколога. Врач приедет быстро, проведёт осмотр, назначит лечение. Лечение алкоголизма — длительный процесс, и важно помнить, что для успешного выздоровления нужно пройти длительный процесс, который может занять несколько месяцев или даже больше, в зависимости от степени зависимости. Если запой затягивается, а попытки самостоятельного вывода из состояния запоя на дому не приносят результата, следует обратиться к опытному врачу. Наши врачи помогут вывести из запоя даже в самых тяжёлых случаях, когда человек страдает от длительного употребления и огромного желания выпить. Лечение зависимости требует не только медикаментов, но и работы с психотерапевтом, изменения поведения, мотивации. У нас можно заказать услугу вывода из запоя, получить консультацию и записаться на лечение. Опыт наших специалистов — более 15 лет успешного лечения алкоголиков и наркозависимых. Мы помогаем справиться с последствиями отравления этиловым спиртом и продуктами его распада.
Подробнее – вывод из запоя на дому недорого
Информация о доставке по всей РФ делает компанию универсальным поставщиком
https://redmetsplav.ru/store/magniy-i-ego-splavy/zarubezhnye-splavy-2/magniy-gk-mgal8zn1—din-1729-part-2/folga-magnievaya-gk-mgal8zn1—din-1729-part-2/
Jungle Driving School Omaha
4020 Ѕ 147th St, Omaha,
NE 68137, United Ѕtates
14024170547
school bus driver course
Обратившись к нам, вы получаете не только экстренную помощь, но и полный комплекс услуг с гарантией качества и анонимности. Вот основные преимущества нашей работы:
Детальнее – нарколог капельница на дом
Реабилитация после запоя в стационаре Балашихи. Мы поможем вам восстановиться после запоя и предотвратить рецидивы.
Подробнее – вывод из запоя в стационаре в балашихе
Вывод из запоя у пожилых людей в стационаре Балашихи. Наши специалисты учитывают возрастные изменения организма при назначении лечения.
Подробнее тут – вывод из запоя круглосуточно в балашихе
Нарколог на дом в Балашихе с выездом врача, диагностикой состояния и проведением необходимой помощи в наркологической клинике «Частный Медик 24».
Получить дополнительные сведения – вызов нарколога на дом круглосуточно
Высокая квалификация персонала, знают специфику редких металлов и особенности их применения.
https://xn--80aeedb0bfzeok.xn--p1ai/catalog/mednoe-dvukhrastrubnoe-koleno-pod-paiku/mednoe-dvukhrastrubnoe-koleno-pod-paiku-180-gradusov-40-5kh36kh1-1-mm-27kh29-mm-tverdaia-paika-m3r-gost-32590-2013/
Нарколог на дом в Балашихе с выездом врача, диагностикой состояния и проведением необходимой помощи в наркологической клинике «Частный Медик 24».
Узнать больше – http://www.domen.ru
salon gier lotto biaЕ‚ystok Najlepsze kasyna internetowe slots casino polska
Четкая структура меню позволяет быстро найти нужный металл
https://redmetsplav.ru/store/magniy-i-ego-splavy/zarubezhnye-splavy-2/magniy-g-a3z1—afnor-nf-a65-717/izdeliya-iz-magniya-g-a3z1—afnor-nf-a65-717/
Детоксикация наркоманов в Москве — это первый и самый важный шаг на пути к полному избавлению от наркотической зависимости. В наркологической клинике «Частный Медик 24» детоксикация от наркотиков проводится строго в условиях стационара, с применением современных медицинских методик и под круглосуточным контролем опытных врачей. Лечение наркомании требует комплексного подхода, и детоксикация позволяет безопасно очистить организм от токсичных продуктов распада психоактивных веществ, снять острые симптомы абстиненции и подготовить пациента к дальнейшей реабилитации. Мы работаем круглосуточно, чтобы каждый житель Москвы и области мог получить экстренную наркологическую помощь именно тогда, когда она жизненно необходима. Хочу подчеркнуть: наша главная задача — не просто снять ломку, а сделать первый шаг к полноценной жизни без наркотиков. Использование качественных медикаментов и проверенных схем детоксикации является основой успешного лечения.
Ознакомиться с деталями – детоксикация организма от наркотиков москва
https://github.com/promocode5
https://bbs.ybk001.com/home.php?mod=space&uid=544508
https://www.clickasnap.com/profile/bonuspromocode2
https://motion-gallery.net/users/1013094
https://jali.me/codigoprom1
Благодарим за оперативную поставку ниобиевых труб, выручили в очень сжатые сроки.
https://xn--80aeedb0bfzeok.xn--p1ai/catalog/latunnye-vnutrennie-stopornye-koltsa-po-din/latunoe-vnutrennee-stopornoe-pruzhinnoe-koltso-m90-95-5kh3-mm-lsch-din-472/
czy lotto to hazard Najlepsze Kasyna Online ivibet bonus bez depozytu
Магниевый прокат представлен в достаточном ассортименте
https://redmetsplav.ru/store/magniy-i-ego-splavy/zarubezhnye-splavy-2/magniy-ek41a—astm-b275/truba-magnievaya-ek41a—astm-b275/
Алкогольная зависимость — серьёзная болезнь, которая часто сопровождается длительными запоями. Симптомы интоксикации этанолом требуют немедленного медицинского вмешательства. Признаки, при которых нужно вызывать врача на дом: сильная рвота, скачки артериального давления, бессонница, тревожность, тремор, спутанность сознания. Если вовремя не начать лечение алкоголизма, могут развиться алкогольный психоз, делирий, серьёзные нарушения работы сердечно-сосудистой и нервной систем. Квалифицированная помощь на дому позволяет быстро снять абстинентный синдром и нормализовать самочувствие. Наш врач-нарколог приедет в течение 30–60 минут, проведёт осмотр, поставит капельницу и окажет необходимую психологическую поддержку. Не стоит заниматься самолечением — только профессиональный нарколог способен правильно оценить тяжесть состояния и подобрать эффективные препараты. Помните: каждый час промедления увеличивает риск серьёзных осложнений, поэтому действовать нужно незамедлительно. Позвоните прямо сейчас, и дежурный консультант оформит вызов, сориентирует по ценам и ответит на любые вопросы.
Получить дополнительную информацию – vyzov-narkologa-na-dom-nedorogo
Алкогольная зависимость — серьёзная болезнь, которая часто сопровождается длительными запоями. Симптомы интоксикации этанолом требуют немедленного медицинского вмешательства. Признаки, при которых нужно вызывать врача на дом: сильная рвота, скачки артериального давления, бессонница, тревожность, тремор, спутанность сознания. Если вовремя не начать лечение алкоголизма, могут развиться алкогольный психоз, делирий, серьёзные нарушения работы сердечно-сосудистой и нервной систем. Квалифицированная помощь на дому позволяет быстро снять абстинентный синдром и нормализовать самочувствие. Наш врач-нарколог приедет в течение 30–60 минут, проведёт осмотр, поставит капельницу и окажет необходимую психологическую поддержку. Не стоит заниматься самолечением — только профессиональный нарколог способен правильно оценить тяжесть состояния и подобрать эффективные препараты. Помните: каждый час промедления увеличивает риск серьёзных осложнений, поэтому действовать нужно незамедлительно. Позвоните прямо сейчас, и дежурный консультант оформит вызов, сориентирует по ценам и ответит на любые вопросы.
Подробнее – нарколог на дом московский
Вы получаете не просто разовую процедуру, а комплекс медицинской помощи. Врач нарколога может объяснить родственникам, как говорить с зависимым, что делать после капельницы, какие препараты принимать, когда необходимо лечение в клинике и почему кодирование алкоголизма или реабилитация часто становятся следующим этапом. Такой подход помогает не только вывести пациента из запоя, но и начать полноценное восстановление.
Изучить вопрос глубже – вывод из запоя клиника
Весь металл проходит строгий входной контроль, за всё время работы ни одного случая брака.
https://xn--80aeedb0bfzeok.xn--p1ai/catalog/mednoe-dvukhrastrubnoe-koleno-pod-paiku/mednoe-dvukhrastrubnoe-koleno-pod-paiku-180-gradusov-64kh55kh1-4-mm-32-5kh34-5-mm-tverdaia-paika-m3rt-gost-32590-2013/
Вывод из запоя в Сочи требуется, когда человек не может самостоятельно прекратить употребление алкоголя, испытывает тяжелое похмелья, симптомы ломки, тревогу, рвоту, бессонницу, слабость, ухудшение самочувствие и изменение поведение. Даже если запой длится всего несколько дней, риск осложнений для здоровья остается высокий: страдают сердце, печень, почки, нервного системы, психика и общее состояние организма.
Подробнее – вывод из запоя на дому цена сочи
Описание применения металлов в атомной энергетике подчеркивает качество
https://redmetsplav.ru/store/magniy-i-ego-splavy/zarubezhnye-splavy-2/magniy-az92—csa-hg-9/polosa-magnievaya-az92—csa-hg-9/
hot slot online Kasyno Bonus bez Depozytu za RejestracjД™ playbison kod promocyjny 2026
https://demcra.com/r/test/1276915_How_to_Maximize_a_Table_Games_Bonus_for_Better_Rewards
Getting back into the workforce happens more often than you’d think. This is where our site can help: you explore truck driver salary australia, with no hidden fees and no fine print, and apply to as many roles as you like, whenever suits you.
Врач контролирует состояние пациента на протяжении всей процедуры — от первого введения препаратов до стабилизации самочувствия. Обычно уже через час после постановки капельницы уходит тошнота, нормализуется сон, снижается тревожность и тяга к спиртному. По завершении инфузионной терапии нарколог оставляет необходимые медикаменты на несколько дней, дает чёткие инструкции по их приёму и рекомендует дальнейшие шаги: амбулаторное наблюдение, кодирование или реабилитацию. После вывода из запоя обязательно даются рекомендации по продолжению лечения алкоголизма, включая кодирование и реабилитацию. Во многих случаях — да: в частной клинике платная помощь включает выездную стабилизацию, чтобы анонимно и быстро провести необходимые процедуры на месте.
Исследовать вопрос подробнее – narkolog-na-dom
https://anunt-imob.ro/user/profile/867498
https://hostndobezi.com/code1win9
https://www.halaltrip.com/user/profile/369010/parissportifs1/
https://sketchfab.com/Rice-Jamel
https://calisthenics.mn.co/members/40572502
Поставки всегда вовремя, логистика отлажена до мелочей, что важно для бесперебойной работы цеха.
https://xn--80aeedb0bfzeok.xn--p1ai/catalog/latunnoe-litoe-koltso/latunnoe-litoe-koltso-70kh100-mm-ls59/
Обратившись к нам, вы получаете не только экстренную помощь, но и полный комплекс услуг с гарантией качества и анонимности. Вот основные преимущества нашей работы:
Получить дополнительные сведения – вызов нарколога на дом
Широкий выбор тугоплавких металлов, таких как вольфрам и молибден
https://redmetsplav.ru/store/magniy-i-ego-splavy/zarubezhnye-splavy-2/magniy-az80a—astm-b107/provoloka-magnievaya-az80a—astm-b107/
Анонимность и конфиденциальность гарантированы. Мы обеспечиваем полную анонимность и конфиденциальность на всех этапах лечения.
Подробнее – помощь вывод из запоя в балашихе
Программа 12 шагов построена как последовательный путь: человек учится признавать болезнь, принимать помощь, разбирать причины употребления, проводить моральную инвентаризацию, исправить ошибки, компенсировать нанесенный ущерб и поддерживать трезвость через регулярные действия. В основе программы лежит не давление, а постепенная работа с отрицанием, самообманом, страхами и привычкой возвращаться к прежним решениям.
Детальнее – 12 шаговая программа для зависимых
Наркологическая помощь на дому особенно важна при алкогольной интоксикации, длительном запое, сильной слабости, тревоге, рвоте, нарушении сна, высоком давлении, треморе, спутанности поведения и риске осложнений. Врач нарколог приезжает по адресу, проводит диагностику, уточняет длительность употребления алкоголя, наличие хронического алкоголизма, опыт лечения, противопоказаний, заболеваний сердца, печени, нервной системы и других органов. После этого специалист выбирает безопасную схему терапии.
Подробнее – нарколог на дом московский
Нарколог на дом в Балашихе с быстрым выездом специалиста, осмотром пациента и оказанием медицинской помощи в наркологической клинике «Частный Медик 24».
Подробнее можно узнать тут – http://www.domen.ru
Удобный сайт и понятная навигация по каталогу, легко найти нужную марку стали или сплава.
https://xn--80aeedb0bfzeok.xn--p1ai/catalog/mednyi-perekhodnoi-troinik-press/mednyi-perekhodnoi-press-troinik-15kh10-mm-m3-gost-r-52948-2008/
sol casino bonus code п»їKasyno Online Polska black horse automat
Сегодня легко вызвать нарколога на дом в балашиху круглосуточно, просто позвонив по единому телефону нашего специализированного центра в любое время суток, любой день (даже в выходные и праздники). Нарколог на дом в Балашихе — экстренная помощь при алкогольной и наркотической зависимости. Если ваш близкий человек страдает от запоя или отравления алкоголем, не ждите — срочный вызов врача на дом позволит быстро стабилизировать состояние и избежать тяжёлых последствий. Наша наркологическая клиника предлагает полный комплекс услуг: вывод из запоя, кодирование, детоксикацию, психотерапию и реабилитацию. Опытные специалисты выезжают по любому адресу в Балашихе и ближайшим районам Московской области. Мы работаем круглосуточно, гарантируем полную анонимность и конфиденциальность — никакие данные не передаются третьим лицам, а врач приезжает без опознавательных знаков.
Исследовать вопрос подробнее – narkolog-na-dom-vyvod-iz-zapoya
Вывод из запоя в Балашихе с медицинским наблюдением, индивидуальным подбором терапии и помощью специалистов в наркологической клинике «Частный Медик 24».
Исследовать вопрос подробнее – вывод из запоя клиника
Пребывание в стационаре даёт целый ряд неоспоримых преимуществ, которые делают этот этап незаменимым для многих пациентов, особенно на начальной стадии терапии и в случаях тяжёлой интоксикации. Большое внимание мы уделяем качеству медицинских услуг и комфорту каждого пациента. В нашей частной клинике работают кандидаты медицинских наук и врачи высшей категории, что является гарантией успешного лечения алкоголизма и наркомании. Сейчас мы готовы принять вас в любом районе Москвы и Московской области.
Подробнее – anonimnaya-narkologicheskaya-klinika-moskva
Большой опыт работы, судя по копирайту с 2013 года
https://redmetsplav.ru/store/magniy-i-ego-splavy/zarubezhnye-splavy-2/magniy-as41b—astm-b94/list-magnievyy-as41b—astm-b94/
Профессиональный подход менеджеров в Екатеринбурге, грамотно проконсультировали по техническим характеристикам сплавов.
https://xn--80aeedb0bfzeok.xn--p1ai/catalog/latunnye-vnutrennie-stopornye-koltsa-po-din/latunoe-vnutrennee-stopornoe-pruzhinnoe-koltso-m17-18-3kh1-mm-lk-din-472/
goodgame poker gry pl Najlepsze kasyna internetowe bonus bez depozytu betclic
Вывод из запоя на дому удобен, когда пациенту тяжело посещать клинику, когда близкого человека нельзя оставить одного или когда необходимо быстро получить помощь без поездки в больницы. Нарколог приезжает на место, проводит обследование, фиксирует жалобы, проверяет давление, пульс, насыщение кислородом, оценивает риски и затем назначает лечение запоя.
Узнать больше – вывод из запоя капельница сочи
Раздел «Контакты» содержит все необходимые реквизиты и карту
https://redmetsplav.ru/store/magniy-i-ego-splavy/zarubezhnye-splavy-2/magniy-am-60/pokovka-magnievaya-am-60/
Долго искали надежного поставщика циркония, в Редметсплав предложили лучшие условия и чистоту металла.
https://xn--80aeedb0bfzeok.xn--p1ai/catalog/mednyi-perekhodnoi-troinik-press/mednyi-perekhodnoi-press-troinik-34kh6-mm-m3r-gost-r-52948-2008/
Вывод из запоя на дому — это комплексная процедура, которая начинается с первичного осмотра и диагностики состояния пациента. Врач-нарколог оценивает уровень интоксикации, измеряет артериальное давление, проверяет пульс, собирает анамнез. Только после этого принимается решение о схеме лечения. Основной метод — инфузионная терапия (капельница). Капельница содержит солевые растворы, витамины (группы B и C), гепатопротекторы, ноотропы, успокоительные средства, а при необходимости — кардиопротекторы и препараты для нормализации давления. Очищение организма после установки капельницы позволит в короткое время привести пациента в осознанное состояние и существенно облегчит последствия абстинентного синдрома. Медикаментозное лечение алкоголизма включает ускоренный вывод продуктов распада этанола из крови, восстановление самочувствия и устранение симптомов похмелья.
Подробнее тут – narkologi-na-domu-nedorogo
Информация о доставке по всей РФ делает компанию универсальным поставщиком
https://redmetsplav.ru/store/magniy-i-ego-splavy/zarubezhnye-splavy-2/magniy-9990—csa-hg-2/lenta-magnievaya-9990—csa-hg-2/
Основой лечения алкогольного запоя на дому является инфузионная терапия — капельница, состав которой подбирает опытный нарколог после осмотра пациента. Медикаментозное лечение алкоголизма включает ускоренный вывод продуктов распада этанола из крови, восстановление самочувствия и устранение симптомов похмелья. Очищение организма после установки капельницы позволит в короткое время привести пациента в осознанное состояние и существенно облегчит последствия абстинентного синдрома. Для снятия тревоги, бессонницы и депрессии дополнительно назначаются седативные и психотерапевтические средства. Во многих случаях — да: в частной клинике платная помощь включает выездную стабилизацию, чтобы анонимно и быстро провести необходимые процедуры на месте. Вызов нарколога на дом оплачивается по доступным ценам, а первичная консультация по телефону предоставляется бесплатно. Лечение алкоголизма требует комплексного подхода, поэтому после детокса врач рекомендует дальнейшую программу: кодирование, психотерапию, реабилитацию.
Получить больше информации – https://narkolog-na-dom-balashiha13-1.ru/
Вывод из запоя — это экстренная наркологическая помощь, направленная на безопасное прерывание длительного употребления алкоголя и комплексное лечение алкогольной зависимости. Алкогольная зависимость — тяжёлая болезнь, которая разрушает здоровье и требует немедленного лечения. Вывод из запоя — первый и самый важный этап лечения алкоголизма, ведь без качественного вывода из запоя невозможно эффективное избавление от пагубного пристрастия. Наша наркологическая клиника в Москве предлагает срочный вывод из запоя на дому и в стационаре. Лечение запоя начинается с детоксикации — капельницы, которая очищает организм от токсинов и продуктов распада алкоголя. Опытный нарколог проводит осмотр, оценивает физическое состояние и возраст пациента, подбирает необходимые препараты и ставит капельницу. Лечение должно быть анонимным и безопасным, поэтому мы гарантируем полную конфиденциальность — ваше имя не разглашается, документы не передаются третьим лицам. Вывод из запоя — это лишь начало лечения алкоголизма, за ним следует длительная терапия, кодирование и реабилитация. Важно понимать: лечение зависимости — процесс не одного дня, но он станет первым шагом к полноценной жизни. Наши специалисты используют современные методики выведения из запоя , применяя эффективные , которые быстро восстанавливают организм после интоксикации алкоголя .
Узнать больше – https://vyvod-iz-zapoya-balashiha13-1.ru/
gry na pieniД…dze online Najszybciej wyplacajace kasyna w Polsce freebet za rejestracjД™
Технические специалисты компании помогли выбрать оптимальный сплав для работы в агрессивных средах.
https://xn--80aeedb0bfzeok.xn--p1ai/catalog/latunnoe-litoe-koltso/latunnoe-litoe-koltso-500kh600-mm-lts30a3/
Нарколог на дом в Балашихе нужен, когда человек после алкоголя, запоя, отравления, абстинентного синдрома или употребления наркотиков не может самостоятельно восстановиться и нуждается в медицинской помощи. Вызов врача на дом позволяет быстро оценить состояние пациента, провести осмотр, подобрать препараты, назначить лекарства, поставить капельницу и определить, возможно ли лечение в домашних условиях или требуется госпитализация в стационаре.
Детальнее – narkolog-na-dom-moskovskoj-oblasti
Раздел «Производство» подтверждает статус завода, а не просто перекупщика
https://redmetsplav.ru/store/magniy-i-ego-splavy/zarubezhnye-splavy-2/magniy-3-5161—din-1729-part-1/polosa-magnievaya-3-5161—din-1729-part-1/
выездная наркологическая служба оперативно приедет по указанному адресу, имея при себе все необходимое оборудование и медикаменты, в том числе для оказания неотложной помощи.
Выяснить больше – врач вывод из запоя сочи
Вывод из запоя в стационаре — безопасное и комфортное восстановление. В нашем стационаре созданы все условия для быстрого и эффективного вывода из запоя.
Получить дополнительные сведения – вывод из запоя на дому цена в балашихе
Удобный сайт и понятная навигация по каталогу, легко найти нужную марку стали или сплава.
https://xn--80aeedb0bfzeok.xn--p1ai/catalog/mednyi-perekhodnoi-troinik-press/mednyi-perekhodnoi-press-troinik-40-5kh25-mm-m2-gost-r-52948-2008/
sportaza casino no deposit bonus п»їKasyno Online Polska best online gambling sites
Наличие циркония свидетельствует о работе с высокотехнологичными заказами
https://redmetsplav.ru/store/magniy-i-ego-splavy/rossiyskie-splavy-1/magniy-ml3—gost-2856-79/list-magnievyy-ml3—gost-2856-79/
Обращаем внимание, что таблица носит ознакомительный характер. Точную программу лечения и финальную цену определяет врач после осмотра и необходимых анализов. Врач нарколог бесплатно ответит на все ваши вопросы по услуге вывода из запоя на дому и оформит вызов врача.
Получить дополнительную информацию – vyvod-iz-zapoya-cena-balashiha
Алкогольная зависимость — серьёзная проблема, требующая незамедлительного лечения. Вывод из запоя — первый обязательный этап лечения алкоголизма, без которого невозможно дальнейшее лечение. Наша наркологическая клиника в Москве оказывает срочное лечение запоя на дому и в стационаре. Лечение начинается с очищения организма — инфузионной терапии, которую проводит опытный врач-нарколог. Эффективное лечение зависимости невозможно без анонимности, поэтому мы гарантируем полную конфиденциальность и соблюдение юридических прав пациентов. Лечение должно быть комплексным: детоксикация, терапия, кодирование, реабилитация. Наши специалисты используют современные методики выведения из запоя , применяя эффективные , которые быстро восстанавливают организм после интоксикации алкоголя . Лечение подбирается индивидуально, с учётом стажа, возраста, симптомов абстиненции, общего состояния и уровня токсического отравления. Диагностика состояния — обязательная часть первого приёма врача.
Углубиться в тему – kruglosutochnyj-vyvod-iz-zapoya-balashiha
В Балашихе выездной формат удобен для семьи, если близкого нельзя быстро доставить в клинику или состояние пациента ухудшается на фоне длительного запоя. Дом становится местом первичной стабилизации, когда врач видит, что капельница, вывод из запоя, консультация, снятие интоксикации и дальнейшие рекомендации могут быть проведены безопасно. Если состояние тяжелое, нарколог объясняет, почему нужна госпитализация, стационар, дополнительные обследования и круглосуточный медицинский контроль.
Выяснить больше – narkolog-na-dom-balashiha13-4.ru/
Ответственная компания, которая ценит долгосрочное сотрудничество, всегда идут навстречу клиенту.
https://xn--80aeedb0bfzeok.xn--p1ai/catalog/latunnaia-vtulka/latunnaia-vtulka-160-mm-lts23a6zh3mts2/
Алкогольная зависимость — серьёзная проблема, требующая незамедлительного лечения. Вывод из запоя — первый обязательный этап лечения алкоголизма, без которого невозможно дальнейшее лечение. Наша наркологическая клиника в Москве оказывает срочное лечение запоя на дому и в стационаре. Лечение начинается с очищения организма — инфузионной терапии, которую проводит опытный врач-нарколог. Эффективное лечение зависимости невозможно без анонимности, поэтому мы гарантируем полную конфиденциальность и соблюдение юридических прав пациентов. Лечение должно быть комплексным: детоксикация, терапия, кодирование, реабилитация. Наши специалисты используют современные методики выведения из запоя , применяя эффективные , которые быстро восстанавливают организм после интоксикации алкоголя . Лечение подбирается индивидуально, с учётом стажа, возраста, симптомов абстиненции, общего состояния и уровня токсического отравления. Диагностика состояния — обязательная часть первого приёма врача.
Ознакомиться с деталями – вывод из алкогольного запоя
Врач контролирует состояние пациента на протяжении всей процедуры — от первого введения препаратов до стабилизации самочувствия. Обычно уже через час после постановки капельницы уходит тошнота, нормализуется сон, снижается тревожность и тяга к спиртному. По завершении инфузионной терапии нарколог оставляет необходимые медикаменты на несколько дней, дает чёткие инструкции по их приёму и рекомендует дальнейшие шаги: амбулаторное наблюдение, кодирование или реабилитацию. После вывода из запоя обязательно даются рекомендации по продолжению лечения алкоголизма, включая кодирование и реабилитацию. Во многих случаях — да: в частной клинике платная помощь включает выездную стабилизацию, чтобы анонимно и быстро провести необходимые процедуры на месте.
Ознакомиться с деталями – vyzov-vracha-narkologa-na-dom
jak pokazac ping w lolu Kasyno Bonus bez Depozytu za Rejestracje darmowe spiny za potwierdzenie e mail
Информация о доставке по всей РФ делает компанию универсальным поставщиком
https://redmetsplav.ru/store/magniy-i-ego-splavy/rossiyskie-splavy-1/magniy-ma14/izdeliya-iz-magniya-ma14/
Цены на спецстали одни из самых конкурентных на рынке, при этом качество на уровне мировых стандартов.
https://xn--80aeedb0bfzeok.xn--p1ai/catalog/mednyi-perekhodnoi-troinik-press/mednyi-perekhodnoi-press-troinik-53-6kh14-mm-m2t-gost-r-52948-2008/
Основа лечения запоя — инфузионная терапия (капельница). Капельница позволяет быстро доставить необходимые лекарственные средства прямо в кровь, минуя желудок. Стандартная лечебная процедура включает введение солевых растворов, витаминного комплекса, успокоительных, ноотропов, гепатопротекторов, кардиопротекторов. Такая терапия снимает острую интоксикацию, восстанавливает водно-солевой баланс, улучшает работу сердца, печени, головного мозга. Лечение с помощью капельницы даёт облегчение уже через несколько часов: проходит тошнота, головная боль, тремор, снижается давление, налаживается сон. Эффективность лечения зависит от качества препаратов и опыта врача. Наши специалисты используют собственные проверенные методики, гарантируя безопасность. При лечении алкогольной зависимости капельница — только первый шаг. Далее лечение продолжается таблетированными формами (налтрексон, дисульфирам, Алгоминал, Эспераль). Медикаментозное лечение помогает снизить тягу к алкоголю и предотвратить срыв. Любое лечение индивидуально и зависит от длительности запоя, степени алкоголизации, тяжести состояния пациента на момент проведения лечения, наличия сопутствующей патологии и хронических заболеваний. Мы также проводим лечение наркотической зависимости, используя УБОД для снятия ломки от героина, метадона, солей, спайса, марихуаны, амфетамина. Однако основная специализация — лечение алкоголизма, прерывание запоев и восстановление после них.
Подробнее тут – narkolog-vyvod-iz-zapoya
Использование современных технологий защиты данных пользователей
https://redmetsplav.ru/store/kobalt/wallex/kobalt-wallex-25-2/provoloka-kobaltovaya-wallex-25-2/
gaminator kody bonusowe forum Najlepsze Kasyna Online ruletka bonus bez depozytu
Основа лечения запоя — инфузионная терапия (капельница). Капельница позволяет быстро доставить необходимые лекарственные средства прямо в кровь, минуя желудок. Стандартная лечебная процедура включает введение солевых растворов, витаминного комплекса, успокоительных, ноотропов, гепатопротекторов, кардиопротекторов. Такая терапия снимает острую интоксикацию, восстанавливает водно-солевой баланс, улучшает работу сердца, печени, головного мозга. Лечение с помощью капельницы даёт облегчение уже через несколько часов: проходит тошнота, головная боль, тремор, снижается давление, налаживается сон. Эффективность лечения зависит от качества препаратов и опыта врача. Наши специалисты используют собственные проверенные методики, гарантируя безопасность. При лечении алкогольной зависимости капельница — только первый шаг. Далее лечение продолжается таблетированными формами (налтрексон, дисульфирам, Алгоминал, Эспераль). Медикаментозное лечение помогает снизить тягу к алкоголю и предотвратить срыв. Любое лечение индивидуально и зависит от длительности запоя, степени алкоголизации, тяжести состояния пациента на момент проведения лечения, наличия сопутствующей патологии и хронических заболеваний. Мы также проводим лечение наркотической зависимости, используя УБОД для снятия ломки от героина, метадона, солей, спайса, марихуаны, амфетамина. Однако основная специализация — лечение алкоголизма, прерывание запоев и восстановление после них.
Получить дополнительную информацию – vyvod-iz-zapoya-balashiha
Перед заказом штор советую ознакомиться с этим пошаговым гидом — есть чек-лист замеров и рекомендации по выбору ткани: ссылка.
Вывод из запоя на дому в Сочи проводится анонимно: соседям, коллегам и третьим лицам не передается информация о состоянии пациента, диагнозе, курсе лечения, факте вызова врача или необходимости дальнейшего наблюдения. Документы оформляются только в пределах медицинской работы, а постановки на учет при обращении в частную клинику не происходит.
Узнать больше – вывод из запоя круглосуточно в сочи
Каждый случай вывода из запоя требует своего подхода. Лечение в клинике или на дому начинается с вызова нарколога. Врач приедет быстро, проведёт осмотр, назначит лечение. Лечение алкоголизма — длительный процесс, и важно помнить, что для успешного выздоровления нужно пройти длительный процесс, который может занять несколько месяцев или даже больше, в зависимости от степени зависимости. Если запой затягивается, а попытки самостоятельного вывода из состояния запоя на дому не приносят результата, следует обратиться к опытному врачу. Наши врачи помогут вывести из запоя даже в самых тяжёлых случаях, когда человек страдает от длительного употребления и огромного желания выпить. Лечение зависимости требует не только медикаментов, но и работы с психотерапевтом, изменения поведения, мотивации. У нас можно заказать услугу вывода из запоя, получить консультацию и записаться на лечение. Опыт наших специалистов — более 15 лет успешного лечения алкоголиков и наркозависимых. Мы помогаем справиться с последствиями отравления этиловым спиртом и продуктами его распада.
Исследовать вопрос подробнее – http://vyvod-iz-zapoya-balashiha13.ru
Быстрая доставка в регионы через «Деловые Линии», груз пришел в целости и отлично упакованным.
https://xn--80aeedb0bfzeok.xn--p1ai/catalog/latunnoe-litoe-koltso/latunnoe-litoe-koltso-900kh400-mm-lmtss/
Наличие кобальтовых сплавов заинтересует авиастроение
https://redmetsplav.ru/store/kobalt/stellite/kobalt-stellite-4/truba-kobaltovaya-stellite-4/
Нарколог на дом приезжает в экстренных и неотложных ситуациях и быстро оценивает состояние и сразу начинает необходимые процедуры. Врач может провести вывод из запоя, снятие абстинентного синдрома, медикаментозное вытрезвление, стабилизацию давления, инфузионную терапию, подбор лекарств, мотивационную беседу и первичный план восстановления. Помощь оказывается анонимно, без постановки на учет, без лишних опознавательных знаков и без передачи персональных данных третьим лицам.
Получить дополнительные сведения – http://narkolog-na-dom-v-novorossijske3.ru
automaty online game Kasyno Bonus bez Depozytu za Rejestracje automaty do gry kasyno joker
Ответственная компания, которая ценит долгосрочное сотрудничество, всегда идут навстречу клиенту.
https://xn--80aeedb0bfzeok.xn--p1ai/catalog/mednyi-perekhodnoi-troinik-press/mednyi-perekhodnoi-press-troinik-18kh12-mm-m3m-gost-r-52948-2008/
Помощь оказывают врачи с практикой в наркологии, психиатрии и восстановительной терапии.
Подробнее тут – запой нарколог на дом в новороссийске
Вывод из запоя — это только первый шаг в лечении алкогольной зависимости. Без последующей терапии риск рецидива очень высок. Наш наркологический центр предлагает полный курс лечения алкоголизма, включая кодирование и психотерапию. Кодирование на дому проводится различными методами: уколом (Торпедо, Эспераль, Налтрексон, Аквилонг), медикаментозным вшиванием (дисульфирам, Вивитрол), гипнозом по Довженко, а также двойным блоком. Каждый метод подбирается врачом индивидуально, с согласия пациента и при отсутствии противопоказаний. Опытный нарколог объяснит, какая кодировка подойдёт именно вам, учитывая стаж и форму зависимости.
Разобраться лучше – vyzov-narkologa-na-dom-kruglosutochno-nedorogo
Нарколог на дом приезжает в экстренных и неотложных ситуациях и быстро оценивает состояние и сразу начинает необходимые процедуры. Врач может провести вывод из запоя, снятие абстинентного синдрома, медикаментозное вытрезвление, стабилизацию давления, инфузионную терапию, подбор лекарств, мотивационную беседу и первичный план восстановления. Помощь оказывается анонимно, без постановки на учет, без лишних опознавательных знаков и без передачи персональных данных третьим лицам.
Разобраться лучше – вызвать нарколога на дом новороссийск
Сайт поддерживает английскую версию, что важно для экспорта
https://redmetsplav.ru/store/kobalt/stellite/kobalt-stellite-12h/prutok-kobaltovyy-stellite-12h/
Нарколог на дом в Балашихе с быстрым приездом специалиста, осмотром пациента и медицинской поддержкой в наркологической клинике «Похмельная служба».
Получить дополнительную информацию – http://narkolog-na-dom-balashiha13-4.ru
Основой лечения алкогольного запоя является инфузионная терапия — капельница. Капельница позволяет быстро доставить лекарства прямо в кровь, минуя желудочно-кишечный тракт. Состав капельницы подбирает врач-нарколог индивидуально, исходя из тяжести состояния и результатов теста показателей крови. В стандартную инфузионную терапию входят солевые растворы, витамины группы B и C, ноотропы, кардиопротекторы, гепатопротекторы, препараты для нормализации артериального давления и сердечной деятельности. Дозы лекарственных средств рассчитываются строго по весу и возрасту, с учётом противопоказаний. Лечение капельницей даёт быстрый эффект: уже через несколько часов пациент чувствует значительное улучшение. Капельница снимает тошноту, жажду, головную боль, уменьшает тремор и потливость, облегчает физическое состояние. Лечение абстинентного синдрома капельницей может проводиться амбулаторно на дому или в условиях стационара. Однако даже после капельницы необходимо продолжать лечение алкоголизма — терапия должна быть комплексной. Терапия обязательно включает необходимые процедуры для полного очищения организма и восстановления функций печени и мозга. Современная наркологическая помощь использует комплекс препаратов, направленных на снятие ломки, устранение депрессии и улучшение сна. Мы используем успокоительные и ноотропы, чтобы поддержать нервную систему и улучшить самочувствие в течение нескольких дней. Водно-электролитный баланс восстанавливается за счёт специальных растворов, что особенно важно при сильном обезвоживании.
Углубиться в тему – srochnyj-vyvod-iz-zapoya
Обращаем внимание, что таблица носит ознакомительный характер. Точную программу лечения и финальную цену определяет врач после осмотра и необходимых анализов. Врач нарколог бесплатно ответит на все ваши вопросы по услуге вывода из запоя на дому и оформит вызов врача.
Подробнее тут – вывод из запоя с выездом
Лечение зависимости от алкоголя у мужчин в стационаре Балашихи. Мы предлагаем индивидуальный подход к лечению мужчин, учитывая все особенности организма.
Изучить вопрос глубже – вывод из запоя капельница на дому в балашихе
Основой лечения алкогольного запоя является инфузионная терапия — капельница. Капельница позволяет быстро доставить лекарства прямо в кровь, минуя желудочно-кишечный тракт. Состав капельницы подбирает врач-нарколог индивидуально, исходя из тяжести состояния и результатов теста показателей крови. В стандартную инфузионную терапию входят солевые растворы, витамины группы B и C, ноотропы, кардиопротекторы, гепатопротекторы, препараты для нормализации артериального давления и сердечной деятельности. Дозы лекарственных средств рассчитываются строго по весу и возрасту, с учётом противопоказаний. Лечение капельницей даёт быстрый эффект: уже через несколько часов пациент чувствует значительное улучшение. Капельница снимает тошноту, жажду, головную боль, уменьшает тремор и потливость, облегчает физическое состояние. Лечение абстинентного синдрома капельницей может проводиться амбулаторно на дому или в условиях стационара. Однако даже после капельницы необходимо продолжать лечение алкоголизма — терапия должна быть комплексной. Терапия обязательно включает необходимые процедуры для полного очищения организма и восстановления функций печени и мозга. Современная наркологическая помощь использует комплекс препаратов, направленных на снятие ломки, устранение депрессии и улучшение сна. Мы используем успокоительные и ноотропы, чтобы поддержать нервную систему и улучшить самочувствие в течение нескольких дней. Водно-электролитный баланс восстанавливается за счёт специальных растворов, что особенно важно при сильном обезвоживании.
Получить больше информации – вывод из запоя с выездом
основанием для вызова специалиста является неспособность человека самостоятельно выйти из состояния непрерывного употребления алкоголя и наличие признаков абстиненции.
Подробнее тут – вывод из запоя на дому круглосуточно сочи
Снятие ломки при алкоголизме в стационаре Балашихи. Наши специалисты помогут вам справиться с симптомами абстиненции.
Подробнее тут – вывод из запоя клиника в балашихе
kasyna podobne do total casino Najlepsze Kasyna Online hell spin bonus bez depozytu
Ответственная компания, которая ценит долгосрочное сотрудничество, всегда идут навстречу клиенту.
https://xn--80aeedb0bfzeok.xn--p1ai/catalog/latunnoe-litoe-koltso/latunnoe-litoe-koltso-450kh400-mm-lts14k3s3/
Алкогольная зависимость — серьёзная болезнь, которая часто сопровождается длительными запоями. Симптомы интоксикации этанолом требуют немедленного медицинского вмешательства. Признаки, при которых нужно вызывать врача на дом: сильная рвота, скачки артериального давления, бессонница, тревожность, тремор, спутанность сознания. Если вовремя не начать лечение алкоголизма, могут развиться алкогольный психоз, делирий, серьёзные нарушения работы сердечно-сосудистой и нервной систем. Квалифицированная помощь на дому позволяет быстро снять абстинентный синдром и нормализовать самочувствие. Наш врач-нарколог приедет в течение 30–60 минут, проведёт осмотр, поставит капельницу и окажет необходимую психологическую поддержку. Не стоит заниматься самолечением — только профессиональный нарколог способен правильно оценить тяжесть состояния и подобрать эффективные препараты. Помните: каждый час промедления увеличивает риск серьёзных осложнений, поэтому действовать нужно незамедлительно. Позвоните прямо сейчас, и дежурный консультант оформит вызов, сориентирует по ценам и ответит на любые вопросы.
Подробнее – нарколог на дом круглосуточно
Наличие редких позиций, например, изделий из гафния и ванадия
https://redmetsplav.ru/store/kobalt/rossiyskie-splavy-3/kobalt-k2/provoloka-kobaltovaya-k2/
В Балашихе выездной формат удобен для семьи, если близкого нельзя быстро доставить в клинику или состояние пациента ухудшается на фоне длительного запоя. Дом становится местом первичной стабилизации, когда врач видит, что капельница, вывод из запоя, консультация, снятие интоксикации и дальнейшие рекомендации могут быть проведены безопасно. Если состояние тяжелое, нарколог объясняет, почему нужна госпитализация, стационар, дополнительные обследования и круглосуточный медицинский контроль.
Получить дополнительные сведения – http://www.domen.ru
Вывод из запоя в стационаре — безопасное и комфортное восстановление. В нашем стационаре созданы все условия для быстрого и эффективного вывода из запоя.
Разобраться лучше – вывод из запоя вызов на дом
Помощь при алкогольной интоксикации в стационаре Балашихи. Наши специалисты проведут необходимые процедуры для снятия симптомов интоксикации.
Разобраться лучше – наркология вывод из запоя
Рекомендации строятся вокруг состояния человека, а не по универсальному шаблону для всех случаев.
Углубиться в тему – https://narkolog-na-dom-v-novorossijske1.ru
Помощь при алкогольной интоксикации в стационаре Балашихи. Наши специалисты проведут необходимые процедуры для снятия симптомов интоксикации.
Исследовать вопрос подробнее – помощь вывод из запоя
Thanks on your marvelous posting! I definitely enjoyed reading it,
you are a great author.I will ensure that I bookmark your
blog and will often come back sometime soon. I want to encourage that you continue your great posts, have a nice day!
Порадовало наличие вольфрамовых прутков редких диаметров, менеджер оперативно помог с подбором.
https://xn--80aeedb0bfzeok.xn--p1ai/catalog/mednyi-perekhodnoi-troinik-press/mednyi-perekhodnoi-press-troinik-70kh28-mm-m1-gost-r-52948-2008/
Нарколог на дом — это профессиональная медицинская помощь без поездки в клинику, когда человек находится в состоянии запоя, алкогольной интоксикации, наркотической ломки, сильного похмелья, тревоги, бессонницы или резкого ухудшения самочувствия. Выездной врач проводит осмотр пациента, оценивает состояние организма, подбирает препараты, ставит капельницу, выполняет необходимые процедуры и дает рекомендации по дальнейшему лечению. Такая наркологическая помощь особенно важна, если ситуация требует быстрого реагирования, а самостоятельно ехать в центр, диспансер или стационар невозможно.
Получить больше информации – нарколог на дом в новороссийске
Наличие обратной связи позволяет быстро отправить запрос
https://redmetsplav.ru/store/kobalt/rossiyskie-splavy-3/kobalt-ep207/provoloka-kobaltovaya-ep207/
polskie legalne kasyna Najszybciej wyplacajace kasyna w Polsce darmowe pieniadze za rejestracje bez depozytu
Лечение зависимости от алкоголя в стационаре Балашихи. Наши специалисты приедут к вам домой и проведут все необходимые процедуры.
Узнать больше – вывод из запоя
I love your blog.. very nice colors & theme. Did you design this website yourself
or did you hire someone to do it for you? Plz
answer back as I’m looking to construct my own blog and would like
to find out where u got this from. thanks
Наркологическая помощь позволяет безопасно начать выведение токсинов, снизить интоксикации, восстановить водно-солевой баланс и подобрать дальнейшее лечение алкогольной зависимости. Нарколог проводит анализ состояния пациента, уточняет стаж употребления спиртного, причины запоя, наличие хронического заболевания, психических расстройств, противопоказаний и других ограничений. После диагностики врач выбирает схему: амбулаторно на дому, в стационаре клиники или с госпитализацией.
Подробнее тут – вывод из запоя капельница в сочи
Запоя вывод в клинике Сочи: лечение алкогольной интоксикации, капельница, детоксикация, помощь нарколога на дому, кодирование и реабилитация
Подробнее тут – наркология вывод из запоя сочи
Абстинентный синдром, или «ломка», — это мучительное состояние, которое возникает при отказе от приёма наркотических веществ. Человек испытывает сильные физические и психические страдания: боль в мышцах и суставах, тошноту, рвоту, бессонницу, потливость, дрожь в теле, панические атаки, агрессию или глубокую депрессию. В такие моменты больной не способен контролировать свои действия и нуждается в экстренной медицинской помощи. Детоксикация наркомана в условиях стационара позволяет купировать абстинентный синдром, предотвратить опасные для жизни осложнения, такие как острая сердечная или дыхательная недостаточность. Стоит отметить, что попытки самостоятельной борьбы с ломкой часто заканчиваются срывом или передозировкой, поэтому так важно своевременно обратиться к профессионалам.
Подробнее можно узнать тут – detoksikaciya-organizma-ot-narkotikov
Технические характеристики сплавов помогают инженерам в подборе
https://redmetsplav.ru/store/kobalt/haynes/kobalt-haynes-150-1/prutok-kobaltovyy-haynes-150-1/
Ответственная компания, которая ценит долгосрочное сотрудничество, всегда идут навстречу клиенту.
https://xn--80aeedb0bfzeok.xn--p1ai/catalog/latunnoe-litoe-koltso/latunnoe-litoe-koltso-125kh700-mm-lazhmts/
najlepsze gry kasyno Najszybciej wyplacajace kasyna w Polsce kod promocyjny do vulkan vegas
Вывод из запоя — это только первый шаг в лечении алкогольной зависимости. Без последующей терапии риск рецидива очень высок. Наш наркологический центр предлагает полный курс лечения алкоголизма, включая кодирование и психотерапию. Кодирование на дому проводится различными методами: уколом (Торпедо, Эспераль, Налтрексон, Аквилонг), медикаментозным вшиванием (дисульфирам, Вивитрол), гипнозом по Довженко, а также двойным блоком. Каждый метод подбирается врачом индивидуально, с согласия пациента и при отсутствии противопоказаний. Опытный нарколог объяснит, какая кодировка подойдёт именно вам, учитывая стаж и форму зависимости.
Подробнее можно узнать тут – https://narkolog-na-dom-balashiha13-3.ru/
Основой лечения алкогольного запоя является инфузионная терапия — капельница. Капельница позволяет быстро доставить лекарства прямо в кровь, минуя желудочно-кишечный тракт. Состав капельницы подбирает врач-нарколог индивидуально, исходя из тяжести состояния и результатов теста показателей крови. В стандартную инфузионную терапию входят солевые растворы, витамины группы B и C, ноотропы, кардиопротекторы, гепатопротекторы, препараты для нормализации артериального давления и сердечной деятельности. Дозы лекарственных средств рассчитываются строго по весу и возрасту, с учётом противопоказаний. Лечение капельницей даёт быстрый эффект: уже через несколько часов пациент чувствует значительное улучшение. Капельница снимает тошноту, жажду, головную боль, уменьшает тремор и потливость, облегчает физическое состояние. Лечение абстинентного синдрома капельницей может проводиться амбулаторно на дому или в условиях стационара. Однако даже после капельницы необходимо продолжать лечение алкоголизма — терапия должна быть комплексной. Терапия обязательно включает необходимые процедуры для полного очищения организма и восстановления функций печени и мозга. Современная наркологическая помощь использует комплекс препаратов, направленных на снятие ломки, устранение депрессии и улучшение сна. Мы используем успокоительные и ноотропы, чтобы поддержать нервную систему и улучшить самочувствие в течение нескольких дней. Водно-электролитный баланс восстанавливается за счёт специальных растворов, что особенно важно при сильном обезвоживании.
Выяснить больше – vyvod-iz-zapoya-s-vyezdom-balashiha
Для срочного обращения подходит точная формулировка услуги: сегодня легко вызвать нарколога на дом в балашиху круглосуточно, просто позвонив по единому телефону нашего специализированного центра в любое время суток, любой день (даже в выходные и праздники).
Детальнее – нарколог на дом круглосуточно
Врач контролирует состояние пациента на протяжении всей процедуры — от первого введения препаратов до стабилизации самочувствия. Обычно уже через час после постановки капельницы уходит тошнота, нормализуется сон, снижается тревожность и тяга к спиртному. По завершении инфузионной терапии нарколог оставляет необходимые медикаменты на несколько дней, дает чёткие инструкции по их приёму и рекомендует дальнейшие шаги: амбулаторное наблюдение, кодирование или реабилитацию. После вывода из запоя обязательно даются рекомендации по продолжению лечения алкоголизма, включая кодирование и реабилитацию. Во многих случаях — да: в частной клинике платная помощь включает выездную стабилизацию, чтобы анонимно и быстро провести необходимые процедуры на месте.
Получить дополнительные сведения – narkolog-na-dom-balashiha
Алкогольная зависимость — серьёзная болезнь, которая часто сопровождается длительными запоями. Симптомы интоксикации этанолом требуют немедленного медицинского вмешательства. Признаки, при которых нужно вызывать врача на дом: сильная рвота, скачки артериального давления, бессонница, тревожность, тремор, спутанность сознания. Если вовремя не начать лечение алкоголизма, могут развиться алкогольный психоз, делирий, серьёзные нарушения работы сердечно-сосудистой и нервной систем. Квалифицированная помощь на дому позволяет быстро снять абстинентный синдром и нормализовать самочувствие. Наш врач-нарколог приедет в течение 30–60 минут, проведёт осмотр, поставит капельницу и окажет необходимую психологическую поддержку. Не стоит заниматься самолечением — только профессиональный нарколог способен правильно оценить тяжесть состояния и подобрать эффективные препараты. Помните: каждый час промедления увеличивает риск серьёзных осложнений, поэтому действовать нужно незамедлительно. Позвоните прямо сейчас, и дежурный консультант оформит вызов, сориентирует по ценам и ответит на любые вопросы.
Получить дополнительные сведения – вызов нарколога на дом круглосуточно недорого
Наркологическая помощь помогает безопасно начать выведение токсинов, снизить выраженность алкогольной интоксикации, восстановить водно-солевой баланс и подобрать дальнейшее лечение алкоголизма. Нарколог проводит анализ состояния пациента, уточняет стаж употребления спиртного, причины запоя, наличие хронического заболевания, психических расстройств, противопоказаний и других ограничений. После диагностика врач выбирает схему: амбулаторно на дому, в стационаре клиники или с дальнейшей госпитализацией.
Углубиться в тему – вывод из запоя сочи
https://www.centrotecnologico.edu.mx/profile/codeprombonus173822/profile
https://www.bib.az/blogs/154578/Sportsbook-Bonus-vs-Casino-Bonus
https://hanson.net/users/codgeosxbet
https://penzu.com/p/e600e993566edc86
https://500px.com/p/bonuscode20623?view=photos
http://app.gxbs.net/home.php?mod=space&uid=2009640
Описание складских позиций сокращает время ожидания ответа
https://redmetsplav.ru/store/tantal-i-ego-splavy/tantal-t-10-1/truba-tantalovaya-t-10/
Удобный сайт и понятная навигация по каталогу, легко найти нужную марку стали или сплава.
https://xn--80aeedb0bfzeok.xn--p1ai/catalog/mednyi-perekhodnoi-troinik-press/mednyi-perekhodnoi-press-troinik-27-4kh22-mm-m1t-gost-r-52948-2008/
beep beep casino darmowe spiny Kasyno Bonus bez Depozytu za Rejestracje kasyna z wplata blik
Профессиональный подход менеджеров в Екатеринбурге, грамотно проконсультировали по техническим характеристикам сплавов.
https://xn--80aeedb0bfzeok.xn--p1ai/catalog/latunnoe-litoe-koltso/latunnoe-litoe-koltso-450kh500-mm-lazhmts/
Врач контролирует состояние пациента на протяжении всей процедуры — от первого введения препаратов до стабилизации самочувствия. Обычно уже через час после постановки капельницы уходит тошнота, нормализуется сон, снижается тревожность и тяга к спиртному. По завершении инфузионной терапии нарколог оставляет необходимые медикаменты на несколько дней, дает чёткие инструкции по их приёму и рекомендует дальнейшие шаги: амбулаторное наблюдение, кодирование или реабилитацию. После вывода из запоя обязательно даются рекомендации по продолжению лечения алкоголизма, включая кодирование и реабилитацию. Во многих случаях — да: в частной клинике платная помощь включает выездную стабилизацию, чтобы анонимно и быстро провести необходимые процедуры на месте.
Выяснить больше – chastnyj-narkolog-na-dom
sts wyplata w punkcie Najlepsze Kasyna Online proszД™ o weryfikacjД™
Запоя вывод в клинике Сочи: лечение алкогольной интоксикации, капельница, детоксикация, помощь нарколога на дому, кодирование и реабилитация
Исследовать вопрос подробнее – вывод из запоя клиника сочи
после вашего обращения наш врач приезжает по указанному адресу с медработниками в гражданской форме и на машине без опознавательных символов, проводит осмотр, собирает историю болезни (анамнез).
Разобраться лучше – вывод из запоя дешево
Наличие циркония свидетельствует о работе с высокотехнологичными заказами
https://redmetsplav.ru/store/volfram/splavy-volframa-1/volfram-vd-25-1/poroshok-volframovyy-vd-25/
звоните круглосуточно по телефону горячей линии клиники: наши специалисты готовы оказать необходимую помощь в решении проблемы алкогольной зависимости.
Подробнее – http://vivod-iz-zapoya-sochi23.ru
dragon slots bonus bez depozytu п»їKasyno Online Polska jackpot gra online za darmo
Выбор наркологической клиники — решение, от которого зависит не только здоровье, но и будущее человека. В «Триумфе» понимают, что зависимость затрагивает всю семью, поэтому программы лечения алкоголизма обязательно включают работу с родственниками, групп психологической поддержки и формирование устойчивой мотивации на трезвость. За годы деятельности мы помогли сотням людей вернуть контроль над своей жизнью, и каждый новый пациент для нас — не просто история болезни, а человек, заслуживающий уважения, сострадания и профессиональной помощи. Наши специалисты успешно лечат как алкогольную, так и наркотическую зависимость, а также помогают справиться с игроманией и другими видами расстройств. Если вам нужна наркологическая клиника в Москве, где работают настоящие профессионалы, — звоните в «Триумф». Очень важно не откладывать обращение, ведь на счету каждая минута, и наша скорая наркологическая помощь доступна круглосуточно.
Разобраться лучше – https://narkologicheskaya-klinika-moskva13.ru/anonimnaya-narkologicheskaya-klinika-moskva/
Описание преимуществ компании подчеркивает надежность поставок
https://redmetsplav.ru/store/vismut/zarubezhnye-splavy-3/vismut-toc-13—pn-h-87203/polosa-vismutovaya-toc-13—pn-h-87203/
Благодарим за оперативную поставку ниобиевых труб, выручили в очень сжатые сроки.
https://xn--80aeedb0bfzeok.xn--p1ai/catalog/latunnoe-litoe-koltso/latunnoe-litoe-koltso-100kh200-mm-lts30a3/
Запоя вывод в клинике Сочи: лечение алкогольной интоксикации, капельница, детоксикация, помощь нарколога на дому, кодирование и реабилитация
Ознакомиться с деталями – вывод из запоя на дому круглосуточно
С пациентом работают профильные специалисты, которые оценивают состояние и подбирают безопасный план помощи.
Подробнее – http://www.domen.ru
В Новороссийске наркологическая служба работает круглосуточно: вы можете вызвать специалиста на дом в любое время суток, ночью, в праздники и без выходных. Наркологическая служба работает по принципу круглосуточного дежурства, что позволяет оказать быструю помощь в экстренных случаях. При обращении по телефону оператор уточняет адрес, состояние больного, длительность приема алкоголя или наркотиков, наличие хронических заболеваний, противопоказания, жалобы, симптомы и необходимость срочного выезда.
Детальнее – вызвать нарколога на дом
Информация о проверке качества продукции повышает лояльность клиентов
https://redmetsplav.ru/store/vismut/zarubezhnye-splavy-3/vismut-n26055—uns/krug-vismutovyy-n26055—uns/
Удобный сайт и понятная навигация по каталогу, легко найти нужную марку стали или сплава.
https://xn--80aeedb0bfzeok.xn--p1ai/catalog/mednye-otvody-press/mednyi-otvod-press-90-gradusov-53-6-mm-m1t-gost-r-52948-2008/
bonus no deposit 2026 Kasyno Bonus bez Depozytu za Rejestracje darmowe spiny za rejestracje kasyno
Сегодня легко вызвать нарколога на дом в Балашиху круглосуточно, просто позвонив по единому телефону нашего специализированного центра в любое время суток, любой день (даже в выходные и праздники). Наркологическая помощь может понадобиться в любое время дня и ночи, поэтому клиника доктора Исаева оказывает широкий спектр услуг, в том числе в домашних условиях, 24/7. Алкогольная зависимость и наркомания — серьёзные заболевания, требующие немедленного квалифицированного вмешательства. Вывод из запоя и лечение алкоголизма на дому или в стационаре начинается с полного осмотра врача-нарколога, диагностики состояния и назначения индивидуальной схемы терапии. Мы гарантируем полную анонимность и конфиденциальность — данные пациента обрабатываются строго в соответствии с политикой обработки персональных данных. Наши специалисты имеют многолетний опыт работы с зависимыми людьми, используют современные и безопасные препараты, позволяющие быстро восстановить организм после отравления алкоголем или наркотиками. Лечение алкоголизма — это процесс, который требует времени и комплексного подхода, но первый шаг к выздоровлению можно сделать уже сегодня. Очень важно не откладывать обращение, ведь каждый день запоя усугубляет состояние здоровья и повышает риск тяжелых осложнений. Вывод из запоя и детоксикация — первый этап на пути к трезвости, и от качества лечения зависит дальнейшая ремиссия.
Получить дополнительную информацию – vyzov-narkologa-na-dom
Помощь можно получить анонимно, с аккуратным оформлением и внимательным отношением к личным данным.
Получить дополнительные сведения – вывод из запоя на дому в новороссийске
Нарколог на дом приезжает в экстренных и неотложных ситуациях и быстро оценивает состояние и сразу начинает необходимые процедуры. Врач может провести вывод из запоя, снятие абстинентного синдрома, медикаментозное вытрезвление, стабилизацию давления, инфузионную терапию, подбор лекарств, мотивационную беседу и первичный план восстановления. Помощь оказывается анонимно, без постановки на учет, без лишних опознавательных знаков и без передачи персональных данных третьим лицам.
Получить больше информации – нарколог на дом анонимно в новороссийске
Помощь может включать консультацию, детоксикацию, стационар и дальнейшее сопровождение по показаниям.
Подробнее можно узнать тут – вывод из запоя на дому цена
Весь металл проходит строгий входной контроль, за всё время работы ни одного случая брака.
https://xn--80aeedb0bfzeok.xn--p1ai/catalog/latunnaia-vtulka/latunnaia-vtulka-199-mm-lts40mts3zh/
darmowe spiny lemon casino Najszybciej wyplacajace kasyna w Polsce pytania do gry
https://jm-cougar.fr/
Cheers! Loads of knowledge.
Капельница от запоя в стационаре — эффективный способ детоксикации. Мы используем современные препараты для быстрого и безопасного выведения из запоя.
Получить больше информации – нарколог вывод из запоя
Информация о доставке по всей РФ делает компанию универсальным поставщиком
https://redmetsplav.ru/store/vismut/zarubezhnye-splavy-3/vismut-cac904/pokovka-vismutovaya-cac904/
mr bet casino opinie п»їKasyno Online Polska paysera bonus bez depozytu
https://wiki-net.win/index.php/Bonus_instantan%C3%A9_sans_d%C3%A9p%C3%B4t_:_profitez_d%E2%80%99une_offre_imm%C3%A9diate_sans_verser_d%E2%80%99argent
https://jobs.landscapeindustrycareers.org/profiles/8593276-betboostpro7
https://all4.vip/p/page/view-persons-profile?id=135860
https://portfolium.com/freebonus1
https://coactuem.ub.edu/profiles/melbetindia1/activity?locale=en
https://roadwiki.site/wiki/Code_Promo_Bookmaker_Le_Guide_Complet_Pour_Profiter_des_Meilleures_Offres_en_Ligne
Профессиональный подход к описанию каждого вида металла
https://redmetsplav.ru/store/vismut/zarubezhnye-splavy-3/vismut-c89831—cda/provoloka-vismutovaya-c89831—cda/
Спасибо команде за профессионализм и помощь в реализации нашего сложного промышленного проекта!
https://xn--80aeedb0bfzeok.xn--p1ai/catalog/latunnaia-vtulka/latunnaia-vtulka-90-mm-lts23a6zh3mts2/
звоните круглосуточно по телефону горячей линии клиники: наши специалисты готовы оказать необходимую помощь в решении проблемы алкогольной зависимости.
Детальнее – http://vivod-iz-zapoya-sochi23.ru
darmowe spiny za rejestracje nowosci п»їKasyno Online Polska kasyno bez depozytu za rejestracje 2026
Продажа проволоки из тугоплавких металлов востребована в электронике
https://redmetsplav.ru/store/vismut/zarubezhnye-splavy-3/vismut-c49255—uns/list-vismutovyy-c49255—uns/
Надежная защита груза при транспортировке, даже длинномерные изделия доходят без повреждений.
https://xn--80aeedb0bfzeok.xn--p1ai/catalog/melkhiorovaia-truba/melkhiorovaia-truba-22kh1-2kh14000-mm-mnzhmts30-1-1-gost-10092-2006/
zakЕ‚ady bukmacherskie bez depozytu Najlepsze kasyna internetowe kasyno online polski
Капельница от запоя в стационаре — эффективный способ детоксикации. Мы используем современные препараты для быстрого и безопасного выведения из запоя.
Ознакомиться с деталями – вывод из запоя на дому цена
Возможность заказа висмута — достаточно редкое предложение на рынке
https://redmetsplav.ru/store/vismut/zarubezhnye-splavy-3/vismut-42-3993—csnstn-423993/pokovka-vismutovaya-42-3993—csnstn-423993/
Закупали шлак ферросилиция для строительных нужд, материал качественный, без лишних примесей.
https://xn--80aeedb0bfzeok.xn--p1ai/catalog/provoloka-latunnaia/provoloka-latunnaia-8mm-ls59-1ptv/
Реабилитация после запоя в стационаре Балашихи. Мы поможем вам восстановиться после запоя и предотвратить рецидивы.
Подробнее – https://vyvod-iz-zapoya-v-stacionare-balashiha13.ru/
Наркологическая клиника «Триумф» в Москве — специализированное медицинское учреждение, где пациенты получают квалифицированную помощь при алкогольной и наркотической зависимости. Лечение алкоголизма и наркомании в нашей клинике проводят опытные наркологи и психиатры, которые знают, как вернуть человека к нормальной жизни. Мы объединили под одной крышей специалистов разного профиля, чтобы предложить полноценный замкнутый цикл лечения: от первичной консультации и детоксикации до длительной реабилитации и социальной адаптации. Наша наркологическая клиника предлагает как стационарное лечение, так и помощь на дому — обратившись к нам, вы можете быть уверены в полной анонимности. Главные ценности нашей работы — безопасность, анонимное лечение, доказательная медицина и бережное отношение к каждому обратившемуся. В клинике созданы комфортные условия для стационарного пребывания, включая палаты различной категории, а также предусмотрена возможность амбулаторного наблюдения и выездной помощи на дому.
Узнать больше – narkologicheskaya-klinika-v-moskve-ceny
Hello it’s me, I am also visiting this web page on a regular basis, this website is truly fastidious
and the people are truly sharing fastidious thoughts.
my web-site عرب سكس
Детоксикация наркоманов в Москве — это первый и самый важный шаг на пути к полному избавлению от наркотической зависимости. В наркологической клинике «Частный Медик 24» детоксикация от наркотиков проводится строго в условиях стационара, с применением современных медицинских методик и под круглосуточным контролем опытных врачей. Лечение наркомании требует комплексного подхода, и детоксикация позволяет безопасно очистить организм от токсичных продуктов распада психоактивных веществ, снять острые симптомы абстиненции и подготовить пациента к дальнейшей реабилитации. Мы работаем круглосуточно, чтобы каждый житель Москвы и области мог получить экстренную наркологическую помощь именно тогда, когда она жизненно необходима. Хочу подчеркнуть: наша главная задача — не просто снять ломку, а сделать первый шаг к полноценной жизни без наркотиков. Использование качественных медикаментов и проверенных схем детоксикации является основой успешного лечения.
Разобраться лучше – narkologicheskaya-pomoshch-detoksikaciya-moskva
vulkan vegas no deposit bonus code Najlepsze Kasyna Online kasyno online na prawdziwe pieniД…dze
Четкая структура меню позволяет быстро найти нужный металл
https://redmetsplav.ru/store/vismut/rossiyskie-splavy-2/vismut-vi00—gost-10928-90/provoloka-vismutovaya-vi00—gost-10928-90/
Цены на спецстали одни из самых конкурентных на рынке, при этом качество на уровне мировых стандартов.
https://xn--80aeedb0bfzeok.xn--p1ai/catalog/mednye-zaglushki-pod-paiku/mednaia-zaglushka-kolpachok-pod-paiku-16kh12kh0-7-mm-10-6kh12-6-mm-miagkaia-paika-m3m-gost-r-52922-2008/
Кодирование от алкоголизма в стационаре Балашихи. Мы предлагаем различные методы кодирования, подходящие для каждого пациента.
Получить дополнительные сведения – вывод из запоя на дому недорого
Современная реабилитация 12 шагов может сочетаться с медицинской помощью, если пациент находится в тяжелом состоянии. При интоксикации, запое, похмелье, ломке, тревоге, бессоннице, психозе, депрессии, употреблении наркотиков или алкоголя сначала может потребоваться нарколог, врач, психиатр, стационар, капельница, детоксикация, УБОД по показаниям или медикаментозное лечение. После стабилизации начинается реабилитационный процесс, где главный акцент делается на понимании зависимости, честности, ответственности, группе и новой системе жизни.
Изучить вопрос глубже – http://www.domen.ru
звоните круглосуточно по телефону горячей линии клиники: наши специалисты готовы оказать необходимую помощь в решении проблемы алкогольной зависимости.
Углубиться в тему – вывод из запоя на дому в сочи
Хороший обзор с идеями по применению штор в интерьере и практическими советами по оформлению: https://documentmsk.ru/stati/shtory-v-interere-idei-stil-i-prakticheskoe-primenenie/.
Раздел «Контакты» содержит все необходимые реквизиты и карту
https://redmetsplav.ru/store/vanadiy-i-ego-splavy/vanadiy-fvd20s20—tu-14-141-08-91/truba-vanadievaya-fvd20s20—tu-14-141-08-91/
Спецстали для машиностроения закупаем только здесь, надежность материала подтверждена испытаниями.
https://xn--80aeedb0bfzeok.xn--p1ai/catalog/latunnaia-polosa/latunnaia-polosa-1-6kh200-mm-lzhmts59-1-1-gost-931-90/
unibet darmowe spiny Najszybciej wyplacajace kasyna w Polsce vulkan vegas bonus code forum
Лаконичное приветствие на главной странице сразу вводит в курс дела
https://redmetsplav.ru/store/titan/rossiyskie-splavy-4/titan-vt41—ost-1-90013-81/lenta-titanovaya-vt41—ost-1-90013-81/
Редметсплав — надежный партнер, работаем по поставкам нержавеющего проката уже второй год, сбоев не было.
https://xn--80aeedb0bfzeok.xn--p1ai/catalog/mednoe-dvukhrastrubnoe-koleno-pod-paiku/mednoe-dvukhrastrubnoe-koleno-pod-paiku-180-gradusov-108kh92kh2-1-mm-15kh19-mm-tverdaia-paika-m2r-gost-r-52922-2008/
top casinos online Najlepsze Kasyna Online millennium przelewy godziny
Нарколог на дом — это удобный и безопасный способ получить профессиональную медицинскую помощь без поездки в клинику, если человек находится в состоянии запоя, алкогольной интоксикации, наркотической ломки, сильного похмелья, тревоги, бессонницы или резкого ухудшения самочувствия. Выездной врач проводит осмотр пациента, оценивает состояние организма, подбирает препараты, ставит капельницу, выполняет необходимые лечебные действия и дает рекомендации по дальнейшему лечению. Такая наркологическая помощь особенно важна, когда ситуация требует быстрого реагирования, а ехать самостоятельно в центр, диспансер или стационар невозможно.
Изучить вопрос глубже – запой нарколог на дом в новороссийске
Водители отзовитесь Цены растут как на дрожжах Менеджеры врут про коэффициенты Короче, нашел нормальный способ — автострахование онлайн купить осаго автострахование осаго быстро Экономия почти 3000 рублей В общем, вся инфа вот здесь — страхование осаго цена https://osagopilot.ru Покупайте ОСАГО онлайн выгодно Перешлите тому у кого машина
Помогаем быстро перейти от консультации к конкретному плану: выезд, стационар или наблюдение.
Исследовать вопрос подробнее – нарколог на дом в новороссийске
Технические характеристики сплавов помогают инженерам в подборе
https://redmetsplav.ru/store/titan/rossiyskie-splavy-4/titan-tl3—ost-5r-9071-88/list-titanovyy-tl3—ost-5r-9071-88/
Долго искали надежного поставщика циркония, в Редметсплав предложили лучшие условия и чистоту металла.
https://xn--80aeedb0bfzeok.xn--p1ai/catalog/latunnaia-polosa/latunnaia-polosa-1-3×400-mm-l80-gost-931-90/
Лечение запоя без госпитализации в стационаре Балашихи. Мы предлагаем лечение на дому, без необходимости госпитализации.
Получить дополнительную информацию – вывод из запоя вызов
Реабилитация 12 шагов в Москве — это программа лечения зависимости, которая помогает человеку после наркотической, алкогольной или смешанной аддикции перейти от хаотичных попыток бросить к последовательной работе над собой. Программа 12 шагов применяется при наркомании, алкоголизме, лудомании, игромании, созависимости и других формах химической зависимости. Ее цель — помочь человеку признать болезнь, прекратить употреблять психоактивные вещества, получить опору, научиться жить трезво и постепенно вернуть способность управлять своими решениями.
Подробнее тут – programma-12-shagov-samostoyatelno
gry darmowe kasyno Najszybciej wyplacajace kasyna w Polsce ewinner bonus powitalny
Наши специалисты используют эффективные методы детоксикации, которые помогают быстро устранить физическую тягу к наркотикам и нормализовать работу внутренних органов. Индивидуальный подход к каждому больному, грамотный подбор лекарственных средств и многолетний опыт врачей-наркологов гарантируют высокие результаты лечения. Здесь вы найдете всю необходимую информацию о том, как проходит детоксикация от наркотиков в нашем центре, какие методики применяются и почему так важно не откладывать обращение за профессиональной помощью. Мы также даем подробные рекомендации родственникам наркозависимых, помогая им правильно вести себя в кризисной ситуации и преодолеть страх осуждения. Мотивация больного на прохождение полного курса лечения — ключевой фактор, и наши психологи уделяют этому особое внимание.
Узнать больше – detoksikaciya-narkomanov-moskva13-1.ru/
Лаконичное приветствие на главной странице сразу вводит в курс дела
https://redmetsplav.ru/store/titan/rossiyskie-splavy-4/titan-nbti-50/pokovka-titanovaya-nbti-50/
Прозрачное оформление документов и быстрое выставление счетов, приятно работать с профессионалами.
https://xn--80aeedb0bfzeok.xn--p1ai/catalog/mednyi-perekhodnoi-troinik-press/mednyi-perekhodnoi-press-troinik-64kh14-7-mm-m1rm-gost-r-52948-2008/
Вывод из запоя в Казани на дому и в клинике: врач-нарколог, капельница, детоксикация, лечение алкоголизма, кодирование, реабилитация. Круглосуточная помощь анонимно.
Выяснить больше – вывод из запоя казань
goldbet darmowe spiny bez depozytu 2026 Kasyno Bonus bez Depozytu za Rejestracje lemon casino 11
Никелевые сплавы — основа для жаропрочных конструкций
https://redmetsplav.ru/store/titan/rossiyskie-splavy-4/titan-45tmb-vd/list-titanovyy-45tmb-vd/
Редметсплав — надежный партнер, работаем по поставкам нержавеющего проката уже второй год, сбоев не было.
https://xn--80aeedb0bfzeok.xn--p1ai/catalog/latunnaia-polosa/latunnaia-polosa-7×500-mm-lmts58-2-gost-931-90/
Возможность заказать листы и полосы нестандартных размеров
https://redmetsplav.ru/store/tantal-i-ego-splavy/tantal-t-1/provoloka-tantalovaya-t/
Цены на спецстали одни из самых конкурентных на рынке, при этом качество на уровне мировых стандартов.
https://xn--80aeedb0bfzeok.xn--p1ai/catalog/mednyi-perekhodnoi-troinik-press/mednyi-perekhodnoi-press-troinik-80kh28-mm-m2r-gost-r-52948-2008/
gra w kasyno Kasyno Bonus bez Depozytu za Rejestracje darmowe pieniД…dze za rejestracjД™ 2026
I do consider all of the concepts you have introduced
for your post. They are very convincing and can certainly work.
Nonetheless, the posts are very short for newbies.
Could you please extend them a bit from subsequent time?
Thanks for the post.
Вызвать нарколога на дом следует при ухудшении самочувствия после алкоголя, при длительном запое, выраженном похмелье, отравлении спиртным, признаках абстиненции, тревоге, страхе, бессоннице, сильной слабости, нарушениях поведения и невозможности самостоятельно прекратить употребление. Чем дольше человек находится в запое, тем выше риск осложнений для здоровья, поэтому откладывать вызов врача опасно.
Углубиться в тему – narkolog-na-dom
Широкий выбор тугоплавких металлов, таких как вольфрам и молибден
https://redmetsplav.ru/store/niobiy1/splavy-niobiya-1/niobiy-nbp2-1/izdeliya-iz-niobiya-nbp2/
Закупали шлак ферросилиция для строительных нужд, материал качественный, без лишних примесей.
https://xn--80aeedb0bfzeok.xn--p1ai/catalog/latunnaia-polosa/latunnaia-polosa-3×550-mm-l63-gost-931-90/
energy casino opinie forum Kasyno Bonus bez Depozytu za Rejestracje nv casino code
Реабилитация после запоя в стационаре Балашихи. Мы поможем вам восстановиться после запоя и предотвратить рецидивы.
Получить больше информации – вывод из запоя на дому круглосуточно
Наличие калькулятора металлопроката упрощает расчет веса и стоимости
https://redmetsplav.ru/store/molibden-i-ego-splavy/molibden-sh-mch-1/pokovka-molibdenovaya-sh-mch/
Высокий уровень сервиса и контроля качества, для нашего научного проекта это было критически важно.
https://xn--80aeedb0bfzeok.xn--p1ai/catalog/mednye-otvody-press/mednyi-otvod-press-90-gradusov-34-mm-m2t-gost-r-52948-2008/
Помощь оказывают врачи с практикой в наркологии, психиатрии и восстановительной терапии.
Узнать больше – вызов нарколога на дом
Пребывание в стационаре даёт целый ряд неоспоримых преимуществ, которые делают этот этап незаменимым для многих пациентов, особенно на начальной стадии терапии и в случаях тяжёлой интоксикации. Большое внимание мы уделяем качеству медицинских услуг и комфорту каждого пациента. В нашей частной клинике работают кандидаты медицинских наук и врачи высшей категории, что является гарантией успешного лечения алкоголизма и наркомании. Сейчас мы готовы принять вас в любом районе Москвы и Московской области.
Детальнее – staciomedika-narkologicheskaya-klinika-vyvoda-iz-zapoya-moskva-otzyvy
Merhaba arkadaşlar Güvenilir bir bahis sitesi bulmak gerçekten çok zor Yıllardır bahis oynuyorum ama bu kadar zor olacağını düşünmemiştim Her şey pürüzsüz çalışıyor — 1xbet yeni giriş kolay Site çok hızlı, hiç takılmıyor Neyse, kaydet kenarda dursun — 1x bet giriş 1x bet giriş Tek adres 1xbet giriş Bahis yapan herkese yolla
Kasyno Online Polska darmowe spiny spin citynational casino no deposit bonusbetonred kod promocyjny 2026nine casino no deposit bonusverde casino jak wypłacić pieniądze
Магниевый прокат представлен в достаточном ассортименте
https://redmetsplav.ru/store/molibden-i-ego-splavy/molibden-mo-cu60-1/truba-molibdenovaya-mo-cu60/
Нарколог на дом — это удобный и безопасный способ получить профессиональную медицинскую помощь без поездки в клинику, если человек находится в состоянии запоя, алкогольной интоксикации, наркотической ломки, сильного похмелья, тревоги, бессонницы или резкого ухудшения самочувствия. Выездной врач проводит осмотр пациента, оценивает состояние организма, подбирает препараты, ставит капельницу, выполняет необходимые лечебные действия и дает рекомендации по дальнейшему лечению. Такая наркологическая помощь особенно важна, когда ситуация требует быстрого реагирования, а ехать самостоятельно в центр, диспансер или стационар невозможно.
Выяснить больше – врач нарколог на дом
Поставки всегда вовремя, логистика отлажена до мелочей, что важно для бесперебойной работы цеха.
https://xn--80aeedb0bfzeok.xn--p1ai/catalog/list-aliuminievyi-gladkii/list-aliuminievyi-260kh1500kh3000-mm-amg6/
Millet dinleyin Ne kadar uğraştım anlatamam Ama bu site her şeyi değiştirdi — 1xbet güncel adres tıkla Çekimler anında Kısacası, tüm bilgiler linkte — 1xbet spor bahislerinin adresi 1xbet spor bahislerinin adresi Sakın sahte sitelere bulaşma İhtiyacı olan herkese gönder
Arkadaşlar merhaba Uzun zamandır güvenilir bir bahis sitesi arıyorum Artık kimseye güvenmiyordum Ama sonunda bu siteyi buldum — 1xbet yeni giriş kolay Her gün yeni bonus ve promolar var Neyse, her şey mevcut — 1xbet giriş adresi 1xbet giriş adresi Tek adres 1xbet giriş Bahis yapan herkese gönder
Вывод из запоя на дому в Сочи проводится анонимно: соседям, коллегам и третьим лицам не передается информация о состоянии пациента, диагнозе, курсе лечения, факте вызова врача или необходимости дальнейшего наблюдения. Документы оформляются только в пределах медицинской работы, а постановки на учет при обращении в частную клинику не происходит.
Разобраться лучше – вывод из запоя на дому цена
Kasyno Bonus bez Depozytu za Rejestracje total casino grysymbole kart nazwykasyno online depozyt smsfree slot machineskasyno stalowa wola
http://legend001.com/bbs/home.php?mod=space&uid=1267799
Сайт поддерживает английскую версию, что важно для экспорта
https://redmetsplav.ru/store/molibden-i-ego-splavy/molibden-cm5-4/polosa-molibdenovaya-cm5-1/
http://users.atw.hu/animalsexforum/profile.php?mode=viewprofile&u=45667
https://pinshape.com/users/9012604-orionblack0?tab=designs
http://www.supergame.one/home.php?mod=space&uid=2440323
https://www.diigo.com/item/note/bgs85/vyq4?k=5ddf9f845b377b3817f237cefbd6d2a0
https://carwiki.site/wiki/Online_Betting_Promo_Code_A_Complete_Guidebook_to_Offers_Bonus_Terms_and_Safer_Betting
Весь металл проходит строгий входной контроль, за всё время работы ни одного случая брака.
https://xn--80aeedb0bfzeok.xn--p1ai/catalog/melkhiorovaia-truba/melkhiorovaia-truba-22kh2-5kh7000-mm-mnzhmts30-1-1-gost-10092-2006/
https://hackmd.okfn.de/s/r1agHhrEze
В экстренных ситуациях, когда состояние больного стремительно ухудшается, а промедление грозит серьёзными осложнениями, наши специалисты готовы немедленно оказать следующую помощь. Лечение запоя — одна из самых востребованных услуг наркологической клиники, и мы оказываем её в любое время суток. Если ваш близкий сильно страдает, не ждите — скорая помощь приедет быстро, а консультацию можно получить бесплатно по телефону.
Исследовать вопрос подробнее – лучшая наркологическая клиника москва
Write more, thats all I have to say. Literally, it seems
as though you relied on the video to make your
point. You obviously know what youre talking about, why waste your intelligence on just posting videos to your blog when you could be giving us
something enlightening to read?
Капельница от запоя — доступная цена в стационаре Балашихи. Стоимость процедуры начинается от 3 500 ?, и вы всегда будете заранее информированы о стоимости услуг.
Углубиться в тему – вывод из запоя на дому круглосуточно балашиха
после вашего обращения наш врач приезжает по указанному адресу с медработниками в гражданской форме и на машине без опознавательных символов, проводит осмотр, собирает историю болезни (анамнез).
Получить больше информации – вывод из запоя на дому в сочи
Najlepsze Kasyna Online vulkan vegas free spins no depositenergy casino 42real online casinopet master darmowe spinysmiling joker demo
Четкое позиционирование как эксперта в области редких металлов
https://redmetsplav.ru/store/magniy-i-ego-splavy/zarubezhnye-splavy-2/magniy-sismg4640-04—ss-144640/truba-magnievaya-sismg4640-04—ss-144640/
Долго искали надежного поставщика циркония, в Редметсплав предложили лучшие условия и чистоту металла.
https://xn--80aeedb0bfzeok.xn--p1ai/catalog/mednye-dvukhrastrubnye-mufty-pod-paiku/mednaiadvukhrastrubnaiamufta-pod-paiku108kh3-3mmm3rtgost-32590-2013/
Вывод из запоя на дому удобен, когда пациенту тяжело посещать клинику, когда близкого человека нельзя оставить одного или когда необходимо быстро получить помощь без поездки в больницы. Нарколог приезжает на место, проводит обследование, фиксирует жалобы, проверяет давление, пульс, насыщение кислородом, оценивает риски и затем назначает лечение запоя.
Получить дополнительные сведения – вывод из запоя на дому недорого сочи
Кодирование от алкоголизма в стационаре Балашихи. Мы предлагаем различные методы кодирования, подходящие для каждого пациента.
Углубиться в тему – наркологический вывод из запоя балашиха
Kasyno Bonus bez Depozytu za Rejestracje gry gdzie mozna wygrac pieniadzehell spin casino opiniezakЕ‚ady bukmacherskie bez dowodulucky 81 demo100zl za rejestracje
Представлен полный цикл изделий: от фольги и проволоки до крупных поковок
https://redmetsplav.ru/store/magniy-i-ego-splavy/zarubezhnye-splavy-2/magniy-qe22—csa-hg-9/provoloka-magnievaya-qe22—csa-hg-9/
Гибкая система оплаты и прозрачные условия договора, никаких скрытых наценок или задержек.
https://xn--80aeedb0bfzeok.xn--p1ai/catalog/medno-nikelevaia-plita/medno-nikelevaia-plita-35-mm-mnzh5-1/
Najlepsze kasyna internetowe blackjack online 1v1blackjack online simulatorsalon gier karpaczenergy casino bonus za rejestracjeforum bonus bez depozytu
Сайт выглядит профессионально и лаконично, без лишней рекламы
https://redmetsplav.ru/store/magniy-i-ego-splavy/zarubezhnye-splavy-2/magniy-mg-re3zn2zr/krug-magnievyy-mg-re3zn2zr/
Приятно удивлены скоростью обработки запроса на сайте, менеджер связался очень быстро.
https://xn--80aeedb0bfzeok.xn--p1ai/catalog/mednye-krestoviny-pod-paiku/mednaia-krestovina-pod-paiku-25kh21kh0-9-mm-16-4kh18-4-mm-tverdaia-paika-m1r-gost-32590-2013/
Bahisçiler dikkat Her yer dolandırıcı dolu Neredeyse bahsi bırakıyordum En sağlam platform bu — 1xbet turkey güncel giriş Çekimler 5 dakika içinde Neyse, kaybetmemek için tıklayın — 1xbet türkiye 1xbet türkiye Sakın sahte sitelere kanma Bunun gibilerin derdine düşenlere gönder
Удобное разделение продукции на сплавы и конкретные виды проката
https://redmetsplav.ru/store/magniy-i-ego-splavy/zarubezhnye-splavy-2/magniy-mgal6zn1-alloy-22—iso-3116/izdeliya-iz-magniya-mgal6zn1-alloy-22—iso-3116/